
Can you make an extension cord connection waterproof for outdoor use? Yes, you absolutely can! Properly waterproofing an extension cord connection is crucial for safety and to prevent damage, especially when used outdoors. Exposed electrical connections can be a serious hazard, leading to electric shock, short circuits, and even fires. This guide will walk you through the essential steps and best practices for extension cord weatherproofing to ensure your outdoor electrical connections are safe and reliable. We’ll cover everything from choosing the right materials to creating a robust waterproof cord joint, effectively sealing extension cords, and protecting outdoor cords.
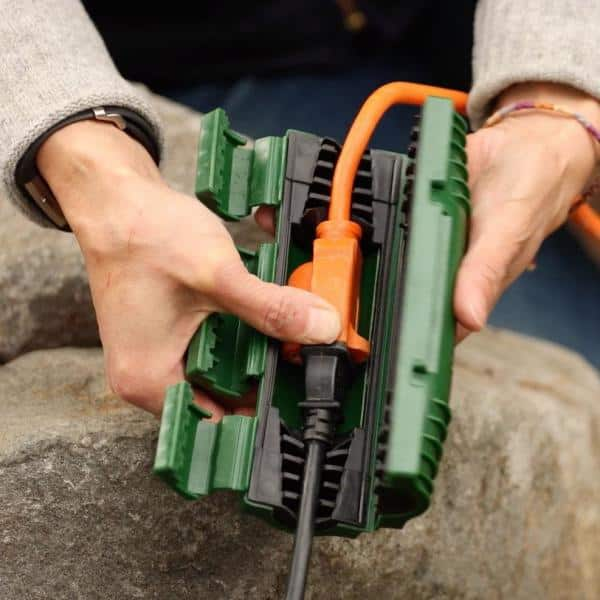
Image Source: images.thdstatic.com
Why is Waterproofing Essential for Outdoor Connections?
Using electrical devices outdoors, whether for garden lights, power tools, or holiday decorations, exposes extension cords and their connections to the elements. Rain, dew, sprinklers, and even high humidity can penetrate unprotected connections. This moisture can:
- Cause Corrosion: Metal components within the plugs and sockets can corrode, leading to poor conductivity and potential failure.
- Create Short Circuits: Water is a conductor of electricity. When it comes into contact with live wires, it can create a path for electricity to flow where it shouldn’t, causing sparks, smoke, and damage.
- Increase the Risk of Electric Shock: If water bridges the gap between live parts and a user, it can cause a severe or even fatal electric shock.
- Degrade Insulation: Prolonged exposure to moisture can weaken the insulation of the cord itself, making it more susceptible to damage.
Therefore, taking steps to ensure cord connection waterproofing is not just a good idea; it’s a critical safety measure.
Choosing the Right Extension Cord for Outdoor Use
Before you even think about waterproofing a connection, you need to start with the right extension cord. Not all extension cords are created equal, and using an indoor-rated cord outdoors is a recipe for disaster.
Key Features to Look For:
- Gauge (AWG): This refers to the thickness of the wire. A lower AWG number means a thicker wire, which can handle more electrical current and is generally more durable. For outdoor use, aim for a gauge appropriate for the power draw of your device and the length of the cord.
- Number of Conductors: Most outdoor extension cords have three conductors: hot, neutral, and ground. The ground wire is a vital safety feature.
- Jacket Material: The outer layer of the cord is its primary protection. Look for cords with durable, weather-resistant jackets made from materials like PVC or rubber. These are designed to withstand UV rays, temperature fluctuations, and moisture.
- UL or ETL Listing: Ensure the cord is tested and certified by a recognized safety organization like Underwriters Laboratories (UL) or ETL. This indicates it meets safety standards.
Methods for Waterproofing Extension Cord Connections
There are several effective ways to achieve extension cord weatherproofing, ranging from simple protective covers to more involved sealing techniques. The best method often depends on the specific connection and the level of exposure it will face.
1. Using a Commercial Waterproof Extension Cord Connector Box or Cover
This is often the easiest and most reliable method. These products are specifically designed for outdoor electrical connections.
Types of Connector Boxes/Covers:
- Snap-Together Covers: These are typically made of durable plastic with rubber gaskets. You simply plug your cords into each other, then snap the cover securely over the connection point. Many also have cable strain relief to prevent tugging on the connection itself.
- Screw-Together Connectors: These offer a more robust seal. The connector consists of two halves that screw together around the joined cords, creating a tight, watertight enclosure.
- Specialized “Spider” Connectors: These are designed for multiple connections and can often accommodate different sizes of cords. They usually feature individual seals for each cable entry point.
How to Use Them:
- Plug Together: Connect your male and female extension cord ends securely.
- Position the Cover: Open the connector box or cover.
- Enclose the Connection: Place the plugged-in connection inside the box.
- Secure the Cover: Close the box and fasten it according to its design (snapping, screwing, etc.). Ensure all gaskets are properly seated and seals are tight.
- Strain Relief: If the cover has cable strain relief, ensure the cords are secured in a way that prevents the connection from bearing any weight or tension.
These options provide excellent waterproof cord joint capabilities and are a great way to ensure protecting outdoor cords. They are often referred to as garden extension cord cover solutions.
2. Using Weatherproof Electrical Tape (Specifically Designed for Outdoor Use)
While not a standalone solution for a complete submersion, high-quality weatherproof electrical tape can significantly enhance the protection of a connection.
What to Look For:
- Self-Fusing Silicone Tape: This type of tape fuses to itself to create a seamless, watertight, and electrically insulating barrier. It’s ideal for sealing extension cords.
- Rubber Splicing Tape: Similar to silicone tape, it creates a waterproof seal and provides electrical insulation.
- Heavy-Duty Vinyl Electrical Tape: While standard electrical tape isn’t ideal for prolonged outdoor use, some heavy-duty vinyl tapes offer better weather resistance. However, they are less effective for creating a truly waterproof seal compared to silicone or rubber tape.
How to Use It:
- Plug Together: Connect your extension cords securely.
- Start Wrapping: Begin wrapping the tape several inches back onto each cord, overlapping each layer by at least half the tape’s width.
- Stretch and Wrap: Stretch the tape as you wrap. This is crucial for self-fusing tapes to activate their adhesive and create a solid seal.
- Build Thickness: Apply multiple layers to create a substantial, robust seal.
- Cover Fully: Ensure the entire connection and a good portion of each cord leading into the connection are covered.
- Consider a Secondary Layer: For added protection, you can wrap a layer of heavy-duty vinyl electrical tape over the silicone or rubber tape to provide physical protection against abrasion and UV rays.
This method is excellent for extension cord splice protection when done correctly, creating a good waterproof cord joint.
3. Using Waterproof Heat Shrink Tubing
Heat shrink tubing is a versatile solution for sealing extension cords. When heated, it shrinks tightly around the connection, creating a durable, insulated, and waterproof seal.
Types of Heat Shrink Tubing:
- Adhesive-Lined Heat Shrink Tubing: This is the best choice for cord connection waterproofing. It has an inner layer of adhesive that melts and flows when heated, creating an airtight and watertight seal around the connection.
- Heavy-Wall Heat Shrink Tubing: While offering good insulation, it may not provide the same level of waterproof protection as adhesive-lined versions unless sealed separately at the ends.
How to Use It:
- Prepare the Cords: If you are splicing wires, ensure the wire ends are securely joined using appropriate connectors (e.g., crimp connectors). If you are simply protecting a male-to-female plug connection, you might be joining the outer jackets.
- Cut Tubing: Cut a piece of heat shrink tubing long enough to cover the entire connection and extend at least 1-2 inches onto each cord. Ensure the diameter is appropriate for the cords.
- Slide Tubing: Slide the heat shrink tubing onto one of the cords before making the connection. If protecting a male-to-female connection, you might need to slide it onto the female end first, make the connection, and then slide it over.
- Make the Connection: Plug your extension cords together securely.
- Position Tubing: Slide the heat shrink tubing over the connection, centering it.
- Apply Heat: Use a heat gun (preferred for even heating) or a reliable lighter to heat the tubing. Keep the heat gun moving to avoid scorching. The tubing will shrink evenly. For adhesive-lined tubing, you’ll see the adhesive ooze out from the ends, indicating a good seal.
- Cool Down: Allow the connection to cool completely before putting it into use.
This method is excellent for creating a robust waterproof cord joint and providing excellent extension cord splice protection.
4. Combining Methods for Maximum Protection
For critical applications or areas with extreme weather exposure, combining methods offers the highest level of protecting outdoor cords.
- Connector Box + Tape: Use a good quality connector box and then wrap the exterior with weatherproof electrical tape for an extra layer of defense against moisture and physical damage.
- Heat Shrink Tubing + Tape: After applying adhesive-lined heat shrink tubing, wrap the entire assembly with heavy-duty vinyl electrical tape for added UV and abrasion resistance.
- DIY Waterproofing Boxes: While commercial boxes are recommended, you can create a DIY solution using a waterproof plastic container with cable glands. Drill holes for the cable glands, feed the cords through, and then make the connection inside the container. Seal the cable glands tightly around the cords. This provides a sturdy enclosure for outdoor electrical connections.
Best Practices for Safe Outdoor Electrical Connections
Beyond just waterproofing the connection point, several other practices are vital for electrical safety outdoors:
1. Use the Right Type of Extension Cord
- Heavy-Duty: Always opt for heavy-duty extension cords rated for outdoor use. They are built to withstand more stress and environmental factors.
- Proper Gauge: Match the cord’s gauge to the power requirements of your equipment. An undersized cord can overheat and pose a fire risk.
2. Keep Connections Off the Ground
- Elevate: Whenever possible, keep your waterproofed connection elevated off the ground. Use a garden extension cord cover or simply hang it from a hook or support. This significantly reduces its exposure to puddles, mud, and dampness.
- Avoid Low-Lying Areas: Do not place connections in ditches, depressions, or areas prone to collecting water.
3. Inspect Cords and Connections Regularly
- Pre-Use Check: Before each use, visually inspect the entire length of the extension cord, the plugs, and your waterproofed connection. Look for any signs of damage, such as cuts, nicks, abrasions, fraying, or cracked insulation.
- Post-Use Check: After use, especially after rain, check the connection point for any signs of moisture ingress.
4. Avoid Overloading Circuits
- Know Your Limits: Be aware of the amperage rating of your extension cords and the circuit breaker for the outlet you are using. Do not plug too many high-draw devices into a single circuit.
- Daisy-Chaining: Avoid connecting multiple extension cords together unless absolutely necessary, and ensure each connection is properly waterproofed.
5. Use Ground Fault Circuit Interrupters (GFCIs)
- Essential Safety: If you are not using a GFCI-protected outlet, consider using a portable GFCI adapter. GFCIs are designed to shut off power instantly if they detect a ground fault (like electricity flowing through water or a person), providing an extra layer of protection.
6. Proper Storage
- Dry and Protected: When not in use, store your extension cords in a dry, protected location, such as a garage or shed. This prolongs their lifespan and ensures they are in good condition for your next outdoor electrical project.
Common Mistakes to Avoid
- Using Indoor Cords Outdoors: This is the most basic but critical mistake. Indoor cords lack the weather-resistant jacket and durability needed for outdoor environments.
- Leaving Connections Exposed: Even a brief rain shower can cause problems if connections are not properly protected.
- Relying on Duct Tape: Standard duct tape is not a suitable material for waterproofing electrical connections. It degrades quickly when exposed to moisture and UV light and does not provide reliable insulation.
- Not Allowing for Strain Relief: A connection that is constantly being pulled or bearing weight is more likely to fail. Ensure connections are supported and not under tension.
- Ignoring Damaged Cords: Never use an extension cord that shows signs of damage. Replace it immediately.
Table: Waterproofing Methods Comparison
| Method | Ease of Use | Durability | Waterproofing Level | Cost | Best For |
|---|---|---|---|---|---|
| Connector Box/Cover | Very Easy | High | Excellent | Moderate | General outdoor use, garden lights, tools |
| Weatherproof Tape | Easy | Moderate | Good | Low | Enhancing existing connections, temporary fixes |
| Heat Shrink Tubing | Moderate | High | Excellent | Low | Permanent splices, robust connections |
| Combination (Box+Tape) | Moderate | Very High | Superior | Moderate | High-exposure areas, critical applications |
| DIY Container + Glands | Moderate | High | Excellent | Low | Custom setups, multiple cord entries |
Frequently Asked Questions (FAQ)
Q1: Can I use a regular extension cord for outdoor lighting?
A1: No, it is strongly recommended to use only extension cords specifically rated for outdoor use. Regular indoor cords are not designed to withstand moisture, temperature changes, and UV exposure, posing a significant safety risk.
Q2: What is the best way to protect extension cords from rain?
A2: The best way to protect extension cords from rain is to ensure all connections are properly waterproofed using methods like connector boxes, adhesive-lined heat shrink tubing, or specialized weatherproof tape. Keeping connections elevated off the ground also significantly reduces exposure.
Q3: How do I know if my extension cord connection is truly waterproof?
A3: A truly waterproof connection will be fully enclosed in a sealed housing, or tightly wrapped with materials that fuse together to create a seamless barrier, preventing any moisture ingress. Visual inspection after exposure to water, and ensuring no dampness or corrosion is present, is key.
Q4: Can I bury an extension cord connection?
A4: It is generally not recommended to bury standard extension cords or their connections unless they are specifically rated for direct burial and installed according to strict electrical codes. Burying unprotected connections is a major safety hazard.
Q5: What if my extension cord gets wet?
A5: If your extension cord connection gets wet and was not properly waterproofed, unplug it immediately from the power source. Inspect the connection and cord for any damage or signs of corrosion. If there are any concerns, it’s best to replace the cord. Always ensure the cord is completely dry before plugging it back in, even after proper waterproofing.
Q6: Are there specific types of connectors for outdoor extension cords?
A6: Yes, there are specialized outdoor-rated extension cord connectors, often called “weatherproof connectors” or “waterproof coupler extensions.” These are designed to create a secure and sealed connection between two extension cords. Always ensure they are rated for outdoor use and have appropriate IP (Ingress Protection) ratings for water resistance.
By following these guidelines and choosing the right methods for extension cord weatherproofing, you can confidently and safely power your outdoor devices, ensuring your outdoor electrical connections are secure, reliable, and protected from the elements. Prioritizing safety with proper waterproof cord joint techniques is essential for protecting outdoor cords and preventing hazardous situations. Remember, when in doubt, consult a qualified electrician.