
Can you achieve perfectly square cuts with a miter saw without calibration? No, precise and accurate cuts require a properly calibrated miter saw. This miter saw calibration guide will walk you through the essential steps to ensure your miter saw is tuned and set up for optimal miter saw accuracy. We’ll cover everything from basic miter saw alignment to fine-tuning the bevel for perfect joinery.
A miter saw is a powerful tool for any woodworker, from the hobbyist to the professional. Its ability to make clean, repeatable angled cuts is invaluable for projects ranging from simple shelves to intricate cabinetry. However, even the best miter saw can produce inaccurate results if it’s not properly calibrated. This guide will help you perform essential miter saw tuning and setup to achieve the precision cuts you need. We’ll break down how to adjust miter saw settings for perfect 90-degree angles and consistent bevels, ensuring your projects look their best.
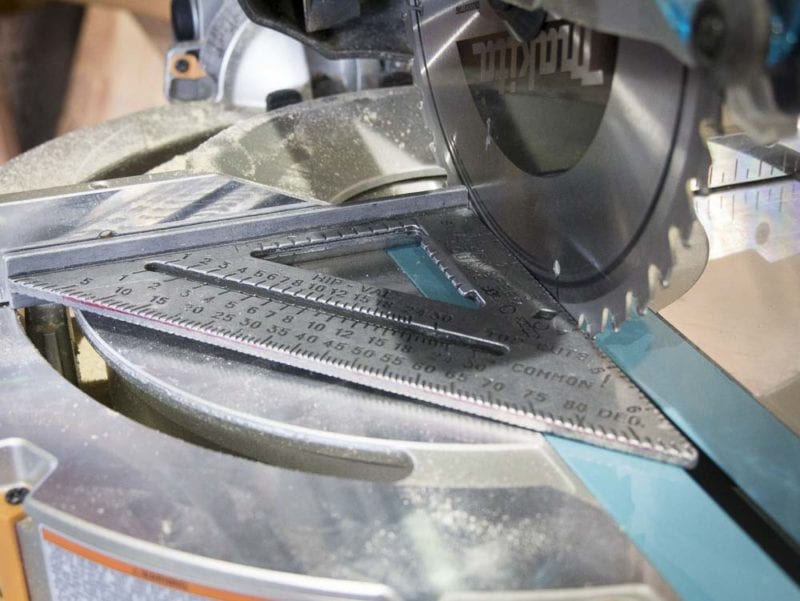
Image Source: www.protoolreviews.com
Why Miter Saw Calibration Matters
Calibrating your miter saw isn’t just about making your cuts look good; it’s about ensuring your projects fit together seamlessly. When your saw is out of alignment, even slightly, you’ll end up with gaps in your joints, pieces that don’t meet at the intended angles, and a lot of frustration. This can lead to wasted material and time spent trying to correct errors. A calibrated saw means:
- Perfectly Square Cuts: Essential for framing, trim work, and anything requiring right-angle joints.
- Accurate Miters: Crucial for picture frames, boxes, and any project where angles need to meet precisely.
- Repeatable Results: Once calibrated, you can trust your saw to make the same angle cut over and over again.
- Reduced Material Waste: Fewer mistakes mean less scrap wood.
- Professional Finish: High-quality joinery elevates the appearance of any woodworking project.
Essential Tools for Miter Saw Calibration
Before you begin, gather these simple tools. Having them ready will make the calibration process smooth and efficient.
- Combination Square: A must-have for checking 90-degree angles.
- Speed Square: Useful for quick checks and transferring angles.
- Protractor or Digital Angle Gauge: For verifying bevel angles with precision.
- Carpenter’s Pencil: For marking cut lines.
- Scrap Wood: You’ll need pieces to test your cuts. Look for straight-grained, stable wood.
- Safety Glasses: Always protect your eyes!
- Dust Mask: Miter saws create a lot of dust.
Step-by-Step Miter Saw Calibration Process
This miter saw calibration guide covers the most common adjustments. We’ll start with the basics of miter saw alignment and move on to finer adjustments.
Step 1: Checking and Adjusting the Miter Saw Table Square (90 Degrees)
This is arguably the most critical step in miter saw calibration. An un-square table will throw off all your angle cuts.
h4. Checking the 90-Degree Miter Angle
- Position the Saw: Place your miter saw on a stable, flat surface. Ensure it’s unplugged for safety.
- Set the Miter Angle: Rotate the saw’s turntable to the 0-degree position. Most saws have a positive stop or detent at 0, 45, and 90 degrees for the miter angle.
- Use Your Square: Place a combination square or speed square against the saw blade and the fence.
- Observe the Gap: Look for any gap between the square and the blade, or between the square and the fence. A perfect 90-degree angle means the square will sit flush against both the fence and the blade’s path.
h4. Adjusting the Miter Saw Table Square
Most miter saws have adjustment screws for the miter fence. These are typically located on the underside of the turntable or near the base of the saw.
- Locate Adjustment Screws: Consult your miter saw’s manual if you’re unsure. These screws allow you to fine-tune the turntable’s position relative to the blade.
- Make Small Adjustments: Loosen any locking mechanism for the miter angle. Then, gently turn the adjustment screws. Turn one screw slightly, then re-check with your square. If needed, turn the other screw.
- Tighten and Re-check: Once you achieve a perfect 90-degree alignment, tighten the miter lock firmly. Make a test cut to confirm.
h4. Performing a Test Cut for Miter Accuracy
- Cut a Piece: Take a piece of scrap wood and cut it square (0 degrees).
- Flip and Join: Take the cut piece, flip it over end-to-end (don’t flip it side-to-side), and place its cut edge against the fence.
- Mark and Cut: Mark a line on the wood. Now, cut this piece using the 0-degree miter setting.
- Check for Gaps: Place the two cut ends together. If the miter saw calibration is correct, the edges should meet perfectly, forming a clean 90-degree corner with no visible gaps. If there’s a gap, repeat the adjustment process.
Step 2: Checking and Adjusting the Miter Saw Bevel (90 Degrees)
The bevel angle determines the tilt of the blade. For accurate crosscuts and miters, the blade must be perfectly perpendicular to the table when the bevel is set to 0 degrees. This is often referred to as the saw’s “vertical” or “plumb” setting.
h4. Checking the 90-Degree Bevel Angle
- Set the Bevel: Ensure the miter angle is set to 0 degrees. Then, adjust the bevel to its 0-degree setting. Again, look for positive stops.
- Use Your Square: Place your combination square against the side of the saw blade and the saw table.
- Look for Gaps: Check for any light showing between the square and the blade or the square and the table.
h4. Adjusting the Bevel Angle
Miter saws typically have adjustment screws for the bevel angle as well. These are usually located near the pivot point of the saw head.
- Locate Bevel Screws: Refer to your saw’s manual for the exact location of these screws.
- Adjust the Bevel: Loosen any bevel locking mechanism. Use the adjustment screws to tilt the saw head slightly. Make small adjustments, re-checking with your square after each turn.
- Secure and Test: Once the bevel is perfectly vertical (90 degrees to the table), tighten the bevel lock. Make a test cut.
h4. Performing a Test Cut for Bevel Accuracy
- Cut a Piece: Cut a piece of scrap wood square with the miter saw set to 0 degrees miter and 0 degrees bevel.
- Mark: Make a mark across the width of the cut surface.
- Flip and Re-cut: Flip the piece end-to-end and place its cut edge against the fence. Set the miter to 0 degrees and the bevel to 0 degrees. Cut the piece again.
- Check for Squareness: The two cut surfaces should meet perfectly flush. If there’s a gap, it indicates the bevel isn’t truly at 90 degrees to the table. Repeat the bevel adjustment.
Step 3: Checking and Adjusting the Miter Saw Fence Alignment
A straight and properly aligned fence is crucial for both miter and bevel cuts. The fence guides your workpiece and ensures cuts are made parallel to the blade’s path when set correctly.
h4. Checking Fence Alignment
- Blade to Fence: With the blade lowered and the saw unplugged, check if the blade is parallel to the fence at the 0-degree miter setting. You can use a ruler or a piece of paper. Slide it between the blade and the fence at the front and the back of the blade. The resistance should be the same, indicating they are parallel.
- Fence Perpendicularity: Use your square to ensure the fence itself is perfectly perpendicular (90 degrees) to the miter saw table.
h4. Adjusting the Miter Saw Fence
Most fences on miter saws can be adjusted slightly.
- Locate Fence Adjustments: Look for screws that attach the fence to the turntable. These may be accessible from the back or the side of the fence.
- Adjust for Parallelism: If the blade isn’t parallel to the fence, you might need to adjust the fence’s position relative to the turntable. Some saws allow you to shim the fence or have dedicated adjustment screws.
- Adjust for Perpendicularity: If the fence itself isn’t 90 degrees to the table, you might need to loosen its mounting screws, adjust it, and re-tighten.
Step 4: Calibrating the Miter Saw Blade for Angle Accuracy
This section focuses on ensuring that when you set your miter saw to a specific angle (like 45 degrees), the blade actually cuts at that angle.
h4. Verifying Miter Angles
- Set a Common Angle: Rotate the saw to a common miter angle, such as 45 degrees.
- Use a Protractor or Angle Gauge: Place your protractor or digital angle gauge against the blade and the fence.
- Compare Readings: Compare the reading on your gauge to the setting on your miter saw. Note any difference.
h4. Adjusting Miter Angle Settings
Miter saws have a mechanism to calibrate the angle indicators.
- Locate Angle Stops: Most saws have adjustment screws that affect the positive stops for common angles, or they allow you to calibrate the angle indicator itself.
- Fine-Tune the Indicator: If the indicator is off, you may need to loosen a screw holding the indicator marker and reposition it to match the actual angle of the blade, as verified by your angle gauge.
- Adjust Positive Stops (if applicable): Some saws have screws that physically limit the turntable’s travel. These are used to set the positive stops at precise angles. Adjust these screws to match your desired angles.
- Test Cuts: Always make test cuts at your desired angles and check them with your square or angle gauge. For example, cut a 45-degree angle on a piece of wood. Then, cut another piece at 45 degrees. Place the two pieces together to form a 90-degree corner. The angles should meet perfectly.
Step 5: Calibrating the Miter Saw Bevel for Angle Accuracy
Similar to the miter angle, the bevel angle indicator needs to be accurate.
h4. Verifying Bevel Angles
- Set a Bevel Angle: Set your miter saw to a common bevel angle, like 45 degrees.
- Use Your Angle Gauge: Place your angle gauge against the side of the blade and the saw table.
- Compare Readings: Check the reading against the saw’s bevel indicator.
h4. Adjusting Bevel Angle Settings
- Locate Bevel Adjustment: Find the screws that allow you to adjust the accuracy of the bevel scale. These are typically near the bevel pivot.
- Reposition the Indicator: Loosen the screw holding the bevel indicator and move it to match the actual angle of the blade.
- Test Cuts: Make test cuts at your desired bevel angles. For instance, cut two pieces at 45 degrees bevel. Join them to form a corner. They should meet cleanly.
Table: Miter Saw Calibration Checklist
Here’s a quick checklist to ensure you’ve covered all the essential miter saw tuning steps:
| Component | Checkpoint | Desired Result | Adjustment Needed? |
|---|---|---|---|
| Miter Angle (0 Degrees) | Blade perpendicular to fence | No gap between square and blade/fence | Yes/No |
| Bevel Angle (0 Degrees) | Blade perpendicular to table | No gap between square and blade/table | Yes/No |
| Miter Fence | Parallel to blade at 0 degrees | Consistent gap (or no gap) front to back | Yes/No |
| Perpendicular to table | Square sits flush | Yes/No | |
| Miter Angle Indicator | Accuracy at common angles (e.g., 45°) | Matches actual cut angle (verified with gauge) | Yes/No |
| Bevel Angle Indicator | Accuracy at common angles (e.g., 45°) | Matches actual cut angle (verified with gauge) | Yes/No |
| Positive Stops | Firm and accurate at 0°, 45°, 90° | Blade locks precisely at these positions | Yes/No |
Common Issues and Troubleshooting
Even with careful calibration, you might encounter specific problems. Here’s how to address them.
Saw Dust Interfering with Readings
Sawdust can accumulate on the table, fence, and blade, throwing off your measurements.
- Solution: Regularly clear the saw of dust. A brush or compressed air can be very helpful. Ensure the blade is clean before making checks.
Worn Components
Over time, parts of your miter saw can wear down, making perfect calibration difficult.
- Solution: Check for excessive play in the turntable or saw head. If components are significantly worn, consider professional servicing or replacement parts. A wobbly blade is a common sign of a worn arbor or blade.
Blade Wobble
A wobbling blade will cause inaccurate cuts, regardless of calibration.
- Solution: Ensure the blade is mounted correctly, with the teeth facing the correct direction. Check if the blade itself is warped or damaged. Inspect the arbor nut and washers for damage. A worn arbor bearing can also cause wobble.
Fence Sagging
If the fence isn’t rigid or sags, it won’t provide a stable reference.
- Solution: Ensure all fence mounting screws are tight. If the fence is warped, you might need to replace it or try shimming it to make it straight and true.
Advanced Calibration and Fine-Tuning
Once the basic calibration is done, you might want to fine-tune for even greater precision.
Calibrating for Specific Angles Beyond Defaults
If you frequently use angles other than the standard 45 or 90 degrees, you can calibrate your saw for those specific angles.
- Set the Desired Angle: Use your angle gauge to accurately set the saw to the specific angle you need.
- Adjust the Indicator: Loosen the indicator and move it to match the gauge’s reading.
- Mark the Angle: You can even add your own markings on the saw’s scale for custom angles.
Repeatability Checks
After calibration, it’s good practice to check the repeatability of your cuts.
- Cut Multiple Pieces: Set your saw to a specific angle (e.g., 22.5 degrees). Make several cuts on scrap wood without readjusting the angle.
- Measure and Compare: Measure the angles of each cut using your angle gauge. They should all be very close to 22.5 degrees.
Maintaining Miter Saw Accuracy
Calibration isn’t a one-time task. Regular checks will ensure your saw remains accurate.
Regular Cleaning
Keep your saw clean, especially the turntable, fence, and angle adjustment mechanisms. Dust and debris can impede smooth operation and throw off settings.
Periodic Checks
Make it a habit to perform basic checks (e.g., the 90-degree miter and bevel) before starting critical projects or after transporting the saw.
Blade Quality and Maintenance
- Sharp Blades: Always use sharp, high-quality blades. Dull blades require more force, leading to inaccurate cuts and potential safety hazards.
- Correct Blade: Ensure you are using the correct blade for the material you are cutting.
Environmental Factors
Temperature and humidity can cause wood to expand or contract, affecting joint fit. While this isn’t directly a saw calibration issue, be aware of how these factors might influence your project results.
Frequently Asked Questions (FAQ)
Q1: How often should I calibrate my miter saw?
A: It’s best to perform a basic calibration check (especially for the 90-degree miter and bevel) before starting any important project. For saws that are used frequently, a more thorough calibration every few months is recommended. Transporting the saw can also knock it out of alignment, so check it after moving it.
Q2: My miter saw has positive stops, but they don’t seem perfectly accurate. What should I do?
A: Most miter saws have adjustment screws that control the positive stops. Consult your saw’s manual to locate these screws and adjust them to align precisely with the actual blade angle when the stop is engaged. You may need to loosen the stop mechanism, adjust the physical stop, and then re-tighten.
Q3: Can I calibrate my miter saw without a combination square or angle gauge?
A: While you can get a rough idea using other methods, a combination square and an angle gauge are highly recommended for accurate miter saw setup and calibration. They provide the precision needed to ensure your cuts are truly square and at the correct angles.
Q4: What if my miter saw fence is not straight?
A: A warped or bent fence will significantly impact your cut accuracy. Check if the fence is securely attached and if there’s any play. If the fence itself is the issue, you may need to replace it. Some saws allow for shimming the fence to correct minor issues, but a severely warped fence usually requires replacement for optimal miter saw accuracy.
Q5: My miter saw blade cuts at an angle even when everything else seems calibrated. What could be wrong?
A: This often points to an issue with the saw’s arbor or bearings. If the arbor itself is bent, the blade will naturally cut at an angle. Check for wobble in the blade when it’s spinning. If you suspect a problem with the arbor or bearings, it might be time for professional servicing or to consider replacing the saw if it’s an older model.
By following this comprehensive miter saw calibration guide, you can significantly improve the precision and accuracy of your woodworking projects. Consistent miter saw tuning and proper miter saw setup are key to achieving those perfect, repeatable cuts that make all the difference. Happy cutting!