
Are you looking to replace your chainsaw’s guide bar or simply want to ensure you have the correct one for a specific job? Knowing how to measure the chainsaw bar is crucial for optimal performance and safety.
How do you measure a chainsaw bar? You measure a chainsaw bar from the tip of the drive sprocket to the nearest point of the engine housing (where the bar meets the saw’s body). You measure the total length.
This guide will walk you through the simple steps to accurately measure your chainsaw bar, deciphering its essential dimensions, and understanding why these measurements matter for your chainsaw bar replacement and overall saw maintenance. We’ll cover everything from the basic chainsaw bar length to more specific details like chainsaw bar gauge and chainsaw bar pitch, helping you with chainsaw bar identification.
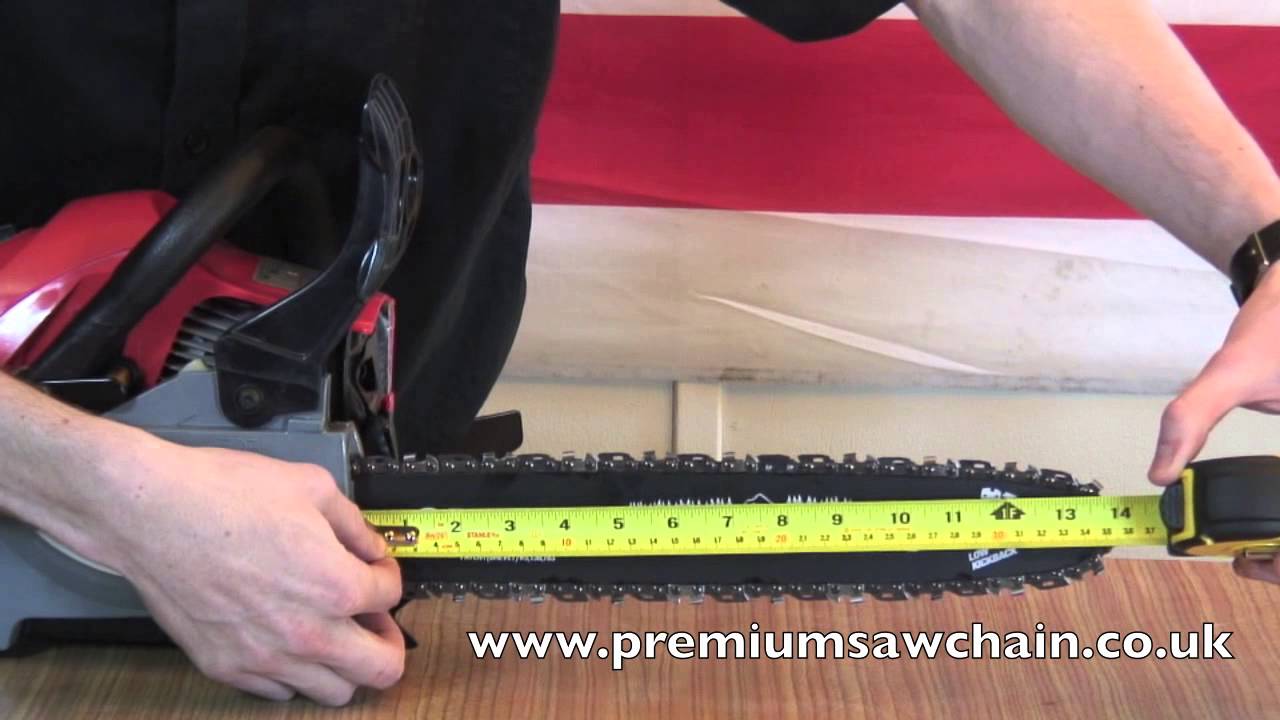
Image Source: i.ytimg.com
Why Measuring Your Chainsaw Bar Matters
Getting the right chainsaw guide bar size is more than just a detail; it’s fundamental to your chainsaw’s operation and your safety. An incorrectly sized bar can lead to poor cutting performance, increased wear on your chainsaw’s components, and even dangerous kickback.
Performance and Efficiency
A bar that’s too long can strain your chainsaw’s engine and chain, leading to overheating and reduced cutting speed. Conversely, a bar that’s too short might not be able to handle the task at hand, forcing you to make more passes and ultimately slowing down your work. The correct chainsaw bar length ensures your saw operates within its intended parameters, maximizing its power and efficiency.
Safety First
The chain and bar work in tandem with the engine’s power. When these components are mismatched, the balance is disrupted. This can cause the chain to run unevenly, increasing the risk of it derailing or causing excessive vibration. Both scenarios significantly elevate the danger of kickback, a sudden and violent upward and backward movement of the chainsaw. Accurately measuring your chainsaw bar helps maintain the intended safety margins.
Longevity of Your Chainsaw
Using the wrong size bar puts unnecessary stress on your engine, clutch, and drive sprocket. This can lead to premature wear and tear on these vital parts, shortening the lifespan of your chainsaw. By ensuring you have the correct chainsaw bar dimensions, you protect your investment and keep your saw running smoothly for longer.
Deciphering Chainsaw Bar Markings: A Visual Clue
Before you even pick up a measuring tape, take a close look at your existing chainsaw bar. Most manufacturers emboss crucial information directly onto the bar itself. This often includes the chainsaw bar pitch and the chainsaw bar gauge, along with other identifying marks.
Chainsaw Bar Pitch: The Tooth Spacing
Chainsaw bar pitch refers to the distance between the drive links of your chainsaw chain. It’s typically measured in inches (e.g., 3/8″, .325″, or .404″). This measurement is critical because the drive sprocket on your chainsaw must match the pitch of the chain. If they don’t match, the chain won’t engage properly with the sprocket, leading to slippage or, worse, damage to both.
Chainsaw Bar Gauge: The Groove Width
The chainsaw bar gauge refers to the thickness of the drive links that fit into the groove of the guide bar. Common gauges include .050 inches (1.3mm) and .058 inches (1.5mm). Similar to pitch, the gauge of your chain needs to match the groove width of your bar for proper seating and smooth operation. A chain that’s too thin will wobble in the groove, while a chain that’s too thick won’t fit or will bind.
Other Identifying Marks
You might also find numbers or codes on the bar that help in chainsaw bar identification. These can indicate the brand, the specific model series the bar is designed for, or even manufacturing batch information. While these aren’t direct measurements, they can be incredibly useful when searching for a replacement.
The Two Key Measurements: Length and Pitch
When we talk about measuring a chainsaw bar, two primary measurements usually come to mind: the overall length and the pitch. While the gauge is vital, it’s typically a stamping on the bar rather than something you’d measure with a tape.
Measuring the Chainsaw Bar Length
This is the most common measurement people need. To get the most accurate chainsaw bar length, follow these steps:
Tools You’ll Need:
- Measuring tape or ruler
The Process:
- Position the Bar: Lay your chainsaw on a flat, stable surface. Ensure the bar is easily accessible.
- Locate the Starting Point: The starting point for your measurement is the tip of the guide bar. More specifically, it’s the center of the outermost drive sprocket.
- Locate the Ending Point: The ending point is the closest point on the guide bar where it connects to the chainsaw’s powerhead (the engine casing). You’re measuring up to where the bar disappears into the saw’s body.
- Measure Accurately: Place the zero mark of your measuring tape or ruler at the starting point. Stretch the tape along the top of the bar, keeping it as straight as possible. Read the measurement where the bar meets the engine housing.
Important Note: Chainsaw bar length is generally quoted as the cutting length, not the total length of the metal bar. For example, a 20-inch bar will have a cutting surface of approximately 20 inches.
Measuring the Chainsaw Bar Pitch (If Not Stamped)
If the pitch isn’t clearly stamped on your bar, or if you want to double-check, you can measure it. This requires counting drive links.
Tools You’ll Need:
- Measuring tape or ruler (with millimeter markings if possible)
- Your chainsaw chain (still on the bar, or removed carefully)
The Process:
- Count Drive Links: A drive link is the part of the chain that protrudes downwards and engages with the guide bar groove and the drive sprocket. Count the number of drive links on your chain that sit inside the guide bar.
- Measure the Total Length of Drive Links: Lay the chain flat, making sure it’s not stretched or compressed. Measure the total length from the tip of the first drive link to the tip of the last drive link you counted.
- Calculate Pitch:
- Formula: Pitch = (Total Length of Drive Links / Number of Drive Links) * 2
- Example: If you counted 30 drive links and the total length is 9.5 inches, then:
- Pitch = (9.5 inches / 30) * 2 = 0.3167 * 2 = 0.6334 inches.
- This is very close to 5/8 inch pitch (0.625 inches). Chainsaw manufacturers often round these measurements.
Common Pitches and Their Drive Link Counts (for a typical 20-inch bar):
| Pitch | Drive Link Count (approximate for 20″ bar) |
|---|---|
| .325″ | 70-74 |
| 3/8″ | 66-68 |
| .404″ | 56-60 |
Note: These counts can vary slightly based on bar design and manufacturer.
Comprehending Chainsaw Bar Gauge
The chainsaw bar gauge is the thickness of the metal in the guide bar’s groove. It’s designed to match the drive links of your chainsaw chain.
How to Check Chainsaw Bar Gauge:
- Look for Stampings: As mentioned, this is usually stamped on the bar. Look for numbers like .050, .058, or .063.
- Measure if Unsure: If there are no stampings, or if you suspect wear has altered the groove, you can use a caliper or a thin feeler gauge to measure the width of the groove at its narrowest point.
- .050″ (1.3mm): Common on smaller saws and for lighter-duty cutting.
- .058″ (1.5mm): A very common gauge, suitable for a wide range of saws.
- .063″ (1.6mm): Often found on more powerful professional saws.
Why Gauge Matters: The chain’s drive links must fit snugly into the groove. A loose fit can lead to the chain coming off the bar, while a too-tight fit can cause binding and excessive heat.
How to Check Chainsaw Bar Wear
Chainsaw bars wear down over time, just like chains do. Checking for wear is an essential part of chainsaw maintenance.
Signs of a Worn Bar:
- Groove Widening: The groove where the chain runs can become wider than the chain’s drive links. This can be checked by looking for excessive side-to-side play of the chain when it’s properly tensioned.
- “Hooked” Rails: The edges of the guide bar’s rails can become rounded or “hooked” from abrasion. You can often see this by looking down the length of the bar – the rails should be square and parallel, not curved.
- Uneven Wear: One side of the bar may wear faster than the other, causing the bar to bend slightly.
How to Inspect for Wear:
- Visual Inspection: Look for any obvious damage, burrs, or signs of bending.
- Check for Straightness: Place a straight edge along the bar to see if it’s warped or bent.
- Feel the Rails: Run your finger (carefully!) along the edges of the rails. They should feel sharp and square, not rounded.
- Chain Fit: With the chain tensioned, check for excessive side play. The chain should move freely but without sloppy movement.
If your bar shows significant wear, it’s time for a chainsaw bar replacement.
Chainsaw Bar Replacement: When and How
Knowing when to replace your guide bar is as important as knowing how to measure it.
When to Replace Your Chainsaw Bar:
- Excessive Wear: When the rails are rounded, the groove is too wide, or the bar is significantly worn.
- Damage: If the bar is bent, cracked, or has significant burrs that cannot be filed out.
- Incorrect Size: If you’re upgrading to a different size bar for a specific cutting task.
- Routine Maintenance: Many professionals replace bars proactively after a certain amount of chain usage to ensure optimal performance and safety.
The Chainsaw Bar Replacement Process:
- Safety First: Ensure the chainsaw is off, the chain brake is engaged, and wear sturdy gloves to protect your hands.
- Remove the Bar Nuts: Locate and remove the bar nuts that hold the guide bar in place.
- Remove the Old Bar: Gently pull the old guide bar away from the chainsaw. The chain will likely come off with it.
- Clean the Area: Before installing the new bar, clean the mounting studs, the clutch cover area, and the oiling port on the new bar.
- Install the New Bar: Slide the new guide bar onto the mounting studs. Make sure the chain oiling groove on the bar aligns with the oiling port on the saw.
- Mount the Chain: Place the new chain onto the guide bar, ensuring the drive links sit correctly in the bar groove. Make sure the chain is oriented correctly (the cutters should face forward on the top of the bar).
- Tension the Chain: Fit the chain tensioning screw (if adjustable at the bar) and then the bar nuts. Tension the chain so it’s snug against the bar but can still be pulled around by hand (with gloves!). Check the manufacturer’s manual for specific tensioning procedures.
- Final Tension Check: Spin the chain by hand. It should rotate smoothly. Ensure the chain is tight enough that it doesn’t sag, but not so tight that it binds.
- Reinstall Sprocket Cover: Put the clutch cover and bar nuts back on securely.
Choosing the Right Chainsaw Guide Bar for Your Needs
Beyond just measuring your current bar, you might want to choose a different size for specific tasks.
Factors to Consider:
- Chainsaw Power: Your chainsaw’s engine displacement (cc) dictates the maximum bar length it can safely and effectively handle. Check your chainsaw’s manual for recommended bar lengths.
- Type of Wood: Hardwoods generally require shorter bars for more control, while softwoods or larger diameter logs might benefit from longer bars.
- Cutting Task: For felling large trees, a longer bar is necessary. For limbing or cutting smaller branches, a shorter bar offers better maneuverability.
- Chain and Bar Compatibility: Always ensure the new bar has the same pitch and gauge as your chain (or that you are also replacing the chain to match the new bar).
Frequently Asked Questions (FAQ)
Here are some common questions people have about measuring and selecting chainsaw bars.
Q1: What is the standard chainsaw bar length?
There isn’t a single “standard” chainsaw bar length, as it varies greatly depending on the chainsaw’s power and intended use. Chainsaw bars commonly range from 10 inches for small electric or battery-powered saws to 36 inches or even longer for large professional forestry saws. The most important thing is to match the bar length to your chainsaw’s capabilities and your specific cutting needs.
Q2: Can I put a longer bar on my chainsaw?
While it might be technically possible to fit a longer bar, it’s generally not recommended unless your chainsaw’s manufacturer explicitly states it’s supported. Using a bar that’s too long for your saw’s engine can lead to:
- Overheating: The engine will struggle to drive the longer chain, generating excessive heat.
- Reduced Cutting Speed: The saw will bog down, making cuts slower and less efficient.
- Increased Wear: The engine, clutch, and drive sprocket will experience premature wear.
- Safety Risks: The chainsaw’s balance and safety features (like kickback control) are designed around specific bar lengths. A longer bar can increase the risk of dangerous kickback.
Always consult your chainsaw’s user manual for recommended bar lengths.
Q3: Does the number of teeth on the chain matter for measuring the bar?
The number of teeth on the chain relates to the chain’s length and pitch, but it’s not the primary measurement for the bar itself. When you’re measuring chainsaw bar length, you’re measuring the physical bar. When you’re checking compatibility, you’re concerned with the bar’s pitch and gauge, and the chain’s corresponding pitch and gauge. The number of teeth (or drive links) will be a consequence of the chain length you choose for a given pitch and gauge.
Q4: How do I know if I need a new chainsaw bar or just a new chain?
You need a new chainsaw bar if:
- The bar’s rails are rounded or hooked.
- The groove is significantly widened, causing the chain to have excessive side-to-side play.
- The bar is bent, cracked, or damaged in any way.
- The bar’s surface is uneven or heavily burred.
You likely only need a new chain if:
- The existing chain is dull and cannot be sharpened effectively.
- The chain is damaged (e.g., broken links, stretched excessively).
- The chain has reached its wear limit (indicated by stretching or cutters becoming too small).
It’s often best practice to replace both the chain and the guide bar together, especially if the bar is showing signs of wear. This ensures optimal performance and longevity for both components.
By following this guide, you’ll be well-equipped to accurately measure your chainsaw bar, understand its critical dimensions, and make informed decisions about maintenance and replacement. This knowledge will not only improve your cutting experience but also significantly enhance your safety while operating your chainsaw.