
Can I tighten a skill saw blade myself? Yes, you can tighten a skill saw blade yourself, and it’s a crucial maintenance task for safe and effective operation. Learning how to properly secure your circular saw blade ensures it doesn’t loosen during use, preventing dangerous kickback and ensuring clean cuts. This guide will walk you through the process step-by-step, covering everything you need to know about saw blade replacement and ensuring your circular saw blade is firmly in place.
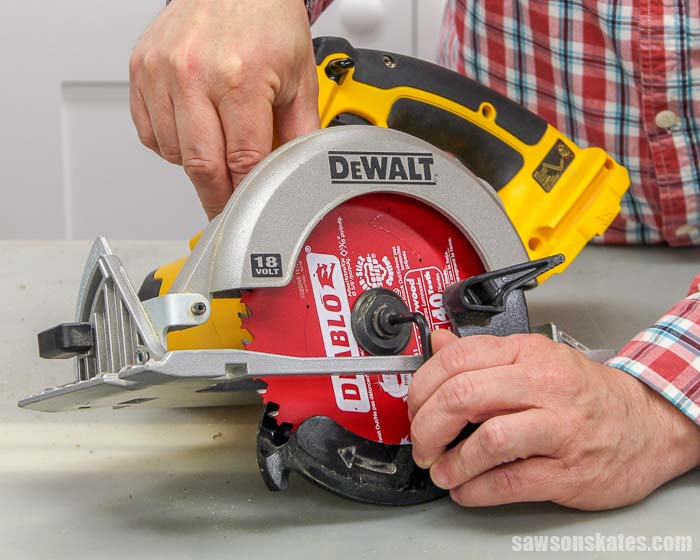
Image Source: sawsonskates.com
Why Blade Security Matters
A loose circular saw blade is a significant safety hazard. When a blade isn’t tightened securely, it can wobble or even detach from the saw during operation. This can lead to several dangerous situations:
- Kickback: The most common and serious risk. If the blade binds in the material being cut, a loose blade can suddenly jolt the saw upwards and towards you.
- Loss of Control: A wobbling blade makes the saw difficult to control, leading to inaccurate cuts and potential damage to your workpiece.
- Blade Damage: A loose blade can chip, shatter, or deform, creating dangerous flying debris.
- Damage to the Saw: The arbor and spindle can be damaged if the blade is not properly secured.
Regularly checking and tightening your skill saw blade is as important as changing the blade itself. It’s a simple preventive measure that dramatically enhances your safety.
Essential Tools for Blade Tightening
Before you begin, gather the necessary tools. Most circular saws come with the required accessories, but it’s good to be familiar with them:
- Hex Wrench (Allen Key): This is typically used to lock the spindle or shaft, preventing it from turning while you loosen or tighten the blade nut.
- Arbor Wrench (Spanner Wrench): This tool fits over the arbor nut or spindle nut and is used to turn it. Some saws have a specific slot or protrusion on the saw housing that engages with the arbor to help lock it.
- Gloves: For a better grip and protection from sharp edges.
- Safety Glasses: Always wear safety glasses when working with power tools, even when performing maintenance.
- Clean Cloth: To wipe down the arbor and washers.
Understanding the Components
To effectively tighten your skill saw blade, you need to know the names of the key parts involved:
- Spindle/Arbor: The shaft that the blade mounts onto.
- Blade Washer: A flat disc that sits between the arbor nut and the blade, and often on the other side of the blade as well. These ensure even pressure distribution.
- Arbor Nut / Blade Nut / Spindle Nut: The fastener that holds the blade in place on the arbor. While often called an arbor nut, some manufacturers might use slightly different terminology like blade nut or spindle nut. They all refer to the same component that secures the blade.
- Locking Pin/Button: Many saws have a spindle lock button or pin that engages when the spindle is in a specific position. This prevents the arbor from spinning when loosening or tightening the arbor nut.
Step-by-Step Guide to Tightening Your Skill Saw Blade
Here’s how to ensure your circular saw blade is as secure as it can be:
Step 1: Safety First! Disconnect Power
This is the most critical step. Always unplug your skill saw from the power source before attempting any maintenance, including tightening the blade. If you are using a cordless saw, remove the battery pack. Never skip this step; it’s your primary line of defense against accidental startup.
Step 2: Access the Blade
Most circular saws have a blade guard that retracts. You’ll need to hold this guard out of the way or have it rest in a retracted position to access the blade and the arbor nut. Some saws have a lever or mechanism to hold the guard open temporarily.
Step 3: Lock the Spindle
Locate the spindle lock button or pin on your saw. This is often a button on the motor housing that you push while the blade is exposed. When you press this button, it engages a pin that stops the arbor from turning. You might need to rotate the blade slightly to find the position where the lock engages.
- Finding the Lock: Look for a small button or lever on the side or top of the saw’s motor housing, near the blade assembly.
- Engaging the Lock: Press the button firmly. You should feel a slight click or resistance as it locks.
Step 4: Loosen the Existing Arbor Nut (If Necessary)
If your blade feels loose, or if you’re performing a saw blade replacement, you’ll need to loosen the arbor nut.
- Place the arbor wrench onto the arbor nut.
- Hold the spindle lock firmly engaged.
- Turn the arbor wrench counter-clockwise to loosen the arbor nut. Remember, “lefty loosey.”
- Once loosened, you can typically unscrew the arbor nut the rest of the way by hand.
Important Note on Arbor Nut Removal: If the arbor nut is extremely tight, it might be difficult to loosen even with the spindle lock engaged. In such cases, you can sometimes use a mallet to gently tap the end of the arbor wrench to shock the nut loose. Be very careful not to damage the saw or the arbor.
Step 5: Inspect and Clean the Components
Before tightening, take a moment to inspect the blade, washers, and arbor:
- Blade: Check for any damage, chips, or excessive wear. If the blade is damaged, perform a saw blade replacement.
- Washers: Ensure the blade washer is clean and free of debris. A dirty washer can lead to uneven pressure.
- Arbor: Wipe the arbor clean with a cloth to remove any sawdust or metal filings. This ensures the blade sits flush.
Step 6: Reinstall the Blade (If Replacing)
If you’re doing a saw blade replacement, ensure you install the new blade correctly.
- Blade Direction: The most critical aspect is blade direction. Most circular saw blades have an arrow indicating the direction of rotation. This arrow should point in the same direction as the saw’s motor rotation, which is usually indicated by an arrow on the saw housing or guard.
- Placement: Slide the blade onto the arbor, ensuring it sits flat against the inner blade washer.
Step 7: Secure the Arbor Nut
Now it’s time for arbor nut tightening.
- Place the outer blade washer onto the arbor, over the blade.
- Screw the arbor nut back onto the arbor by hand. Ensure it’s threading correctly and not cross-threading.
- Tighten the arbor nut as much as you can by hand.
- Place the arbor wrench onto the arbor nut.
- Engage the spindle lock again.
- Turn the arbor wrench clockwise to tighten the arbor nut. Remember, “righty tighty.”
- Apply firm pressure. You want the nut to be snug and secure, but avoid over-tightening, which can damage the arbor or the nut itself. A good rule of thumb is to tighten it until you feel significant resistance, and then give it a firm final turn.
Step 8: Test the Blade
Once the arbor nut is tightened:
- Release the spindle lock.
- Manually rotate the blade to ensure it spins freely and smoothly.
- Check for any wobbling. If it wobbles, the arbor nut may not be tight enough, or the blade might be warped or incorrectly seated. You may need to repeat the tightening process.
Troubleshooting Common Issues
Here are some common problems you might encounter and how to address them:
The Spindle Lock Won’t Engage
- Problem: The button seems stuck, or you can’t find the right position.
- Solution: Rotate the blade slightly while gently pressing the spindle lock button. Sometimes, the locking pin needs to align perfectly with a notch in the spindle. Ensure there isn’t debris preventing the pin from moving.
The Arbor Nut is Extremely Tight
- Problem: You can’t loosen or tighten the arbor nut even with the spindle locked.
- Solution: As mentioned, a gentle tap on the end of the arbor wrench with a rubber mallet might help break it free. If it’s still stuck, applying a penetrating lubricant (like WD-40, but ensure it doesn’t get on the blade surface) and letting it sit for a few minutes can help. If you’re performing a saw blade replacement and can’t remove the old blade, it might be time to seek professional help to avoid damaging the saw.
The Blade Wobbles After Tightening
- Problem: The arbor nut feels tight, but the blade still wobbles.
- Solution:
- Ensure you used both blade washers, one on each side of the blade.
- Check that the washers and the blade are seated correctly on the arbor.
- The blade itself might be warped or damaged. Perform a saw blade replacement.
- Re-tighten the arbor nut, ensuring the spindle lock is fully engaged and you apply firm pressure.
Which Way Does the Arbor Nut Turn?
- Answer: The arbor nut on most circular saws tightens by turning clockwise and loosens by turning counter-clockwise. Always remember “righty-tighty, lefty-loosey.”
When to Replace Your Circular Saw Blade
Proper tightening is important, but a worn-out or damaged blade also poses risks. Consider replacing your circular saw blade when:
- It’s dull: You have to push harder to make cuts, and the cuts are rough or burning the wood.
- It’s damaged: You see bent teeth, chips, or cracks.
- It’s the wrong type: Using a blade not designed for the material you’re cutting can be inefficient and dangerous.
- You’ve used it extensively: Blades have a lifespan.
Performing a saw blade replacement is straightforward once you’ve mastered the tightening process.
Maintaining Your Skill Saw for Optimal Performance
Regular maintenance is key to keeping your skill saw running safely and efficiently.
Blade Cleaning
- Periodically clean your circular saw blade with a stiff brush and a degreaser. Pitch and sawdust buildup can affect cutting performance and even cause the blade to overheat.
Arbor Maintenance
- Keep the arbor clean and free of rust or corrosion. A clean arbor ensures the blade mounts flush and securely.
Checking Fasteners
- Beyond the arbor nut, regularly check other fasteners on your saw to ensure they are tight and that the saw is in good working order.
Frequently Asked Questions (FAQ)
What is the purpose of the spindle lock?
The spindle lock, often a button or pin, is designed to hold the saw’s arbor (spindle) stationary. This is essential because it prevents the arbor from spinning while you are loosening or tightening the arbor nut, allowing you to apply the necessary torque.
How tight should the arbor nut be?
The arbor nut should be snug and secure, but not excessively tight. Over-tightening can strip the threads on the arbor or the nut, or even damage the blade or washers. A good rule of thumb is to tighten it until you feel firm resistance, and then give it a solid final turn with the arbor wrench. The spindle lock should be engaged during this final tightening to ensure it stays put.
Can I use a regular wrench to tighten the arbor nut?
No, you should not use a regular wrench. Circular saws require specialized tools that fit the specific arbor nut and often have a mechanism to engage the spindle lock. Using the wrong tool can damage the nut or the saw and may not allow you to achieve proper tightening. Always use the arbor wrench and hex wrench provided with your saw or compatible replacements.
What if my saw doesn’t have a spindle lock?
Some older or simpler models of circular saws might not have a spindle lock button. In these cases, you can often use a piece of wood or a rubber mallet to wedge against the blade teeth to prevent it from turning while you loosen or tighten the arbor nut. However, be extremely careful when doing this, as it can be less secure and potentially damage the blade teeth. It’s always best to refer to your saw’s manual for specific instructions. If your saw lacks this feature, consider if a newer model with a spindle lock might be a safer upgrade.
How often should I check the tightness of my skill saw blade?
It’s a good practice to check the tightness of your skill saw blade before each use, or at least periodically if you use the saw frequently. A quick visual inspection and a gentle attempt to wobble the blade can tell you if it feels loose. If you’ve recently performed a saw blade replacement, ensure the arbor nut is properly tightened.
By following these steps and taking proper precautions, you can safely and effectively tighten your skill saw blade, ensuring a safer and more efficient woodworking experience. Remember, regular maintenance and attention to detail are crucial when working with power tools.