
Can you make accurate angled cuts with a sliding compound miter saw? Yes, absolutely! A sliding compound miter saw is a powerful tool that allows for precise angled cuts, both for miters (horizontal angles) and bevels (vertical angles). This makes it incredibly versatile for a wide range of woodworking projects.
This guide will walk you through everything you need to know to confidently operate your sliding compound miter saw, from initial setup to making those perfect cuts. We’ll cover safety, adjustments, techniques, and even help you choose the right blade for the job. Whether you’re building shelves, crafting furniture, or tackling more complex projects, mastering your sliding compound miter saw will elevate your woodworking game.
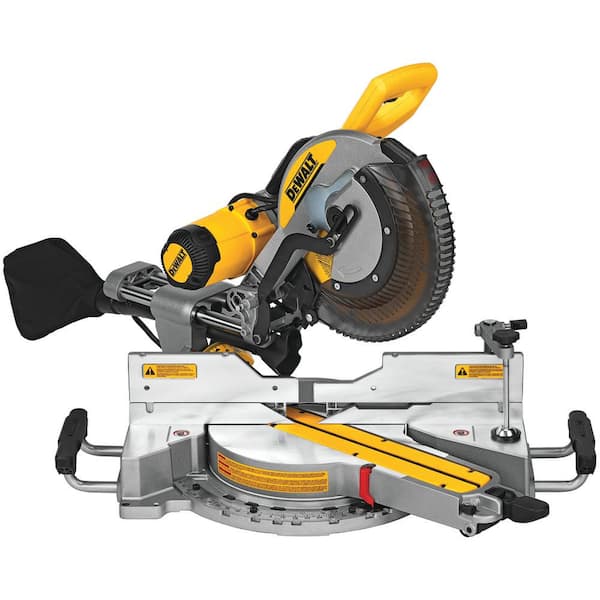
Image Source: images.thdstatic.com
Getting Started: Setting Up Your Sliding Miter Saw
Before you even think about cutting wood, proper setup is crucial for both safety and accuracy. Setting up a sliding miter saw involves a few key steps to ensure it’s stable, aligned, and ready for action.
The Importance of a Stable Base
A wobbly saw is a dangerous saw. Always place your sliding compound miter saw on a sturdy workbench, stand, or dedicated cabinet. If you’re using a portable stand, ensure it’s fully extended and locked in place. For stationary use, consider bolting the saw base to your workbench for maximum stability.
Blade Alignment: The Key to Precision
Misaligned blades are a common cause of inaccurate cuts and potential kickback. Here’s how to check and adjust alignment:
Checking Blade Squareness (90 Degrees)
- Place a Square: Lay a reliable carpenter’s square on the saw’s base table.
- Lower the Blade: Carefully lower the blade until it just touches the square. Do this without the saw running.
- Observe: Check if the blade perfectly aligns with the 90-degree mark on the square.
- Adjustments: Most saws have adjustment screws for the fence and turntable. Consult your saw’s manual for specific instructions on how to adjust these to achieve a perfect 90-degree cut.
Checking Blade Tilt (0 Degrees Bevel)
- Use a Square: Again, use your carpenter’s square. This time, you’ll be checking the blade’s vertical alignment.
- Lower the Blade: Lower the blade to its lowest point without the saw running.
- Align Vertically: See if the blade’s face is perfectly parallel to the back fence.
- Adjustments: Bevel stops are usually adjustable. Refer to your owner’s manual to fine-tune the bevel detents or stops.
Miter Fence Adjustment: Ensuring Straight Cuts
The fence is your guide for making straight cuts and setting miter angles accurately.
- Checking for Square: Ensure the fence is perfectly perpendicular (90 degrees) to the blade’s path when the turntable is set to zero.
- Alignment Procedure:
- Lower the blade to the table.
- Place a square against the fence and the blade.
- If it’s not a perfect 90 degrees, locate the fence adjustment bolts on your saw.
- Loosen the bolts slightly, nudge the fence into perfect alignment with the square, and then retighten the bolts securely.
Dust Collection: A Cleaner and Safer Workspace
Wood dust isn’t just messy; it can be a health hazard and reduce visibility. A good dust collection system is essential.
- Connecting Your System: Most sliding compound miter saws have a dust port. Connect a shop vacuum or a dedicated dust collector to this port using the appropriate adapter.
- Bagged Vacuums: If using a shop vac with a bag, ensure the bag is not full, as this can restrict airflow and reduce collection efficiency.
- Bagless Collectors: For larger jobs, a dedicated dust collector with a finer filter will be more effective.
- Tips for Better Collection:
- Ensure a snug fit between the dust port and the hose.
- Keep the dust collection hose free of kinks.
- Periodically clean out the dust bin or bag.
Miter Saw Blade Selection: The Right Tool for the Job
The type of blade you use significantly impacts the quality of your cut. Using the wrong blade can lead to splintering, rough edges, and difficulty cutting.
Blade Tooth Count and Material
- Low Tooth Count (e.g., 24-40 teeth): These blades are designed for rough cuts and general lumber. They remove material quickly but leave a coarser finish. Ideal for framing lumber or rough construction.
- Medium Tooth Count (e.g., 50-60 teeth): A good all-around choice for most woodworking projects. They offer a balance between cutting speed and finish quality.
- High Tooth Count (e.g., 80+ teeth): These blades produce very smooth, clean cuts, ideal for fine woodworking, trim, and hardwoods where a pristine finish is desired. However, they cut slower and can be more prone to burning if the saw is bogged down.
- Blade Material:
- Carbide-Tipped: The most common and durable type. Carbide teeth stay sharp longer than standard steel blades.
- High-Speed Steel (HSS): Less common for miter saws, HSS blades are not as durable as carbide and are typically found on older or less expensive models.
Blade Diameter and Kerf
- Diameter: Miter saws come in various blade diameters (e.g., 8-inch, 10-inch, 12-inch). Ensure you use the correct diameter for your saw. A larger diameter blade can often cut deeper.
- Kerf: This refers to the width of the cut the blade makes.
- Thin Kerf: These blades remove less material, requiring less power from your saw and producing less dust. They are often a good choice for cordless saws.
- Full Kerf: These blades are thicker and more durable but require more power.
Specialized Blades
- Dado Blades: While not typically used with standard miter saws, specialized blades exist for creating dados (grooves). Always check your saw’s manual to see if it supports such attachments.
- Non-Ferrous Metal Blades: If you plan to cut aluminum or other soft metals, you’ll need a blade specifically designed for that purpose. These blades have a different tooth geometry and pitch.
Making Precise Cuts Miter Saw Techniques
The beauty of a sliding compound miter saw lies in its ability to make a variety of precise cuts. Let’s explore the common types of cuts and how to achieve them.
Basic Crosscutting with a Sliding Miter Saw
Crosscutting is cutting wood across its width. The sliding feature of your saw allows you to cut wider boards than a standard miter saw.
- Measure and Mark: Use a tape measure and pencil to mark your desired cut line on the workpiece. It’s helpful to place a small “X” on the side of the line where you want the waste material to be.
- Position the Wood: Place the wood against the saw’s fence.
- Align the Blade: For a straight crosscut, ensure the blade is aligned with your mark. Most saws have a laser guide or a visible blade shadow to help with alignment. Position the blade so the teeth are just to the waste side of your pencil line.
- Engage the Slide (for wider boards): If your board is wider than the stationary cutting capacity, gently pull the saw head forward along the rails until the blade is positioned over the wood.
- Safety First: Place your hands a safe distance from the blade. Many woodworkers find it comfortable to hold the workpiece down with one hand and operate the saw handle with the other.
- Start the Saw: Allow the blade to reach full speed before it contacts the wood.
- Lower the Blade: Smoothly and steadily lower the blade through the wood. For sliding saws, push the head forward through the cut while keeping the blade at full speed.
- Retract and Stop: Once the cut is complete, raise the blade while it’s still spinning, then release the trigger and let the blade stop completely before removing the workpiece.
Cutting Angles on a Miter Saw: Miter Cuts
Miter cuts are angled cuts across the width of the board. These are essential for creating frames, cornices, and other joinery.
- Identify the Angle: Determine the desired miter angle. This is usually set on the turntable.
- Set the Miter Angle: Loosen the turntable lock and rotate the turntable to your desired angle (e.g., 45 degrees for a picture frame corner). Many saws have positive stops at common angles like 0, 15, 22.5, 31.6, and 45 degrees. Ensure the lock is engaged securely at the set angle.
- Position the Wood: Place the wood against the fence.
- Align the Cut: Align the blade with your cut line. Remember to position the blade to cut on the waste side of your mark.
- Perform the Cut: Follow the same procedure as a basic crosscut, ensuring the blade reaches full speed before contacting the wood and moving smoothly through the cut.
Cutting Compound Angles
A compound cut involves both a miter and a bevel angle. This is where the “compound” in sliding compound miter saw really shines.
- Set the Miter Angle: First, set your desired miter angle on the turntable.
- Set the Bevel Angle: Next, tilt the saw head to the desired bevel angle. Again, use the positive stops or adjust to your marked angle. Ensure the bevel lock is secure.
- Position and Cut: Place the wood against the fence and the table. Align the blade with your cut line and perform the cut as usual.
Bevel Cuts on a Miter Saw
Bevel cuts are angled cuts through the thickness of the wood, typically used for joining pieces at an angle where the face of the wood is not perpendicular to the cut.
- Set the Miter Angle to Zero: Ensure the turntable is set to 0 degrees for a straight crosscut through the board’s thickness.
- Set the Bevel Angle: Tilt the saw head to your desired bevel angle.
- Position the Wood: Place the wood against the fence and the table.
- Align and Cut: Align the blade with your desired cut line on the workpiece. Perform the cut, allowing the blade to reach full speed before contacting the wood and making a smooth pass.
Making Precise Cuts with Depth Stop
The depth stop feature is invaluable for creating grooves or dados of a consistent depth.
- Adjust the Depth Stop: Locate the depth stop adjustment knob or screw.
- Set the Depth: Lower the blade to the desired depth and adjust the stop so it prevents the blade from going any lower.
- Perform the Cut: Make your cut. The blade will stop at the set depth, creating a consistent groove. Important: Always ensure the depth stop is securely locked.
Cutting Molding and Trim
Molding and trim work often require specific angles to achieve tight joints.
- Crown Molding: Cutting crown molding requires a specific technique where the molding is placed upside down and backward against the saw’s fence and table. This is because the “top” of the molding is against the fence, and the “bottom” is against the table. Consult your saw’s manual or online resources for the exact orientation. The miter and bevel angles are often found in charts for standard ceiling heights and wall angles.
- Baseboards and Casing: These are typically cut at miter angles (e.g., 45 degrees for inside corners, 30-45 degrees for outside corners). The sliding feature is particularly useful here for cutting wider pieces of trim without needing a standard miter saw.
Advanced Techniques and Tips for Your Sliding Compound Miter Saw
Beyond basic cuts, a few advanced tips can help you get the most out of your sliding compound miter saw.
Repetitive Cuts with a Stop Block
For projects requiring multiple pieces of the same length, a stop block is a game-changer for accuracy and speed.
- Make Your First Cut: Cut one piece to the desired length.
- Position the Stop Block: Place a piece of scrap wood against the fence, on the side of the blade where your workpiece will be.
- Mark the Stop Block: Use your already cut piece. Position it against the fence and mark the end of that piece onto the stop block.
- Secure the Stop Block: Clamp the stop block securely to the saw’s table or extension wings. Ensure the clamp is positioned so the blade will not hit it.
- Make Subsequent Cuts: Now, when you place your workpiece against the fence and butt its end against the stop block, you’ll get consistent lengths every time.
Working with Different Wood Species
- Softwoods (Pine, Fir): These are generally easy to cut. Use a medium-tooth blade for good balance between speed and finish. Be mindful of tear-out on the exit side of the cut.
- Hardwoods (Oak, Maple, Cherry): Hardwoods require more power and sharper blades. A higher tooth count blade will yield a cleaner finish and reduce the risk of burning. Ensure your blade is sharp, as dull blades can cause excessive heat and scorching.
- Plywood: Plywood can be prone to splintering on the cut line, especially on the top surface.
- Blade Choice: Use a high-tooth-count plywood blade.
- Scoring: Before cutting, score the cut line with a sharp utility knife. This helps to cleanly sever the top veneer.
- Support: Ensure the plywood is well-supported to prevent it from sagging as the cut progresses.
Using the Sliding Feature Effectively
The sliding mechanism allows you to cut wider boards.
- Balance: When sliding the saw head, maintain steady pressure. Avoid jerky movements.
- Full Extension: For the widest cuts, ensure you pull the saw head fully forward along the rails.
- Support: For long or wide boards, ensure they are adequately supported on both sides of the saw and that the workpiece extends beyond the saw table.
Featherboards and Hold-Downs
For particularly thin or delicate materials, or when making precise cuts where the workpiece might shift, consider using featherboards or hold-downs. These accessories apply gentle pressure to the workpiece, keeping it stable against the fence and table.
Sliding Compound Miter Saw Safety: Essential Practices
Safety is paramount when operating any power tool, and the sliding compound miter saw is no exception. Adhering to these safety guidelines will help prevent accidents and ensure a positive woodworking experience.
Personal Protective Equipment (PPE)
- Safety Glasses or Face Shield: Always wear eye protection. Flying debris from wood or the blade can cause serious eye injury. A full face shield offers additional protection.
- Hearing Protection: Miter saws can be loud. Use earplugs or earmuffs to protect your hearing.
- Dust Mask or Respirator: As mentioned, dust can be harmful. Wear a dust mask or respirator, especially during extended cutting sessions.
- Appropriate Clothing: Avoid loose clothing, dangling jewelry, or anything that could get caught in the blade. Roll up sleeves and tie back long hair.
- Work Gloves (with caution): While gloves can protect your hands from splinters when handling wood, never wear gloves when operating the saw itself. They can reduce your grip on the handle and increase the risk of your hand getting too close to the blade.
Safe Operating Procedures
- Read the Manual: Before operating your saw for the first time, thoroughly read and comprehend your owner’s manual. It contains specific safety instructions and operating procedures for your model.
- Keep Guards in Place: Never remove or bypass the blade guard. It is designed to protect you from the spinning blade.
- Secure Your Workpiece: Always clamp down your workpiece, especially when making angled cuts or cutting small pieces. Never try to hold the wood with your hands directly in the path of the blade.
- Stable Setup: Ensure the saw is on a stable surface. As discussed in the setup section, a wobbly saw is dangerous.
- Blade Safety:
- Sharp Blades: Use sharp blades. Dull blades require more force, increasing the risk of kickback.
- Correct Blade: Use the correct type and size of blade for your saw and the material you are cutting.
- Blade Guard Movement: Ensure the blade guard retracts smoothly as you lower the blade and returns fully when you raise it.
- Kickback Awareness: Kickback occurs when the blade binds in the wood and forcefully throws the workpiece back towards the operator. It can happen due to:
- Binding in knots.
- The workpiece not being held firmly.
- Cutting wet or warped wood.
- Using a dull blade.
- The cut closing up on the blade.
- To avoid kickback:
- Ensure the workpiece is held firmly against the fence and table.
- Never force the cut. Let the blade do the work.
- Avoid cutting warped or bowed wood without proper support.
- Be extra cautious when cutting through knots.
- One Hand on the Handle: Always keep one hand on the saw handle while cutting. The other hand should be positioned safely away from the blade, either holding the workpiece or operating a clamp.
- Let the Blade Stop: Always wait for the blade to come to a complete stop before removing the workpiece or making any adjustments.
- Clear the Area: Keep your workspace clean and free of clutter. Ensure good lighting.
- Do Not Overreach: Position yourself comfortably in front of the saw. Avoid overreaching to make a cut.
- Disconnect Power: Always unplug the saw when changing blades, making adjustments, or performing maintenance.
Maintenance for Your Sliding Compound Miter Saw
Regular maintenance ensures your saw performs reliably and safely.
Blade Cleaning and Sharpening
- Cleaning: Over time, resin and pitch can build up on the blade, reducing its cutting efficiency and increasing the risk of burning. Use a specialized blade cleaner or a degreaser and a stiff brush to clean the blade.
- Sharpening: When blades become dull, it’s time for sharpening. You can send them to a professional sharpening service or, if you’re proficient, sharpen them yourself with a diamond file or a sharpening jig.
Lubrication
Check your saw’s manual for recommended lubrication points. Typically, the sliding rails and pivot points benefit from occasional light lubrication to ensure smooth operation. Use a lubricant recommended by the manufacturer.
Checking and Tightening Fasteners
Periodically inspect all bolts and screws on your saw. Vibrations during use can loosen fasteners over time. Ensure all adjustments and mounting bolts are snug.
Cleaning the Motor and Vents
Keep the saw’s motor housing and cooling vents clear of dust and debris. This prevents overheating and ensures optimal motor performance. Use compressed air to blow out dust.
Frequently Asked Questions (FAQ)
Q1: What is the difference between a miter saw and a sliding compound miter saw?
A: A standard miter saw can only make miter and bevel cuts up to the limit of its blade’s reach. A sliding compound miter saw has rails that allow the blade head to slide forward and backward. This significantly increases the width of the material you can cut (crosscut capacity) and also allows for more complex angled cuts.
Q2: Can I cut metal with a sliding compound miter saw?
A: You can cut certain non-ferrous metals like aluminum with a blade specifically designed for metal. However, you cannot cut ferrous metals like steel or iron with a standard wood blade or even a specialized metal-cutting blade on a wood-cutting miter saw without risking serious damage to the saw and the blade, not to mention extreme danger. Always use the correct blade and check your saw’s manual.
Q3: How do I prevent tear-out when cutting plywood?
A: To prevent tear-out on plywood, use a high-tooth count blade, score the cut line with a utility knife before cutting, and support the plywood well to prevent sagging. Sometimes, using masking tape along the cut line can also help.
Q4: My saw’s laser guide isn’t accurate. What should I do?
A: Most laser guides are adjustable. Consult your owner’s manual for instructions on how to calibrate the laser to align perfectly with the blade’s cutting path.
Q5: What is a compound cut?
A: A compound cut is a cut that involves both a miter angle (rotation of the turntable) and a bevel angle (tilt of the saw head). This allows for cutting angles that are not parallel to the faces of the wood, often used in complex joinery or trim work.
Conclusion: Your Path to Perfect Wood Cuts
Mastering your sliding compound miter saw opens up a world of woodworking possibilities. By prioritizing sliding compound miter saw safety, selecting the right miter saw blade selection, carefully performing cutting angles on a miter saw, utilizing effective miter saw dust collection, properly setting up a sliding miter saw, and practicing techniques for making precise cuts miter saw, you’ll be well on your way to creating professional-quality results. From crosscutting with a sliding miter saw to executing intricate bevel cuts on a miter saw, and fine-tuning your miter saw fence adjustment, each step contributes to your success. Your sliding compound miter saw for woodworking projects will become an indispensable tool, transforming your creative visions into tangible realities. Happy cutting!