
Can you change a Skil saw blade yourself? Absolutely! Changing a Skil saw blade is a straightforward process that most DIYers can handle with a little guidance. This guide will walk you through how to perform a Skil saw blade change, ensuring you can keep your tool in top working condition. We’ll cover everything from gathering your tools to the final blade installation, making the entire process simple and safe.
Performing Skil circular saw maintenance regularly is key to ensuring your tool operates efficiently and safely. One of the most common maintenance tasks is circular saw blade replacement. Whether your current blade is dull, damaged, or you simply need a different type of blade for a specific cut, knowing how to change it is essential. This Skil saw blade change tutorial is designed to make removing a circular saw blade and Skil saw blade installation a breeze.
This comprehensive circular saw blade maintenance guide will help you with Skil power tool repair in a practical way. By following these steps, you’ll be able to confidently perform a Skil saw blade swap whenever needed. Let’s get started with the best practices for changing saw blade safely.
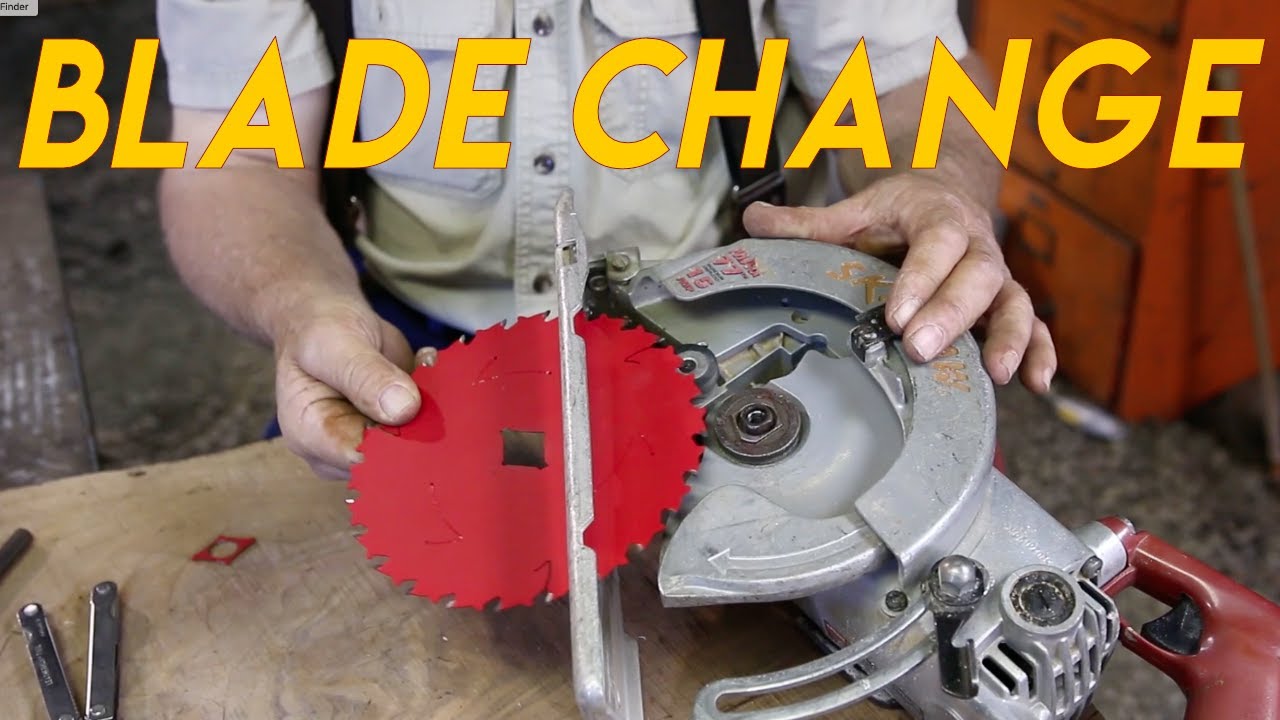
Image Source: i.ytimg.com
Why Change Your Skil Saw Blade?
Over time, even the best Skil saw blades can lose their sharpness. A dull blade not only makes cutting more difficult but also increases the risk of kickback, which is a dangerous reaction where the saw jumps back towards the operator. Here are several common reasons why you might need to change your Skil saw blade:
- Dullness: The most frequent reason. A dull blade requires more force to cut, heats up quickly, and produces ragged edges.
- Damage: Nicks, chips, or bent teeth on the blade can lead to poor cuts and unsafe operation.
- Material Changes: You might need a different type of blade for specific materials. For example, a wood-cutting blade won’t perform well on metal or masonry.
- Specific Cuts: Blades come with different tooth counts and configurations. A blade with more teeth provides a smoother finish, while fewer teeth are better for faster rip cuts.
- Wear and Tear: All blades have a lifespan. Even with proper care, they will eventually wear out and need replacement.
Essential Tools and Safety Gear
Before you begin, gather all the necessary tools and safety equipment. Having everything ready will make the process smooth and efficient.
Tools Needed:
- Your Skil Saw: Ensure it’s unplugged or the battery is removed.
- New Skil Saw Blade: Make sure it’s compatible with your Skil saw model. Check the saw’s manual for specifications.
- Spanner Wrench: Most Skil saws come with a specific wrench for changing the blade. This is often stored on the saw itself.
- Blade Removal Tool (Optional): Some manufacturers offer specialized tools to make blade removal easier.
- Gloves: Thick work gloves protect your hands from sharp edges and debris.
- Safety Glasses or Goggles: Crucial for protecting your eyes from flying dust and debris.
- Rag or Shop Towel: For cleaning the blade area.
Safety Gear:
- Safety Glasses: Non-negotiable for eye protection.
- Work Gloves: Protect your hands.
- Dust Mask: Especially important when cutting wood or other materials that create dust.
- Hearing Protection: Saws can be loud.
Table 1: Tools for Skil Saw Blade Change
| Tool Name | Purpose |
|---|---|
| Skil Saw | The tool you are maintaining. |
| New Skil Saw Blade | Replacement for the old or worn-out blade. |
| Spanner Wrench | Used to loosen and tighten the arbor nut holding the blade in place. |
| Work Gloves | Protect your hands from sharp blades and debris. |
| Safety Glasses | Protect your eyes from dust and flying particles. |
| Rag/Shop Towel | For cleaning the blade arbor and surrounding areas. |
| Dust Mask | To prevent inhalation of sawdust and debris. |
Step-by-Step Guide to Changing Your Skil Saw Blade
Let’s break down the process of how to change a Skil saw blade into simple, actionable steps. This Skil saw blade change tutorial focuses on safety and efficiency for a successful Skil saw blade swap.
Step 1: Disconnect Power
This is the most critical safety step. Changing saw blade safely begins with ensuring the saw cannot accidentally turn on.
- Corded Saws: Unplug the power cord from the electrical outlet. Ensure the cord is out of the way and won’t get caught or plugged back in accidentally.
- Cordless Saws: Remove the battery pack from the Skil saw. Store the battery separately during the blade change.
Never attempt to change a blade while the saw is plugged in or has a battery inserted.
Step 2: Prepare the Saw for Blade Access
You need to access the blade assembly, which is usually covered by a guard.
- Retract the Lower Blade Guard: Most Skil circular saws have a spring-loaded lower blade guard that covers the blade. You’ll need to hold this guard back to access the blade and the arbor nut. There’s often a small lip or handle on the guard to grip.
- Position the Saw: Place the Skil saw on a stable, flat surface. For corded saws, ensure the cord is not creating a tripping hazard or pulling on the saw.
Step 3: Locate the Arbor Lock
Skil saws, like most circular saws, use an arbor lock mechanism to prevent the blade from spinning while you loosen the arbor nut. This is crucial for removing a circular saw blade.
- Find the Lock Button/Pin: Look for a button or pin on the motor housing near the blade arbor. This button, when pressed or held, locks the arbor shaft.
- Engage the Arbor Lock: Press and hold the arbor lock button. You might need to rotate the blade slightly to find the correct position for the lock to engage fully. Once engaged, the blade should not spin freely.
Step 4: Loosen the Arbor Nut
This is where you’ll use the spanner wrench.
- Fit the Wrench: Place the spanner wrench onto the arbor nut. Ensure it fits snugly to prevent slipping.
- Determine the Direction: For most screws and nuts, “righty-tighty, lefty-loosey” applies. However, on a saw blade, the rotation during use can cause the nut to tighten. Therefore, you’ll usually turn the nut counter-clockwise to loosen it.
- Apply Steady Pressure: While holding the arbor lock engaged, apply steady, firm pressure to the spanner wrench in the loosening direction (counter-clockwise). If the nut is very tight, you might need to use more force.
Caution: Some saws may have a reverse thread on the arbor nut. Consult your Skil saw manual if the standard direction doesn’t work.
Step 5: Remove the Old Blade
Once the arbor nut is loosened enough, you can remove it completely.
- Unscrew the Arbor Nut: Continue turning the arbor nut counter-clockwise by hand or with the wrench until it comes off the arbor shaft. Keep track of the nut and any washers that might be attached or sit between the blade and the nut.
- Carefully Remove the Blade: With the arbor nut removed, you can now gently pull the old blade off the arbor. It might be stuck due to dust or rust, so a slight wiggle might be needed. Be careful of sharp edges.
Tip for Stuck Blades: If the blade is very difficult to remove, you can try spraying a penetrating lubricant (like WD-40) around the arbor and letting it sit for a few minutes. Ensure you wipe away any excess lubricant before installing the new blade.
Step 6: Clean the Blade Area
This is a good time for some basic Skil circular saw maintenance.
- Wipe Down: Use a clean rag or shop towel to wipe down the arbor shaft, the blade flange (the metal disc on either side of the blade), and the area around the guard. Removing dust and debris will ensure the new blade sits flush and true.
- Inspect for Damage: While cleaning, inspect the arbor and flanges for any signs of damage, rust, or excessive wear.
Step 7: Install the New Skil Saw Blade
Now it’s time for Skil saw blade installation.
- Orient the Blade Correctly: Skil saw blades, like most circular saw blades, have an arrow or marking indicating the direction of rotation. This arrow should point in the same direction as the rotation arrow on your Skil saw housing. This is vital for the blade to cut properly and safely.
- Position the Blade: Slide the new blade onto the arbor shaft, ensuring the teeth are facing the correct direction and the blade sits flush against the inner blade flange.
- Replace Washers (if any): If your saw uses any washers or spacers, replace them in the correct order. Typically, a washer goes between the arbor nut and the blade.
Step 8: Tighten the Arbor Nut
Secure the new blade in place.
- Thread the Arbor Nut: Screw the arbor nut back onto the arbor shaft. Thread it on by hand, turning it clockwise until it’s snug.
- Engage the Arbor Lock: Press and hold the arbor lock button again to keep the arbor from spinning.
- Tighten with the Wrench: Use the spanner wrench to fully tighten the arbor nut. Turn it clockwise. Apply firm pressure to ensure the blade is securely fastened, but avoid overtightening, which can damage the threads.
- Release the Arbor Lock: Once the nut is tight, release the arbor lock button.
Step 9: Test the Blade Rotation
A quick check to confirm everything is secure.
- Spin by Hand: Gently spin the blade by hand to ensure it moves freely and doesn’t wobble or rub against the guard or any other part of the saw.
- Check Guard Operation: Make sure the lower blade guard retracts and springs back smoothly.
Step 10: Reconnect Power and Test Cut
The final steps before resuming work.
- Reconnect Power: Plug the saw back in or reinsert the battery pack.
- Test Cut: Make a test cut in a piece of scrap material. Listen for any unusual noises and observe the cut quality.
Table 2: Key Differences in Blade Types
| Blade Feature | Impact on Cutting | Best For |
|---|---|---|
| Tooth Count | More teeth = Smoother cut, slower cutting. Fewer teeth = Faster cut, rougher finish. | 60+ teeth: Fine finishes, plywood. < 30 teeth: Ripping lumber. |
| Tooth Type | ATB (Alternating Tooth Bevel): Sharpest cut. | General purpose, crosscutting. |
| FTG (Flat Top Grind): Durable, good for ripping. | Ripping hardwood. | |
| Hi-ATB (High-Alternating Tooth Bevel): Ultra-smooth finish. | Laminates, veneer plywood. | |
| Kerf (Blade Width) | Thin kerf: Less resistance, less dust. | Efficiency, less strain on the motor. |
| Standard kerf: More durable, less prone to bending. | General construction, rougher jobs. | |
| Material Specific | Carbide-tipped: Durable, stays sharp longer. | Wood, engineered wood products. |
| Diamond grit/carbide-tipped with specialized teeth: For metal, masonry. | Metal cutting, tile, concrete. |
Troubleshooting Common Issues During a Skil Saw Blade Change
Even with a straightforward process, you might encounter a few hiccups. Here’s how to handle them.
Problem: Arbor Lock Won’t Engage
- Cause: The arbor shaft might be slightly rotated, or there’s debris preventing the lock from seating.
- Solution: Try rotating the blade slightly by hand while pressing the lock button. Clean the area around the lock button and the arbor with a brush or compressed air.
Problem: Arbor Nut Won’t Loosen
- Cause: The nut is extremely tight, possibly due to heat or debris, or it might have reverse threading (less common).
- Solution:
- Ensure the arbor lock is fully engaged.
- Apply more steady pressure to the wrench.
- Try a penetrating lubricant if it seems seized.
- Double-check your saw’s manual for any specific instructions regarding the arbor nut thread direction.
Problem: New Blade Wobbles
- Cause: The blade is not seated correctly on the arbor, or the blade itself is warped.
- Solution:
- Remove the blade.
- Ensure the arbor shaft and the inside of the blade are clean.
- Verify the blade’s rotation arrow is correctly aligned.
- Check that you haven’t mixed up the inner and outer blade flanges or washers.
- If the blade still wobbles after reinstallation, the blade itself may be defective, and you should try a different one.
Problem: Blade Guard Sticks
- Cause: Sawdust, debris, or a bent spring can impede the guard’s movement.
- Solution:
- Clean the area around the blade guard and its pivot point thoroughly.
- Inspect the guard for any bends or damage.
- Check the spring mechanism for any obstructions.
Skil Saw Blade Maintenance Guide: Keeping Your Blades Sharp
Beyond just changing them, proper maintenance can extend the life of your Skil saw blades and improve their performance.
- Clean Blades Regularly: After use, wipe down your blades to remove resin, sap, and sawdust. A specialized blade cleaner or a degreaser can be effective for stubborn buildup.
- Avoid Cutting Nails and Metal: Unless your blade is specifically designed for it, avoid cutting materials with embedded metal. This can quickly dull or damage your blade.
- Store Blades Properly: Store blades in a dry place, ideally in their original protective sleeves or a blade storage case. This prevents them from getting nicked or bent.
- Use the Right Blade for the Job: As mentioned in the table, using a blade designed for the material and cut type will prevent premature wear and improve efficiency.
- Resharpening (Professional Service): While you can’t typically sharpen saw blades at home with basic tools, professional sharpening services are available. For valuable blades or when you notice a significant drop in performance, consider having them professionally resharpened. This is part of effective Skil circular saw maintenance.
Frequently Asked Questions (FAQ)
How often should I change my Skil saw blade?
The frequency of Skil saw blade replacement depends on usage and the material being cut. A good indicator is when you notice increased effort required to cut, rougher cut edges, or excessive heat buildup. For general DIY use, a blade might last for many projects, but for professional use, it could be daily or weekly.
Can I use a generic blade instead of a Skil-branded blade?
Yes, you can often use blades from other reputable brands as long as they match the specifications of your Skil saw, such as arbor size (the hole in the center of the blade) and maximum RPM. Always check your Skil saw manual for recommended blade specifications.
What does the arrow on a Skil saw blade mean?
The arrow on a Skil saw blade indicates the direction of rotation. It should always point in the same direction as the rotation arrow molded into the housing of your Skil saw. Incorrect orientation means the blade won’t cut effectively and could be dangerous.
How do I know if my Skil saw blade is dull?
Signs of a dull blade include:
* Needing to push harder to make a cut.
* The saw bogging down or stalling during cuts.
* Producing splintered or ragged edges.
* The blade getting excessively hot during use.
* The saw vibrating more than usual.
Is it safe to change a Skil saw blade myself?
Yes, it is safe to change a Skil saw blade yourself by following the proper safety precautions, most importantly, disconnecting the power source (unplugging or removing the battery) before starting any work. Using the correct tools and wearing safety gear are also essential for safe operation. This entire guide is dedicated to changing saw blade safely.
How do I deal with a blade that won’t budge when trying to loosen the nut?
If the arbor nut is stuck, ensure the arbor lock is fully engaged. Try a penetrating oil and let it sit for a few minutes. If it’s still stubborn, ensure you’re using the correct counter-clockwise motion for loosening and applying steady pressure. Avoid jerky movements.
What kind of maintenance is needed for a Skil circular saw besides blade changes?
Other Skil circular saw maintenance tasks include keeping the saw clean, especially the vents and the blade guard mechanism. Inspecting the power cord (for corded models) for damage and ensuring the battery is in good condition (for cordless models) are also important. Regularly checking for loose screws or parts is also a good practice.
This detailed Skil saw blade change tutorial should equip you with the knowledge to confidently perform circular saw blade replacement on your Skil saw. Regular maintenance and knowing how to replace a Skil saw blade will ensure your tool remains a reliable partner for all your cutting projects. Remember, a sharp blade is a safe and efficient blade. Happy cutting!