
Can you make wood filler from sawdust? Yes, you absolutely can make effective wood filler from sawdust, often using simple household items and a bit of know-how. This age-old woodworking trick is not only economical but also environmentally friendly, turning waste material into a useful repair product. Whether you’re tackling small nicks, larger gouges, or filling nail holes, this DIY approach offers a customizable and readily available solution.
Working with wood often means encountering imperfections. These can range from minor dents and scratches from everyday use to larger cracks or gaps that mar the beauty and integrity of a piece. While commercial wood fillers are readily available, learning to make your own from sawdust provides a fantastic way to achieve a perfect match for your existing wood and can save you money. This guide will walk you through the process, explaining the different methods, the materials you’ll need, and how to achieve professional-looking results with your sawdust repair.
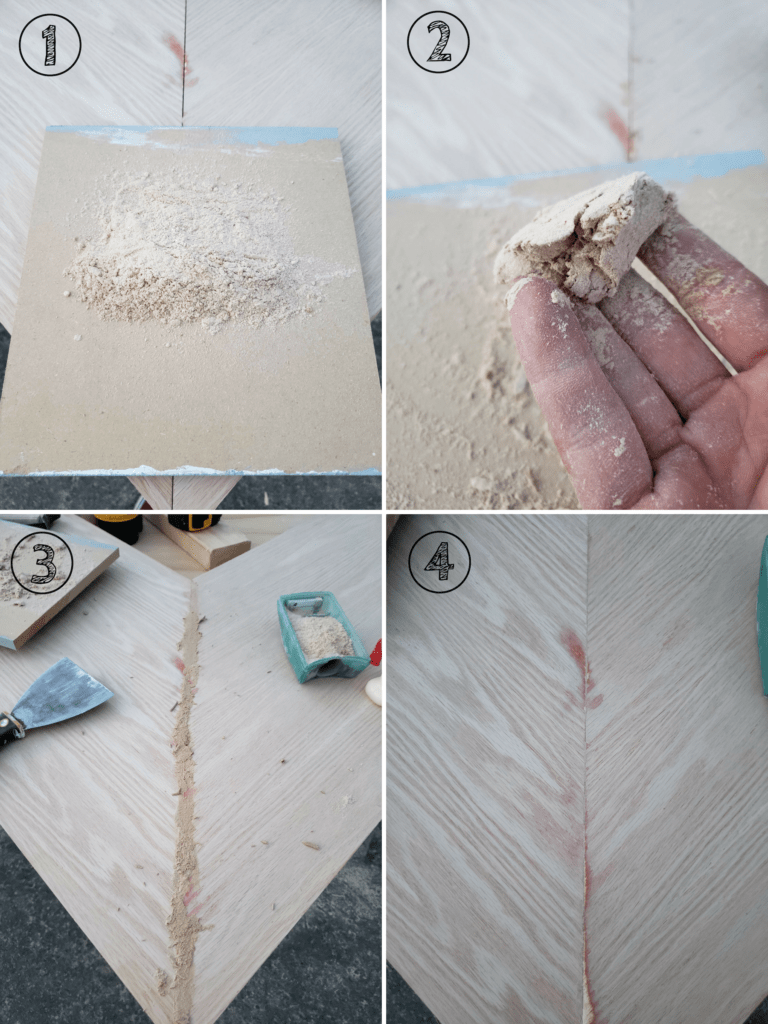
Image Source: www.thehomestud.com
Why Use Sawdust for Wood Filler?
The primary advantage of using sawdust is its ability to perfectly match the color and grain of the wood you’re repairing. This means the filled area will blend seamlessly, making the repair virtually invisible. Unlike pre-mixed fillers, which often come in generic colors that rarely match, a homemade wood dust filler guarantees a custom shade.
Here are some other compelling reasons to consider making your own wood filler:
- Cost-Effective: Sawdust is often free or very inexpensive, especially if you have your own woodworking tools or can get scraps from a local lumberyard.
- Environmentally Friendly: It’s a great way to repurpose waste material, reducing landfill waste and promoting sustainability in your projects.
- Customization: You have complete control over the color and consistency of your filler.
- Availability: You likely have the basic ingredients for homemade wood filler already in your workshop or home.
Gathering Your Materials: The Foundation of Your Filler
The success of your sawdust repair hinges on using the right type of sawdust and the appropriate binder. Not all sawdust is created equal, and the binder will determine the strength, drying time, and durability of your filler.
Types of Sawdust to Use
The best sawdust comes from the same type of wood you are repairing. This ensures the closest possible color match.
- Fine Sawdust: This is ideal for filling small cracks, nail holes, and minor surface imperfections. It mixes well and creates a smooth paste.
- Coarser Sawdust or Wood Shavings: While not ideal for fine work, larger particles can be useful for filling larger voids or for applications where a slightly coarser texture is acceptable. You might need to grind down coarser material for finer fillers.
Important Considerations for Sawdust:
- Dryness: Ensure your sawdust is completely dry. Moisture can lead to mold or affect the drying and bonding of your filler. Air dry it thoroughly or spread it on a tray in a warm, dry place.
- Purity: Use clean sawdust free from paint, varnish, glue, or other contaminants. These will compromise the integrity and appearance of your filler.
Choosing Your Binder: The Glue That Holds It Together
The binder is what transforms loose sawdust into a workable paste. Several common materials can serve this purpose, each with its own characteristics.
- Wood Glue (PVA Glue): This is the most common and generally the best option for most DIY wood putty projects. It’s strong, water-based, and readily available. It dries clear or can be tinted.
- Water: For very fine dust and small repairs, plain water can sometimes be enough to create a temporary putty, but it lacks strength.
- Shellac: A natural resin dissolved in alcohol, shellac can be used as a binder for a hard, durable filler, especially good for outdoor repairs or high-wear surfaces.
- Epoxy: For extremely durable and waterproof repairs, epoxy resin is an excellent choice. It creates a very strong sawdust epoxy filler that can withstand significant stress.
- Cyanoacrylate (Super Glue): This can be used with sawdust to create a very fast-setting filler, good for quick fixes and small chips.
Method 1: The Classic Wood Glue and Sawdust Paste
This is the go-to method for most woodworking enthusiasts. It’s simple, effective, and the materials are easy to find. This method produces a versatile wood dust paste suitable for a wide range of repairs.
What You’ll Need:
- Fine sawdust from the wood you’re repairing.
- White or yellow wood glue (PVA glue).
- A small mixing container (plastic or disposable cup).
- A mixing stick or putty knife.
- Optional: A touch of water if the mixture is too stiff.
Step-by-Step Guide:
- Prepare Your Sawdust: Ensure your sawdust is fine and completely dry. If you have larger particles, you can run it through a blender or food processor (dedicated for craft use!) to create a finer powder, or use a sanding block to grind it down.
- Start Mixing: Place a small amount of sawdust into your mixing container.
- Add Glue Gradually: Begin adding wood glue to the sawdust, a little at a time. Stir with your mixing stick or putty knife.
- Achieve the Right Consistency: Continue adding glue and mixing until you achieve a thick, peanut butter-like consistency. It should be firm enough to hold its shape but pliable enough to spread and press into the crack or hole. Avoid making it too wet, as this will cause it to shrink excessively as it dries.
- Test the Consistency: A good test is to try and roll a small amount into a ball. If it holds its shape without crumbling, it’s about right. If it’s too dry and crumbly, add a tiny bit more glue. If it’s too wet and sticky, add a bit more sawdust.
- Apply the Filler: Use a putty knife or your finger to press the sawdust glue mixture firmly into the damaged area. Make sure to overfill slightly, as the wood dust filler will likely shrink a little as it dries.
- Clean Up Excess: Wipe away any excess filler from the surrounding wood with a damp cloth before it dries.
- Drying: Allow the filler to dry completely. Drying time will vary depending on the thickness of the application and humidity, but it can take anywhere from 30 minutes to several hours.
- Sanding: Once dry, sand the repaired area smooth. Start with a medium-grit sandpaper (like 120-grit) and finish with a finer grit (like 220-grit) for a smooth finish that matches the surrounding wood.
Pro Tip: For slightly different color matching, you can mix sawdust from different wood species, or add a tiny amount of wood stain to the glue before mixing.
Method 2: Creating a Stronger Filler with Epoxy
For repairs that need to be exceptionally strong, waterproof, or durable, sawdust epoxy is the way to go. This creates a robust wood dust sealant that can withstand more demanding conditions.
What You’ll Need:
- Fine sawdust from the wood you’re repairing.
- Two-part epoxy resin (available at hardware stores). Follow the manufacturer’s instructions for mixing ratios.
- Small mixing container.
- Mixing sticks.
- Disposable gloves.
- Optional: A small amount of solvent (like denatured alcohol) for cleaning.
Step-by-Step Guide:
- Prepare Sawdust: Ensure sawdust is fine and dry.
- Mix Epoxy: In a clean container, carefully measure and mix the two parts of the epoxy resin according to the manufacturer’s instructions. Work in a well-ventilated area and wear gloves.
- Add Sawdust: Gradually add the fine sawdust to the mixed epoxy. Stir thoroughly until you achieve a thick, paste-like consistency. It should be firm enough to hold its shape but spreadable.
- Apply: Use a putty knife to apply the sawdust epoxy to the damaged area. Press it in firmly to ensure it fills all voids. Because epoxy cures quickly, work efficiently.
- Smooth and Clean: Smooth the surface as best you can with the putty knife. Clean up any excess before the epoxy hardens, as it’s much harder to remove once cured.
- Curing: Allow the epoxy to cure completely according to the product’s instructions. This is typically several hours or overnight.
- Sanding: Once cured, sand the area smooth. Epoxy can be harder to sand than wood glue, so you might need a coarser grit sandpaper to start.
When to Use Sawdust Epoxy:
- Outdoor furniture repairs.
- Filling larger cracks or holes that will be subjected to stress.
- Areas that need to be waterproof or resistant to moisture.
- Repairs on marine applications or boat building.
Method 3: The Shellac and Sawdust Blend
Shellac offers a durable, fast-drying filler, particularly useful for antique restoration or projects that require a finish compatible with traditional lacquers. This can create a wood chip filler that dries hard and is sandable.
What You’ll Need:
- Fine sawdust.
- Shellac flakes (available at craft or woodworking stores) or pre-mixed shellac.
- Denatured alcohol (if using flakes).
- Small mixing container.
- Mixing stick.
Step-by-Step Guide:
- Prepare Sawdust: Ensure sawdust is fine and dry.
- Prepare Shellac (if using flakes): Dissolve shellac flakes in denatured alcohol in a sealed container. The ratio determines the cut (e.g., 1 lb cut is 1 lb flakes to 1 gallon alcohol). For filler, a thicker consistency is better, so start with a higher concentration. Allow it to dissolve, shaking occasionally.
- Mix: Add sawdust to the shellac until you get a thick, workable paste.
- Apply: Apply the mixture to the damaged area using a putty knife.
- Dry and Sand: Shellac dries relatively quickly. Once dry, you can sand it smooth.
Considerations for Shellac Filler:
- Shellac is sensitive to alcohol and moisture once cured.
- It dries very hard and can be brittle.
Method 4: The Quick Fix: Super Glue and Sawdust
For very small chips, cracks, or accidental drill holes where speed is of the essence, super glue mixed with sawdust is a surprisingly effective DIY wood putty.
What You’ll Need:
- Fine sawdust.
- Cyanoacrylate glue (super glue).
- A small piece of cardboard or a disposable palette for mixing.
- A toothpick or small applicator.
Step-by-Step Guide:
- Prepare Sawdust: Ensure sawdust is fine and dry.
- Apply Glue: Place a small amount of sawdust over the damaged area.
- Apply Super Glue: Drip super glue onto the sawdust. The glue will wick into the dust, creating a hard mass. You may need to add more sawdust and glue to build up the repair.
- Press and Hold: You may need to hold the sawdust in place with a toothpick or your finger (wearing gloves!) while the glue sets, which is very quick.
- Sand: Once cured (which takes seconds to minutes), you can carefully sand the area smooth.
Limitations:
- This method is best for very small, non-structural repairs.
- Super glue can become brittle over time.
- Avoid contact with skin.
Advanced Techniques and Tips for Perfect Sawdust Repair
Beyond the basic methods, a few advanced techniques can elevate your homemade wood filler from functional to flawless.
Color Matching: The Art of Imperceptible Repair
Achieving a perfect color match is crucial for an invisible repair.
- Test Swatches: Always create a small test swatch of your filler on a scrap piece of the same wood before applying it to your project.
- Mix and Match Sawdust: If you can’t get sawdust from the exact wood species, try mixing fine sawdust from different species to approximate the color.
- Wood Stain: A tiny amount of compatible wood stain added to your glue-based filler can help fine-tune the color. Add it before mixing with sawdust. Start with just a drop or two.
- Aging: Remember that wood darkens with age and exposure to light. Consider how the wood has aged before making your final color adjustment.
Achieving the Right Consistency: The Key to Smooth Application
The consistency of your wood dust paste is critical for easy application and minimal shrinkage.
- Start with Less Binder: It’s easier to add more binder if your mixture is too dry than it is to fix an overly wet mixture.
- Peanut Butter Consistency: Aim for a consistency similar to thick peanut butter or frosting. It should hold its shape but be spreadable.
- Add Gradually: Add your binder to the sawdust in small increments, mixing thoroughly at each stage.
- Shrinkage: All fillers shrink slightly as they dry. Overfilling the repair area slightly and then sanding it flush is the standard practice.
Application Techniques for Different Repairs
The way you apply the filler can impact the final result.
- Nail Holes: Use a small putty knife or even a toothpick to press the filler firmly into the hole. Overfill slightly.
- Cracks and Gouges: For narrow cracks, use a thin putty knife or a palette knife to push the filler deep into the crack. For wider gouges, build up the filler in layers if necessary, allowing each layer to partially dry.
- Surface Scratches: For very shallow scratches, a thin layer of your finest sawdust glue paste might suffice.
Sanding and Finishing: The Final Touches
Proper sanding and finishing are essential to make the repair disappear.
- Allow Complete Drying: Ensure the filler is completely dry before sanding. If it feels soft or gummy, it needs more time.
- Start Coarse, Finish Fine: Begin sanding with a grit of sandpaper suitable for the filler’s hardness (e.g., 120-grit for glue-based, possibly 80-grit for epoxy). Gradually move to finer grits (180, 220, or even higher) to achieve a smooth finish that matches the surrounding wood.
- Feather the Edges: Sand the edges of the filled area so they blend smoothly into the surrounding wood.
- Dust Removal: Thoroughly remove all sanding dust before applying any finish. A tack cloth is ideal for this.
- Finishing: Apply your chosen finish (stain, varnish, paint) over the repaired area. You may need multiple coats to achieve a perfect match, especially with stains.
Common Pitfalls to Avoid with Your Wood Chip Filler
Even with the best intentions, some mistakes can lead to less-than-ideal results. Here’s what to watch out for when making and using your wood chip filler.
- Using Wet Sawdust: This is a recipe for disaster. Mold can grow, and the filler won’t cure properly.
- Contaminated Sawdust: Sawdust with paint, oil, or old glue will weaken your filler and affect its appearance.
- Too Much Binder: An overly wet mixture will shrink significantly, potentially leaving a divot. It also takes much longer to dry.
- Not Enough Binder: A dry, crumbly mixture won’t hold together and will be difficult to apply.
- Not Filling Deep Enough: If you don’t press the filler into cracks and holes, air pockets will remain, weakening the repair.
- Sanding Too Soon: Trying to sand before the filler is fully cured can result in a gummy mess.
- Ignoring Color Match: A poorly color-matched repair will always be noticeable. Take the time to get it right.
When to Choose Commercial Wood Filler
While homemade wood filler is fantastic for many situations, there are times when a commercial product might be a better choice.
- Large Structural Repairs: For significant structural damage or areas that will bear a lot of weight, professionally engineered wood fillers or wood epoxies are often stronger and more reliable.
- Speed: If you need a quick fix and don’t have time to gather materials and make your own.
- Specific Properties: Commercial fillers come with specific properties like extreme flexibility, fast curing, or resistance to certain chemicals that might be hard to replicate at home.
- Matching Pre-Finished Surfaces: If you’re repairing a piece that has a very specific factory finish that’s hard to replicate, a commercial filler designed to be stained or painted might be easier.
Frequently Asked Questions (FAQ)
Q1: Can I use sawdust from any type of wood for filler?
A1: While you can use sawdust from any wood, it’s always best to use sawdust from the same species of wood you are repairing for the closest color match. Softwoods like pine will produce a different color than hardwoods like oak.
Q2: How long does homemade wood filler last?
A2: Properly stored in an airtight container, wood glue-based filler can last for several months to a year. Epoxy and shellac-based fillers are generally more stable and can last longer. However, it’s always best to make only what you need for your current project.
Q3: Will my sawdust filler shrink?
A3: Yes, most fillers, including those made from sawdust, will shrink slightly as they dry because the binder loses moisture or solvent. This is why it’s recommended to overfill the repair slightly and then sand it flush once dry.
Q4: Can I paint over homemade wood filler?
A4: Yes, you can paint over wood glue and sawdust filler once it’s completely dry and sanded. For epoxy or shellac fillers, ensure they are fully cured and sanded smooth, as some finishes might interact differently with them. Always test your paint on a scrap piece first.
Q5: Is sawdust filler waterproof?
A5: Wood glue and sawdust filler are water-resistant when dry but not fully waterproof. For truly waterproof repairs, an epoxy-based wood dust sealant would be more appropriate.
Q6: How do I get a very fine powder from sawdust?
A6: You can use a dedicated blender or food processor (use one you won’t use for food!) to grind sawdust into a fine powder. Alternatively, you can use a sanding block to grind it down into dust or use a mortar and pestle for small amounts.
Making your own wood filler from sawdust is a rewarding skill that combines practicality with a touch of resourcefulness. By carefully selecting your materials and paying attention to the details of mixing and application, you can achieve repairs that are both strong and virtually invisible, preserving the beauty and longevity of your wooden projects.