
Can you attach a power strip to the wall? Yes, you absolutely can, and doing so is a fantastic way to tidy up your space, prevent tripping hazards, and keep your electronics organized. This comprehensive guide will walk you through everything you need to know to safely and effectively attach a power strip to your wall. We’ll explore various methods, essential tools, and safety considerations to ensure your wall mounted power strip solution is both practical and secure.
Living in a world powered by electricity means we often have a surplus of devices needing juice. This frequently leads to a tangled mess of cords and power strips sprawled across floors or desks. Not only is this unsightly, but it can also be a safety concern. Fortunately, with the right approach, you can mount power strip units neatly and securely, transforming cluttered areas into organized, hazard-free zones. Whether you’re looking to secure power strip units behind a desk, entertainment center, or in a workshop, this guide has you covered.
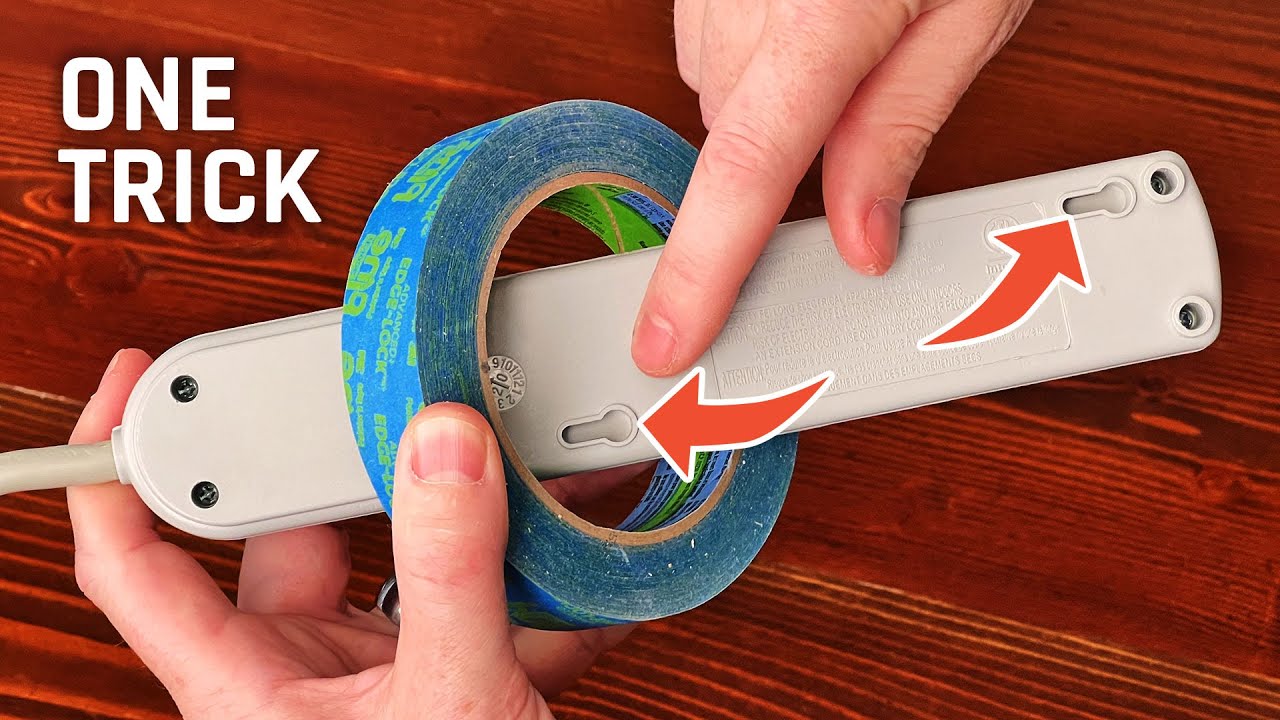
Image Source: i.ytimg.com
Why Mount Your Power Strip?
Before diving into the “how,” let’s explore the compelling “why.” Mounting a power strip offers several key advantages:
- Safety First: Loose cords are a major tripping hazard, especially in busy areas. A wall mounted power strip keeps cords off the floor, significantly reducing the risk of accidents. This is particularly important in homes with children or pets.
- Organization and Aesthetics: Say goodbye to the spaghetti junction of cables! Mounting your power strip creates a clean, organized look, making your living or working space more visually appealing.
- Accessibility: When a power strip is mounted at a convenient height, plugging and unplugging devices becomes much easier, eliminating the need to bend down or search for the strip.
- Protecting Your Equipment: Keeping power strips off the floor can protect them from spills, dust bunnies, and accidental damage.
Methods for Attaching a Power Strip to Your Wall
There are several effective ways to attach power strip to wall safely. The best method for you will depend on the type of wall, the weight of your power strip and connected devices, and your personal preference. We’ll cover the most common and reliable power strip mounting solutions.
1. Using Adhesive Mounts
Adhesive power strip mounts are a popular choice for their ease of use and non-damaging nature, especially on smooth surfaces. These often come in the form of strong double-sided tape or specialized adhesive strips.
How to Use Adhesive Mounts:
- Clean the Surface: This is the most critical step for adhesive success. Thoroughly clean the wall area where you intend to mount the power strip with rubbing alcohol or a mild cleaner. Ensure it’s completely dry before proceeding.
- Prepare the Power Strip: Most power strips have designated mounting holes or a flat surface suitable for adhesive. If using a dedicated adhesive mount, follow its specific instructions for attaching it to the power strip.
- Apply the Adhesive: Peel off the backing from the adhesive and carefully press it firmly onto the cleaned wall surface. For double-sided tape specifically designed for mounting, apply it to the back of the power strip first, then press the power strip onto the wall.
- Allow to Cure: Many adhesives require a curing period (usually 24-48 hours) to reach maximum strength. Avoid hanging anything heavy on the power strip during this time.
Pros of Adhesive Mounts:
- Easy to install.
- No drilling required, preserving wall integrity.
- Ideal for renters or those who prefer not to make permanent changes.
- Good for lighter power strips and fewer devices.
Cons of Adhesive Mounts:
- May not be suitable for heavy-duty power strips with many plugged-in adapters.
- Adhesion can be compromised by dust, moisture, or uneven surfaces.
- The adhesive may eventually degrade or leave residue upon removal.
2. Using Screws (The Most Secure Method)
For a truly robust and long-lasting power strip mounting solutions, using screws is the way to go. This method provides the strongest hold and is suitable for virtually any type of power strip and wall material. This is how you screw in power strip units for maximum stability.
Preparing for Screws:
- Identify Mounting Points: Most power strips are designed with pre-drilled holes for mounting. If yours doesn’t, you may need to drill small pilot holes in the power strip casing itself, being careful not to damage internal components.
- Choose the Right Screws: Select screws that are appropriate for your wall type.
- Drywall: Use drywall anchors (like plastic expansion anchors or self-drilling anchors) in conjunction with screws. The anchor provides a secure base for the screw in the hollow wall.
- Wood Studs: If you can locate a wall stud (using a stud finder), you can screw directly into the wood. This offers the strongest possible hold.
- Plaster Walls: Similar to drywall, plaster walls may require anchors.
- Concrete/Brick: You’ll need masonry anchors and screws, and a hammer drill to create the pilot holes.
Tools You’ll Need:
- Power drill or screwdriver
- Drill bits (sized for your anchors or pilot holes)
- Screwdriver bit that matches your screws
- Stud finder (for drywall)
- Level
- Pencil
Steps to Screw in a Power Strip:
- Locate Mounting Points: Determine where you want to mount power strip and identify the mounting holes on the strip.
- Position the Power Strip: Hold the power strip against the wall at the desired location. Use a level to ensure it’s straight. Mark the screw hole positions on the wall with a pencil.
- Drill Pilot Holes (if necessary):
- For Drywall/Plaster with Anchors: Drill holes at your pencil marks slightly smaller than your drywall anchors. Gently tap the anchors into the holes until they are flush with the wall surface.
- For Studs: Drill pilot holes directly into the stud at your pencil marks. The pilot hole should be slightly smaller than the screw’s diameter.
- For Concrete/Brick: Use a hammer drill and masonry bit to drill holes, then insert masonry anchors.
- Attach the Power Strip: Align the power strip’s mounting holes with the pilot holes (or anchors) in the wall.
- Insert and Tighten Screws: Drive the screws through the power strip and into the wall anchors or studs. Tighten them until the power strip is snug against the wall, but be careful not to overtighten, which could strip the screws or damage the wall.
Pros of Using Screws:
- Extremely secure and durable.
- Can support heavier loads.
- Suitable for all wall types with the correct anchors.
- Long-lasting mounting solution.
Cons of Using Screws:
- Requires drilling holes in the wall.
- May not be ideal for renters or temporary setups.
- Requires more tools and effort.
3. Utilizing Cable Management Systems and Brackets
There are specialized power strip mounting solutions designed to integrate with cable management. These often include brackets or clips that hold the power strip and allow you to route cables neatly. Some are designed to attach extension cord holder functionalities directly to the power strip.
Types of Brackets and Holders:
- Under-Desk Brackets: These are U-shaped or flat brackets that screw or adhere to the underside of a desk or shelf, holding the power strip securely out of sight.
- Velcro Straps: Heavy-duty Velcro straps can be used to secure a power strip to a desk leg, shelf, or even a specially designed bracket.
- Dedicated Power Strip Mounts: Many manufacturers offer specific mounting brackets designed to fit their power strips. These often use screws or strong adhesives.
- 3D-Printed Mounts: With the rise of 3D printing, custom mounts are becoming available for specific power strip models, often designed to screw into walls or desks.
How to Use Brackets:
- Choose the Right Bracket: Select a bracket or holder that is compatible with your power strip and your intended mounting surface.
- Follow Bracket Instructions: Each bracket will have its own installation method, which might involve screws, adhesives, or clips.
- Secure the Power Strip: Once the bracket is mounted, slide or clip the power strip into place.
Pros of Brackets and Holders:
- Can offer excellent organization and concealment.
- Many are designed for easy installation.
- Some provide additional cable management features.
Cons of Brackets and Holders:
- Availability and compatibility can be an issue.
- May add to the overall cost.
4. The “Hang Power Strip” Approach: Zip Ties and Straps
For less permanent or more adaptable solutions, you can hang power strip units using zip ties or sturdy straps. This is particularly useful for temporarily securing a power strip to furniture legs, shelving units, or even bed frames.
How to Hang a Power Strip:
- Secure the Power Strip: Use heavy-duty zip ties or Velcro straps to firmly attach the power strip to the desired support structure (e.g., a desk leg, shelf upright). Ensure it’s tight and won’t slip.
- Manage Cords: Use additional zip ties or cable wraps to bundle and route the power cords neatly.
Pros of Hanging:
- Extremely flexible and temporary.
- No damage to walls or furniture.
- Quick and easy to set up.
Cons of Hanging:
- Not as aesthetically pleasing as mounted solutions.
- May not be suitable for heavy power strips or many devices.
- Can potentially loosen over time.
Important Safety Considerations When Mounting
Regardless of the method you choose, safety should always be your top priority.
1. Weight Distribution and Load Capacity
- Check the Power Strip’s Rating: Ensure the power strip is rated for the total wattage of the devices you intend to plug into it. Overloading a power strip can lead to overheating and fire hazards.
- Consider the Combined Weight: When mounting, factor in the weight of the power strip itself plus all the connected adapters and cords. A heavy load requires a more robust mounting solution (like screws into studs).
- Distribute Weight Evenly: If your power strip has multiple mounting points, use them all to distribute the weight evenly across the wall.
2. Wall Material and Mounting Hardware
- Know Your Wall: Identifying your wall material (drywall, plaster, wood, concrete) is crucial for selecting the correct mounting hardware. Using the wrong anchors or screws in drywall can lead to the mount pulling out of the wall.
- Use Appropriate Anchors: Never screw directly into drywall without anchors if the load is more than a few pounds. Anchors provide a secure grip.
- Avoid Over-Tightening: Overtightening screws can strip the anchors or the wall material, compromising the hold.
3. Heat Dissipation
- Ensure Airflow: Power strips, especially those with many devices plugged in, can generate heat. Ensure there is adequate airflow around the power strip. Avoid mounting it in an enclosed space where heat can build up.
- Keep Away from Flammable Materials: Mount the power strip away from curtains, paper, or other flammable materials.
4. Cable Management and Cord Safety
- Avoid Pinching: Ensure cords are not pinched or crushed when mounting the power strip, particularly where they enter the strip or exit the wall.
- Secure Loose Cords: Use cable ties or clips to keep cords neatly managed and prevent them from becoming tripping hazards or getting tangled.
- Inspect Cords Regularly: Periodically check power cords for any signs of damage, fraying, or wear and tear. Replace damaged cords immediately.
5. Placement Considerations
- Avoid Water Sources: Do not mount power strips near sinks, bathtubs, or other sources of moisture.
- Accessibility: Mount the power strip at a height that is convenient for plugging and unplugging devices, but out of reach of very young children if possible.
- Aesthetics: Plan the placement to minimize visual clutter and integrate with your room’s decor.
Step-by-Step Summary: Attaching Your Power Strip
Here’s a quick recap of the general steps, adaptable to most mounting methods:
- Choose Your Method: Decide whether you’ll use adhesive, screws, brackets, or straps.
- Gather Your Tools and Materials: Ensure you have everything needed for your chosen method.
- Select the Location: Find the ideal spot on your wall, considering accessibility, safety, and aesthetics.
- Prepare the Mounting Surface: Clean the wall or desk surface thoroughly.
- Mark the Mounting Points: Use a level and pencil to mark where the power strip or its mount will attach.
- Install the Mount/Prepare for Attachment: Drill pilot holes, insert anchors, or apply adhesive as required.
- Attach the Power Strip: Secure the power strip to the wall or mount.
- Test the Mount: Gently tug on the power strip to ensure it’s secure.
- Connect Devices: Plug in your devices, ensuring not to overload the strip.
- Manage Cords: Tidy up all cables using ties or clips.
Frequently Asked Questions (FAQ)
Q1: Can I mount a power strip directly onto wallpaper?
A: While some strong adhesives might hold temporarily, mounting directly onto wallpaper is generally not recommended. Wallpaper adhesive can be weak, and the surface may not be smooth or strong enough. It’s best to peel back a small section of wallpaper to expose the drywall or plaster underneath, or use a method that doesn’t rely on adhesion, like screwing into studs if possible.
Q2: What is the best way to mount a heavy power strip with many adapters?
A: For a heavy power strip, the most reliable method is to screw in power strip units directly into wall studs. If studs aren’t available, use heavy-duty drywall anchors rated for significant weight. Adhesive mounts are unlikely to provide sufficient support for heavy loads.
Q3: How do I find wall studs?
A: The easiest way to find wall studs is by using an electronic stud finder. You can also try tapping on the wall; a hollow sound indicates an empty space, while a solid thud suggests a stud. Another method is to look for electrical outlets or light switches, as they are usually attached to a stud.
Q4: Can I use zip ties to mount a power strip to the wall?
A: You can use zip ties to hang power strip units from existing structures like shelves or desk legs, but this isn’t typically considered wall mounting. For direct wall attachment, zip ties alone are not a secure or safe method.
Q5: Will adhesive mounts damage my paint?
A: High-quality adhesive power strip mounts are often designed to be removable without damaging paint. However, results can vary depending on the type of paint, the adhesive used, and how long it has been in place. It’s always a good idea to test the adhesive on an inconspicuous area of the wall first, or use a low-tack adhesive if you’re concerned about paint damage.
Q6: What kind of screws should I use for mounting a power strip on drywall?
A: For drywall, you should always use drywall anchors in conjunction with screws. The anchor provides a secure grip within the drywall. Common options include plastic expansion anchors, self-drilling drywall anchors, or toggle bolts for heavier loads. The screw should then be chosen to fit snugly into the anchor.
Q7: Is it safe to mount a power strip upside down?
A: While technically possible, mounting a power strip upside down is generally not recommended. Dust and debris can accumulate in the outlets more easily, potentially causing short circuits or fire hazards. Most power strips are designed to function optimally in an upright or horizontal position.
By following these guidelines and choosing the most appropriate method for your needs, you can effectively and safely attach power strip to wall, bringing order and safety to your electrical setup. Happy mounting!