
Can you build a miter saw station yourself? Yes, you absolutely can! Building your own miter saw station is a rewarding DIY project that can transform your workshop. It offers better support, improved accuracy, and essential storage for your tools and materials. What is a miter saw station? It’s a custom-built workbench designed specifically to house and optimize the use of your miter saw, often incorporating features like extensions, dust collection, and storage. This guide will walk you through the entire process, from planning to the final touches.
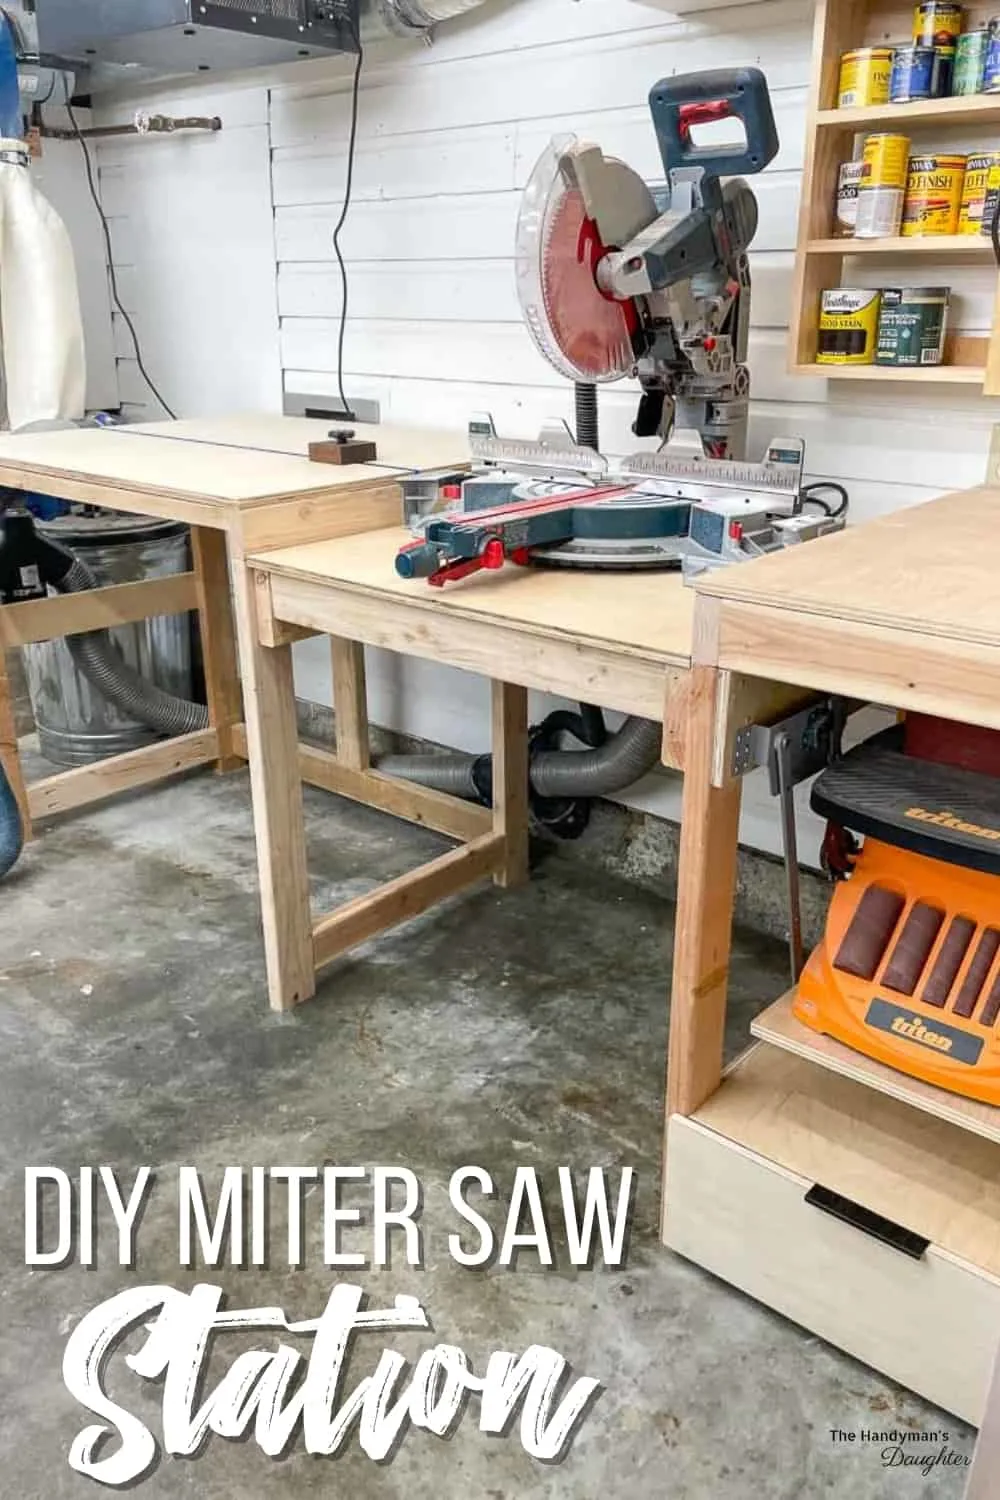
Image Source: www.thehandymansdaughter.com
Planning Your Miter Saw Station: The Foundation of Success
Before you pick up a saw or a piece of lumber, careful planning is key. This stage determines the functionality, size, and overall success of your DIY miter saw setup. Consider your space, your miter saw’s size, and the types of projects you’ll be tackling.
Assessing Your Space and Needs
- Workshop Size: Measure the available space. Do you have a dedicated garage bay, a corner of a basement, or a small shed? This will dictate the scale of your station.
- Miter Saw Size: Know the dimensions of your current miter saw. Some fold up, others are larger benchtop models. This impacts how much space it needs on the main table.
- Project Types: Will you be cutting long boards, small trim, or sheet goods? This influences the need for outfeed support and extension wings.
- Storage Requirements: Do you need space for blades, clamps, measuring tools, or safety equipment?
Design Considerations for Your Miter Saw Workbench Plans
Your miter saw workbench plans should be detailed. Sketching out your design is crucial.
- Height: A comfortable working height is usually around your hip or waist level. This prevents back strain. A good starting point is the height of your saw’s base or slightly higher.
- Footprint: How wide and deep does the station need to be? Factor in room for the saw, material support, and movement around the station.
- Extension Wings: These are vital for supporting long pieces of lumber. They can be fixed or foldable.
- Outfeed Support: This is the area behind the saw that supports material as it exits the cut. It can be a simple flat surface or incorporate rollers or a fence.
- Storage Solutions: Think about shelves, drawers, cabinets, and pegboards.
Choosing Your Materials
The materials you choose will affect the cost, durability, and appearance of your station.
- Frame:
- Dimensional Lumber: 2x4s and 2x6s are common and affordable for the main structure.
- Plywood: ¾-inch birch or cabinet-grade plywood is excellent for the tabletop and shelf surfaces.
- Top Surface:
- Plywood: ¾-inch MDF or plywood offers a smooth, flat surface. Consider a sacrificial layer of hardboard on top for easier cleanup and replacement.
- Laminate: For a durable and easy-to-clean surface, consider applying laminate.
- Hardware: Screws (wood screws, pocket hole screws), bolts, hinges, drawer slides, casters (if you want it mobile).
- Optional Materials:
- Pegboard: For tool storage.
- Sheet Metal: For a smooth sliding surface on outfeed extensions.
- Metal Fencing/Extrusion: For creating adjustable fences or jigs.
Step-by-Step Construction: Bringing Your Design to Life
This is where your DIY miter saw setup starts to take shape.
Step 1: Building the Base and Legs
The base provides the structural integrity of your station.
- Cut your lumber: Based on your plans, cut your 2x4s or 2x6s for the legs and the base frame. Ensure all cuts are square.
- Assemble the base frame: Create a rectangular or square frame for the bottom of your station. Use wood glue and screws for strong joints. Pocket holes are an excellent way to create strong, hidden joinery.
- Attach the legs: Securely attach the legs to the corners of the base frame. Again, glue and screws or bolts are recommended.
- Add bracing: Diagonal bracing in the corners or along the sides will significantly increase stability and prevent racking.
Step 2: Constructing the Main Table and Saw Support
This is the heart of your miter saw station.
- Create the saw platform: This is a sturdy section of the table where your miter saw will sit. It needs to be perfectly flat and strong. Plywood is a good choice.
- Cut the main tabletop: Cut your ¾-inch plywood or MDF to the desired dimensions for the main tabletop.
- Build support structure for the tabletop: Install crossmembers made from 2x4s or plywood beneath the tabletop, attaching them to the legs. This creates a robust support system.
- Attach the tabletop: Secure the tabletop to the support structure using screws. Ensure it’s flush and level.
- Mount the saw platform: Securely attach the saw platform to the main tabletop in its designated spot. Consider recessing the saw slightly into the table for a cleaner look and better material support.
Step 3: Adding Extension Wings and Outfeed Support
These features are crucial for handling longer materials.
- Design your extensions: Will they be simple flip-up supports, or more robust table extensions?
- Build the extension frames: Use lumber or plywood to build the frames for your extension wings.
- Attach extension supports: If you’re building flip-up extensions, use strong hinges. For fixed extensions, build them as part of the main table structure.
- Install outfeed support: This can be a simple extension of the tabletop, or you might build a separate miter saw outfeed table with adjustable height or rollers for easier material handling.
Step 4: Incorporating Miter Saw Storage
Efficient storage keeps your tools organized and accessible.
- Design your storage: Think about open shelves, closed cabinets, or drawers.
- Build storage units: Construct simple boxes for shelves, or use drawer slides for drawers.
- Integrate storage into the base: Many designs incorporate lower cabinets or open shelving beneath the main workbench. This is a great place to build a miter saw cabinet.
- Consider wall-mounted storage: Pegboard or shelves above the station can hold frequently used items.
Step 5: Implementing Miter Saw Dust Collection
Dust is a major concern in any workshop. Effective miter saw dust collection is essential for a cleaner and healthier environment.
- Basic Dust Collection:
- Shop Vacuum: Connect your shop vacuum directly to the dust port on your miter saw. This is the simplest solution.
- Dust Collection Port: Many station designs incorporate a dedicated dust collection port that captures sawdust blown off the blade or falling from the saw. This often involves building a shroud or enclosure around the saw.
- Advanced Dust Collection:
- Dust Collector System: For a more robust solution, integrate your station with a central dust collector. This might involve creating a dedicated intake port with blast gates.
- Miter Saw Enclosure: A full miter saw enclosure can significantly improve dust capture by containing the sawdust. This often involves building walls around the saw, with an opening for material. You can even add a fan to help direct dust to your collection system.
Step 6: Creating Custom Jigs and Accessories
A homemade miter saw jig can greatly enhance accuracy and repeatability.
- Repeat Stops: Build simple stops that attach to the fence or extension wings to ensure consistent cut lengths.
- Crosscut Sled: While often associated with table saws, a modified crosscut sled can also be useful for precise, repetitive crosscuts with a miter saw.
- Featherboards: These help hold your material firmly against the fence during cuts, preventing kickback and improving accuracy.
- Miter Gauge Fence: Upgrade your saw’s fence with a more robust, extended fence made from MDF or plywood for better support and the ability to attach jigs.
Step 7: Finishing Touches and Enhancements
Make your station truly your own.
- Leveling Feet: If your station isn’t mobile, add leveling feet to ensure it sits perfectly flat on uneven floors.
- Casters: If mobility is desired, install heavy-duty casters so you can easily move your station around the workshop. Locking casters are essential for stability when in use.
- Fence System: Consider adding an adjustable fence system with track saw extrusions or T-track to easily attach jigs and stops.
- Lighting: Add task lighting above the cutting area to improve visibility.
- Paint or Finish: Protect the wood and give your station a professional look with paint or a durable finish.
Mobile Miter Saw Station Options
Not everyone has a dedicated workshop space. A mobile miter saw stand is a fantastic solution.
Building a Mobile Base
- Heavy-Duty Casters: Invest in good quality, load-rated casters. Swivel casters are best for maneuverability.
- Integration with Station: Build casters directly into the legs of your station, or create a separate rolling base that the entire station sits on.
- Locking Mechanism: Ensure your casters have robust locking mechanisms to keep the station stable when in use.
Fold-Down or Collapsible Designs
- Folding Wings: Design extension wings that fold down flat against the main body of the station.
- Collapsible Legs: Some advanced designs feature legs that fold in, making the unit more compact for storage.
- Durable Hinges and Latches: Use strong hardware that can withstand repeated use.
Miter Saw Dust Collection Refinements
Let’s delve deeper into optimizing your miter saw dust collection.
Optimizing Your Dust Port Connection
- Tight Seals: Ensure any adapter connecting your vacuum hose to the saw’s dust port has a tight seal to prevent air leaks. Duct tape can be your friend here.
- Hose Length: Use a hose that’s long enough to allow for movement of the saw head without being overly cumbersome.
- Swivel Fittings: Consider adding swivel fittings to the hose to prevent tangling.
Building a Dust Collection Shroud
A custom shroud can greatly improve dust capture by creating a more enclosed environment around the blade.
- Materials: Plywood, MDF, or even clear acrylic can be used for shrouds.
- Design: The shroud should wrap around the back and sides of the saw, with an opening for the blade. It should be designed to allow the saw to tilt and swivel freely.
- Dust Port Integration: The shroud should have a port to connect your vacuum hose, ideally positioned to catch dust as it’s expelled.
Dust Management for Station Features
- Outfeed Table Dust Control: Design your outfeed table with a slight slope towards a dust collection point or a built-in collection bin.
- Storage Area Dust Prevention: If you have open shelves, consider adding a simple dust skirt made from fabric or thin plastic to help contain dust.
Miter Saw Storage Solutions in Detail
Efficient miter saw storage goes beyond just shelving.
Blade Storage
- Blade Racks: Build simple racks that hold blades vertically or horizontally. Ensure they are protected from damage.
- Drawer Inserts: Custom inserts for drawers can keep blades separated and safe.
Accessory Storage
- Clamp Racks: Mount clamps on the sides of your station or in dedicated racks.
- Measuring Tape Holders: Simple hooks or brackets can keep measuring tapes handy.
- Push Stick and Safety Gear Storage: Designated spots for push sticks, safety glasses, and hearing protection are crucial.
Material Storage
- Underneath Storage: Shelves or bins beneath the main workbench are perfect for lumber scraps, pre-cut pieces, or sheet goods.
- Side Storage: Vertical storage on the sides of the station can hold longer pieces of wood or material.
Advanced Miter Saw Station Features
For the serious woodworker, consider these enhancements.
Integrated Fences and Guides
- Adjustable Fences: Using T-track or Incra-style tracks allows for highly adjustable fences and the easy attachment of jigs.
- Zero-Clearance Inserts: For your saw’s base, a zero-clearance insert can reduce tear-out on the bottom of cuts.
Dado Stack Capability
- If your miter saw supports dado blades (most don’t, but some larger models might), you’ll need to design your station to accommodate the wider cuts and ensure adequate dust collection.
Dedicated Outfeed Table with Rollers
- A well-designed miter saw outfeed table can have built-in rollers or even a leveling mechanism to ensure consistent support for long materials. This is a significant upgrade for accuracy.
Frequently Asked Questions (FAQ)
Q1: How high should my miter saw station be?
A1: The ideal height is typically at your hip or waist level, allowing you to operate the saw comfortably without bending over. Measure the height of your miter saw’s base and add a few inches for your tabletop.
Q2: Can I build a miter saw station on a budget?
A2: Absolutely! Using readily available lumber like 2x4s and ¾-inch construction-grade plywood can keep costs down. Focus on essential features first and add more elaborate storage or extensions later.
Q3: What is the best material for a miter saw station top?
A3: ¾-inch MDF or plywood is a popular choice for its flatness and affordability. Some woodworkers prefer a sacrificial layer of ¼-inch hardboard on top for easier replacement and a cleaner cutting surface.
Q4: How do I make my miter saw station mobile?
A4: Install heavy-duty, lockable casters to the base of your station. Ensure the casters are rated to handle the weight of the station plus the heaviest materials you’ll be cutting.
Q5: What are the benefits of a miter saw enclosure?
A5: A miter saw enclosure significantly improves dust collection by containing sawdust, making your workshop cleaner and healthier. It can also reduce noise and act as a barrier against flying debris.
Q6: How important is an outfeed table for a miter saw station?
A6: An miter saw outfeed table is very important for supporting long pieces of lumber, ensuring accuracy, and preventing material from tipping or binding during cuts.
Q7: Where can I find miter saw workbench plans?
A7: Many woodworking websites, magazines, and YouTube channels offer free and paid miter saw workbench plans. You can also design your own based on your specific needs and available space.
Building a miter saw station is a project that pays dividends in workshop efficiency, accuracy, and organization. By following these steps and adapting them to your needs, you can create a truly functional and valuable addition to your woodworking space. Happy building!