
Can you change a chop saw blade yourself? Yes, you absolutely can! With the right tools and a few simple steps, anyone can perform a chop saw blade replacement safely. This guide will walk you through the process of changing your chop saw blade, ensuring you know how to perform a miter saw blade removal and saw blade installation with confidence.
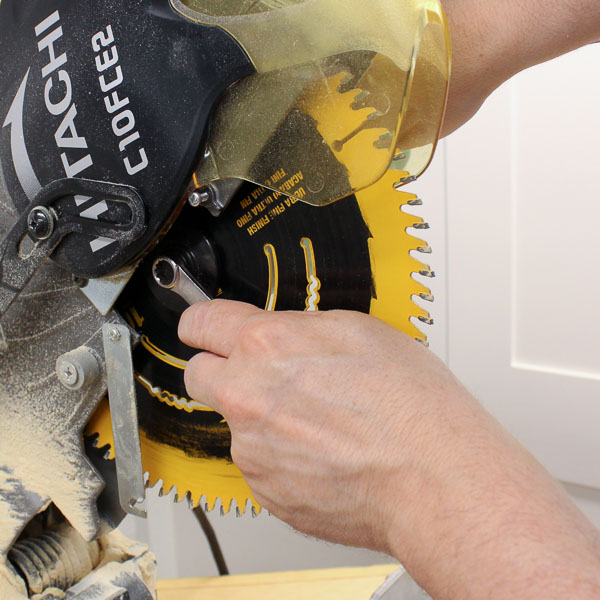
Image Source: sawsonskates.com
Preparing for a Chop Saw Blade Replacement
Before you even think about touching your chop saw, proper preparation is key to a safe and successful chop saw blade replacement. This isn’t just about having the right tools; it’s about creating a safe environment and having a clear plan.
Gathering Your Essential Tools
To successfully complete a power saw blade swap, you’ll need a few specific items. Having these ready beforehand will make the entire process smoother and quicker.
- New Chop Saw Blade: Ensure the new blade matches your saw’s specifications for arbor size and blade diameter. Using the wrong size can be dangerous.
- Wrench or Socket Set: Most chop saws use a specific bolt size to hold the blade. Check your saw’s manual or the existing blade’s hardware to determine the correct wrench or socket size.
- Allen Wrench (Hex Key): Some chop saws use an Allen bolt instead of a standard nut.
- Gloves: Thick work gloves are essential for protecting your hands from sharp blades and any rough edges.
- Safety Glasses: Always wear safety glasses to protect your eyes from flying debris.
- Dust Mask: Sawdust can be irritating to your lungs, so a dust mask is recommended, especially if you’re working in an enclosed space.
- Clean Cloth or Rag: For wiping down the blade and saw components.
- Blade Guard Removal Tool (if applicable): Some blade guards are designed with specific clips or mechanisms that might require a small tool to release.
Ensuring a Safe Work Area
A safe environment is the first step in any chop saw maintenance. Think about where you’re working and what could go wrong.
- Unplug the Saw: This is the most critical safety step. Always ensure the chop saw is unplugged from the power source before you begin any work on it. Double-check that the cord is not accidentally plugged in.
- Stable Surface: Place the chop saw on a stable, level surface. This prevents it from tipping over during the process or when you’re cutting.
- Good Lighting: Ensure the area is well-lit so you can clearly see what you’re doing.
- Clear the Area: Remove any clutter, debris, or flammable materials from around the saw. Sawdust can be a fire hazard.
- No Distractions: Avoid working when you’re tired, rushed, or distracted. Focus is paramount for safety.
Step-by-Step: Changing Your Chop Saw Blade
Now that you’re prepared, let’s get to the actual process of the power saw blade swap. Follow these steps carefully for a smooth chop saw blade replacement.
Step 1: Securing the Blade and Guard
The first step in miter saw blade removal is to access the blade itself. This usually involves dealing with the blade guard.
Blade Guard Removal
Most chop saws have a retractable blade guard that swings out of the way as you cut. To access the blade for changing, you’ll need to position this guard correctly.
- Lower the Saw Head: Gently lower the saw head so that the blade guard is accessible and the blade is fully exposed.
- Position the Guard: Some guards can be manually pushed or pulled to stay in the retracted position. Others might have a clip or lever to lock them in place. Refer to your saw’s manual if you’re unsure how to secure your specific blade guard. Never force the blade guard.
Securing the Arbor Bolt
To loosen the bolt holding the blade, you need to stop the arbor (the shaft the blade spins on) from turning.
- Blade Clamp Bolt: Locate the bolt or nut that secures the blade to the arbor. This is usually in the center of the blade.
- Wrench Placement: Place the appropriate wrench or socket onto the bolt head.
- Preventing Rotation: Many chop saws have a spindle lock button or lever. Press and hold this button to lock the arbor. If your saw doesn’t have this feature, you might need to use a block of wood or a specialized tool to wedge against the blade or teeth to prevent it from turning while you apply pressure to the bolt.
Step 2: Removing the Old Blade
With the blade guard secured and the arbor locked, you can now remove the old blade.
Loosening the Arbor Bolt
- Direction of Turn: Remember the common mnemonic: “Lefty-loosey, righty-tighty.” For most bolts, you’ll turn the wrench counter-clockwise to loosen.
- Apply Steady Pressure: Apply steady pressure to the wrench. If the bolt is very tight, you might need a bit of force, but avoid jerky movements.
- Complete Removal: Once loosened, unscrew the bolt completely. Keep track of the bolt and any washers or flanges that come off with it. These are crucial for reinstallation.
Taking Off the Blade
- Careful Handling: Once the bolt is removed, the blade will be free. Carefully slide the old blade off the arbor.
- Blade Washers/Flanges: Pay attention to any washers or flanges that were between the bolt and the blade, or between the blade and the saw’s arbor flange. These are usually specific to your saw and need to be put back in the correct order. Often, there’s an inner flange attached to the arbor and an outer flange that the bolt goes through.
Step 3: Installing the New Blade
This is where you perform the saw blade installation. It’s essentially the reverse of removal, but with a crucial detail: blade direction.
Checking Blade Direction
This is a critical step for both performance and safety. A chop saw blade has a specific direction it should spin.
- Arrow Indicator: Most blades have an arrow embossed on the side that indicates the direction of rotation. This arrow should point in the same direction as the saw’s motor spins the blade when it’s running.
- Tooth Bevel: Look at the teeth. The angled side of the teeth should face the direction of rotation. If the blade is installed backward, it will cut poorly and could put undue stress on the saw.
Mounting the New Blade
- Position on Arbor: Carefully slide the new blade onto the arbor. Ensure it sits flush against the inner flange.
- Replace Washers/Flanges: Reinstall any washers or flanges that you removed. Make sure they are in the correct order and orientation.
Securing the Arbor Bolt
- Tighten the Bolt: Place the arbor bolt back into its position.
- Hand Tighten First: Start by hand-tightening the bolt to ensure it’s threaded correctly and not cross-threading.
- Use Wrench: Once hand-tight, use your wrench or socket to tighten the bolt.
- Blade Clamp: You’ll need to secure the blade again. Use the spindle lock feature on your saw if it has one, or wedge the blade as you did during removal.
- Proper Tightness: Tighten the bolt firmly, but do not overtighten. Overtightening can strip the threads or damage the blade or arbor. A snug fit is sufficient. If you have a torque wrench and know the specification for your saw, that’s ideal, but for most DIYers, snug is usually the goal.
Step 4: Final Checks and Testing
Before you start cutting, a few final checks are essential to confirm your chop saw blade replacement was done correctly and safely.
- Blade Spin: Gently spin the blade by hand to ensure it rotates freely without any binding or wobbling. Also, check that the blade is centered on the arbor.
- Blade Guard Function: Make sure the blade guard moves freely and returns to its protective position as you release the saw head. Test this by manually raising and lowering the saw head.
- Secure Components: Double-check that all nuts, bolts, and guards are secure.
- Clear Debris: Wipe away any sawdust or debris from the saw’s motor housing, base, and the new blade.
- Plug In and Test: Now, plug the saw back into the power source.
- Initial Run: With the saw off the material, run the chop saw for a few seconds. Listen for any unusual noises or vibrations. This is a good way to catch any issues before you start cutting.
Frequently Asked Questions About Chop Saw Blade Changes
Here are some common questions people have when it comes to changing their chop saw blades.
What is the most important safety precaution when changing a chop saw blade?
The most important safety precaution is always unplugging the saw from the power source before starting any work. This prevents accidental activation of the motor, which could lead to severe injury.
Can I use a regular wood blade on my metal chop saw?
No, you should not use a regular wood blade on a metal chop saw or vice versa. Metal cutting blades are designed with different tooth geometry, tooth count, and often a harder carbide material to handle the tougher material and heat generated during metal cutting. Using the wrong blade can lead to poor cuts, rapid blade wear, damage to the saw, and significant safety hazards like blade shattering. Similarly, wood blades aren’t designed for the stresses of metal.
How often should I change my chop saw blade?
The frequency of chop saw blade replacement depends on several factors:
- Material Being Cut: Cutting hard materials like metal or dense hardwoods will dull blades faster than cutting softwoods.
- Amount of Use: Frequent use naturally wears out blades quicker.
- Cut Quality: If your cuts are becoming rough, splintered, or you’re experiencing burning, it’s a sign the blade is dull and needs changing.
- Blade Condition: Inspect your blade for chipped teeth, cracks, or excessive wear.
As a general rule, if you notice a significant decrease in cut quality or increased effort required to make a cut, it’s time for a new blade.
What does “arbor” mean in the context of a chop saw?
The arbor is the metal shaft that the saw blade is mounted onto. It’s connected directly to the motor and spins the blade at high speed when the saw is operational.
What is the purpose of the blade guard?
The blade guard is a crucial safety feature designed to protect the operator from the spinning blade and flying debris. It covers the blade when it’s not in use and retracts automatically as the saw head is lowered to make a cut.
My chop saw blade is stuck. What should I do?
If a blade is stuck or the arbor bolt is difficult to loosen, do not force it.
- Penetrating Oil: Try applying a small amount of penetrating oil around the arbor bolt and let it sit for a few minutes.
- Proper Tool: Ensure you are using the correct size wrench or socket and that it is firmly seated on the bolt head.
- Two-Person Job: If you’re still struggling, it might be best to have a second person help stabilize the saw or the blade while you apply controlled force.
- Professional Help: If you’ve tried these steps and the blade or bolt remains stuck, it might be best to consult a professional or the saw manufacturer for assistance to avoid damaging the saw.
How do I know if I have the right size blade?
Chop saw blades are typically measured by their diameter (e.g., 10-inch, 12-inch) and the arbor size, which is the diameter of the hole in the center of the blade that fits onto the saw’s arbor shaft (e.g., 5/8 inch, 1 inch). Always check your saw’s manual or the specifications of your old blade to ensure you purchase a compatible replacement blade. Using a blade with the wrong diameter can affect performance and safety, and an incorrect arbor size means it won’t fit.
Maintaining Your Chop Saw for Longevity
Regular chop saw maintenance goes beyond just blade changes. Keeping your tool in good condition ensures it performs well and lasts longer.
Keeping the Blade Area Clean
After every use, and especially after a blade change, take a moment to clean.
- Brush Away Dust: Use a stiff brush to remove sawdust and debris from the blade, arbor, and the surrounding area.
- Wipe Down: A slightly damp cloth can be used to wipe down the blade (ensure it’s dry afterward) and the saw’s components. Avoid getting water into electrical parts.
Lubrication and Inspection
- Moving Parts: Occasionally, check the pivot points and the mechanism that raises and lowers the saw head. A light application of lubricant might be necessary, but check your manual first, as some mechanisms are self-lubricating or designed to work dry.
- Power Cord: Inspect the power cord for any signs of damage, fraying, or cuts. Replace it immediately if you find any issues.
- Blade Guard Spring: Ensure the blade guard spring is functioning correctly and that the guard retracts and covers the blade smoothly.
Storing Your Chop Saw
Proper storage also contributes to its longevity.
- Dry Environment: Store your chop saw in a dry, protected environment to prevent rust and corrosion.
- Covering: A dust cover can protect it from dust and accidental damage.
- Secure Storage: If storing it on a shelf or workbench, ensure it’s stable and won’t fall.
By following these maintenance tips, you can keep your chop saw in excellent working order, ensuring safe and efficient operation for years to come. Changing a cutting disc or any power saw blade swap is a manageable task when approached with the right knowledge and safety precautions. Remember, a sharp blade and a well-maintained saw are your best allies for clean cuts and a safe workshop.