
Image Source: sawsonskates.com
How To Change A Miter Saw Blade Safely & Quickly
Can you change a miter saw blade yourself? Yes, you absolutely can change a miter saw blade yourself with a little guidance and the right tools. This guide will walk you through the entire process of miter saw blade replacement, from gathering your supplies to fitting a new miter saw blade, ensuring you can perform a miter saw blade swap quickly and, most importantly, safely. Changing a miter saw blade is a fundamental skill for any woodworker or DIY enthusiast.
Why Miter Saw Blade Maintenance Matters
Over time, even the best miter saw blades will dull. A dull blade not only makes cutting harder and slower but also increases the risk of kickback and produces rougher cuts. Regular miter saw blade maintenance, which includes knowing when to replace a blade, is crucial for both the quality of your work and your safety.
Signs Your Miter Saw Blade Needs Replacement:
- Rough Cuts: If your cuts are splintered, jagged, or have excessive tear-out, your blade is likely dull.
- Burning Wood: A dull blade generates more friction, leading to scorch marks on your workpiece.
- Increased Effort: If you find yourself pushing harder than usual to get through the wood, the blade is dull.
- Blade Wobble: A wobbling blade can be a sign of damage or a poorly seated blade, but a dull blade can sometimes exacerbate this.
- Excessive Noise: A dull blade can cause the saw to vibrate and produce more noise.
Essential Tools and Safety Gear for Blade Changes
Before you begin any miter saw blade installation, safety should be your top priority. Here’s what you’ll need:
Safety Gear:
- Safety Glasses or Face Shield: Protect your eyes from flying debris. This is non-negotiable.
- Gloves: Heavy-duty work gloves protect your hands from sharp blades and potential cuts.
- Hearing Protection: Miter saws can be loud, especially during operation.
Tools for Miter Saw Blade Replacement:
- Your New Miter Saw Blade: Ensure it’s the correct size and tooth count for your saw and intended cuts.
- Wrench or Socket Set: Most miter saws come with a specific wrench or a hex key to loosen and tighten the arbor nut. Check your saw’s manual if you’re unsure.
- Rag or Cloth: For wiping down the arbor and blade.
- Owner’s Manual: Your miter saw’s manual is the ultimate guide for specific instructions related to your model.
- Workbench or Stable Surface: To work on.
Step-by-Step Guide to Changing Your Miter Saw Blade
Follow these detailed miter saw blade change steps for a smooth and secure replacement.
Step 1: Power Off and Unplug Your Miter Saw
This is the most critical safety step.
- Turn Off: Flip the power switch to the “Off” position.
- Unplug: Physically disconnect the power cord from the electrical outlet. Never assume the saw is safe to work on just because it’s turned off.
Step 2: Position the Saw for Access
You need good access to the blade.
- Table Position: Some saws allow the head to be tilted. If yours does, tilt the saw head to a position that gives you easy access to the blade assembly. Usually, a side tilt (bevel) works best, or a full 45-degree tilt to one side.
- Clearance: Ensure you have enough space around the saw to comfortably work.
Step 3: Remove the Blade Guard
Most miter saws have a retractable blade guard that covers the blade. This guard usually needs to be lifted or held out of the way to access the blade.
- Retract: Gently push the blade guard up and away from the blade. Some guards have a mechanism to hold them in place.
- Assistance: If the guard is stiff, you might need a helper to hold it while you work on the blade. Some older models might have screws holding the guard in place, but most modern saws have tool-less designs for this.
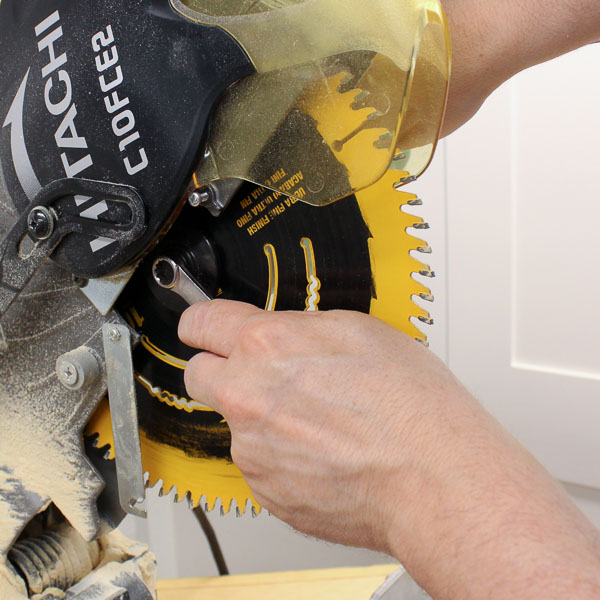
Step 4: Locate and Loosen the Arbor Nut
The arbor nut holds the blade onto the saw’s motor shaft (arbor).
- Identify: The arbor is the metal shaft the blade spins on. The nut is usually a large hex nut in the center of the blade.
- Prevent Rotation: To loosen the nut, you need to stop the arbor from spinning. Most miter saws have a spindle lock button or a mechanism to engage a lock.
- Spindle Lock: Press and hold the spindle lock button (often a small button on the motor housing near the arbor). While holding this, use your wrench to turn the arbor nut counter-clockwise.
- Manual Lock: Some saws require you to insert a hex key into a hole on the motor housing to lock the arbor. Refer to your manual.
- Helper Method (Use with Caution): In some cases, if a spindle lock isn’t easily accessible, a helper can gently hold the blade with a gloved hand (or a piece of wood against the blade teeth, being careful not to push it inward) to prevent it from turning while you loosen the nut. This method is less ideal and requires extra caution.
- Loosen: Once the arbor is locked, place the correct size wrench or socket onto the arbor nut and turn it counter-clockwise. It might be tight, so apply firm, steady pressure.
Step 5: Remove the Old Miter Saw Blade
Once the arbor nut is off, the blade should slide off the arbor.
- Arbor Nut Removal: Completely unscrew the arbor nut by hand and set it aside in a safe place, perhaps with the old blade.
- Blade Removal: Carefully grip the old blade and slide it off the arbor. Be mindful of the teeth. Blades can sometimes be surprisingly heavy.
- Inspect Washers: Pay attention to any washers that might be between the arbor nut and the blade, or between the blade and the motor housing. Note their position. Most saws have an inner and outer flange or washer.
Step 6: Clean the Arbor and Flanges
This is a good time for some basic miter saw blade maintenance.
- Wipe Clean: Use a clean rag to wipe down the arbor shaft and the inner and outer flanges (the metal discs that sandwich the blade). Remove any sawdust, resin, or debris. A clean surface ensures the new blade sits flush and true.
Step 7: Install the New Miter Saw Blade
Proper miter saw blade installation is crucial for safe and accurate cuts.
- Blade Orientation: This is very important! Miter saw blades have teeth that are angled. Look for an arrow on the blade that indicates the direction of rotation. This arrow must point in the same direction as the saw’s motor spins. Generally, the teeth should also be angled forward towards the motor when viewed from the front of the saw.
- Common Mistake: Installing the blade backward will result in poor cuts and can be dangerous.
- Fit the Blade: Slide the new blade onto the arbor shaft, ensuring it sits flat against the inner flange. Make sure the blade is centered on the arbor.
- Replace Washers: If your saw had washers or flanges, put them back in their original positions, ensuring they are clean. The blade should sit snugly between these.
Step 8: Reinstall the Arbor Nut
Secure the new blade in place.
- Thread the Nut: Screw the arbor nut back onto the arbor by hand, turning it clockwise. Ensure it threads smoothly without cross-threading.
- Tighten: Once hand-tight, use your wrench to tighten the nut. Again, you’ll likely need to engage the spindle lock to prevent the arbor from spinning. Tighten the nut firmly, but don’t overtighten it to the point of stripping the threads or damaging the blade or arbor. A snug fit is key.
Step 9: Reattach the Blade Guard
If you removed any screws holding the guard, reattach them. Otherwise, ensure the guard retracts and covers the blade properly. Test its movement to make sure it’s not binding.
Step 10: Test the Blade
Before making any cuts, a quick test is wise.
- Check for Wobble: Gently spin the blade by hand (with the power still OFF and unplugged). It should spin freely without any side-to-side wobble.
- Plug In and Test: Plug the saw back into the outlet. Turn the saw on and let it run for a few seconds without any wood. Listen for any unusual noises and ensure the blade spins smoothly and centrally. Turn the saw off and unplug it again before making any actual cuts.
Choosing the Right Miter Saw Blade
The type of miter saw blade you choose significantly impacts your cuts. Consider the material you’ll be cutting and the desired finish.
Tooth Count Explained:
- Low Tooth Count (e.g., 24-40 teeth): These blades are designed for fast, rough cuts, often in dimensional lumber. They remove material quickly but leave a rougher finish.
- Medium Tooth Count (e.g., 50-60 teeth): A good all-around choice for general-purpose cutting in wood. They offer a balance between cutting speed and finish quality.
- High Tooth Count (e.g., 60+ teeth): Ideal for fine, smooth cuts, often used for trim, molding, or hardwoods where tear-out is a major concern. They cut slower but produce a cleaner finish.
Blade Material:
- High-Speed Steel (HSS): Less common for miter saw blades now, as they dull faster.
- Carbide-Tipped: The most common type. Carbide teeth are much harder and hold an edge longer than steel. Look for blades with quality carbide tips.
Blade Diameter and Arbor Size:
- Diameter: Miter saws are designed for specific blade diameters (e.g., 10-inch, 12-inch). Using a blade that’s too large or too small can be dangerous and damage the saw.
- Arbor Size: This is the diameter of the hole in the center of the blade. It must match the arbor shaft on your miter saw (commonly 5/8 inch, but can vary).
Blade Material Compatibility:
- Wood Blades: The most common.
- Wood and Nail Cutting Blades: Feature carbide teeth designed to withstand occasional contact with nails embedded in reclaimed wood.
- Ferrous Metal Blades: Specifically designed for cutting metal. Never use a wood blade on metal, or vice versa.
- Non-Ferrous Metal Blades: For cutting aluminum, brass, and other non-ferrous metals.
Troubleshooting Common Blade Change Issues
Sometimes, things don’t go as smoothly as planned. Here are a few common problems and how to fix them.
Issue: Arbor Nut Won’t Loosen
- Possible Cause: Arbor lock not engaged properly, or nut is severely seized.
- Solution:
- Ensure the spindle lock is fully engaged. Try wiggling the saw head slightly while pressing the lock.
- Apply a penetrating lubricant (like WD-40) around the threads and let it sit for a few minutes before trying again.
- Use a breaker bar or a longer wrench for more leverage, but be careful not to strip the nut or damage the arbor.
- If it’s still stuck, consider professional help.
Issue: New Blade Wobbles After Installation
- Possible Cause: Blade not seated correctly, arbor nut not tight enough, or the blade itself is warped.
- Solution:
- Unplug the saw. Loosen the arbor nut, remove the blade, and re-clean the arbor and flanges.
- Reinstall the blade, ensuring it sits flush against the inner flange and that the arbor nut is tightened securely with the spindle lock engaged.
- If it still wobbles, try a different new blade. The original blade might have been defective.
Issue: Blade Guard Doesn’t Retract Smoothly
- Possible Cause: Debris buildup, bent spring mechanism, or interference from the blade itself.
- Solution:
- With the saw unplugged, carefully inspect the guard and its mechanism for sawdust or obstructions. Clean thoroughly.
- Check if any part of the guard or its spring mechanism appears bent or damaged.
- Ensure the new blade is the correct size and isn’t interfering with the guard’s movement.
Frequently Asked Questions (FAQ)
Q1: How often should I replace my miter saw blade?
A1: This depends heavily on usage and the material you cut. A good rule of thumb is to replace it when you notice a significant degradation in cut quality (splintering, burning, increased effort required). For frequent use on hardwoods or trim, you might replace blades every few months. For occasional use on softwoods, it could be a year or more.
Q2: Can I use a blade with a different number of teeth than my original?
A2: Yes, you can. However, be aware that changing the tooth count will change the cutting performance. A lower tooth count will cut faster but rougher, while a higher tooth count will cut slower but smoother. Ensure the diameter and arbor size are correct.
Q3: What’s the difference between a crosscut blade and a rip blade for a miter saw?
A3: While miter saws are primarily for crosscutting, you can use different blades. Crosscut blades typically have more teeth and a higher hook angle for cleaner cuts across the grain. Rip blades have fewer teeth and are designed for cutting with the grain, removing material quickly. For general miter saw use, a “combo” or “general purpose” blade is usually best.
Q4: Is it safe to use a blade designed for another type of saw?
A4: Only if the diameter and arbor size are compatible. However, blades are optimized for specific tools. Using a blade not designed for a miter saw might yield poor results or even be unsafe due to different speed ratings or tooth configurations. Always check your owner’s manual.
Q5: Do I need to worry about the direction of the blade teeth when installing?
A5: Absolutely. There’s usually an arrow on the blade indicating rotation direction. The teeth should also angle towards the motor when viewed from the front. Installing it backward will result in poor cuts and can be dangerous.
By following these detailed steps for miter saw blade replacement and adhering to safety guidelines, you can confidently perform a miter saw blade change, keeping your tool in top condition for precise and efficient woodworking. Regular miter saw blade maintenance ensures your saw performs at its best and keeps you safe. This guide covers everything from miter saw blade removal to the final miter saw blade installation, empowering you to tackle this common task with ease.