
Image Source: sawsonskates.com
How To Change Blade On A Miter Saw: Step-by-Step
Can you change a miter saw blade yourself? Absolutely! Changing a miter saw blade is a straightforward task that most DIYers and woodworkers can handle with the right guidance. This comprehensive guide will walk you through the entire process of miter saw blade replacement, from gathering your tools to safely installing a new blade. We’ll cover everything you need to know for a successful miter saw blade change.
Why and When to Change Your Miter Saw Blade
Your miter saw blade is the hardworking component that makes all your cuts. Over time, it can become dull, damaged, or simply not suited for the material you’re working with. Knowing when and why to swap out your blade is crucial for precision, safety, and the longevity of your saw.
Signs Your Miter Saw Blade Needs Replacement:
- Rough or Jagged Cuts: If your cuts aren’t clean and smooth, and you’re seeing splintering or tear-out, your blade is likely dull.
- Increased Effort to Cut: A sharp blade glides through wood. If you find yourself pushing harder or the saw struggles, the blade’s sharpness has diminished.
- Unusual Noises: A dull or damaged blade can cause the saw to vibrate excessively or make grinding noises during operation.
- Visible Damage: Chipped teeth, bent blades, or a cracked blade are clear indicators that immediate replacement is necessary.
- Material Incompatibility: You might need a different type of miter saw blade for specific materials like metal or plastics.
Types of Miter Saw Blades
The world of miter saw blades is diverse, with each type designed for specific tasks and materials. Choosing the right blade can significantly impact the quality of your cuts and the efficiency of your work.
Common Miter Saw Blade Types:
- General Purpose Blades: These are your everyday workhorses, suitable for a variety of wood types. They often have a medium tooth count.
- Crosscut Blades: Designed for making cuts across the grain of wood. These typically have a higher tooth count for smoother finishes. A good example of the best miter saw blade for crosscuts often features 60 to 80 teeth.
- Rip Blades: Optimized for cutting with the grain. They usually have fewer teeth and larger gullets (the spaces between teeth) to clear sawdust efficiently.
- Thin Kerf Blades: These blades are thinner than standard blades, requiring less power from your saw and producing less waste material (sawdust).
- Combination Blades: These blades aim to offer a balance between crosscutting and ripping capabilities.
- Specialty Blades: This category includes blades for cutting metal, plastic, laminate, or even abrasive materials. Always ensure the blade is rated for the material you intend to cut.
When embarking on a miter saw blade replacement, consider the primary tasks you perform. For precise cabinetry or trim work, a high-tooth-count crosscut blade is often preferred. For rougher framing lumber, a fewer-tooth blade might suffice.
Safety First: Essential Miter Saw Blade Safety Practices
Before you even think about touching a blade, prioritizing miter saw blade safety is paramount. A miter saw blade is a sharp, fast-moving cutting tool, and carelessness can lead to serious injury.
Key Safety Precautions:
- Unplug the Saw: NEVER attempt to change a blade while the miter saw is plugged into a power outlet. This is the most critical safety step. Always ensure the power cord is disconnected.
- Wear Safety Glasses: Protect your eyes from flying debris, even when the saw is off.
- Wear Gloves: Protect your hands from sharp teeth and potential splinters.
- Ensure the Saw is Stable: Make sure the miter saw is securely placed on a stable surface or workbench.
- Clear Your Workspace: Remove any clutter, sawdust, or loose objects from around the saw and the immediate work area.
- Allow the Blade to Stop Completely: If you’ve just used the saw, wait for the blade to come to a full stop before proceeding.
- Read Your Saw’s Manual: Every miter saw is slightly different. Your owner’s manual will have specific safety instructions and procedures for your model.
Tools You’ll Need for Miter Saw Blade Change
Fortunately, changing a miter saw blade typically doesn’t require an extensive array of specialized tools. Most manufacturers include the necessary items with the saw itself.
Essential Tools:
- Miter Saw Blade Change Tool (Wrench/Allen Key): This is the most important tool. Most miter saws come with a dedicated wrench or an Allen key designed to loosen and tighten the arbor nut. If yours is lost, consult your manual or the manufacturer’s website for the correct size. This is often referred to as the miter saw blade arbor tool.
- New Miter Saw Blade: Ensure you have the correct size and type of blade for your saw and your intended cuts.
- Safety Glasses: As mentioned above, these are non-negotiable.
- Work Gloves: To protect your hands.
- Clean Rags or Compressed Air: For cleaning dust and debris from the arbor and blade housing.
Step-by-Step Guide: How to Change a Miter Saw Blade
Let’s dive into the practical steps for removing a miter saw blade and the subsequent miter saw blade installation.
Step 1: Prepare the Miter Saw and Workspace
- Disconnect Power: Crucially, unplug the miter saw from the power source. Double-check that the cord is out of the way and cannot be accidentally plugged in.
- Position the Saw: Ensure the saw is on a stable surface.
- Lower the Saw Head: Bring the saw blade down to its lowest position so you can easily access the blade. Some saws may have a locking mechanism for this.
- Clear Debris: Use a brush or compressed air to remove any sawdust or wood chips that might be obscuring the blade area.
Step 2: Access the Miter Saw Blade
The method for accessing the blade varies slightly between miter saw models. Generally, you’ll need to remove a blade guard or cover.
- Blade Guard Removal: Most miter saws have a blade guard that swings away or can be removed with a screw.
- Swinging Guards: Many modern saws have guards that are spring-loaded and swing up and out of the way when the saw head is lowered. You might need to hold it in this position.
- Screw-Secured Guards: Some guards are attached with a screw, often located on the side or bottom of the saw head. Use the appropriate screwdriver or Allen key to remove this screw. Keep the screw in a safe place – perhaps in the saw’s tool storage area if it has one.
Step 3: Lock the Miter Saw Arbor
To remove the miter saw blade, you need to prevent the arbor (the shaft the blade mounts onto) from spinning.
- Locate the Arbor Lock Button: Most miter saws have a small button or pin on the motor housing, usually near the arbor shaft.
- Engage the Lock: While the arbor is accessible, push and hold this lock button. This will engage a mechanism that stops the arbor from rotating. You’ll feel it click or engage. Keep holding this button while you proceed to loosen the arbor nut.
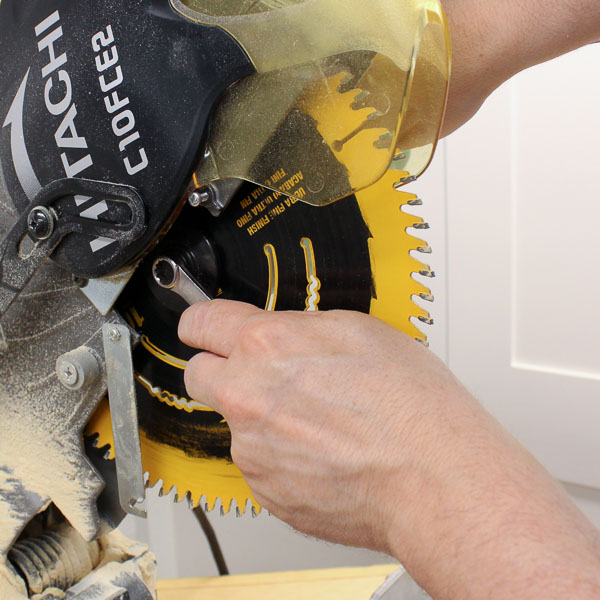
Step 4: Loosen and Remove the Arbor Nut
The blade is held in place by a large nut on the arbor shaft.
- Identify the Arbor Nut: This is the nut directly in front of the blade.
- Use the Miter Saw Blade Change Tool: Place the appropriate end of your miter saw blade change tool (wrench or Allen key) onto the arbor nut.
- Loosen the Nut: Turn the nut counter-clockwise to loosen it. Remember the phrase “lefty-loosey.” While holding the arbor lock button firmly engaged, apply steady pressure to loosen the nut. It might be quite tight, so don’t be afraid to use a bit of force, but avoid jerking movements.
- Remove the Nut: Once the nut is loose enough, you can usually unscrew it by hand.
Step 5: Remove the Old Miter Saw Blade
With the arbor nut removed, the blade is no longer secured.
- Carefully Slide Off the Blade: Grasp the blade by its edges, being mindful of the sharp teeth. Gently slide the old blade off the arbor shaft.
- Inspect the Arbor: Before placing the new blade, take a moment to inspect the arbor shaft. Ensure it’s clean and free from any damage or debris. The arbor is a critical component for proper blade mounting.
Step 6: Install the New Miter Saw Blade
Now it’s time for miter saw blade installation.
- Orient the New Blade: Look for an arrow on the side of the new blade. This arrow indicates the direction of rotation. The arrow should point in the same direction as the blade spins when the saw is on (usually clockwise from the front). If there’s no arrow, the teeth should be angled in the direction of rotation.
- Mount the Blade: Carefully slide the new blade onto the arbor shaft, ensuring it’s seated flush against the inner flange (the metal disc on the shaft). Make sure the blade is oriented correctly as per the rotation arrow.
- Replace the Arbor Nut: Screw the arbor nut back onto the shaft clockwise (“righty-tighty”).
- Tighten the Arbor Nut:
- Engage the Arbor Lock Button: Once again, push and hold the arbor lock button to secure the shaft.
- Tighten the Nut: Use the miter saw blade change tool to tighten the nut firmly. It needs to be snug enough to prevent the blade from slipping, but do not overtighten. Overtightening can damage the arbor or the blade. A good rule of thumb is to tighten it until you feel significant resistance, then give it a slight extra turn.
Step 7: Reassemble the Blade Guard
The final step before using the saw again is to put the blade guard back in place.
- Swing or Re-secure the Guard: If you have a swinging guard, ensure it moves freely and returns to its protective position over the blade. If you removed a guard with a screw, reinsert and tighten the screw.
- Test the Guard: Gently try to swing the guard out of the way again to confirm it operates correctly.
Step 8: Final Safety Check
- Remove the Tool: Ensure the miter saw blade change tool is removed from the vicinity of the saw.
- Clear the Area: Make sure there are no loose tools or rags near the blade.
- Plug In and Test: Now, you can plug the miter saw back into the power outlet. Turn the saw on briefly (without cutting anything) to ensure the blade spins smoothly and without wobble or unusual noises. Turn it off and unplug it again if you notice any issues.
What is the Arbor on a Miter Saw?
The arbor on a miter saw is the central shaft that the blade is mounted onto. It’s driven by the saw’s motor and rotates at high speed to perform the cutting action. The arbor has a threaded end where the arbor nut screws on to secure the blade in place. It’s a vital component that ensures the blade is securely and accurately positioned for cutting.
When Should I Use a Miter Saw Blade Change Tool?
You should use a miter saw blade change tool (the wrench or Allen key provided with your saw) every time you need to remove miter saw blade or install new miter saw blade. This specialized tool is designed to fit the arbor nut precisely, allowing you to loosen and tighten it securely. Using the wrong tool can strip the nut or damage the arbor.
Troubleshooting Common Miter Saw Blade Change Issues
Even with careful steps, you might encounter minor hiccups.
- Arbor Nut Won’t Loosen: Ensure you are holding the arbor lock button firmly. Try a bit more steady pressure on the wrench. If it’s exceptionally tight, a gentle tap with a rubber mallet on the wrench handle might help break it free (while still holding the lock).
- Blade Wobbles After Installation: This is usually due to the blade not being seated correctly on the arbor, a loose arbor nut, or a damaged arbor. Recheck that the blade is flush against the inner flange and that the arbor nut is tightened properly. If the wobble persists, inspect the arbor for damage.
- Arbor Lock Button Stuck: Sometimes sawdust can get lodged around the lock button. Try cleaning around it with compressed air or a small brush. If it’s still stuck, consult your saw’s manual for specific troubleshooting or contact the manufacturer.
Best Practices for Maintaining Your Miter Saw Blades
Proper care extends the life of your blades and ensures optimal performance.
Blade Maintenance Tips:
- Clean After Use: Remove sawdust and pitch from the blade after each significant use. Pitch (sticky sap from wood) can build up and affect cutting performance. Use a dedicated blade cleaner or denatured alcohol and a soft cloth.
- Store Properly: Store blades in a dry place, ideally in their original protective sleeves or in a blade storage case to prevent damage to the teeth.
- Avoid Cutting Nails or Foreign Objects: Hitting metal embedded in wood will quickly dull or damage your blade. Always inspect lumber for fasteners before cutting.
- Know When to Replace: Don’t push a dull blade too far. Replacing a blade when it shows signs of dullness is much safer and produces better results than trying to force a dull blade through material.
Frequently Asked Questions (FAQ)
Q1: How often should I change my miter saw blade?
A1: The frequency depends on usage and the type of materials you cut. For heavy use or cutting abrasive materials, you might need to change it every few months. For occasional DIY use on softwoods, a blade can last much longer. Look for signs of dullness like rough cuts.
Q2: Can I use a blade from a different brand of miter saw?
A2: As long as the blade diameter and arbor size (the hole in the center of the blade) match your miter saw’s specifications, you can often use blades from different brands. Always check your saw’s manual for required blade specifications.
Q3: What is the best miter saw blade for crosscuts?
A3: For crosscuts, a blade with a higher tooth count (typically 60-80 teeth for standard 10-inch or 12-inch saws) will provide the smoothest finish. Blades with a “high ATB” (Alternate Top Bevel) tooth grind are also excellent for clean crosscuts.
Q4: My miter saw didn’t come with a blade wrench. What do I do?
A4: Check the storage compartment on your saw first. If it’s not there, consult your miter saw’s manual to determine the correct size and type of wrench needed for the arbor nut. You can then purchase a replacement from a hardware store or online.
Q5: Is it safe to use a blade with a smaller arbor hole than specified?
A5: No, it is not safe. If your saw requires a 5/8-inch arbor hole and you have a blade with a 1-inch hole, you would need an arbor reducing sleeve. However, it’s always best to use blades with the correct arbor size directly to avoid potential issues with improper mounting and safety. Never force a blade onto an arbor or use makeshift adapters.
By following these detailed steps and safety guidelines, you can confidently perform miter saw blade replacement and keep your saw cutting accurately and efficiently. Happy cutting!