
Image Source: i.ytimg.com
How to Change a Blade on an Angle Grinder: A Step-by-Step Guide
Can you change the blade on an angle grinder yourself? Yes, absolutely! With a few simple tools and a commitment to safety, you can easily perform an angle grinder wheel replacement or changing an angle grinder disc on your own. This guide will walk you through the entire process, from preparing your workspace to safely mounting a new angle grinder accessory removal or angle grinder blade installation. This skill is a fundamental part of angle grinder maintenance and essential for keeping your tool in top working order for any angle grinder tool replacement needs.
Preparing Your Workspace and Gear
Before you even think about touching your angle grinder, setting up a safe and organized workspace is crucial. This is where angle grinder safety tips come into play, and they are non-negotiable.
Essential Safety Gear
- Safety Glasses or Face Shield: This is your first line of defense against flying debris. Never operate an angle grinder without them.
- Work Gloves: Thick, durable gloves protect your hands from cuts, abrasions, and heat.
- Hearing Protection: Angle grinders are loud. Earplugs or earmuffs will save your hearing.
- Dust Mask or Respirator: When grinding or cutting, dust is produced. A mask prevents you from inhaling harmful particles.
- Sturdy Footwear: Closed-toe shoes are a must to protect your feet from dropped tools or materials.
- Long Sleeves and Pants: Wear durable clothing to protect your skin from sparks and debris. Avoid loose clothing that could get caught in the tool.
Workspace Considerations
- Clear the Area: Remove any flammable materials, such as rags, wood shavings, or solvents, from your work area. Sparks from the grinder can easily ignite them.
- Good Lighting: Ensure your workspace is well-lit so you can see what you’re doing clearly.
- Stable Work Surface: If you’re working on a bench, make sure it’s sturdy. If you’re working on the ground, ensure the material you’re cutting or grinding is stable and won’t move.
- Ventilation: If you’re working indoors, ensure good ventilation to clear away dust and fumes.
Tools You’ll Need
Changing an angle grinder blade is straightforward, but you’ll need a couple of specific tools.
- Spanner Wrench (or Pin Wrench): This is the most important tool. It usually comes with your angle grinder and has pins or notches that fit into holes on the flange or spindle lock.
- Vice Grips or Pliers (Optional but Recommended): These can be helpful for extra grip when how to remove grinder wheel if it’s stuck.
- Gloves: As mentioned in safety gear, they are also a tool for protection.
- Rag or Cloth: For cleaning and wiping.
Step-by-Step: How to Change the Angle Grinder Blade
Now that your safety precautions are in place and you have your tools, let’s get down to the practical steps of angle grinder wheel replacement.
Step 1: Disconnect Power
This is the absolute first and most critical step.
- Unplug Corded Grinders: If your grinder is electric, ensure it is unplugged from the power source. Double-check the cord to make sure it’s not still connected.
- Remove Battery from Cordless Grinders: For battery-powered models, remove the battery pack completely. Never attempt to change a blade with the battery inserted. This prevents accidental startups.
Step 2: Secure the Grinder
To make the process easier and safer, you need to prevent the grinder from spinning while you work.
- For Cordless Grinders: Simply holding it firmly is usually enough, especially if you’ve removed the battery.
- For Corded Grinders: Rest the grinder on a flat surface. The weight of the grinder itself often provides enough resistance. You can also place a rag or non-slip mat underneath to prevent it from sliding.
Step 3: Locate and Engage the Spindle Lock
Most angle grinders have a spindle lock button. This is a small button, usually on the side of the gear housing, that locks the spindle in place.
- Press and Hold: Find the spindle lock button. You’ll need to press and hold this button firmly. This prevents the spindle from turning, which is essential for loosening the nut.
Step 4: Loosen the Retaining Nut
The disc is held in place by a retaining nut. This nut is usually threaded onto the spindle.
- Insert the Spanner Wrench: While holding down the spindle lock button, insert the spanner wrench into the holes on the retaining nut.
- Turn Counter-Clockwise: To loosen the nut, turn the spanner wrench counter-clockwise. Lefty-loosey is the rule here. You might need to apply a good amount of force, especially if the nut is tight or hasn’t been removed for a while.
- Stubborn Nuts: If the nut is very tight and won’t budge, you can try tapping the wrench lightly with a rubber mallet. Be careful not to hit the grinder itself too hard. Sometimes, the nut is designed to be tight to prevent it from loosening during operation.
Step 5: Remove the Retaining Nut and Outer Flange
Once the nut is loosened enough, you can remove it completely.
- Unscrew the Nut: Continue turning the nut counter-clockwise by hand until it’s completely off the spindle.
- Remove the Outer Flange: The outer flange is the disc-shaped metal piece that sits on top of the cutting or grinding disc. It will lift off easily once the nut is removed.
Step 6: Remove the Old Disc
With the nut and outer flange removed, the old disc should now be free.
- Lift Off the Disc: Carefully lift the old disc off the spindle. Be mindful that the disc might be hot if you were recently using the grinder.
- Inspect the Inner Flange: There’s usually an inner flange that sits directly on the spindle. Take this off as well. Inspect it for any damage or debris.
Step 7: Clean the Spindle and Flanges
Before installing a new disc, it’s a good idea to clean the components.
- Wipe Down: Use a clean rag to wipe down the spindle, the inner flange, and the outer flange. Remove any dust, debris, or rust. A clean surface ensures the new disc sits properly and securely. This is part of good angle grinder maintenance.
Step 8: Install the New Disc
This is the angle grinder blade installation phase. Make sure you have the correct disc for your intended task.
- Place the Inner Flange: Slide the inner flange back onto the spindle. Ensure it sits flat and flush against the gear housing.
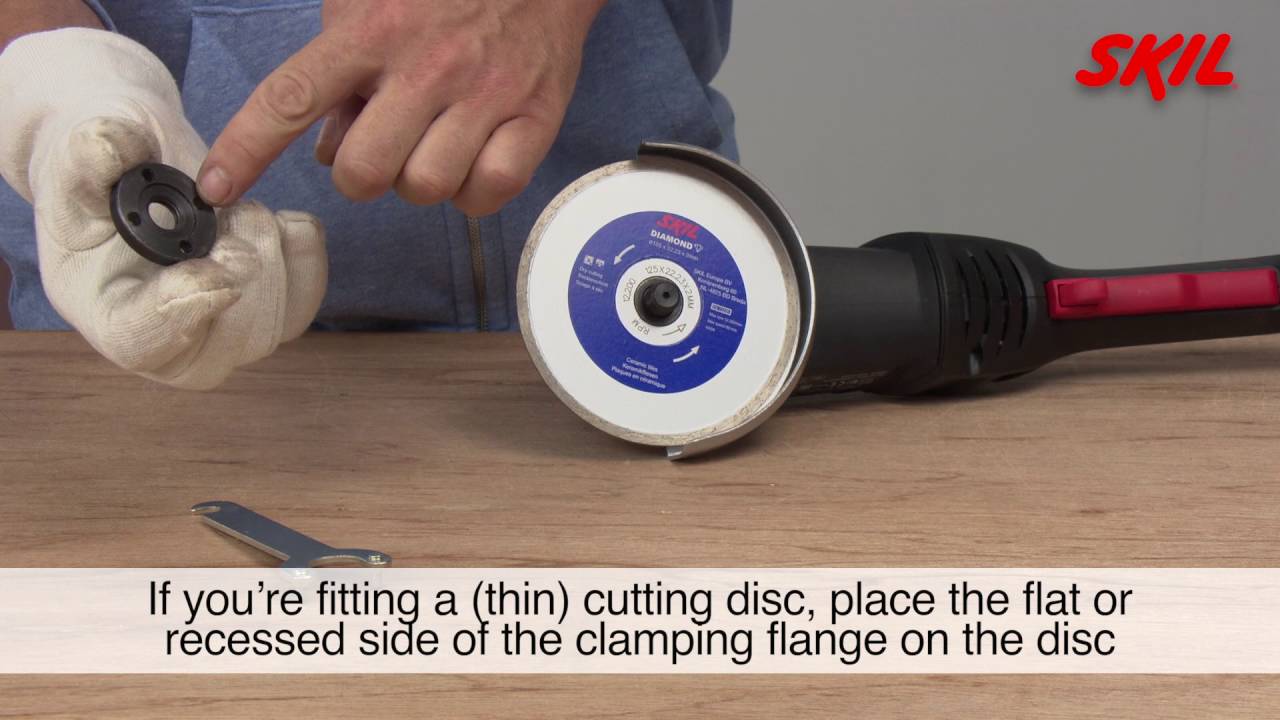
- Position the New Disc: Carefully place the new disc onto the spindle. Make sure the side with the markings or grit is facing outward, away from the grinder body. If you’re using a cutting disc, it will usually have an arrow indicating the direction of rotation. Ensure this arrow aligns with the grinder’s expected rotation. If you are how to mount grinder disc for the first time, pay close attention to the disc’s orientation.
- Replace the Outer Flange: Place the outer flange back onto the spindle, over the new disc. Make sure the flange sits evenly on the disc.
Step 9: Tighten the Retaining Nut
Now, you need to secure the new disc.
- Thread the Nut: Screw the retaining nut back onto the spindle by hand, turning it clockwise (righty-tighty). Tighten it as much as you can by hand.
- Engage Spindle Lock: Press and hold the spindle lock button again.
- Tighten with Spanner Wrench: Use the spanner wrench to tighten the nut firmly. Turn it clockwise. You want it snug, but don’t overtighten to the point where you might strip the threads or damage the disc. The goal is a secure fit that won’t come loose during operation. Over-tightening can also make future angle grinder tool replacement or disc changes more difficult.
Step 10: Final Checks
Before you power up, a quick check ensures everything is right.
- Spin Test: Gently try to spin the disc by hand. It should not wobble or feel loose. It should turn smoothly within the confines of the nut and flanges.
- Check for Clearance: Make sure the disc is properly seated and there are no obstructions.
- Reconnect Power (for Corded): If it’s a corded grinder, plug it back into the power outlet.
- Reinsert Battery (for Cordless): If it’s a cordless grinder, reinsert the battery.
Selecting the Right Disc for the Job
Choosing the correct disc is as important as knowing how to change it. The type of disc you use depends entirely on what you need to do. This is a key aspect of effective angle grinder accessory removal and installation.
Here’s a quick rundown of common disc types:
| Disc Type | Primary Use | Material | Notes ”
* Grinding Disc: Used for smoothing metal, removing rust, or shaping metal.
* Cutting Disc: Thinner discs designed to cut through metal or masonry. They are brittle and should not be used for grinding.
* Wire Wheel Brush: For removing rust, paint, or scale from metal surfaces.
* Flap Disc: Combines sanding and grinding, good for blending and finishing.
* Diamond Disc: Designed for cutting hard materials like concrete, stone, and tile.
Always ensure the disc you select is rated for the speed of your angle grinder. The RPM rating on the disc must be equal to or greater than the RPM of the grinder.
Common Angle Grinder Troubleshooting
Sometimes, things don’t go perfectly smoothly. Here are a few common angle grinder troubleshooting issues you might encounter.
- Disc Won’t Come Off:
- Ensure the spindle lock is fully engaged.
- Try tapping the spanner wrench on the nut with a rubber mallet.
- If the nut is severely seized, a penetrating oil might help, but be sure to clean it off before installing a new disc.
- Disc Wobbles After Installation:
- The disc is not seated properly on the spindle or flanges.
- The retaining nut is not tight enough.
- The flanges are damaged or dirty. Revisit Steps 7, 8, and 9.
- Spanner Wrench Won’t Engage:
- Make sure you are using the correct spanner wrench for your grinder model.
- Check that the spindle lock button is being pressed correctly and is fully engaged.
- The holes on the nut might be damaged or clogged with debris.
Angle Grinder Maintenance Beyond Disc Changes
Keeping your angle grinder in good shape involves more than just changing discs. Regular angle grinder maintenance will extend its life and ensure safety.
- Keep it Clean: After each use, blow out any dust or debris from the vents using compressed air. Wipe down the body of the grinder.
- Inspect the Cord: For corded grinders, regularly check the power cord for any cuts, fraying, or damage. Replace the cord immediately if it’s compromised.
- Check Brushes (if applicable): Some older angle grinder models have carbon brushes that wear out. Consult your owner’s manual to see if your grinder has them and how to check and replace them.
- Store Properly: Store your angle grinder in a clean, dry place, preferably in its original case or a tool bag to protect it from dust and damage.
Frequently Asked Questions (FAQ)
Q1: How often should I change the angle grinder disc?
A: The disc should be changed when it becomes worn down, chipped, or damaged. For cutting discs, change them when they are too thin to safely cut. For grinding discs, change them when they no longer effectively remove material or the abrasive surface is gone. Never use a damaged disc.
Q2: Can I use a disc that is the wrong size?
A: No. Always use discs that are the correct diameter and have the correct arbor hole size for your angle grinder. Using the wrong size disc is extremely dangerous and can lead to catastrophic failure.
Q3: Do I need to wear safety glasses when just changing the disc?
A: Yes, it’s always a good practice to wear safety glasses. Even when not operating the tool, there’s a risk of debris falling from the grinder or dust being released during the disc removal process.
Q4: What if the nut is extremely hard to loosen?
A: If the nut is extremely seized, you might need to apply a bit more leverage, but be cautious. Ensure the spindle lock is fully engaged. Gentle tapping with a rubber mallet on the spanner wrench can sometimes break the seal. Avoid excessive force that could damage the spindle or the grinder housing. If it still won’t budge, consider seeking professional help or a more robust angle grinder troubleshooting method.
Q5: Can I use a disc designed for a different type of grinder?
A: No. Always match the disc’s RPM rating to your angle grinder’s RPM. Using a disc rated for a lower RPM than your grinder can cause the disc to shatter. Similarly, ensure the disc is designed for the material you intend to work with.
Changing a blade on your angle grinder is a fundamental maintenance task that empowers you to use your tool effectively and safely. By following these detailed steps and prioritizing safety, you can confidently perform this angle grinder wheel replacement and keep your projects moving forward. Remember, a well-maintained tool is a safe tool.