
Can you cut pavers with an angle grinder? Yes, you absolutely can cut pavers with an angle grinder, and it’s a common and effective method for achieving precise cuts during paver installation. This guide will walk you through the process, covering everything from choosing the right tools to ensuring your safety.
Cutting pavers might seem daunting, but with the right approach and tools, it’s a manageable task for any DIY paver installer. Whether you’re creating intricate patterns, fitting around obstacles, or simply needing to adjust paver sizes, an angle grinder is your go-to tool. We’ll cover the essentials, including selecting the best diamond blade for pavers, understanding dust suppression for grinding, and employing crucial safety precautions angle grinder use demands.
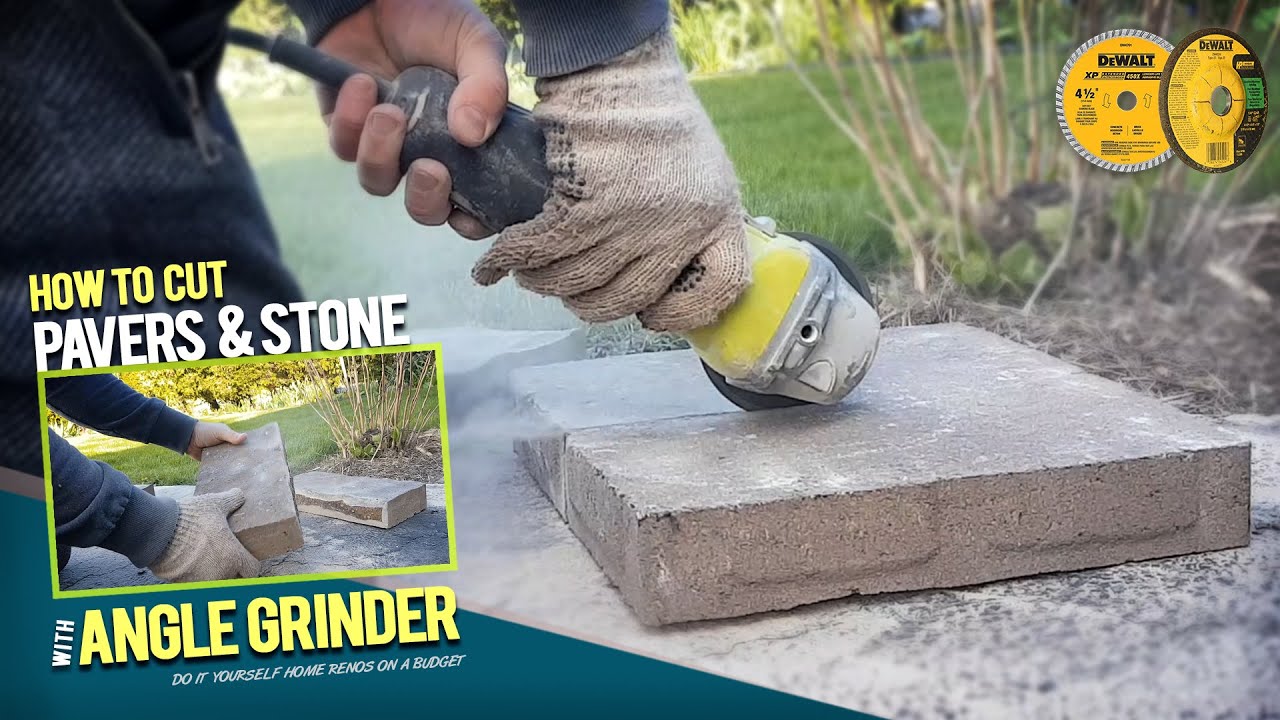
Image Source: i.ytimg.com
Essential Tools and Materials for Cutting Pavers
Before you start cutting, gather all the necessary paver installation tools and materials. Having everything on hand will make the job smoother and safer.
The Angle Grinder
Your primary tool for cutting pavers is an angle grinder. These come in various sizes, but for cutting pavers, a 4.5-inch or 5-inch grinder is generally suitable. Look for one with a good power rating to handle the dense material of pavers.
- Power: A higher wattage generally means more power, which is beneficial for making clean cuts without bogging down.
- Speed: Variable speed is a plus, allowing you to adjust the RPM based on the task, though most paver cutting is done at full speed.
Diamond Blades: The Key to Paver Cutting
The type of blade you use is critical. For cutting pavers, you absolutely need a diamond blade for pavers. These blades are specifically designed to cut through hard materials like concrete, stone, and, of course, pavers.
- Continuous Rim Blades: These blades have a smooth, uninterrupted edge. They are ideal for making very clean, precise cuts, often preferred for decorative work or when a smooth finish is paramount. They tend to produce less chipping.
- Segmented Blades: These blades have a rim with segments separated by gaps. The gaps help with cooling and dust removal. They are generally more aggressive and faster cutting, making them good for rougher cuts or bulk removal.
- Turbo Blades: A hybrid between continuous rim and segmented blades, turbo blades have a wavy or serrated edge. They offer a good balance of speed and finish, often a great choice for general paver cutting.
Choosing the Right Diamond Blade:
When selecting your diamond blade for pavers, consider the following:
- Paver Material: Some pavers are denser than others. A good quality, thick diamond blade will last longer and cut better.
- Wet vs. Dry Cutting: Some blades are designed for wet cutting pavers, while others are for dry cutting pavers. We’ll discuss this distinction further.
- Brand Reputation: Invest in a reputable brand. Cheaper blades can wear out quickly, chip easily, or even shatter, posing a safety risk.
The Paver Cutting Guide (Optional but Recommended)
For consistent, straight cuts, a paver cutting guide or a rip fence attachment for your grinder is highly recommended. This accessory attaches to your grinder and rides along the edge of the paver, ensuring you maintain a straight line. It significantly improves accuracy and reduces the chance of stray cuts.
Safety Gear: Non-Negotiable
Safety is paramount when using power tools, especially an angle grinder. Never compromise on safety gear.
- Safety Glasses/Goggles: Essential for protecting your eyes from flying debris.
- Hearing Protection: Angle grinders are loud. Earplugs or earmuffs are crucial.
- Dust Mask or Respirator: Cutting concrete or pavers generates silica dust, which is harmful to inhale. A P100 respirator is recommended for dry cutting pavers.
- Work Gloves: Protect your hands from abrasion and vibration.
- Sturdy Footwear: Steel-toed boots are ideal.
- Long Sleeves and Pants: Wear durable clothing to protect your skin from sparks and debris.
Other Helpful Tools
- Marker: A permanent marker or chalk to clearly mark your cutting lines.
- Measuring Tape: For accurate measurements.
- Hammer and Chisel: For minor adjustments or breaking off small pieces after a cut.
- Bucket of Water (for wet cutting): To cool the blade and suppress dust.
- Vacuum Cleaner (with HEPA filter): For cleaning up dust after dry cutting.
Preparing Your Pavers for Cutting
Proper preparation is key to achieving clean cuts and ensuring safety.
Marking Pavers for Cuts
Precision starts with clear markings. Use a marking pavers for cuts method that is easily visible.
- Measure and Mark: Use your measuring tape to mark the exact line where you want to cut.
- Use a Straight Edge: For straight lines, use a ruler, a straight piece of wood, or a metal edge as a guide.
- Permanent Marker or Chalk: A thick permanent marker or a piece of chalk works well. For darker pavers, a contrasting color is best. Some people prefer using a grease pencil.
Scoring Pavers for Clean Cuts
For an even cleaner cut, especially with finer finishes, consider scoring pavers for clean cuts. This involves making a shallow preliminary cut along your marked line before making the full cut.
- Initial Shallow Pass: Set your angle grinder to a shallow depth (just a few millimeters).
- Follow the Mark: Carefully guide the grinder along your marked line, creating a shallow groove.
- Second Pass (Deeper): Once the scoring is complete, you can make your main cut, following this scored line. The scored line acts as a channel for the blade, preventing it from wandering and reducing the risk of chipping on the surface. This technique is particularly useful for wet cutting pavers as it helps guide the water.
Cutting Techniques: Wet vs. Dry
You have two primary methods for cutting pavers with an angle grinder: wet cutting and dry cutting. Each has its pros and cons.
Wet Cutting Pavers
Wet cutting pavers involves using water to cool the diamond blade and suppress dust. This is often the preferred method for a few key reasons:
- Dust Control: Water significantly reduces the airborne silica dust, making it much safer to work with.
- Blade Cooling: The water lubricates and cools the diamond blade, preventing it from overheating. This extends the life of the blade and can result in cleaner cuts by reducing heat-related chipping.
- Cleaner Cuts: The water can help wash away debris, potentially leading to a smoother finish.
How to Wet Cut:
- Water Source: You can use a garden hose with a spray nozzle. Some grinders have attachments for a continuous water feed, or you can manually spray water.
- Application:
- Manual Spray: Have a helper spray water onto the cutting line as you cut. Alternatively, you can pause periodically to spray water yourself.
- Continuous Feed: If you have a grinder with a water feed attachment, connect it to a hose.
- Cutting Process:
- Hold the grinder firmly with both hands.
- Gently lower the spinning blade onto the marked line.
- Let the grinder do the work; don’t force it.
- Keep a steady, consistent speed.
- Periodically reapply water, especially if cutting through thicker pavers.
Considerations for Wet Cutting:
- Water Management: You’ll have a slurry of water and debris. Ensure you have a plan for managing this runoff, especially if working in an area where it could cause issues.
- Electrical Safety: Be extremely cautious when using water and electricity together. Ensure your grinder is in good condition, and use GFCI (Ground Fault Circuit Interrupter) outlets for power.
Dry Cutting Pavers
Dry cutting pavers is done without water. It’s simpler in terms of setup but presents significant safety and operational challenges.
- Pros: No water management needed, simpler setup.
- Cons:
- Excessive Dust: Generates large amounts of harmful silica dust. This necessitates high-quality respiratory protection (e.g., P100 respirator) and good ventilation.
- Blade Overheating: The blade can overheat quickly, leading to premature wear, chipping, and potential shattering. You’ll need to pause more frequently to let the blade cool.
- Reduced Cut Quality: More prone to chipping and a rougher finish due to heat and dust.
How to Dry Cut:
- Safety First: Absolutely ensure you are wearing a high-quality respirator, safety glasses, hearing protection, and sturdy clothing.
- Dust Suppression (Limited): While not as effective as water, some grinders have dust shrouds that can connect to a shop vacuum to capture some of the dust. This is a good addition if you must dry cut.
- Cutting Process:
- Hold the grinder firmly with both hands.
- Lower the blade onto the marked line.
- Use a steady, moderate pressure. Avoid forcing the grinder.
- Take frequent breaks (every 30 seconds to a minute of cutting) to allow the blade and motor to cool.
- Let the dust settle before proceeding after a break.
When to Consider Dry Cutting:
Dry cutting is generally discouraged for extended periods or for many cuts. It might be considered for a single, very small cut where water access is impossible, but even then, extreme caution is advised. If you have a significant amount of cutting to do, investing in a concrete saw for pavers with a water feed system might be a better and safer long-term solution.
The Angle Grinder Cutting Process: Step-by-Step
Let’s break down the actual cutting process, incorporating all the best practices.
Step 1: Secure the Paver
A loose paver will shift during cutting, leading to inaccurate cuts and increased risk.
- On the Ground: If the paver is already laid, try to brace it with a piece of wood or a wedge on either side to prevent movement.
- Loose Pavers: If you’re cutting pavers before installation, place them on a stable, flat surface. A workbench, a sturdy sawhorse, or even a flat piece of plywood on the ground can work. You can use clamps to hold the paver securely if needed.
Step 2: Position for the Cut
- Ergonomics: Position yourself so you have a stable stance and good control of the grinder.
- Blade Clearance: Ensure the paver is positioned so that the entire depth of the cut can be made without the blade hitting the surface you’re cutting on.
Step 3: Make the Cut
- Start the Grinder: Turn on the angle grinder and let it reach full speed before it touches the paver.
- Controlled Entry: Gently lower the spinning diamond blade for pavers onto the marked line.
- Steady Guidance: Use your paver cutting guide if you have one, or carefully guide the grinder along the marked line with slow, steady pressure. Let the blade do the work; forcing it can cause the blade to bind, overheat, or chip the paver.
- Full Depth: Continue cutting through the entire thickness of the paver. If the paver is very thick, you might need to make two passes.
- Cooling and Dust Control: Apply water consistently if wet cutting, or take cooling breaks if dry cutting.
- Finishing the Cut: As you reach the end of the cut, maintain control to prevent the paver from breaking unevenly.
Step 4: Handling Cut Pavers
Once the cut is complete, carefully remove the grinder.
- Let the Blade Stop: Allow the blade to come to a complete stop before lifting the grinder.
- Inspect the Cut: Examine the cut for any chips or rough edges. Minor imperfections can often be smoothed with a rubbing stone or by lightly grinding.
- Clean Up: Immediately clean up any debris and dust. For dry cutting, use a vacuum with a HEPA filter. For wet cutting, manage the slurry.
Advanced Tips for Perfect Paver Cuts
Here are some extra tips to elevate your paver cutting skills:
Using a Concrete Saw for Pavers
While an angle grinder is versatile, a concrete saw for pavers (often a small walk-behind saw or a cut-off saw with a larger blade) can be more efficient for larger projects or for making many cuts. These saws are designed for this purpose and often come with integrated water supply systems, offering superior dust control and speed.
Advanced Scoring Techniques
For complex patterns or to minimize chipping on delicate finishes, you can score in multiple shallow passes. Gradually increase the depth with each pass. This is a slower process but yields exceptional results.
Managing Chipping
- Blade Choice: As mentioned, continuous rim blades or high-quality turbo blades are better for reducing chipping.
- Cutting Speed: Don’t rush the cut. A slower, controlled pace allows the diamond to do its work without brute force.
- Blade Angle: Ensure the blade is perpendicular to the paver surface.
- Scoring: As discussed, scoring helps.
- Support: Ensure the paver is fully supported, especially at the start and end of a cut.
Keeping Your Angle Grinder in Good Condition
- Blade Tightness: Regularly check that your diamond blade is securely tightened to the grinder flange.
- Guard Position: Always keep the safety guard in place and correctly positioned.
- Cooling: Allow the grinder to cool down during extended use, especially when dry cutting.
- Cleanliness: Keep the grinder and its air vents clean from dust.
Safety Precautions Angle Grinder Use: A Deeper Dive
Let’s reiterate and expand on the critical safety precautions angle grinder use requires. This is not just about comfort; it’s about preventing serious injury.
Personal Protective Equipment (PPE)
- Eye Protection: Safety glasses are the minimum. Goggles offer a better seal against dust and debris. Ensure they are impact-resistant.
- Hearing Protection: Angle grinders are loud. Prolonged exposure to noise without protection can cause permanent hearing damage. Use earplugs or earmuffs.
- Respiratory Protection: Dust suppression for grinding is key, but even with water, some fine particles can become airborne. For dry cutting, a P100 respirator is non-negotiable. Ensure it fits snugly.
- Hand Protection: Heavy-duty work gloves protect against cuts, abrasions, and vibration.
- Body Protection: Wear thick, long-sleeved shirts and long pants made of durable material like denim. Avoid loose clothing that could get caught in the grinder.
- Footwear: Closed-toe, sturdy shoes, preferably with steel toes, are essential.
Safe Operating Procedures
- Two-Handed Grip: Always hold the grinder with both hands. Familiarize yourself with the auxiliary handle provided with your grinder.
- Stable Stance: Maintain a balanced and stable footing. Don’t overreach.
- Blade Guard: Never operate the grinder without the safety guard in place. Ensure it’s positioned to deflect debris away from you.
- No Force: Let the tool do the work. Forcing the grinder can lead to kickback, blade binding, or tool damage.
- Check Before Starting: Before switching on, ensure the blade is clear of any objects and that the grinder is not resting on the workpiece.
- Avoid Kickback: Kickback happens when the blade catches on the material and is violently thrown back towards the operator. This is more likely if the blade is forced, the material is not properly supported, or the blade is not cutting cleanly. Maintain a firm grip and a stable stance to counteract this.
- Hot Surfaces: Blades and the grinder motor can become very hot. Allow them to cool before touching or storing.
- Work Area: Keep the work area clean and free of clutter, especially flammable materials. Ensure good lighting.
- Electrical Safety: If using a corded grinder, ensure the cord is in good condition and does not create a tripping hazard. Use GFCI protection, especially when working with water.
Dust Suppression for Grinding: The Importance of Water
Dust suppression for grinding is a critical safety measure when working with concrete and pavers. Silica dust, created when these materials are cut or ground, is a known carcinogen and can cause serious respiratory diseases like silicosis.
- Wet Cutting: As detailed earlier, this is the most effective method. The water binds with the dust particles, preventing them from becoming airborne.
- Dust Shrouds and Vacuums: If wet cutting isn’t feasible, a dust shroud attached to the grinder and connected to a vacuum cleaner with a HEPA filter can capture a significant portion of the dust. However, this is less effective than wet cutting.
- Ventilation: Ensure good airflow in your workspace, especially if dry cutting. Work outdoors if possible.
Common Paver Cutting Scenarios
- Straight Cuts: Standard cuts to shorten or width-adjust pavers.
- Angle Cuts: Cutting pavers at an angle (e.g., for a soldier course or decorative pattern). This requires careful marking and steady guidance.
- Curved Cuts: While angle grinders are not ideal for smooth, complex curves, you can make a series of short, straight cuts to approximate a curve. This is challenging and requires significant practice.
- Cutting Around Obstacles: Measuring precisely and making cuts to fit pavers around drains, posts, or other landscape features.
Troubleshooting Common Issues
| Problem | Cause | Solution |
|---|---|---|
| Chipping Pavers | Forcing the grinder, dull blade, dry cutting, poor support, wrong blade | Use less force, get a new/better blade, use wet cutting, secure paver, score first |
| Blade Binding | Paver shifting, wrong cutting angle, cut closing up | Secure paver better, ensure blade is perpendicular, make a wider cut or relief cut |
| Overheating | Prolonged use without cooling, dry cutting | Take more frequent breaks, use water for wet cutting |
| Dust | Dry cutting | Use wet cutting method or dust shroud with vacuum |
| Inaccurate Cuts | Poor marking, not using a guide, paver movement | Mark precisely, use a paver cutting guide, secure the paver |
Frequently Asked Questions (FAQ)
Q1: What is the best blade for cutting pavers with an angle grinder?
A1: A diamond blade specifically designed for cutting stone, concrete, or pavers is essential. For the cleanest cuts, a continuous rim blade is often preferred, while turbo blades offer a good balance of speed and finish.
Q2: Can I use a standard metal cutting blade for pavers?
A2: Absolutely not. Standard metal cutting blades are not designed for hard materials like pavers and will be destroyed quickly, creating a significant safety hazard.
Q3: How deep can an angle grinder cut pavers?
A3: The depth of cut depends on the diameter of your angle grinder’s blade. A 4.5-inch grinder typically cuts around 1 to 1.5 inches deep, while a 5-inch grinder can go a bit deeper. For thicker pavers, you might need multiple passes or a different tool like a dedicated concrete saw.
Q4: Is wet cutting or dry cutting better for pavers?
A4: Wet cutting is generally better. It significantly reduces harmful silica dust and helps cool the blade, extending its life and often resulting in cleaner cuts with less chipping.
Q5: How do I make sure my cuts are straight?
A5: Precise marking, using a straight edge or guide, and employing a paver cutting guide attachment for your grinder are the best ways to ensure straight cuts. Steady hands and letting the grinder do the work are also crucial.
Q6: What are the most important safety precautions when using an angle grinder?
A6: The most important safety precautions include wearing full personal protective equipment (PPE) – safety glasses, hearing protection, respirator, gloves, and sturdy clothing/footwear – always using the blade guard, maintaining a firm two-handed grip, and securing your workpiece.
Q7: How do I minimize chipping when cutting pavers?
A7: To minimize chipping, use a high-quality diamond blade (like a continuous rim or turbo blade), score the paver first, use wet cutting, ensure the paver is well-supported, and let the grinder operate at its own pace without forcing it.
Cutting pavers with an angle grinder is a valuable skill for any DIY landscaper or builder. By following these comprehensive guidelines, prioritizing safety, and using the right tools, you can achieve professional-looking results for your paver projects. Remember, practice makes perfect, so start with a few scrap pavers if you’re new to the process.