
Do you want to make precise cuts with your chop saw? A chop saw table can make your work easier and more accurate.
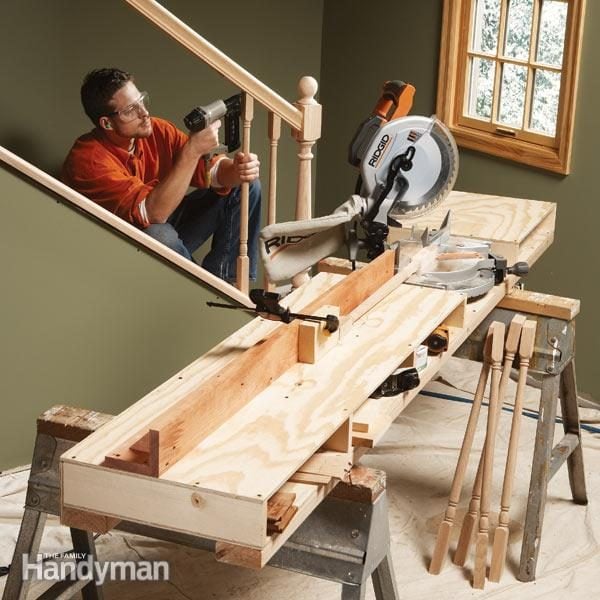
Image Source: www.familyhandyman.com
Why Build a Chop Saw Table?
A chop saw table, often referred to as a miter saw stand or a cutting table, transforms your portable chop saw into a more stable and versatile workshop tool. It elevates your saw to a comfortable working height, provides stable surfaces for cutting long materials, and can incorporate features like lumber support and dust collection. For those without a dedicated table saw, a well-built chop saw table can serve as an excellent table saw alternative for many common woodworking tasks. This DIY guide will walk you through the process of building your own robust DIY saw station.
Benefits of a Dedicated Chop Saw Table:
- Improved Accuracy: A stable base and extended support reduce wobbling, leading to cleaner, straighter cuts.
- Ergonomics: Working at a comfortable height reduces back strain and fatigue.
- Material Support: Long boards and pipes can be supported evenly, preventing binding and dangerous kickbacks.
- Portability: Many designs allow for easy folding or disassembly, making them ideal for those with limited space or who need a portable saw stand.
- Dust Management: Integrating a dust collection system can significantly improve your working environment.
- Versatility: Some tables can be adapted to hold other tools, increasing their utility.
Planning Your Chop Saw Table
Before you grab your tools and lumber, it’s crucial to plan. Consider what you need your table to do.
Key Considerations:
- Chop Saw Size and Type: Will it hold a standard chop saw or a larger sliding compound miter saw? Measure its footprint and height.
- Working Height: Aim for a height that is comfortable for you. A good starting point is usually around waist height.
- Material Support Length: How long are the pieces of wood or metal you typically cut? Your table should offer adequate extension.
- Portability vs. Stability: Do you need to move it around your workshop or to job sites? Or will it be a permanent fixture?
- Storage: Do you need space to store your saw or other accessories?
- Dust Collection: Do you want to integrate a dust collection port?
- Budget: What is your budget for materials?
Design Options:
There are many approaches to building a chop saw table. Some popular designs include:
- Folding Sawhorses: Simple, portable, and easy to build.
- Stationary Workbench Style: A more robust, permanent setup integrated into your workshop.
- Mobile Workbench with Saw Mount: Combines the utility of a mobile workbench with the functionality of a chop saw station.
- Outfeed Table Style: Primarily focused on providing long material support.
This guide will focus on a versatile, relatively straightforward design that offers good stability, material support, and the option for portability. Think of it as a solid foundation for your own custom workbench plans.
Material List and Tools
This list provides a general idea of what you might need. Adjust it based on your specific design and the materials you have available.
Lumber:
- 2x4s: For the main frame, legs, and supports.
- 2x6s or Plywood: For the table base where the saw mounts.
- 1x4s or plywood scraps: For any shelves or smaller supports.
- Plywood (3/4 inch): For the saw mounting surface and potentially extension wings.
Hardware:
- Wood Screws: Various lengths (e.g., 2.5-inch for framing, 1.5-inch for attaching components).
- Lag Bolts or Carriage Bolts with Washers and Nuts: For attaching the saw mount to the base, or for robust leg connections.
- Metal Brackets (L-brackets, corner braces): For reinforcing joints.
- Hinges (optional): If you want a folding design.
- Casters (optional): For a mobile setup. Ensure they are heavy-duty if you plan to move it with the saw mounted.
Tools:
- Measuring Tape: Essential for accurate measurements.
- Pencil: For marking cuts.
- Safety Glasses: Always wear them when cutting or drilling.
- Ear Protection: Chop saws are loud.
- Dust Mask: Protect your lungs.
- Circular Saw or Miter Saw: For cutting lumber.
- Jigsaw (optional): For cutting curves or specific shapes for the saw base.
- Drill/Driver: For drilling pilot holes and driving screws.
- Drill Bits: For pilot holes and clearance holes.
- Countersink Bit (optional): For a cleaner finish.
- Clamps: To hold pieces together while assembling.
- Speed Square or Combination Square: For marking square lines.
- Level: To ensure your table is true.
- Sander and Sandpaper: For smoothing edges.
Building the Base Frame
The base frame is the foundation of your chop saw table. It needs to be sturdy and square.
Step 1: Cut Your Lumber
- Legs: Cut four pieces of 2×4 to your desired working height. For example, if you want a 36-inch working height and your saw base is 6 inches, you might cut legs to 30 inches if your top frame adds 6 inches. It’s better to cut slightly longer and trim later if needed.
- Top Frame Pieces: Cut two pieces of 2×4 to the desired length of your table. This will be the width of your saw’s footprint plus some overhang for stability. Cut two pieces of 2×4 to the desired depth, again with some overhang.
- Lower Brace (Optional but Recommended): Cut pieces of 2×4 to connect the legs lower down, adding significant rigidity.
Step 2: Assemble the Top Frame
- Lay out your two longer top frame pieces parallel to each other.
- Position the shorter top frame pieces between the ends of the longer pieces to form a rectangle.
- Ensure all corners are square using your speed square.
- Drill pilot holes and attach the pieces with 2.5-inch wood screws. Use at least two screws per joint. For extra strength, you can use wood glue on the joints before screwing.
Step 3: Attach Legs to the Top Frame
- Position the top frame upside down on a flat surface.
- Place the cut legs at each corner of the frame, ensuring they are flush with the outside edges.
- Use clamps to hold the legs in place.
- Check that the legs are perpendicular to the frame using a speed square.
- Drill pilot holes through the top frame pieces into the legs.
- Secure each leg with at least two 2.5-inch wood screws, or use lag bolts for maximum strength.
Step 4: Add Lower Bracing (Highly Recommended)
- Measure and cut your lower brace pieces. These will typically connect the legs at a height that makes sense for stability, perhaps about 10-12 inches from the floor.
- Attach these braces to the inside of the legs. Ensure they are level and square to the legs.
- Drill pilot holes and secure with 2.5-inch wood screws. You can also add metal L-brackets at each connection for extra reinforcement.
Tip: If you plan to add casters, you’ll need to reinforce the bottom of the legs where the casters will attach. You can do this by screwing an additional block of wood to the bottom of each leg.
Creating the Saw Mount Platform
This is where your chop saw will sit. It needs to be strong and flat.
Step 1: Cut the Platform Material
- Measure the footprint of your chop saw. You’ll need a piece of plywood (3/4 inch is recommended) that is large enough to accommodate the saw and any mounting holes.
- A common size might be around 18×24 inches, but adjust this to your saw.
Step 2: Create an Opening for the Saw Base (Optional but Useful)
For some designs, you might want to recess the saw slightly into the platform to lower its center of gravity.
- Place your chop saw on the plywood and trace its base.
- Carefully cut out this traced area using a jigsaw. This is a more advanced step and requires precise measuring. For most DIY builds, simply mounting the saw directly onto the flat surface is sufficient.
Step 3: Mount the Platform to the Top Frame
- Place the assembled frame right-side up.
- Center the plywood platform on top of the frame.
- Ensure it overhangs evenly or is flush as per your design.
- Drill pilot holes through the plywood and into the 2×4 top frame.
- Secure the platform with 1.5-inch wood screws, spaced every 6-8 inches. Use wood glue for a stronger bond.
Mounting Your Chop Saw
Now it’s time to attach your saw to its new home.
Step 1: Position the Saw
- Carefully place your chop saw onto the mounted platform.
- Ensure it is centered and aligned the way you want it for comfortable operation.
- Check that the saw’s base doesn’t interfere with the table’s structure.
Step 2: Mark Mounting Holes
- Use a pencil to mark the locations of the mounting holes on your saw’s base.
- If your saw came with specific mounting brackets, use those to guide your marks.
Step 3: Drill and Secure the Saw
- Remove the saw from the platform.
- Drill pilot holes at the marked locations. Use a drill bit that matches the size of the bolts you plan to use.
- For through-bolting (the most secure method), drill all the way through the plywood platform.
- Place the saw back onto the platform, aligning the holes.
- Insert your bolts (lag bolts or carriage bolts) with washers.
- Securely tighten the bolts from underneath with a wrench or socket. Ensure the nuts are also tightened with washers to prevent them from digging into the wood.
Important Safety Note: Ensure your saw is firmly attached. Any looseness can lead to inaccurate cuts and dangerous situations.
Adding Extension Wings and Lumber Support
This is where you can really customize your table for better material handling.
Step 1: Design Your Extensions
- Simple Extensions: Cut pieces of plywood or MDF to extend the width of your table. These can be fixed or removable.
- Rollers or Slides: For the ultimate in lumber support, consider attaching roller stands or drawer slides to the sides of your table. This allows for very long pieces to be cut accurately.
Step 2: Construct and Attach Simple Extensions
- Cut pieces of 3/4-inch plywood to your desired extension size.
- For fixed extensions:
- Attach them directly to the sides of the top frame using screws and possibly wood glue.
- Ensure they are flush with the top of the saw mounting platform.
- For removable extensions:
- You can create simple dado slots in the side 2x4s to slide the extensions into.
- Alternatively, use cleats on the underside of the extensions that fit snugly against the side frame members.
Step 3: Incorporate Rollers or Slides (Advanced)
- Roller Stands: Build simple brackets that attach to the sides of your table, allowing you to slot in portable roller stands.
- Integrated Rollers: Mount roller bearings directly into the side extensions.
- Drawer Slides: Attach heavy-duty drawer slides to the sides of your table. You can then create sliding extension wings that attach to the slides. This offers excellent adjustability.
Integrating Dust Collection
A clean workshop is a productive workshop. A dust collection system can make a big difference.
Step 1: Identify Dust Port Location
- Most chop saws have a dust port. Determine its location and angle.
- You’ll want to position your table so that this port is accessible.
Step 2: Create a Dust Chute or Hood
- Simple Chute: Use scrap plywood or thin MDF to build a small box or chute that connects from the saw’s dust port to a larger opening that can connect to your shop vacuum or dust collector hose.
- Enclosure: Some users build a partial enclosure around the back and sides of the saw to help funnel dust more effectively.
- Hose Management: Consider how you will manage the vacuum hose so it doesn’t interfere with cuts.
Step 3: Connect to Your Dust Collector
- Use appropriate fittings and adapters to connect your chute or enclosure to your shop vacuum or central dust collection system.
- Ensure the connection is secure to maximize dust capture.
Enhancements and Features
Here are some ideas to take your chop saw table to the next level.
Fence and Stops
- Sacrificial Fence: Attach a long piece of 1×4 or 2×4 to the back of your saw’s built-in fence. This provides a fresh surface to cut against and protects your saw’s original fence.
- Adjustable Fence: Build a fence that can be moved forward or backward to accommodate different blade depths or create specific jig setups.
- Repeat Stop: Create an adjustable stop that clamps onto an extension wing or fence. This is invaluable for cutting multiple pieces to the same length quickly and accurately.
Storage
- Lower Shelf: Add a shelf between the legs using plywood or 1x4s to store blades, safety gear, or smaller tools.
- Side Holders: Attach simple brackets or PVC pipe holders to the sides for storing blades or lumber.
Mobility
- Heavy-Duty Casters: If you plan to move your table frequently, invest in locking, heavy-duty casters. Attach them to reinforced leg bottoms. Ensure the casters can handle the weight of the table, saw, and lumber. Consider a design with fold-away legs and casters for easier transport.
Precision Measurement Systems
- Tape Measure Flip Stop: Attach a retractable tape measure to one of your extension wings with a cleat. This allows for quick and accurate measurements without needing a separate tape measure. Look for “flip stops” designed for this purpose.
Table Saw Alternative
A well-built chop saw table can significantly enhance the utility of your chop saw, making it a capable table saw alternative for many tasks. While it won’t replace the rip capacity of a true table saw, it excels at crosscuts and miter cuts. With the addition of jigs and fences, you can perform tasks like cutting tenons or creating dadoes with careful setup.
Frequently Asked Questions (FAQ)
-
Q: What is the ideal working height for a chop saw table?
A: The ideal height is typically around waist level for comfortable operation. This varies based on your personal height and preference, but a good starting point is 34-38 inches. -
Q: Can I use a standard chop saw or do I need a sliding compound miter saw?
A: You can use either. A standard chop saw is great for crosscuts up to its capacity, while a sliding compound miter saw allows for wider boards to be cut. The table construction principles remain the same. -
Q: How do I ensure my table is stable enough?
A: Use sturdy lumber (like 2x4s), build a well-braced base, and ensure all joints are securely fastened with screws and possibly glue. If adding casters, make sure they are rated for the load and lock securely. -
Q: What is the best way to add lumber support?
A: For long pieces, adding roller stands or building extension wings with integrated rollers provides the best lumber support. This prevents the material from sagging or tipping during the cut. -
Q: How can I make my chop saw table portable?
A: Incorporate folding legs, use lighter materials where possible, and attach heavy-duty, locking casters to the legs. Designs that allow the saw to be removed easily will also make it more portable. -
Q: Is it difficult to integrate a dust collection system?
A: A basic dust collection setup is relatively straightforward. You can fashion a simple chute from plywood or attach a flexible hose directly to your saw’s dust port, then connect it to your shop vac. More advanced systems involve building enclosures. -
Q: Can this table be used as a general workbench?
A: Yes, with some modifications. If you build a sturdy enough top and add additional features like a vise or work surface, it can function as a mobile workbench or a dedicated work area. -
Q: How do I ensure cuts are square and accurate?
A: Build your table to be as square and level as possible. Ensure your saw is mounted securely. Use a good quality stop system for repeat cuts, and always use a reliable measuring tape attached accurately to your fence.
Building a chop saw table is a rewarding DIY project that will significantly improve your woodworking capabilities. By following these steps and adapting the design to your needs, you’ll create a versatile and indispensable tool for your workshop. Happy building!