
Can you make wood filler with sawdust? Absolutely! Making wood filler with sawdust is a fantastic way to repair small imperfections in wood, save money, and repurpose material you already have. This guide will walk you through everything you need to know about creating your own sawdust wood glue filler, making it simple and accessible for anyone.
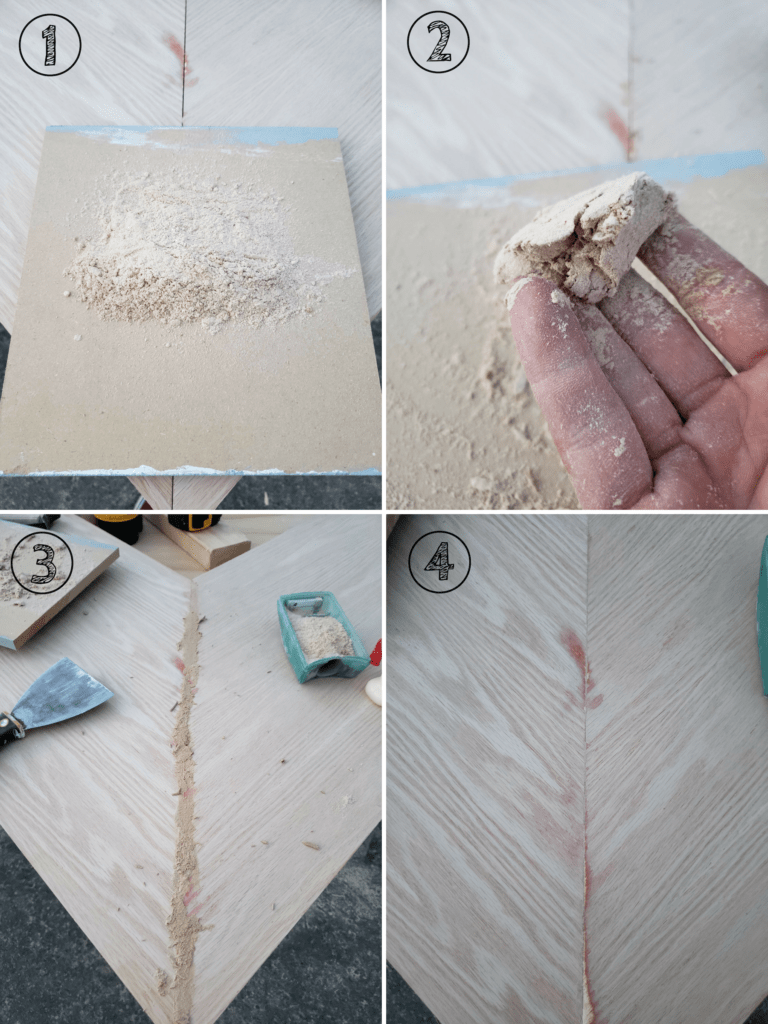
Image Source: www.thehomestud.com
Why Choose Homemade Sawdust Wood Filler?
Before we dive into the “how-to,” let’s consider why this DIY approach is so appealing. Many commercially available wood fillers are excellent, but they can be pricey, especially for larger projects or frequent repairs. Using DIY wood filler sawdust offers several advantages:
- Cost-Effective: Sawdust is often a free byproduct of woodworking. Combining it with a common adhesive like wood glue is significantly cheaper than buying specialized fillers.
- Environmentally Friendly: Repurposing sawdust reduces waste and gives it a new purpose.
- Customizable: You can tailor the color and texture of your filler to match your specific wood project perfectly. This is especially beneficial when repairing wood with sawdust that needs a precise color match.
- Readily Available Materials: You likely have the core ingredients for sawdust filler for wood in your workshop or home already.
What You’ll Need: Gathering Your Ingredients
Creating a robust homemade wood putty sawdust requires just a few basic items. The quality of your filler will largely depend on the quality of your ingredients.
The Sawdust Component
The type of sawdust you use is crucial. It’s not just about collecting any old wood shavings; the species of wood matters.
- Fine Dust is Best: You want very fine sawdust, almost like powder. Coarse shavings won’t mix well and will leave a rough texture.
- Match the Wood: For the best color match, use sawdust from the same type of wood you intend to repair. Oak sawdust for oak repairs, pine for pine, etc.
- Clean Sawdust: Ensure your sawdust is free from contaminants like paint, varnish, nails, or dirt. Contaminants can weaken the filler or affect its color.
- Sanding Dust: If you don’t have a dust collection system, the dust from sandpaper (especially finer grits like 120-220) is excellent for this purpose.
The Binder Component
The binder is what holds the sawdust particles together and allows the filler to harden.
- Wood Glue (PVA Glue): This is the most common and effective binder. White or yellow PVA wood glue works best. It dries strong and is water-based, making cleanup easy.
- Other Binders (Less Common for this Method): While some wood filler recipes sawdust might suggest things like plaster of Paris or epoxy, PVA wood glue is the simplest and most reliable for a basic sawdust and glue wood patch.
Optional Additives
Depending on your needs, you might consider adding a few other items.
- Water: A small amount of water can help adjust the consistency of your filler.
- Stain or Pigment: If you can’t achieve a perfect color match with just sawdust, you can add a small amount of wood stain or artist’s acrylic pigment to the mixture.
Mixing Your Sawdust Wood Filler: Step-by-Step
The process of making wood repair sawdust glue is straightforward. It’s all about achieving the right consistency.
Step 1: Prepare Your Sawdust
- If your sawdust is a bit clumpy, sift it through a fine mesh screen or an old sieve. This removes any larger particles or debris and ensures a uniform mixture.
Step 2: Start with Sawdust
- Pour a small amount of your prepared sawdust into a disposable container, such as a plastic tub or an old jar. You don’t need a lot to start; you can always add more.
Step 3: Add the Binder (Wood Glue)
- Begin adding wood glue to the sawdust. Start with a ratio of roughly one part glue to two parts sawdust, but this is just a starting point.
- Use a small stirring stick or craft stick to mix.
- The goal is to coat every sawdust particle with glue.
Step 4: Mix and Adjust Consistency
- As you mix, you’ll notice the mixture starting to clump together.
- Gradually add more glue or sawdust to achieve your desired consistency.
- For Cracks and Small Holes: You want a paste-like consistency, similar to peanut butter or toothpaste. It should be thick enough to hold its shape but spreadable.
- For Larger Gaps: You might want a slightly thicker mix, almost like a dough, so it doesn’t sag.
- If the mixture is too dry and crumbly, add a tiny bit more glue.
- If the mixture is too wet and runny, add a little more sawdust.
- A little bit of water can be added if the glue is too thick to mix effectively, but be cautious not to add too much.
Step 5: Color Matching (If Needed)
- Once you have the right consistency, assess the color.
- If the color isn’t quite right, add a tiny amount of wood stain or a drop of acrylic paint. Mix thoroughly until the color is uniform. It’s better to add color gradually, as it’s easy to add more but impossible to take away.
Step 6: Final Mixing and Application Readiness
- Once you’re happy with the consistency and color, give it one last good mix.
- Your sawdust and glue wood patch is now ready for use.
Applying Your Homemade Wood Filler
How you apply your sawdust filler for wood depends on the type of repair you’re making.
For Small Cracks and Gouges
- Clean the Area: Ensure the crack or gouge is clean and free of dust or debris.
- Apply the Filler: Use a putty knife or your finger to press the filler firmly into the crack or gouge. Work it in to ensure it fills the void completely.
- Smooth the Surface: Scrape away any excess filler with the putty knife, leaving the surface as smooth as possible and flush with the surrounding wood.
- Let it Dry: Allow the filler to dry completely. Drying time will vary depending on the depth of the fill, humidity, and the amount of glue used.
For Larger Holes or Dents
- Build it Up: For deeper repairs, you may need to apply the filler in layers. Apply a good amount, smooth it down, and let it set slightly before adding the next layer. This prevents sagging and ensures better adhesion.
- Slight Overfill: It’s often a good idea to slightly overfill deeper repairs, as wood filler can shrink a little as it dries.
- Drying and Sanding: Once the filler is completely dry, you can sand it smooth. Start with a medium-grit sandpaper (like 120-grit) and finish with a finer grit (like 180 or 220-grit) for a smooth finish.
For Loose Joints (Temporary Fix)
If you have a loose joint that you need to temporarily secure, a thicker mixture of sawdust wood glue filler can sometimes help.
- Inject the Filler: Try to inject a thicker paste into the gap in the joint using a syringe or a thin, flexible tool.
- Clamp the Joint: Clamp the joint firmly while the filler dries. This is a less permanent solution than traditional joinery but can offer a temporary hold.
Drying and Finishing Your Wood Repair
Proper drying and finishing are essential for a durable and attractive repair.
Drying Times
- Drying times for making wood filler with sawdust can range from a few hours to overnight, or even longer for very deep fills.
- Factors influencing drying time include:
- Humidity: High humidity slows drying.
- Temperature: Warmer temperatures speed drying.
- Amount of Glue: More glue generally means longer drying.
- Depth of Fill: Thicker applications take longer to dry through.
- The filler should feel hard and dry to the touch.
Sanding
- Once completely dry, you can sand the filled area to blend it with the surrounding wood.
- Use sandpaper appropriate for the type of wood and finish you’re aiming for. Start with a coarser grit if needed to level the fill, then move to finer grits for a smooth finish.
- Always sand in the direction of the wood grain.
Staining and Finishing
- Color Match: This is where your careful color matching in the mixing stage pays off. If your homemade wood putty sawdust is a good match, it will accept stain and finish similarly to the surrounding wood.
- Test Stains: It’s always a good idea to test your stain on a scrap piece of wood with the same filler mixture.
- Application: Apply your chosen stain, varnish, paint, or other finish as you normally would. You might find that the filler absorbs stain slightly differently than the original wood, so a bit of touch-up might be needed.
Tips for Success with Sawdust Filler
Here are some additional tips to help you achieve the best results when repairing wood with sawdust:
- Patience is Key: Don’t rush the drying process. Applying finishes too early can lead to problems.
- Small Batches: Mix only what you need. Sawdust filler can dry out in the container if left exposed.
- Experiment with Ratios: Don’t be afraid to slightly adjust the glue-to-sawdust ratio to find what works best for your specific needs and the type of sawdust you’re using.
- Consider Wood Type: Hardwoods might require a slightly different ratio or more glue than softwoods.
- For Exterior Use: While this sawdust filler for wood is great for interior projects, it’s generally not recommended for exterior applications where it will be exposed to moisture, as standard PVA glue can break down. Exterior-rated wood glues can be used, but test first.
Common Issues and Solutions
Even with the best intentions, you might encounter a few minor hiccups.
Problem: Filler Shrinks Too Much
- Cause: Too much glue, not enough sawdust, or applied too thinly.
- Solution: Apply in thinner layers, allowing each to partially set before adding the next. Ensure a good ratio of sawdust to glue for strength. Slightly overfill and sand down.
Problem: Filler Crumbles After Drying
- Cause: Not enough glue, or the sawdust was too coarse.
- Solution: Re-mix with more glue. Ensure you’re using fine sawdust.
Problem: Color Mismatch After Staining
- Cause: Sawdust color was different from the wood, or the filler absorbed the stain differently.
- Solution: Take extra care with color matching during the mixing stage. Test stains on scrap pieces. You might need to lightly scuff sand the filled area and apply stain in thin layers to better match the surrounding wood. Sometimes, a touch-up with a colored pencil or artist’s oil paint can help.
When is Sawdust Filler the Best Choice?
While making wood filler with sawdust is versatile, it’s best suited for certain types of repairs. It’s the best wood filler sawdust can be for:
- Small holes: Nail holes, screw holes, minor dings.
- Shallow cracks: Splits in the wood grain.
- Filling gaps: Where a cosmetic, non-structural fill is needed.
- Color-matched repairs: When you want the repair to blend seamlessly.
- Cost-sensitive projects: When budget is a major factor.
It’s generally not the best choice for:
- Structural repairs: Filling large structural voids or reinforcing weak joints.
- Areas needing high durability: Where the filler will be subject to significant stress or wear.
- Large, deep voids: Unless applied in many thin layers, it can shrink or crack.
Frequently Asked Questions (FAQ)
Here are answers to some common questions about making and using sawdust filler.
Q1: Can I use any type of sawdust?
A: It’s best to use fine sawdust from the type of wood you are repairing for color matching. Avoid sawdust with paint, glue, or other contaminants. Sift it to remove larger particles.
Q2: How much glue should I use with the sawdust?
A: Start with a ratio of about 1 part wood glue to 2 parts sawdust. Adjust as needed to achieve a thick, paste-like consistency similar to peanut butter.
Q3: How long does sawdust filler take to dry?
A: Drying time varies depending on humidity, temperature, and the depth of the fill. It can take anywhere from a few hours to overnight. It should feel hard and dry to the touch before sanding or finishing.
Q4: Can I use sawdust filler for outdoor projects?
A: Standard PVA wood glue is water-based and can break down outdoors. For exterior use, you might try using an exterior-rated wood glue, but testing its durability in your specific conditions is recommended. It’s generally better suited for interior repairs.
Q5: How do I make the sawdust filler match the wood color?
A: Use sawdust from the same type of wood you’re repairing. If the color still isn’t quite right, you can add a very small amount of wood stain or artist’s acrylic paint to the mixture during the blending stage.
Q6: What’s the difference between this and commercial wood filler?
A: Commercial wood fillers are formulated with specific binders, fillers, and additives for optimal performance, shrinkage resistance, and adhesion. Homemade sawdust filler is a great, cost-effective alternative for many cosmetic repairs but might not be as durable or consistent as professionally manufactured products.
By following these steps and tips, you can confidently create and use your own sawdust wood glue filler for a variety of woodworking repairs. It’s a simple, effective, and economical solution for keeping your wooden projects looking their best. Happy repairing!