
Can you safely open a Stanley utility knife? Yes, by following specific safety guidelines and techniques, you can open a Stanley utility knife and change its blade securely. This guide will walk you through everything you need to know about using a Stanley knife safely, from basic operation to detailed utility knife blade replacement. We’ll cover Stanley knife instructions, how to load a Stanley knife, and essential Stanley knife safety tips to ensure you can tackle any cutting task with confidence. Whether you’re dealing with an older manual model or a modern opening a retractable utility knife, mastering these steps is crucial for preventing injuries.
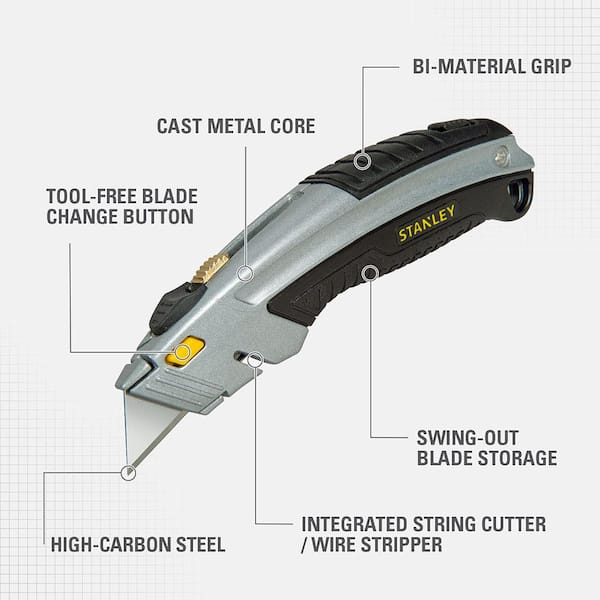
Image Source: images.thdstatic.com
Deciphering Your Stanley Knife: Key Components
Before diving into operation, it’s important to know the parts of your Stanley knife. Knowing these components helps in understanding Stanley knife maintenance and proper handling.
Core Parts of a Stanley Utility Knife
- Handle: The main body of the knife, providing grip and housing the blade mechanism. Stanley knives come in various materials like metal and plastic, designed for durability and comfort.
- Blade: The sharp cutting edge. Utility knife blades are typically made from high-carbon steel for strength and longevity. They are usually double-sided for extended use.
- Blade Slider/Button: This mechanism is used to extend and retract the blade in many models. Its design can vary, from simple push buttons to thumb-operated sliders.
- Blade Lock: A feature that secures the blade in place once extended, preventing accidental retraction or extension during use.
- Blade Storage (Optional): Some Stanley knives have a compartment within the handle to store spare blades. This is a convenient feature for on-the-go replacements.
- Retraction Spring: Found in retractable models, this spring automatically pulls the blade back into the handle when the slider is released.
- Blade Change Mechanism: The specific parts that allow for the safe removal and insertion of a new blade. This often involves a screw, a latch, or a specific disassembly process.
Safely Opening Your Stanley Utility Knife: Step-by-Step
The way you open a Stanley utility knife depends on its type. Most modern Stanley utility knives are retractable, meaning the blade extends and retracts from the handle.
For Retractable Stanley Knives
This is the most common type of Stanley utility knife. The process for opening a retractable utility knife is designed for user safety.
Basic Blade Extension and Retraction
- Grip Firmly: Hold the handle of the Stanley knife securely in your dominant hand. Ensure your fingers are not in the path of the blade.
- Locate the Slider: Find the slider or button, usually located on the side of the handle.
- Extend the Blade: Push the slider forward with your thumb. You should feel or hear the blade lock into position. Most Stanley knives have multiple locking points for different blade extension lengths.
- Test the Lock: Gently try to push the slider back towards the handle without pressing any release mechanism. If it doesn’t move, the blade is locked.
- Retract the Blade: To retract the blade, locate the release mechanism. This is often a button on the slider itself or a separate release near the slider. Press this release and slide the blade back into the handle. Some automatic retraction models will retract the blade as soon as you release the slider.
Advanced Features: Auto-Retract and Safety Locks
Many Stanley knives feature auto-retract mechanisms. When you release the slider, the blade automatically snaps back into the handle. This significantly enhances Stanley knife safety by reducing the risk of accidental cuts. Always check if your specific model has this feature and familiarize yourself with how it works. Some models may also have a secondary safety lock to prevent accidental blade extension when not in use.
For Non-Retractable Stanley Knives (Fixed Blade)
Older or simpler models might have a fixed blade that requires manual Stanley knife disassembly for blade changes.
Fixed Blade Operation
- Identify the Securing Mechanism: Look for a screw or a clamp that holds the blade in place.
- Loosen the Screw/Clamp: Using a screwdriver or the tool provided with the knife, carefully loosen the screw or clamp. Do not remove it completely unless you are changing the blade.
- Extend the Blade (If Applicable): Some fixed blade knives might allow for slight blade extension, but generally, the blade remains exposed.
- Secure the Blade: Once you have adjusted the blade or are ready for use, ensure the screw or clamp is tightened firmly to keep the blade in place.
Important Note: Fixed blade knives expose the sharp edge constantly, requiring extreme caution during all handling and using a Stanley knife. Always store them with a blade guard if possible.
How to Change a Stanley Knife Blade Safely: A Detailed Guide
Changing a blade is a common part of Stanley knife maintenance. Doing it correctly ensures continued performance and, more importantly, prevents injuries. The process is often referred to as how to change Stanley knife blade or utility knife blade replacement.
Preparing for Blade Replacement
Before you start, gather your supplies and prepare your workspace.
Essential Preparations
- Safety First: Always wear cut-resistant gloves. This is non-negotiable for safe utility knife operation.
- Workspace: Choose a clean, well-lit area. Clear any clutter that could interfere with the process.
- New Blades: Have your new Stanley replacement blades ready. They are typically packaged in dispensers for safe handling.
- Disposal: Prepare a safe container for used blades, such as a sharps container or a sturdy metal can with a lid.
Step-by-Step Blade Replacement (Common Retractable Models)
Most Stanley utility knife blade changes involve a straightforward process. Here’s a general guide that applies to many popular models. Refer to your specific Stanley knife instructions for precise details.
Step 1: Retract the Blade
- Crucial Step: Ensure the blade is fully retracted into the handle. If your knife has an auto-retract feature, activate it. If it’s manual, slide the blade back and ensure it’s locked in the retracted position. Never attempt to change a blade while it is extended.
Step 2: Access the Blade Mechanism
- Identify the Release: Most Stanley knives have a mechanism to open the handle or release the blade housing. This is often:
- A thumb screw on the side of the handle.
- A latch or button that releases the handle.
- A quick-release mechanism that allows the slider to detach.
- Consult Your Manual: If you’re unsure, consult your specific Stanley knife instructions. They will show you precisely how your model opens.
Step 3: Disassemble (If Necessary)
- Thumb Screw Models: Unscrew the thumb screw completely. The screw might stay attached to the slider or come out entirely. Be careful not to lose it.
- Latch/Button Models: Press the latch or button firmly and separate the handle halves or slide the blade housing out.
- Quick-Release Models: You might simply pull the slider assembly apart from the main handle body.
Step 4: Remove the Old Blade
- Handle Halves Apart: If the handle has opened, you will see the blade resting in its housing. Carefully lift the old blade out. Handle it by the blunt edge or use pliers if necessary.
- Blade Housing Removed: If you removed a blade housing or slider assembly, you should be able to see the blade secured within it. Gently loosen any retaining clip or screw holding the blade and slide the old blade out.
Step 5: Load the New Blade (How to Load a Stanley Knife)
- Orientation: Utility knife blades are typically double-edged. Ensure you’re loading the blade with the cutting edge facing the correct direction for use. For most knives, the sharp edge should face downwards when extended.
- Placement: Carefully slide the new blade into its designated slot. Make sure it sits flush and aligns correctly with the slider mechanism.
- Securing the Blade: If there was a retaining clip or screw, re-secure it. Ensure the blade is held firmly and cannot move loosely.
Step 6: Reassemble the Knife
- Reverse the Disassembly: Carefully align the handle halves or reattach the blade housing.
- Secure the Mechanism: Tighten the thumb screw, snap the latch shut, or reattach any components you removed. Ensure the knife feels solid and secure.
Step 7: Test the New Blade
- Check Extension: Carefully extend the new blade. It should slide smoothly and lock securely in place.
- Check Retraction: Retract the blade to ensure the mechanism functions correctly.
- Visual Inspection: Look for any loose parts or misalignments.
Blade Replacement for Models with Internal Blade Storage
Some Stanley knives have a compartment in the handle for spare blades. Accessing this is usually straightforward:
- Open the Handle: Most models will require you to unscrew a specific screw or flip a latch to open the handle.
- Access Storage: The internal compartment will then be visible. Take out a spare blade.
- Proceed with Blade Change: Follow the steps above for removing the old blade and loading the new one.
- Close and Secure: Close the handle securely.
Special Considerations for Stanley Knife Disassembly
While most Stanley knives are designed for easy blade changes, some older or specialized models might require more intricate Stanley knife disassembly. Always refer to the specific model’s manual. Never force parts. If a screw is seized or a part won’t budge, stop and seek advice or a different tool. Attempting to force disassembly can damage the knife or cause injury.
Proper Techniques for Using a Stanley Utility Knife
Once your Stanley knife is open and ready, using a Stanley knife effectively and safely is paramount.
Safe Cutting Practices
- Blade Sharpness: Always use a sharp blade. A dull blade requires more force, increasing the risk of slipping. Stanley knife maintenance includes regular blade changes.
- Cutting Direction: Always cut away from your body. Never pull the blade towards yourself.
- Stable Surface: Place the material you are cutting on a stable, flat surface. Avoid cutting on your hand or leg.
- Blade Extension: Only extend the blade as much as necessary for the cut. A longer blade extension increases the risk of breakage or accidental contact.
- Control: Maintain firm control of both the knife and the material being cut.
- Clear Path: Ensure there is nothing behind your cutting line that could be damaged by the blade if it goes through the material.
- One Cut at a Time: Avoid making multiple cuts in rapid succession without re-securing the blade if necessary.
Material Considerations
Different materials require different cutting approaches:
- Cardboard and Packaging: Easy to cut. A moderate blade extension is usually sufficient.
- Drywall: Requires a longer blade extension to cut through the material in one pass. Cut on the waste side of your marked line.
- Carpet and Linoleum: Often requires multiple passes or a robust blade. Keep the blade sharp for cleaner cuts.
- Plastic Sheeting: Can be brittle. A sharp blade and steady pressure are key to avoid cracking.
Stanley Knife Maintenance and Care
Proper Stanley knife maintenance ensures your tool lasts longer and remains safe to use.
Regular Checks
- Blade Condition: Inspect the blade for nicks, chips, or dullness before each use.
- Mechanism Function: Test the blade extension, retraction, and locking mechanism. Ensure it operates smoothly without sticking.
- Handle Integrity: Check the handle for cracks or damage that could compromise its grip or structural integrity.
Cleaning Your Stanley Knife
- Dust and Debris: After use, especially with materials like drywall or wood, brush away any dust or debris from the blade mechanism and handle.
- Lubrication (Occasional): A drop of light machine oil on the slider mechanism can help keep it moving smoothly. Wipe away any excess oil. Be careful not to get oil on the blade itself, as this can affect grip and performance.
Storing Your Stanley Knife
- Retract Blade: Always retract the blade fully before storing.
- Blade Guard: If your knife came with a blade guard, use it for extra protection, especially for non-retractable models.
- Safe Location: Store your Stanley knife in a dry, secure place, out of reach of children and unauthorized users. A toolbox or a dedicated tool drawer is ideal.
Advanced Safety Features and Tips
Beyond the basic operation, several advanced considerations contribute to Stanley knife safety.
Blade Retraction Mechanisms
- Automatic Retraction: As mentioned, auto-retract knives are the safest. They minimize the chance of leaving a blade exposed.
- Spring-Loaded Mechanisms: Be aware of the spring. If it feels weak or the blade doesn’t retract reliably, it might be time for a new knife or professional inspection.
Handle Material and Grip
- Ergonomics: A well-designed handle with a non-slip grip is crucial for preventing drops and accidental slips.
- Material: Metal handles are generally more durable but can be heavier. Plastic handles are lighter but can crack under extreme stress.
Knowing When to Replace Your Knife
- Worn Mechanisms: If the blade slider feels loose, the lock is unreliable, or retraction is faulty, it’s time for a replacement.
- Damaged Handle: Cracks, bends, or significant wear on the handle can make the knife unsafe.
- Corrosion: Rust or heavy corrosion can affect the moving parts and blade.
Frequently Asked Questions (FAQ)
Q1: How often should I change the blade on my Stanley utility knife?
A1: The frequency depends on how often you use the knife and the materials you cut. A good rule of thumb is to change the blade when you notice it struggling to cut through material cleanly or requires excessive force. A sharp blade is safer and more efficient.
Q2: Can I use a blade from a different brand in my Stanley knife?
A2: While many utility knife blades are standardized, it’s best to use genuine Stanley replacement blades or blades specifically designed for your knife model. Using incompatible blades can lead to improper fit, poor performance, and safety hazards. Always check the specifications.
Q3: What is the best way to dispose of used Stanley knife blades?
A3: Used blades are sharp and dangerous. They should be placed in a designated sharps container, a sturdy metal can with a lid, or a thick plastic container clearly labeled “Sharps” or “Blades.” Never throw loose blades directly into the trash. Dispose of these containers according to local regulations for hazardous waste.
Q4: My Stanley knife blade gets stuck. What should I do?
A4: First, ensure the blade is fully retracted and that there isn’t any debris lodged in the slider mechanism. If the problem persists, check your Stanley knife instructions for Stanley knife disassembly to clean the mechanism. If it’s still stuck or damaged, it might be time to replace the knife. Avoid forcing the blade, as this can cause injury.
Q5: What are the key safety features of a Stanley utility knife?
A5: Key safety features include retractable blades, automatic blade retraction (on some models), secure blade locking mechanisms, ergonomic handles with non-slip grips, and sometimes secondary safety locks to prevent accidental blade extension. Always ensuring the blade is retracted when not in use is paramount for Stanley knife safety.
By following these detailed instructions and prioritizing safe utility knife operation, you can confidently use your Stanley utility knife for a wide range of tasks. Remember, proper Stanley knife maintenance and attention to how to load a Stanley knife are just as important as knowing how to open and cut with it.