
Can you sharpen a chainsaw with an electric sharpener? Absolutely! Using an electric sharpener is a fantastic way to keep your chainsaw blade in top condition. This guide will walk you through everything you need to know for effective chainsaw blade sharpening using an electric tool.
A dull chainsaw chain is not only inefficient but also dangerous. It forces you to push harder, increasing the risk of kickback and making your work a frustrating ordeal. Regular chainsaw chain maintenance, including proper sharpening, is crucial for safety, efficiency, and extending the life of your equipment. This detailed guide will teach you how to use an electric chain sharpener, often referred to as an electric file for chainsaws or a powered chainsaw sharpener, to achieve sharp chainsaw teeth. We’ll explore what makes a good electric chainsaw sharpener and provide a step-by-step approach to DIY chainsaw sharpening that anyone can follow.
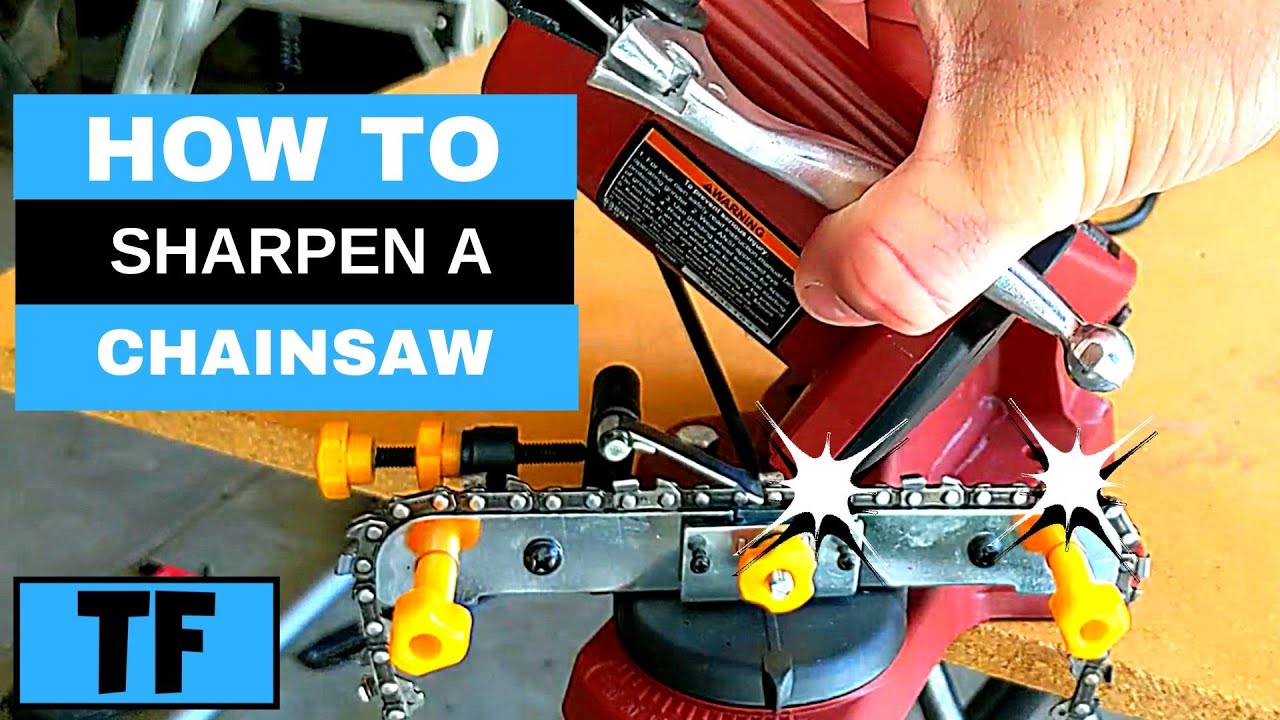
Image Source: i.ytimg.com
Why Sharpen Your Chainsaw Chain?
Before we dive into the “how,” let’s reinforce the “why.” A sharp chainsaw chain makes cutting easier, faster, and safer.
- Efficiency: Sharp teeth bite into wood cleanly and quickly. A dull chain will skid and struggle, requiring more effort and time.
- Safety: A dull chain is more prone to snagging, which can lead to dangerous kickback. Sharp teeth reduce the chance of this happening.
- Reduced Wear: Forcing a dull chain puts extra stress on the engine, bar, and the chain itself. Regular sharpening minimizes this wear and tear.
- Better Cuts: Sharp chains produce cleaner cuts, which are important for various tasks, from firewood preparation to professional logging.
Choosing the Best Electric Chainsaw Sharpener
Not all electric sharpeners are created equal. When selecting an electric chain sharpener, consider these factors:
Key Features to Look For
- Adjustability: The best electric chainsaw sharpener allows for adjustments to the grinding angle and depth. This ensures you can match the factory specifications for your specific chain.
- Grip and Stability: A secure grip and stable base are essential for precise work. Some models have clamps to secure the chain, while others rely on a firm grip.
- Power and Speed: More powerful motors generally provide a smoother and faster sharpening experience. Variable speed options can be a bonus for different chain types.
- Durability: Look for models made from robust materials that can withstand frequent use.
- Included Grinding Stones: Most electric sharpeners come with a few different sized grinding stones (also called grinding wheels or bits). Ensure the included stones are suitable for your chain pitch and gauge.
- Ease of Use: The learning curve for an electric file for chainsaws should be manageable. Look for intuitive controls and clear instructions.
Popular Types of Electric Chainsaw Sharpeners
- Bench-mounted Grinders: These are often more powerful and stable, providing a consistent angle. They are excellent for frequent sharpening but less portable.
- Handheld Electric Files: These are more portable and easier to maneuver. They are a good choice for on-the-go sharpening.
Preparing for Chainsaw Chain Sharpening
Proper preparation is key to a successful sharpening job.
What You’ll Need
- Electric Chainsaw Sharpener: Your chosen powered chainsaw sharpener.
- Appropriate Grinding Stones: The correct size stone for your chain. This is critical. Check your chainsaw manual or the chain itself for the pitch (distance between drive links) and gauge (thickness of the drive link).
- Chainsaw Angle Guide: Some sharpeners have built-in guides, but a separate guide can help ensure consistency.
- Chainsaw Chain Sharpener Jig: A jig can hold the chain firmly and provide a stable platform.
- Gloves: For protection from sharp edges and debris.
- Safety Glasses: Essential eye protection.
- Chainsaw Manual: For specific angle and depth settings.
- A Clean Workspace: Free from debris and well-lit.
Understanding Your Chainsaw Chain
Before you start, familiarize yourself with the different parts of your chainsaw chain and what needs sharpening:
- Cutter: The part that does the cutting. This is what you’ll be sharpening.
- Depth Gauge (or Raker): The small metal piece in front of the cutter. It controls how deep the cutter bites into the wood. It should be slightly lower than the cutter.
- Drive Link: The part that rides in the guide bar groove.
- Tie Strap: Connects the drive links.
Your goal with chainsaw blade sharpening is to restore the sharp edge on the cutter and maintain the correct depth gauge height.
How to Use an Electric Chain Sharpener: Step-by-Step
This section is your comprehensive chainsaw grinder guide. We’ll break down the process for effective chainsaw teeth sharpening.
Step 1: Secure the Chainsaw
Place your chainsaw on a stable surface. If you have a vise, secure the guide bar firmly. This prevents the chain from moving during sharpening, which is crucial for accuracy.
Step 2: Set Up Your Electric Sharpener
- Install the Correct Grinding Stone: Ensure you have the right size grinding stone for your chain’s pitch and gauge. A stone that’s too small or too large will not sharpen effectively and can damage the chain.
- Set the Grinding Angle: Most chainsaws have specific angles for their cutters. Consult your chainsaw manual for the recommended angles. Typically, this is around 25-35 degrees. Your electric chain sharpener will have settings for this.
- Set the Depth of Cut: The depth gauge setting is also critical. It’s usually set with a separate jig or a specific setting on your sharpener. The depth gauge should be slightly lower than the cutter. You’ll often use a file or a special gauge for this if your sharpener doesn’t handle it. Some advanced electric sharpeners might have integrated depth gauge adjustment, but it’s more common to adjust this separately after sharpening the cutter.
Step 3: Sharpening the Cutters
This is the core of the DIY chainsaw sharpening process.
- Select a Starting Cutter: Begin with any cutter. It’s often recommended to start on a right-hand cutter, then do all the right-hand cutters, followed by the left-hand cutters. This ensures consistency.
- Position the Grinding Stone: Place the grinding stone against the cutter’s cutting edge. The stone should be angled correctly to match the cutter’s bevel.
- Engage the Sharpener: Turn on your powered chainsaw sharpener.
- Grind the Cutter: Move the grinding stone smoothly across the cutter. Apply light, even pressure. Move the sharpener from the inside of the cutter to the outside. Do not linger too long on one spot, as this can overheat and damage the cutter.
- Count the Passes: Make a consistent number of passes on each cutter. A good starting point is 3-5 passes per cutter. The goal is to remove the dull metal and create a new, sharp edge. You’ll see sparks as you grind; this is normal.
- Move to the Next Cutter: Advance the chain by one cutter.
- Repeat for All Cutters: Continue this process for every cutter on the chain, alternating between right and left-hand cutters. Ensure you maintain the same angle and number of passes for each. Consistency is vital for an even sharpening.
Important Tip: Aim to remove the same amount of metal from each cutter. If one cutter is severely damaged, you might need more passes on it, but try to match it to the others as closely as possible.
Step 4: Adjusting the Depth Gauges (Rakers)
This is a crucial step for optimal performance and safety. Dull depth gauges will prevent the cutter from biting properly.
- Use a Depth Gauge Tool: A specialized depth gauge filing guide is the best tool for this. It has a slot that rests over the cutter and a tab that aligns with the depth gauge.
- Position the Tool: Place the depth gauge tool over the depth gauge.
- File the Depth Gauge: Using a separate flat file (or a specific filing attachment if your electric sharpener has one), file the depth gauge until it is level with the slot on the tool. File in a direction away from the cutter.
- Repeat for All Depth Gauges: Go around the entire chain and adjust all depth gauges.
Note: Some users prefer to do this after all cutters are sharpened, while others do it every few cutters. The key is to ensure all depth gauges are consistent.
Step 5: Cleaning and Inspection
- Brush Away Debris: Use a brush to remove any metal filings or dust from the chain and the sharpener.
- Inspect the Chain: Look for any burrs or imperfections on the newly sharpened edges. You can lightly brush them away with a fine stone or file.
- Check for Looseness: Ensure the chain is still properly tensioned after sharpening.
Tips for Optimal Chainsaw Chain Maintenance
Beyond sharpening, regular maintenance keeps your chain in excellent condition.
Regular Cleaning
After each use, clean your chainsaw bar and chain. Remove sawdust, sap, and oil residue. This prevents buildup that can hinder lubrication and cause wear.
Proper Lubrication
Ensure your chainsaw’s oiler is functioning correctly and that you are using good quality bar and chain oil. Proper lubrication reduces friction and heat, extending the life of your chain and bar.
Chain Tension
Maintaining the correct chain tension is vital. Too loose, and it can derail. Too tight, and it can cause excessive wear on the bar and drive components. Check tension regularly, especially when the chain is new or after sharpening.
Storing Your Chainsaw
If you’re storing your chainsaw for an extended period, clean it thoroughly and lightly oil the chain to prevent rust.
Common Problems and Solutions in Chainsaw Blade Sharpening
Even with a powered chainsaw sharpener, you might encounter issues.
| Problem | Cause | Solution |
|---|---|---|
| Uneven Sharpening | Inconsistent angle or pressure | Focus on maintaining a steady angle and consistent passes per cutter. |
| Overheating the Cutter | Too much pressure or lingering too long | Use lighter pressure and move the sharpener steadily. Take breaks if needed. |
| Damaged Depth Gauge | Incorrect sharpening angle or over-filing | Use a depth gauge guide and file only until flush with the guide. |
| Chain Not Cutting Well | Dullness, incorrect angles, or depth gauges | Re-sharpen, check all angles, and ensure depth gauges are set correctly. |
| Chain Comes Off Bar | Loose tension or improper filing | Check chain tension and ensure all cutters and depth gauges are uniform. |
When to Replace Your Chainsaw Chain
While an electric file for chainsaws can restore sharpness many times, chains don’t last forever.
- Shortening: Each sharpening removes a small amount of metal from the cutter. Over time, the chain becomes shorter. Look for indicator marks on the chain designed to show when it’s time for replacement.
- Excessive Wear: If the cutters are visibly worn down, rounded, or significantly shorter than the tie straps, it’s time for a new chain.
- Cracked Cutters: If any cutters are cracked or broken, replace the chain immediately.
- Damaged Drive Links: Damaged drive links can cause the chain to jam or run unevenly.
Frequently Asked Questions (FAQ) about Electric Chainsaw Sharpening
Q1: How often should I sharpen my chainsaw chain?
A1: The frequency depends on your usage. A good rule of thumb is to sharpen your chain every time you refuel the chainsaw, especially if you’re cutting through dirt or abrasive materials. Listen to your saw; if it’s bogging down or not cutting cleanly, it’s time to sharpen.
Q2: Can I use any grinding stone with my electric chain sharpener?
A2: No, you must use grinding stones that match your chain’s pitch and gauge. Using the wrong size will not sharpen the chain correctly and can damage both the chain and the sharpener.
Q3: What is the standard angle for sharpening chainsaw teeth?
A3: The most common angle for chainsaw cutters is between 25 and 35 degrees. Always check your chainsaw manufacturer’s recommendations for your specific model and chain type.
Q4: How do I know if my electric chainsaw sharpener is the best one for me?
A4: The “best” electric chainsaw sharpener is subjective and depends on your needs. Consider factors like the types of wood you cut, how often you use your chainsaw, and your budget. For frequent use and precise results, a bench-mounted grinder might be better. For occasional sharpening or portability, a good handheld electric file will suffice.
Q5: Is DIY chainsaw sharpening with an electric sharpener difficult?
A5: With practice and the right guidance, it’s achievable for most users. Taking your time, following instructions carefully, and using the correct angle and stone size are key to success.
By following this comprehensive guide on how to sharpen a chainsaw with an electric sharpener, you can ensure your chainsaw is always ready for action, cutting efficiently and safely. Remember, consistent chainsaw chain maintenance is the secret to a long-lasting and reliable tool.