
Can you sharpen a skill saw blade at home? Yes, you absolutely can sharpen a skill saw blade at home, and doing so can save you money and improve your cutting performance significantly. This guide will walk you through the entire process of sharpening saw blade technology for your circular saw, transforming dull blades into precise cutting tools.
A dull skill saw blade doesn’t just make your cuts ragged; it forces your saw to work harder. This can lead to overheating, reduced motor life, and increased strain on you, the user. Regularly sharpening saw blade edges ensures clean, efficient cuts and extends the lifespan of both your blades and your power tools. Maintaining your tools is a crucial aspect of how to maintain skill saw effectively. This includes not just cleaning but also keeping the cutting edges in prime condition. You can even extend these principles to sharpen miter saw blade units, as the fundamental concepts often overlap.
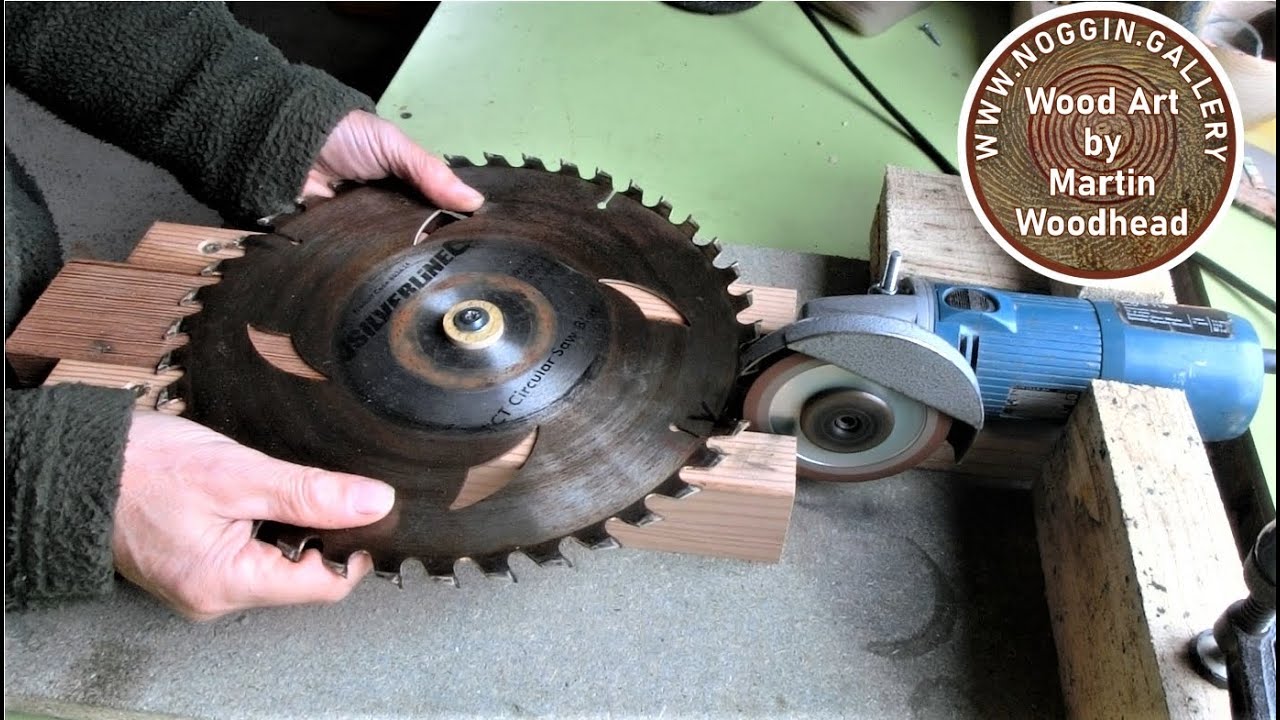
Image Source: i.ytimg.com
Why Sharpen Your Skill Saw Blade?
Ignoring a dull blade is like trying to drive a car with square wheels. It’s inefficient, damaging, and frankly, dangerous. Here’s why keeping your skill saw blades sharp is paramount:
- Cleaner Cuts: Sharp teeth bite into the material cleanly, leaving smooth edges. Dull teeth tear and rip, resulting in splintering and a rough finish. This is especially noticeable when working with delicate materials or when a polished look is desired.
- Reduced Effort: A sharp blade glides through wood with less resistance. This means your saw doesn’t have to strain, requiring less force from you. Less strain translates to more control and less user fatigue.
- Extended Tool Life: When your saw doesn’t have to fight through tough cuts, its motor runs cooler and experiences less wear and tear. This directly contributes to a longer operational life for your skill saw.
- Improved Safety: Dull blades are more prone to binding or kicking back. When a dull blade snags, the sudden, forceful reaction can send the saw flying back towards you, creating a serious safety hazard. Sharp blades reduce this risk by cutting cleanly.
- Cost Savings: Buying new skill saw blades can be expensive. Learning DIY saw blade sharpening allows you to revive old blades for a fraction of the cost of replacements.
Assessing Your Skill Saw Blade’s Condition
Before you start honing saw blade edges, it’s important to know if it’s even worth the effort. Some blades are simply too damaged or worn to be effectively sharpened.
- Visual Inspection: Look closely at the teeth. Are they chipped, bent, or missing? Are the cutting edges worn down to a rounded profile? If you see significant damage, it might be time for a new blade.
- Cutting Performance: How does the blade perform? Does it bog down easily? Do your cuts have rough edges and splinters? These are clear indicators that sharpening is needed.
- Heat: Does your saw get excessively hot very quickly when cutting? This is a sign that the blade is creating too much friction due to dullness.
Signs Your Blade Needs Sharpening
| Sign | Description |
|---|---|
| Splintering | Wood fibers are torn rather than cut cleanly. |
| Rough Cuts | The cut surface is uneven and jagged. |
| Increased Force | You have to push harder to get the saw through the material. |
| Saw Bogging Down | The motor slows significantly or stalls during cuts. |
| Excessive Heat | The blade or saw motor becomes unusually hot during operation. |
| Burning Wood | The wood along the cut line develops scorch marks. |
| Bent/Chipped Teeth | Visible damage to the individual teeth of the blade. |
| Visible Wear | The cutting edge of the teeth appears rounded rather than sharp. |
Methods for Sharpening Skill Saw Blades
There are several ways to approach circular saw blade sharpening. The best method for you will depend on your tools, skill level, and the type of blade you have.
1. Hand Filing: The Traditional Approach
Hand filing saw blade teeth is the most accessible DIY method. It requires patience and a steady hand, but it’s very effective for maintaining blades.
Tools You’ll Need:
- Metal File: A fine-toothed, triangular metal file (often called a “slim taper file”) is ideal. The size of the file should match the gullet (the space between teeth) and the angle of the tooth.
- Vice or Clamp: To securely hold the blade while you work.
- Safety Glasses: Absolutely essential to protect your eyes from metal filings.
- Gloves: To protect your hands and provide a better grip.
- Blade Holder (Optional): Some people create simple jigs to hold the blade at the correct angle.
- Marker: To mark teeth that have already been filed.
Step-by-Step Hand Filing:
- Secure the Blade: Mount the skill saw blade in a vice or clamp. Ensure it’s held firmly but without deforming the blade. Position it so you have good access to the teeth.
- Identify the Angle: Look at the existing bevel on the teeth. You want to replicate this angle as closely as possible. Most skill saw blades have a bevel of around 15-25 degrees.
- Start Filing: Place the file in the gullet between two teeth. Position the file at the correct angle to match the tooth bevel.
- File with Purpose: Use smooth, consistent strokes. Apply pressure on the forward stroke (filing the bevel) and lift the file slightly on the return stroke to avoid dulling the file.
- Work in One Direction: File each tooth in the same direction. This helps maintain the tooth’s integrity and prevent snagging.
- Count Your Strokes: Try to use the same number of strokes on each tooth. This ensures uniformity.
- Progress Around the Blade: Move from one tooth to the next, filing each one. Once you’ve gone around the entire blade, check your progress. You might need to go around a second time if the teeth are very dull.
- Check for Consistency: After filing, visually inspect the teeth. They should all have a similar sharp edge and angle.
- Clean the Blade: Remove any metal filings and dust from the blade.
Pro Tip: Mark the first tooth you file with a marker. When you return to that tooth, you know you’ve completed a full pass.
2. Using a Sharpening Jig: Precision and Ease
A sharpening jig for saw blades is a tool designed to hold the blade and guide the file or grinding wheel at the precise angle. This significantly improves accuracy and makes the process much easier, especially for beginners.
Types of Sharpening Jigs:
- Manual Jigs: These typically hold the blade and have a guide for a hand file.
- Powered Jigs: These often integrate with a rotary tool (like a Dremel) or a small grinder, automating the sharpening process.
How to Use a Sharpening Jig:
The specific instructions will vary depending on the jig you purchase, but the general principle is the same:
- Mount the Jig: Secure the jig according to its instructions.
- Clamp the Blade: Place the skill saw blade onto the jig’s arbor or holder.
- Set the Angle: Adjust the jig to the correct tooth bevel angle. Most jigs will have markings or settings for common angles.
- Attach the Abrasive: Load the appropriate file or grinding stone into the jig’s guide.
- Sharpen Each Tooth: Follow the jig’s guidance to move the abrasive along each tooth, ensuring consistent contact and angle. Again, aim for a similar number of passes per tooth.
3. Bench Grinder: Speed and Power (Use with Caution!)
Using a bench grinder saw blade sharpening method is fast but requires extreme care. The heat generated by a grinder can easily damage the temper of the blade’s teeth if not done correctly. This method is best suited for experienced users.
Tools You’ll Need:
- Bench Grinder: With a fine-grit grinding wheel.
- Dressing Tool: To true the grinding wheel.
- Vice: To hold the blade securely.
- Water Bucket: For cooling the blade.
- Safety Glasses and Face Shield: Critical for protection.
- Gloves: For grip and protection.
- Angle Gauge: To set the correct bevel.
Step-by-Step Bench Grinding:
- Prepare the Grinder: Ensure the grinding wheel is clean and true. Mount a fine-grit wheel.
- Secure the Blade: Clamp the blade in a vice so the tooth you want to grind is accessible.
- Set the Angle: Use your angle gauge to position the blade against the grinding wheel at the correct bevel angle.
- Grind Briefly: Lightly touch the tooth to the grinding wheel. Use very short bursts of contact. Crucially, dip the blade in the water bucket frequently to prevent overheating. Overheating will ruin the temper of the steel, making it soft and unable to hold an edge.
- Work Each Tooth: Move to the next tooth, repeating the process. Try to match the original bevel.
- Cool Down: After each pass or two, let the blade cool down in the water.
- Check for Consistency: Visually inspect teeth for uniformity and sharpness.
Warning: This method carries the highest risk of damaging your blade. If you’re new to sharpening, stick to hand filing or a jig.
4. Using a Rotary Tool: The Compact Option
A rotary tool, like a Dremel, can be an effective option for circular saw blade sharpening, especially for smaller blades or touch-ups.
Tools You’ll Need:
- Rotary Tool: With variable speed control.
- Appropriate Grinding Bit: A small grinding stone or diamond grinding bit designed for metal.
- Angle Guide Attachment (Recommended): Many rotary tools have attachments that help maintain a consistent angle.
- Vice or Clamp: To hold the blade.
- Safety Glasses and Gloves: Essential.
Step-by-Step Rotary Tool Sharpening:
- Secure the Blade: Clamp the blade firmly in a vice.
- Select the Bit and Speed: Choose a grinding bit and set your rotary tool to a medium speed.
- Set the Angle: Position the grinding bit against the tooth at the correct bevel angle. An angle guide is highly recommended here.
- Grind Gently: Apply light pressure and move the rotary tool along the tooth’s bevel. Work in one direction.
- One Tooth at a Time: Focus on sharpening one tooth at a time, ensuring you maintain the correct angle and don’t remove too much material.
- Maintain Consistency: Aim for the same number of passes on each tooth.
- Cooling: While less prone to overheating than a bench grinder, still be mindful of heat and allow the blade to cool if it feels warm.
What Kind of File to Use?
For most hand filing saw blade tasks, a slim taper file is the go-to choice. These files are triangular in cross-section, with three cutting faces and two cutting edges. The slim taper allows them to fit neatly into the gullets between the teeth, and the taper itself helps you maintain the correct angle.
- Tooth Count: Files are often described by their “cut” or the spacing of their teeth. For sharpening saw blades, a “second cut” or “smooth cut” file is generally preferred. These have finer teeth, allowing for more precise material removal and a smoother finish on the cutting edge. A coarse file will remove material too quickly and can create a rougher edge.
- File Material: Ensure the file is made of high-carbon steel, as this is necessary for cutting hardened steel teeth.
Common Tooth Angles to Consider
Skill saw blades come with various tooth configurations and angles designed for different materials and cutting actions.
- 0° Hook Angle: Generally used for crosscutting. The tooth face is perpendicular to the blade’s radius.
- 5° to 15° Hook Angle: Common for rip cuts and general-purpose cutting. These teeth have a more aggressive forward angle.
- Negative Hook Angle (e.g., -5° to -15°): Often found on blades designed for cutting harder materials like plastics, laminates, or aluminum. They offer a cleaner cut with less tear-out.
When sharpening, your goal is to restore the original bevel angle. If you don’t know the original angle, look for factory-sharpened teeth for a visual guide. Using an angle gauge can be very helpful here.
Tooth Count and Blade Type
The number of teeth on your skill saw blade (often referred to as TPI – teeth per inch, though for circular blades it’s just “teeth”) influences how you sharpen.
- Low Tooth Count (e.g., 24T): These blades have larger teeth and wider gullets, making them easier to sharpen by hand. They are good for fast rip cuts.
- High Tooth Count (e.g., 60T+): These blades have smaller, more numerous teeth and narrower gullets. They are designed for fine, clean crosscuts. Sharpening these requires a finer file and more precision. A sharpening jig for saw blades can be particularly useful for these.
Blade Types and Sharpening Considerations
| Blade Type | Teeth per Inch (Approx.) | Primary Use | Sharpening Focus |
|---|---|---|---|
| Rip Blade | 10-24T | Cutting with the grain | Restoring aggressive hook angle |
| Crosscut Blade | 40-80T | Cutting across the grain | Maintaining sharp bevels for clean finish |
| Combination Blade | 24-50T | Versatile | Balancing rip and crosscut needs, consistent angles |
| Specialty Blades | Varies | Laminates, metal, etc. | Often require specific angles and care |
Tooth Rebuilding and Repair
While DIY saw blade sharpening focuses on restoring a sharp edge, severe damage like chipped or missing teeth presents a different challenge.
- Minor Chips: Small chips can often be ground or filed away. However, this will change the tooth geometry and can affect the balance of the blade. You’ll need to remove material from the adjacent teeth to match the ground-down tooth.
- Major Damage: Significantly chipped, bent, or missing teeth usually mean the blade is beyond effective DIY repair. Attempting to grind down a severely damaged tooth to match the rest can remove too much material and compromise the blade’s structure.
When in doubt, it’s safer and more effective to replace severely damaged blades.
Maintaining Your Sharp Blades: The Key to Longevity
Sharpening is only part of saw blade maintenance. Keeping your blades in good condition between sharpenings is vital.
- Keep Them Clean: Wood resin, sap, and metal dust can build up on the blade. This buildup can cause the blade to overheat, reduce cutting efficiency, and lead to corrosion. Use a specialized blade cleaner or a degreaser like mineral spirits. You can also use a brass brush to scrub away residue.
- Proper Storage: Store blades in a dry place, away from moisture, to prevent rust. Blade cases or racks are ideal. Avoid stacking them loosely where teeth can be damaged.
- Avoid Striking Objects: Never let your blade hit nails, screws, rocks, or other hard objects. This is a surefire way to chip or dull your teeth and can even damage your saw.
- Regular Inspection: Even if a blade isn’t dull, inspect it for any signs of damage or buildup between uses.
When to Seek Professional Sharpening
While DIY saw blade sharpening is a great skill to have, there are times when professional sharpening services are better.
- Carbide-Tipped Blades: Many modern skill saw blades have carbide tips brazed onto the steel body. Sharpening these requires specialized equipment and expertise to grind the carbide without damaging the braze or the steel. While some advanced DIYers can manage it with specific jigs, it’s often best left to professionals.
- Very Fine-Toothed Blades: Extremely fine-toothed blades (e.g., 80T+) can be difficult to sharpen accurately by hand due to the small size of the teeth.
- Extensive Damage: If your blade has many chipped, bent, or missing teeth, a professional may be able to salvage it by reshaping teeth, which is beyond simple sharpening.
- Balancing: Professionals can also re-balance blades after sharpening, which is important for high-speed saws to prevent vibration and ensure a smooth cut.
Frequently Asked Questions (FAQ)
- Q1: How often should I sharpen my skill saw blade?
A1: This depends heavily on how often you use it, the materials you cut, and the quality of the blade. A general guideline is every 4-10 uses for general DIY work, or when you notice a decline in cut quality. For heavy use, professional sharpening might be needed more frequently. - Q2: Can I sharpen a blade with a Dremel?
A2: Yes, you can sharpen a skill saw blade with a Dremel, but it requires a specific grinding bit and great care to maintain the correct angle and avoid overheating. Using an angle guide attachment is highly recommended for best results. - Q3: What is the best way to sharpen a skill saw blade for beginners?
A3: For beginners, hand filing saw blade teeth with a slim taper file or using a dedicated sharpening jig for saw blades are the safest and most effective methods to learn. They allow for control and gradual learning. - Q4: Will sharpening damage my blade?
A4: Sharpening, if done incorrectly (e.g., overheating with a grinder, removing too much material, or using the wrong angle), can damage your blade. Taking your time, using the right tools, and following proper techniques will minimize the risk. - Q5: How do I know if my blade is a carbide-tipped blade?
A5: Carbide-tipped blades will have small, often silver or grey, inserts at the very tip of each tooth. These are made of a much harder material than the blade body. - Q6: Can I use the same file for different blades?
A6: Yes, as long as the file is suitable for metal and the teeth are of a similar size. However, it’s good practice to dedicate a file to sharpening or to clean it thoroughly between different types of sharpening tasks. - Q7: What does “hook angle” mean in saw blades?
A7: The hook angle refers to the angle of the front face of the tooth relative to the blade’s radius. A positive hook angle makes the blade more aggressive for faster cutting, while a negative hook angle provides a cleaner cut with less tear-out, especially on harder materials. When sharpening, you aim to restore this original angle. - Q8: How do I clean a skill saw blade after sharpening?
A8: After sharpening, use a clean cloth and a degreaser like mineral spirits or even isopropyl alcohol to remove any metal dust or oil residue. Ensure the blade is completely dry before storing or reattaching it to your saw. This is a key part of overall saw blade maintenance.
By following these guidelines, you can effectively sharpen your skill saw blades, ensuring safer, cleaner, and more efficient woodworking for years to come. Remember, consistent saw blade maintenance is as important as the sharpening itself.