
Can you make straight cuts with a skill saw using a guide? Yes, absolutely! A skill saw guide is a game-changer for anyone looking to achieve precise, straight cuts with their circular saw. Whether you’re a seasoned DIYer or just starting, mastering the use of a skill saw cutting accessory can elevate your woodworking projects from good to great. This guide will dive deep into how to use a skill saw guide, exploring various types and techniques to ensure your cuts are always perfect. We’ll cover everything from setting up a basic cutting guide for skill saw applications to employing more advanced skill saw jigs and accessories.
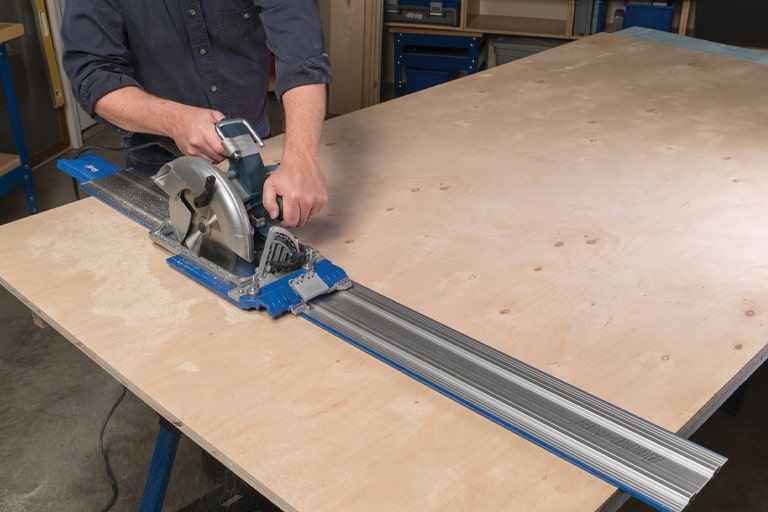
Image Source: learn.kregtool.com
Why Use a Skill Saw Guide?
Using a skill saw guide is crucial for several reasons. Without one, freehand cuts with a circular saw, also known as a skill saw, often result in jagged edges, crooked lines, and wasted materials. This leads to frustration and a less professional finish. A good guide acts as a stabilizer, keeping the saw on track.
Here’s why incorporating a guide is essential:
- Accuracy: Ensures cuts are perfectly straight and on your marked line.
- Consistency: Produces repeatable results, vital for assembly.
- Safety: Helps maintain better control of the saw, reducing the risk of kickback.
- Efficiency: Reduces the need for repeated cuts or extensive sanding to correct errors.
- Material Preservation: Minimizes waste by avoiding miscuts.
Types of Skill Saw Guides
There are several types of skill saw guides available, each with its own strengths and applications. Choosing the right one depends on your project needs and budget.
1. The Rip Fence for Circular Saw
A rip fence is a simple yet effective tool. It attaches to the base plate of your circular saw and slides along the edge of your workpiece.
- How it Works: The rip fence acts as a barrier, guiding the saw blade a consistent distance from the edge of the material.
- Best For: Making rip cuts (cutting along the grain of the wood) or any cut parallel to an existing edge.
- DIY Skill Saw Guide Potential: You can even make a basic rip fence yourself from scrap wood.
Table: Rip Fence Features and Benefits
| Feature | Benefit |
|---|---|
| Adjustable | Can be set for various cut widths |
| Secure Fit | Stays in place during the cut |
| Durable | Withstands the rigors of woodworking |
| Cost-Effective | Generally an inexpensive accessory |
2. Circular Saw Guide Attachments
These are specialized attachments designed to clamp onto your circular saw or act as a separate guide that the saw rides along.
- Clamp-On Guides: These attach directly to the base of your skill saw. They often have a wider base for stability.
- Edge Guides: These are separate pieces of material (metal or wood) that clamp to your workpiece. Your saw, or its rip fence, then runs along this guide. This is a common method for making straight cuts with a skill saw.
3. Cutting Guides for Skill Saw (Commercial Straight Edge Guides)
These are long, rigid strips, often made of aluminum or plastic, with a lip that your saw’s base plate slides against.
- How they Work: You clamp the guide to your workpiece, ensuring the lip is positioned correctly relative to your cut line. Then, you simply run the edge of your saw’s base plate along the guide.
- Advantages: Excellent for long, straight cuts on sheet goods like plywood or MDF. They are often the most reliable way to get factory-edge quality cuts.
- Considerations: Requires careful alignment with the cut line.
4. Skill Saw Jigs
A skill saw jig is a custom-made or purchased device that provides precise guidance for specific types of cuts.
- Types of Jigs:
- Crosscut Jigs: Help make square (90-degree) cuts across the width of a board.
- Dado Jigs: For cutting grooves or dadoes.
- Circle Cutting Jigs: To cut perfect circles.
- DIY Skill Saw Guide Application: Many jigs are excellent DIY projects, allowing you to build exactly what you need.
5. Table Saw Guide vs. Skill Saw Guide
While this article focuses on skill saw guides, it’s worth noting the distinction. A table saw guide, specifically the rip fence and miter slots on a table saw, offers a stationary platform and integrated guides. A skill saw, being a portable tool, relies on external guides or accessories to achieve similar precision. The principles of guiding the blade are similar, but the execution differs significantly.
6. Miter Saw Guide Considerations
A miter saw guide is built into the miter saw itself (the fence and miter angle adjustments). It’s designed for angled crosscuts. While a skill saw can be used with an angle guide, it’s not its primary function. For accurate miter cuts, a miter saw is the tool of choice.
Preparing to Use Your Skill Saw Guide
Before you make that first cut, proper preparation is key. This ensures safety, accuracy, and a smooth workflow.
Setting Up Your Skill Saw
- Blade Depth: Adjust the blade depth so it extends just slightly (about 1/8 to 1/4 inch) below the material you are cutting. This minimizes blade exposure, improving safety and reducing tear-out.
- Base Plate: Ensure the base plate of your skill saw is clean and free of debris.
- Guide Attachment: If using a rip fence or a clamp-on guide attachment, secure it firmly to your saw according to the manufacturer’s instructions.
Preparing Your Workpiece
- Mark Your Cut Line: Use a sharp pencil or marking knife and a reliable straight edge (like a metal ruler or another piece of wood) to draw a clear, precise cut line on your material.
- Support the Material: Ensure your workpiece is adequately supported. For long cuts, use sawhorses or a workbench that can handle the weight and prevent the material from flexing.
- Account for Blade Kerf: Remember that the saw blade has a thickness (the kerf). When setting up your guide, you need to account for this. If your cut line is the precise edge you want to keep, position the guide so the blade cuts on the line. If the line is the waste side, position the guide accordingly.
Tip: For very critical cuts, consider using a marking knife. It scores the wood and can help prevent splintering, especially on hardwoods or delicate veneers.
Using a Skill Saw Guide: Step-by-Step
Let’s walk through the process of making a straight cut using a common type of guide – a commercial straight edge guide.
Method 1: Using a Commercial Straight Edge Guide
This method is excellent for long, accurate cuts, especially on sheet goods.
Materials:
- Circular saw (skill saw)
- Commercial straight edge guide (e.g., Kreg Accu-Cut, BORA WTX Clamp Edge)
- Clamps (at least two sturdy clamps)
- Measuring tape
- Pencil or marking knife
- Safety glasses
- Hearing protection
- Dust mask
Steps:
- Measure and Mark: Measure the desired cut length and draw a precise cut line on your workpiece.
- Determine Blade Offset:
- Place your skill saw on the edge of your workpiece, aligning the blade with your cut line.
- Measure the distance from the edge of your saw’s base plate to the cutting edge of the blade. This is your “blade offset” or “kerf offset.”
- Crucially: Do this measurement from the side of the base plate that will run along your guide.
- Position the Guide:
- Measure from your cut line along the edge of your workpiece by the amount of your blade offset. Mark this new line.
- Place your straight edge guide along this second line. Ensure the edge of the guide is perfectly parallel to your original cut line.
- Important: Double-check the measurement and alignment. A small error here will lead to a crooked cut.
- Clamp the Guide: Securely clamp the straight edge guide to your workpiece at both ends. Ensure the clamps do not obstruct the path of your saw or its base plate.
- Align the Saw:
- Place your skill saw onto the workpiece with the base plate sitting flat.
- Slide the edge of the saw’s base plate against the lip of your straight edge guide.
- Ensure the blade is positioned directly over your original cut line.
- Pre-Start Check:
- Lift the blade guard.
- Make sure the cord is out of the way.
- Confirm the material is stable and the clamps are secure.
- Make the Cut:
- Turn on the skill saw and let it reach full speed.
- Gently push the saw forward, keeping the base plate firmly against the straight edge guide.
- Maintain a steady, consistent speed. Don’t force the saw; let the blade do the work.
- As you reach the end of the cut, continue to support the offcut piece to prevent it from falling and potentially binding the blade or causing a rough finish.
- Finish the Cut: Once the cut is complete, turn off the saw and wait for the blade to stop spinning before lifting it from the material.
- Inspect: Remove the clamps and inspect your cut. It should be perfectly straight and on your intended line.
Method 2: Using a Skill Saw Fence (Rip Fence)
This is ideal for cutting parallel to an existing edge.
Materials:
- Circular saw (skill saw) with a rip fence attachment
- Workpiece
- Measuring tape
- Pencil
- Safety gear
Steps:
- Measure and Mark: Determine the width of the piece you want to cut off. Measure this distance from the edge of your workpiece.
- Set the Rip Fence:
- Loosen the adjustment knob on your rip fence.
- Measure from the cutting edge of the blade (when the saw is positioned as if it were against the edge) to the edge of the rip fence that will bear against your workpiece’s edge.
- Adjust the rip fence so this distance matches your desired cut width.
- Important: Again, account for blade kerf if your measurement is to the edge you want to keep.
- Secure the Fence: Tighten the adjustment knob firmly.
- Position and Support: Place your workpiece on a stable surface.
- Align and Cut:
- Place the rip fence against the edge of your workpiece.
- Turn on the saw.
- Gently push the saw forward, keeping the rip fence firmly in contact with the edge.
- Maintain a smooth, consistent feed rate.
- Complete and Inspect: Finish the cut, turn off the saw, and wait for the blade to stop. Check your cut for accuracy.
Method 3: Creating a DIY Skill Saw Guide (a.k.a. Crosscut Sled Alternative)
For making simple, square crosscuts, you can create a quick guide from scrap wood. This acts similarly to a larger, more stable version of a rip fence but is clamped to the workpiece for each cut.
Materials:
- Two pieces of flat, straight plywood or MDF (one larger as the base, one narrower as the guide fence)
- Your skill saw
- Clamps
- Measuring tape
- Pencil
- Screws or strong adhesive
- Safety gear
Steps:
- Prepare the Base: Cut a piece of plywood or MDF to a suitable size. This will be the wider part that your saw rides on.
- Attach the Guide Fence: Take your narrower, straight piece of wood. This will be the fence your saw’s base plate runs against.
- Align and Attach:
- Place your skill saw on the base piece.
- Align the edge of your saw’s base plate with the desired cut line on your workpiece (imagine your workpiece is placed where the cut will happen).
- Place the guide fence piece onto the base piece, positioning it so that when your saw sits against it, the blade will cut on your intended line.
- Crucial: Measure carefully from the saw’s base plate edge to the guide fence. Ensure it’s the correct distance and perfectly parallel.
- Securely attach the guide fence to the base piece using screws or strong adhesive. Make sure no screws protrude into the area where your saw will travel.
- Use the Guide:
- Clamp your DIY guide onto your workpiece.
- Ensure the guide fence is perfectly aligned with your marked cut line.
- Place your skill saw against the guide fence.
- Make the cut as usual, keeping the saw pressed firmly against the guide.
This DIY skill saw guide is particularly useful for making multiple identical cuts quickly and accurately.
Advanced Techniques and Skill Saw Cutting Accessories
Beyond basic guides, several specialized skill saw cutting accessories can enhance your capabilities.
Using a Circular Saw Guide Rail System
These are high-end systems, like those from Festool or Makita, that use a special guide rail. The saw has a specific shoe that mates with the rail, ensuring absolute precision.
- Pros: Unmatched accuracy, cleaner cuts, dust extraction capabilities.
- Cons: Significant investment.
Leveraging a Skill Saw Jig for Specific Cuts
As mentioned, jigs are excellent for repeatable tasks.
- Straight-Line Jigs: These are often a combination of a base and a movable fence, allowing for precise rip cuts without needing to clamp a separate guide every time.
- Dado Jigs: Allow you to control the depth and width of dados, which are essential for joinery.
- Circle Cutting Jigs: Turn your skill saw into a compass to cut perfect circles.
Making Straight Cuts with a Skill Saw on Curves
While this guide focuses on straight cuts, some circular saw guides, particularly rail systems, can also be used with adapters to make controlled curved cuts. This requires specific jigs and practice.
Maintaining Your Skill Saw and Guides
Proper maintenance ensures longevity and continued accuracy.
- Clean Saw: Keep the base plate and moving parts of your skill saw clean.
- Sharp Blade: A sharp blade is crucial for clean cuts and reduces strain on the saw and the user. Replace blades when they become dull.
- Guide Integrity: Inspect your guides for damage, warping, or bent edges. Repair or replace them as needed.
- Clamp Condition: Ensure your clamps are in good working order and provide a secure grip.
Frequently Asked Questions (FAQ)
Q1: Can I use a table saw guide with a skill saw?
No, a table saw guide (like its rip fence or miter fence) is designed for table saws and cannot be directly used with a skill saw. However, the principles of using a fence to guide the blade are the same, and you can create similar guide systems for your skill saw.
Q2: What’s the best skill saw guide for beginners?
For beginners, a good quality commercial straight edge guide, like those that clamp to your workpiece, is often the easiest to start with. They require minimal setup and provide excellent results for long cuts. A simple rip fence attachment is also a good starting point for rip cuts.
Q3: How do I prevent tear-out when using a skill saw guide?
To prevent tear-out:
* Use a sharp blade.
* Adjust the blade depth to extend only slightly below the material.
* Use a high-quality guide that keeps the saw stable.
* Consider using masking tape or a specialized zero-clearance insert on the saw’s base plate along the cut line.
* On delicate woods, score the cut line with a utility knife before cutting.
Q4: Is a skill saw jig worth the investment?
Yes, if you frequently perform specific types of cuts (like dadoes or repeat crosscuts), a skill saw jig can save you a significant amount of time and improve accuracy, making it well worth the investment. Many can also be made as DIY projects for much less cost.
Q5: How do I ensure my guide is perfectly parallel to my cut line?
This is the most critical step. Use a reliable measuring tape and a sharp pencil or marking knife. Double-check your measurements from the cut line to the guide’s position. A small offset error will result in a crooked cut. For critical cuts, using a metal ruler or framing square to verify alignment is a good practice.
Conclusion
Mastering the use of a skill saw guide transforms a potentially frustrating tool into an instrument of precision. Whether you opt for a simple rip fence, a robust commercial straight edge guide, or a custom-made skill saw jig, the key is careful setup, accurate measurement, and consistent technique. By following these guidelines, you can confidently achieve perfect, straight cuts every time, elevating the quality of your DIY projects and ensuring a safer, more enjoyable woodworking experience. Experiment with different guides and techniques to find what works best for your specific needs and projects. Happy cutting!