
Can you get straight cuts with a circular saw without a fence? Yes, you can achieve remarkably straight cuts with a circular saw even without its built-in rip fence, by utilizing a dedicated cutting guide or a DIY straight edge. This guide will show you exactly how to do that, transforming your circular saw into a precision cutting tool.
If you’re a DIY enthusiast or a professional woodworker, you know that a straight, clean cut is the foundation of any successful project. While a table saw offers excellent precision for rip cuts, it’s not always practical or portable. This is where a circular saw and a reliable guide shine, serving as a fantastic table saw alternative or a portable table saw substitute. We’ll delve into the best methods and tools to ensure your cuts are consistently accurate, whether you’re cutting plywood with a circular saw or trimming dimensional lumber. This post is all about mastering the use of a circular saw guide to achieve those perfect lines, making it easier to produce professional-looking results every time.
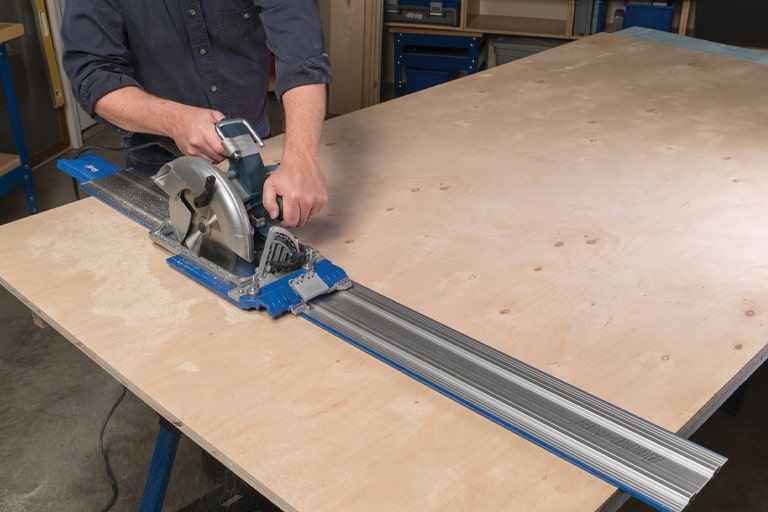
Image Source: learn.kregtool.com
The Essential Role of a Cutting Guide
A circular saw is a powerful and versatile tool, but its handheld nature means that achieving perfectly straight cuts can be a challenge. The blade guard and shoe are designed for general cutting, not for guiding the saw along a specific line with absolute accuracy. This is precisely why a cutting guide for circular saw is invaluable. It acts as an extension of the saw’s base, providing a stable reference point for the saw’s shoe to follow. This ensures the blade travels along a predetermined path, resulting in a clean, straight cut.
Why Guides Are Crucial for Precision
- Accuracy: Guides eliminate the freehand guesswork, which is the primary culprit behind crooked cuts.
- Repeatability: Once set up, you can make multiple identical cuts with confidence.
- Safety: A stable guide helps maintain control of the saw, reducing the risk of kickback.
- Efficiency: Straight cuts mean less time spent sanding, trimming, or adjusting pieces later.
Types of Circular Saw Guides
There are several types of guides available, ranging from commercial products to simple DIY solutions. Each has its advantages, and the best choice often depends on your budget, the types of cuts you’ll be making, and your personal preference.
Commercial Circular Saw Guides
These are purpose-built tools designed to enhance the accuracy of your circular saw.
Types of Commercial Guides:
- Circular Saw Straight Edge Guides: These are typically long, rigid aluminum or plastic extrusions that clamp to your workpiece. They provide a long, straight surface for the saw’s baseplate to slide against. Many come with adjustable clamps and rulers for precise setup.
- Dedicated Cutting Systems/Track Saws: While more advanced and expensive, track saw systems offer unparalleled precision. They consist of a specialized circular saw that rides on a metal track. This system ensures perfectly straight and splinter-free cuts, especially on sheet goods.
- Circular Saw Jigs: These are often more complex setups that can guide the saw in various ways, including making straight cuts, dadoes, or even repeating patterns. Some are designed for specific tasks like cutting dados or tenons.
Pros of Commercial Guides:
- High Accuracy: Generally more precise than DIY options.
- Durability: Made from robust materials for long-term use.
- Ease of Use: Designed for quick setup and reliable performance.
- Specific Features: May include built-in measurement scales, anti-splinter strips, and versatile clamping mechanisms.
Cons of Commercial Guides:
- Cost: Can be a significant investment, especially track saw systems.
- Limited Versatility: Some are designed for specific types of cuts.
DIY Circular Saw Guides
For those on a budget or who enjoy crafting their own tools, a DIY cutting jig or a simple straight edge can be remarkably effective. These are often made from readily available materials like MDF, plywood, or lumber.
Common DIY Guide Materials:
- Plywood or MDF Strips: A long, straight piece of 1/2-inch or 3/4-inch plywood or MDF is a classic choice. Ensure the edge you’ll use as the guide is perfectly straight and smooth.
- Aluminum Extrusion: Similar to commercial straight edges, but you can often find affordable aluminum stock at hardware stores.
- Level: A sturdy metal level can also serve as a temporary straight edge for smaller cuts.
Pros of DIY Guides:
- Cost-Effective: Significantly cheaper than commercial options.
- Customizable: You can build them to the exact length and specifications you need.
- Learning Experience: Building your own jig is a rewarding DIY project.
Cons of DIY Guides:
- Accuracy Dependent on Skill: Requires careful measurement and construction to ensure straightness.
- Durability: May not withstand heavy use as well as commercial products.
- Setup Time: Can take longer to set up compared to pre-made guides.
Mastering the Circular Saw Straight Edge Technique
Using a circular saw straight edge is a fundamental skill for anyone looking to make precise cuts. The core principle is to create a stable, perfectly straight reference that your saw’s baseplate can follow.
Step-by-Step Guide to Using a Straight Edge
1. Choose Your Straight Edge Material:
- For accuracy: A piece of 3/4-inch MDF or high-quality plywood with a factory-finished edge is ideal. Ensure the edge is perfectly straight. You can check this by using a known straight edge or by laying it against a long workbench.
- For rigidity: If you need a very long guide, consider using a straight piece of aluminum extrusion or joining two shorter pieces to create a longer, stable guide.
2. Prepare Your Straight Edge:
- Rip your guide: If you’re using a larger sheet of material, rip a long, straight strip. Aim for a width of at least 3-4 inches.
- Ensure a clean edge: The guiding edge must be absolutely straight and smooth. If there are any imperfections, sand them down.
3. Measure and Mark Your Cut Line:
- On your workpiece, carefully measure and mark the line where you want to cut. Use a sharp pencil or marking knife for the most precise line.
4. Determine the Offset:
This is the most critical step in setting up your guide. You need to account for the distance between the edge of your saw’s baseplate (where it will contact the guide) and the actual cutting edge of the blade.
-
Measure the offset:
- Place your circular saw’s baseplate against the edge of your straight edge material.
- Ensure the blade is positioned directly over your marked cut line.
- Measure the distance from the guiding edge of the straight edge to the side of the blade that will be on your scrap side of the cut. This is your offset.
- Alternatively, if you prefer to have the guide on the side of the blade that stays with your workpiece, measure the distance from the guiding edge to the other side of the blade.
-
Mark the guide’s position:
- On your workpiece, measure this offset distance from your cut line.
- Mark a parallel line for where the edge of your straight edge guide needs to be positioned. This is where the magic happens.
5. Attach Your Straight Edge:
- Align: Position your straight edge so its guiding edge is perfectly aligned with the line you just marked for its placement.
- Clamp securely: Use sturdy clamps (bar clamps, pipe clamps, or C-clamps) to firmly attach the straight edge to your workpiece. Ensure the clamps do not interfere with the path of your circular saw’s baseplate or the blade. Make sure the straight edge is positioned so it doesn’t extend beyond the edge of the workpiece and get caught by the clamp.
6. Position the Circular Saw:
- Place your circular saw onto the workpiece with the baseplate resting against the attached straight edge.
- Double-check that the blade is aligned with your original cut line.
7. Make the Cut:
- Safety First: Ensure your workpiece is stable and that you have a clear path for the saw. Wear safety glasses and hearing protection.
- Start the saw: Let the saw reach full speed before it contacts the material.
- Smooth and steady: Gently feed the saw forward, keeping the baseplate firmly against the straight edge. Don’t force the saw; let its speed do the work.
- Maintain contact: Constantly apply light pressure to keep the baseplate against the guide throughout the entire cut.
- Complete the cut: Continue the cut until the blade has completely passed through the material. Don’t lift the saw while the blade is still spinning.
Table: Understanding the Offset Measurement
| Measurement Point | Description |
|---|---|
| Saw Baseplate Edge | The outer edge of your circular saw’s baseplate that will run along the guide. |
| Blade Cutting Edge | The actual point where the saw blade cuts the material. |
| Cut Line | The line you’ve marked on your workpiece indicating where the material should be severed. |
| Offset Distance | The distance between the Saw Baseplate Edge and the Blade Cutting Edge. This varies depending on your saw. |
| Guide Position Line | A line marked on your workpiece to position the edge of your straight edge guide. |
Key Takeaway: The Guide Position Line is Offset Distance away from the Cut Line, in the direction that keeps the blade on the scrap side.
The DIY Rip Fence: A Versatile Solution
For many cuts, especially those parallel to an existing edge of your material, a DIY rip fence can be an incredibly useful accessory. It’s essentially a long, straight board clamped to your circular saw’s baseplate to act as a fence.
Building a Simple DIY Rip Fence
This is a straightforward cutting guide for circular saw that’s easy to make.
Materials Needed:
- A piece of straight, flat material (e.g., 1/4-inch plywood, hardboard, or a thin melamine board) at least 24 inches long and 3-4 inches wide.
- Two C-clamps or quick-release clamps.
- A measuring tape and pencil.
- A drill and screws (optional, for a more permanent fixture).
Steps to Create and Use:
- Measure your saw’s offset: Just like with a straight edge, you need to determine the distance from the edge of your saw’s baseplate to the blade.
- Mark the fence position: On your chosen fence material, mark a line parallel to one edge at that offset distance.
-
Attach the fence:
- Align the marked line on your fence material with the desired cut line on your workpiece.
- Clamp the fence securely to your workpiece. Ensure it’s parallel to the edge you want to rip along.
- For a more permanent setup: You can attach a small block or runner to the fence material that fits snugly against the edge of your saw’s baseplate. This helps it stay aligned.
-
Make the cut:
- Place the circular saw’s baseplate against the DIY rip fence.
- Ensure the blade is aligned with your cut line.
- Make the cut, keeping the saw pressed firmly against the fence.
This method is excellent for ripping narrow strips from wider boards, essentially turning your circular saw into a makeshift table saw for rip cuts.
Cutting Plywood with a Circular Saw: Enhanced Precision
Cutting plywood with a circular saw is a common task, but plywood’s tendency to splinter can make it challenging. Using a guide greatly improves both the accuracy and the finish of your cuts.
Tips for Splinter-Free Plywood Cuts:
- Blade Selection: Use a blade with more teeth for a cleaner cut. A 40-tooth or 60-tooth blade is generally good for plywood.
- Blade Depth: Set the blade depth so it extends only about 1/4 to 1/2 inch below the bottom of the plywood. This minimizes tear-out on the exit side.
- Support: Ensure the plywood is well-supported, especially the offcut piece, to prevent it from sagging and binding the blade.
- Tape Method: Apply painter’s tape along the cut line. Cut through the tape. This can help hold the wood fibers together and reduce splintering.
- Runner Board: Attach a sacrificial strip of wood (a runner board) to the underside of your plywood, directly beneath the cut line. Clamp it securely. Then, run your saw guide against the edge of this runner board. This guides the saw and the runner board takes the brunt of any tear-out.
Using a Guide for Plywood Cuts:
- Measure and mark your cut line on the plywood.
- Apply painter’s tape along the line if desired.
- Determine the offset from the plywood’s edge to the blade if you’re cutting parallel to an edge (using a rip fence approach). If cutting across the sheet, you’ll use the straight edge method described earlier.
- Clamp your chosen guide (either a straight edge or a DIY rip fence) to the plywood. Ensure it’s precisely aligned with your cut line. If using the runner board method, clamp the runner board first, ensuring its edge is perfectly aligned with your cut line. Then, use the runner board’s edge as your guide for the saw.
- Position the saw against the guide.
- Make the cut, maintaining steady pressure against the guide.
Making a Straight Cut with a Circular Saw: Advanced Techniques
Beyond the basic straight edge and rip fence, there are other ways to achieve a guide for precise cuts.
The Circular Saw Jig: Custom Solutions
A circular saw jig can be tailored for specific tasks, offering even greater accuracy and versatility.
Types of Circular Saw Jigs:
- Dovetail Jigs: While specialized, they often incorporate straight-cutting guides.
- Dado Jigs: Designed to cut grooves of specific widths.
- Repeat Cut Jigs: Used to make multiple identical cuts with precise spacing.
- Crosscut Jigs: Often used with a track saw system or a large guide to ensure square crosscuts on large sheet goods.
Designing Your Own Circular Saw Jig:
- Material: MDF or high-quality plywood is commonly used.
- Key Components:
- Base: A large, flat piece that provides stability.
- Guide Fence: A precisely machined edge that the saw’s baseplate rides against.
- Clamping Mechanism: To secure the jig to your workpiece or the workpiece to the jig.
This approach allows you to create tools for very specific, repeatable tasks, elevating the precision of your circular saw work. For instance, you could build a DIY cutting jig that mounts directly to your saw’s baseplate, featuring an adjustable fence that allows you to set the offset quickly.
The “On-Edge” Method: A Clever Trick
For very long cuts, especially on sheet goods, you can sometimes position the circular saw to cut “on edge” with a long straight edge.
- How it works: Instead of cutting across the face of the material, you clamp a long straight edge to the edge of the sheet and guide the saw along that. This is often used when breaking down large sheets of plywood into smaller, manageable pieces.
- Requirements: A very long, sturdy straight edge (like a level or aluminum extrusion), strong clamps, and careful alignment are essential. The saw’s baseplate will be running along the edge of the straight edge.
Frequently Asked Questions (FAQ)
Q: How far from the blade should my circular saw guide be?
A: The distance, known as the offset, is determined by measuring from the edge of your circular saw’s baseplate to the side of the blade that will be on the scrap side of your cut. This measurement varies depending on the specific saw you are using.
Q: Can I use the factory rip fence that came with my circular saw?
A: Yes, the factory rip fence is designed for making cuts parallel to an existing edge of your material. However, it typically has a limited range (e.g., only a few inches from the edge) and may not be as rigid or accurate as a dedicated straight edge or a well-made DIY guide for longer rip cuts.
Q: What’s the best way to prevent tear-out when cutting plywood?
A: Using a sharp blade with more teeth, setting the blade depth correctly, supporting the material well, applying painter’s tape along the cut line, or using a sacrificial runner board clamped to the underside of the plywood are all effective methods. Combining these with a good cutting guide will yield the best results.
Q: How do I ensure my DIY straight edge is perfectly straight?
A: Use a known straight edge (like a high-quality metal level or a factory-edge piece of MDF/plywood) to check your material. If you’re joining two pieces, ensure the joint is perfectly flush and straight. Sanding the guiding edge smooth is also crucial.
Q: Is a track saw a worthwhile investment for a DIYer?
A: For frequent and demanding sheet good cutting, or if absolute precision and splinter-free edges are critical, a track saw system is an excellent investment. It offers superior accuracy and ease of use compared to other methods. However, for occasional use, a good quality straight edge or a DIY guide can suffice.
Q: How can I make crosscuts perfectly square with a circular saw?
A: To make square crosscuts, you need a guide that is perfectly perpendicular to your desired cut line. This can be achieved by using a large, square piece of material as a reference, or by building a dedicated crosscut sled or jig for your circular saw. Precision alignment is key here.
Conclusion: Elevating Your Cutting Game
Mastering the use of a circular saw guide is a game-changer for any woodworker. Whether you opt for a commercial circular saw straight edge, craft a clever DIY rip fence, or build a specialized circular saw jig, the result is the same: consistently straight, accurate cuts. These techniques transform your circular saw from a general-purpose cutting tool into a precise instrument, enabling you to tackle projects with greater confidence and achieve a professional finish. By following these methods, you’ll find it much easier to achieve that perfect line, every time, whether you’re cutting plywood with a circular saw or making any other precise cut. This skill makes your circular saw a highly capable table saw alternative and a reliable portable table saw substitute, opening up a world of precise woodworking possibilities.