
What is the best way to use a Husqvarna chainsaw file kit? The best way to use a Husqvarna chainsaw file kit is to follow a systematic approach that ensures your chainsaw chain is sharp, efficient, and safe to operate. This involves understanding the components of the kit, the correct filing techniques, and the importance of consistent maintenance.
A sharp chainsaw chain is not just a matter of convenience; it’s a critical aspect of chainsaw maintenance and safety. A dull chain requires more force to cut, leading to operator fatigue, increased wear on the saw, and potentially dangerous kickback situations. Fortunately, with the right tools and a little practice, you can keep your Husqvarna chainsaw cutting like new using its dedicated file kit. This guide will walk you through the process, from identifying the right file to achieving a perfectly sharpened chain.
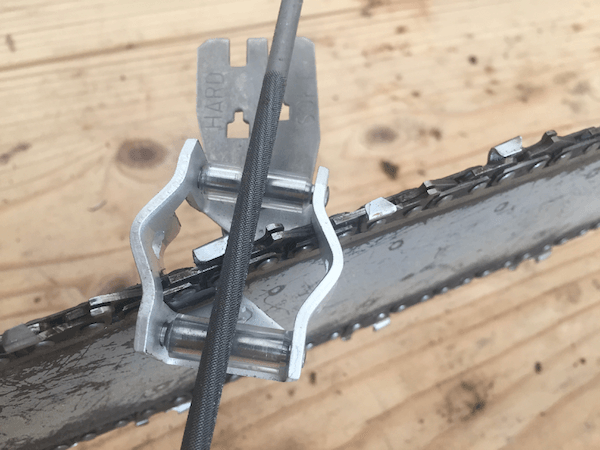
Image Source: www.firewood-for-life.com
Essential Components of Your Husqvarna Chainsaw File Kit
Your Husqvarna chainsaw file kit is designed to be a comprehensive solution for maintaining the cutting edges of your chain. Familiarize yourself with each piece to maximize its effectiveness.
The Round File: The Heart of Sharpening
The round file is the primary tool for shaping and sharpening the cutting teeth of your chainsaw chain. Its diameter is crucial and must match the chain pitch, which is the distance between the drive links.
-
Identifying the Correct Round File Size: The size of the round file is determined by your chainsaw chain’s pitch. Husqvarna typically color-codes its chains or provides clear specifications on the chain or in the owner’s manual. For example:
- .325″ pitch chains often use a 5/32″ (4mm) round file.
- 3/8″ pitch chains commonly use a 7/32″ (5.5mm) round file.
- .404″ pitch chains may require a 13/64″ (5.5mm) or larger round file.
Always double-check your chainsaw’s manual or the chain itself for the exact recommended file size. Using the wrong size file will either not sharpen the tooth correctly or damage its shape.
The Flat File: For Depth Gauge Adjustment
The flat file, often referred to as a bastard file, is essential for adjusting the depth gauge (also known as the raker). The depth gauge controls how much wood the cutting tooth can remove with each pass.
- Purpose of the Flat File: This file is used to lower the depth gauge when it protrudes too far above the cutting tooth. If the depth gauge is too high, the chain will not bite into the wood effectively, leading to slow cutting. If it’s too low, the chain can dig too aggressively, causing premature wear and a risk of kickback.
The Sharpening Guide: Ensuring Precision
The sharpening guide (or file holder) is an invaluable tool that helps you maintain the correct file angle and consistent depth for each tooth. Many Husqvarna file kits include a guide that features markings for common angles.
- Benefits of a Sharpening Guide:
- Consistent Angles: Ensures each tooth is filed at the manufacturer’s recommended angle, which is typically around 25-35 degrees depending on the chain.
- Precise Depth: Helps you file each tooth to the same depth, promoting smooth and even cutting.
- Ease of Use: Provides a comfortable grip and a stable platform for filing.
Other Kit Contents
A complete Husqvarna chainsaw file kit might also include:
- File Handles: Ergonomic handles that fit securely onto the round and flat files.
- Cleaning Brush: A stiff brush for removing sawdust and debris from the chain and file kit components.
- Carrying Pouch: To keep all the tools organized and protected.
Preparing for Chainsaw Sharpening
Before you begin sharpening, proper preparation is key to a successful outcome and your safety.
Safety First: Always Prioritize Safety Gear
Chainsaw sharpening, like any chainsaw work, demands respect for safety. Always wear appropriate personal protective equipment (PPE):
- Cut-Resistant Gloves: Protect your hands from sharp teeth and the file.
- Safety Glasses or Face Shield: Prevent metal filings or debris from entering your eyes.
- Dust Mask: Protect your lungs from fine metal dust.
Securing Your Chainsaw
For effective sharpening, your chainsaw needs to be held firmly and securely.
- Workbench or Vise: The ideal scenario is to secure the chainsaw’s bar in a vise or on a sturdy workbench.
- Chain Brake Engaged: Ensure the chain brake is engaged to prevent accidental movement of the chain.
- Alternative Securing Methods: If a vise isn’t available, you can use sturdy blocks of wood or even the ground, but ensure the saw is stable and won’t shift during the sharpening process.
Inspecting Your Chain
A quick inspection can help you identify any immediate problems before you start filing.
- Damage Check: Look for any bent or broken teeth. Severely damaged teeth may need to be replaced rather than sharpened.
- Wear Signs: Check for excessive wear on the teeth or chain links.
- Chain Tension: Ensure the chain is tensioned correctly. A loose chain can slip on the bar, making sharpening difficult and dangerous.
Mastering the Filing Technique with Your Husqvarna File Kit
The core of chainsaw sharpening lies in the filing technique. This involves a systematic approach to each tooth, ensuring consistency and the correct angles.
Sharpening the Cutting Teeth with the Round File
This is the most crucial step. The goal is to restore the sharp cutting edge of each tooth.
Finding the Correct File Angle
The file angle is paramount for optimal cutting performance. Most modern chainsaw chains are designed to be filed from the side.
- Husqvarna’s Recommended Angle: Husqvarna typically recommends a specific file angle for its chains, often indicated in the owner’s manual or on the chain itself. A common angle is between 25 and 35 degrees.
- Using the Sharpening Guide: If your kit includes a sharpening guide, align the guide so the round file sits at the correct angle relative to the top of the tooth. Many guides have markings that clearly show the desired angle. The guide rests on the top plate of the tooth and the bar top.
The Filing Stroke: One Direction Only
It’s vital to file in one direction to create a clean, sharp edge and avoid damaging the tooth.
- Position the File: Place the round file into the gullet (the curved space) of the cutting tooth, ensuring it contacts the cutting edge. The file should extend out of the tooth and past the heel.
- Apply Firm, Even Pressure: Apply firm, consistent downward pressure on the file as you pull it forward.
- Withdraw the File: Lift the file out of the gullet as you pull it back. Never file on the backstroke. This action will dull the file and damage the tooth.
- Focus on One Tooth at a Time: Work on one tooth at a time, filing until you achieve a sharp, silvery edge. Avoid over-filing, which can shorten the tooth’s life unnecessarily.
Consistency is Key: Filing Every Tooth
- Count Your Strokes: To ensure each tooth is filed to the same degree, count the number of strokes you apply to the first tooth and use that same number for all subsequent teeth on that side of the chain. For example, if you use five strokes on the first tooth, use five strokes on every other tooth.
- Switch Sides: After filing all teeth on one side of the chain, move to the other side and repeat the process, ensuring the same number of strokes and the same filing angle. The goal is symmetry between the left and right-hand cutting teeth.
Adjusting the Depth Gauge with the Flat File
The depth gauge is critical for controlling how deep the cutter bites into the wood.
Using the Depth Gauge Filing Accessory (if included)
Some kits or sharpening guides have a notch or guide that helps you position the flat file correctly relative to the depth gauge.
- Positioning the Flat File: Place the flat file on its side, so it is parallel to the chain’s base plate and just behind the cutting tooth. The flat file should be positioned to lightly shave the top of the depth gauge.
The Filing Process for Depth Gauges
- Locate the Depth Gauge: Identify the depth gauge in front of each cutting tooth.
- File Gently: Use the flat file to gently file the top of the depth gauge. The goal is to lower it so it is approximately 0.025 inches (0.64 mm) below the cutting edge of the tooth. A common guideline is for the depth gauge to be about one-third of the way down the cutter’s gullet.
- Consistency: File each depth gauge to the same level.
- Check with a Gauge: For ultimate precision, use a dedicated depth gauge tool, which often comes with more advanced sharpening kits or can be purchased separately. This tool helps ensure all depth gauges are set to the correct height.
- Smooth Edges: After filing, use the flat file to smooth any rough edges on the depth gauge.
Specific Considerations for Depth Gauges
- Chain Type: Different chain types have slightly different depth gauge profiles and recommended heights. Consult your Husqvarna manual.
- Cutting Conditions: In very hard wood or dirty conditions, you might slightly lower the depth gauges (e.g., by another 0.010 inches) to prevent the chain from loading up. However, for general use, stick to the recommended setting.
Maintaining Your Husqvarna Chainsaw File Kit
Proper care of your file kit ensures its longevity and effectiveness.
Cleaning the Files
After each use, it’s essential to clean your files to maintain their cutting ability.
- Brush Off Debris: Use the cleaning brush to remove sawdust, metal filings, and pitch residue from the teeth of both the round and flat files.
- Avoid Oil: Do not use oil on your files, as this can cause them to clog and become less effective.
Storage
Store your file kit in a dry place to prevent rust.
- Keep it Organized: Use the provided pouch or a designated tool bag to keep all the components together.
- Protect the Files: Ensure the files are not rubbing against each other, which can cause wear.
Troubleshooting Common Sharpening Issues
Even with a good kit, you might encounter problems. Here are some common issues and how to address them.
Issue: Chain is Cutting Slowly or “Pushing”
- Possible Causes:
- Dull chain (most common)
- Depth gauges set too high
- Incorrect file angle used during sharpening
- Chain is too loose
- Solutions:
- Re-sharpen the chain using the correct technique.
- Check and adjust the depth gauges using the flat file.
- Ensure you are using the correct file angle.
- Tension the chain properly.
Issue: Chain is “Chattering” or Bouncing
- Possible Causes:
- Depth gauges are set too low.
- Teeth are unevenly sharpened.
- Solutions:
- Check and adjust depth gauges to the correct height.
- Re-sharpen the chain, ensuring consistent strokes and angles on all teeth.
Issue: Uneven Cutting or Chain Pulling to One Side
- Possible Causes:
- Uneven sharpening – some teeth are sharper or have different angles than others.
- One side of the chain is significantly more worn than the other.
- Solutions:
- Pay close attention to counting strokes and maintaining the correct file angle on both sides of the chain.
- If one side is significantly worn, you may need to file it more aggressively (but still consistently) or consider replacing the chain.
FAQ: Your Chainsaw Sharpening Questions Answered
Here are some common questions people have about using their Husqvarna chainsaw file kit:
Q1: How often should I sharpen my chainsaw chain?
A1: You should sharpen your chainsaw chain whenever you notice a decline in cutting performance. This can be every 5-10 minutes of actual cutting time, depending on the wood you’re cutting and how cleanly you’re cutting. A good rule of thumb is to check the chain’s sharpness every time you refuel your chainsaw.
Q2: Can I use a generic file kit on my Husqvarna chainsaw?
A2: While you can use a generic file kit, it’s highly recommended to use a Husqvarna-specific file kit or one that explicitly matches your chain’s pitch and gauge. Husqvarna designs its chains and file kits to work in perfect harmony, ensuring optimal performance and longevity. Generic kits might have files with incorrect diameters or angles, leading to less effective sharpening or potential damage to the chain.
Q3: What is the difference between a 5/32″ file and a 7/32″ file?
A3: The difference lies in their diameter. A 5/32″ file is smaller in diameter than a 7/32″ file. The correct diameter is crucial for matching your chain’s pitch. Using a file that is too small or too large will not properly sharpen the tooth’s cutting edge and gullet.
Q4: How do I know if my chain is sharp enough?
A4: A sharp chain will produce fine, fluffy sawdust. A dull chain will produce larger, sawdust-like chips, or the saw will tend to “push” through the wood, requiring more force from the operator. When you hold the chainsaw at an angle, the teeth should have a silvery, shiny cutting edge, free of any burrs or dullness.
Q5: Can I sharpen a chain that is damaged (e.g., a bent tooth)?
A5: Minor damage, like a slightly rolled-over cutting edge, can often be corrected with careful filing. However, if a tooth is bent significantly, broken, or the chain has been damaged in a way that affects its overall integrity, it’s generally safer and more effective to replace the entire chain. Sharpening severely damaged teeth can lead to an unsafe and unbalanced chain.
Q6: What is the purpose of the depth gauge?
A6: The depth gauge, also called a raker, precedes the cutting tooth. Its purpose is to limit how deep the cutting tooth can penetrate the wood. By setting the correct height for the depth gauge, you control the chip size and the speed at which the chain cuts. If the depth gauge is too high, the chain won’t bite effectively. If it’s too low, the chain will cut too aggressively, leading to vibration, increased wear, and a higher risk of kickback.
By consistently using your Husqvarna chainsaw file kit with proper technique and attention to detail, you’ll ensure your chainsaw performs at its best, making your cutting tasks safer, easier, and more efficient. Regular sharpening is a fundamental part of chainsaw maintenance that no owner should overlook.