
What is a saw horse? A saw horse is a sturdy A-frame or trestle-like structure used to support workpieces, typically lumber, during cutting, assembly, or finishing operations. Can I use a saw horse for any woodworking task? Yes, saw horses are versatile tools for many woodworking tasks, from cutting large boards to supporting projects during assembly. Who is a saw horse for? Saw horses are essential for anyone involved in woodworking, from DIY enthusiasts and hobbyists to professional carpenters and contractors.
Saw horses are the unsung heroes of the workshop. They provide crucial support, elevate your work to a comfortable height, and make challenging tasks significantly easier. Whether you’re a seasoned woodworker or just starting your DIY journey, knowing how to effectively use saw horses can dramatically improve your efficiency, safety, and the quality of your projects. This comprehensive guide will delve into the world of saw horses, covering everything from choosing the right type to mastering their placement and ensuring stability.
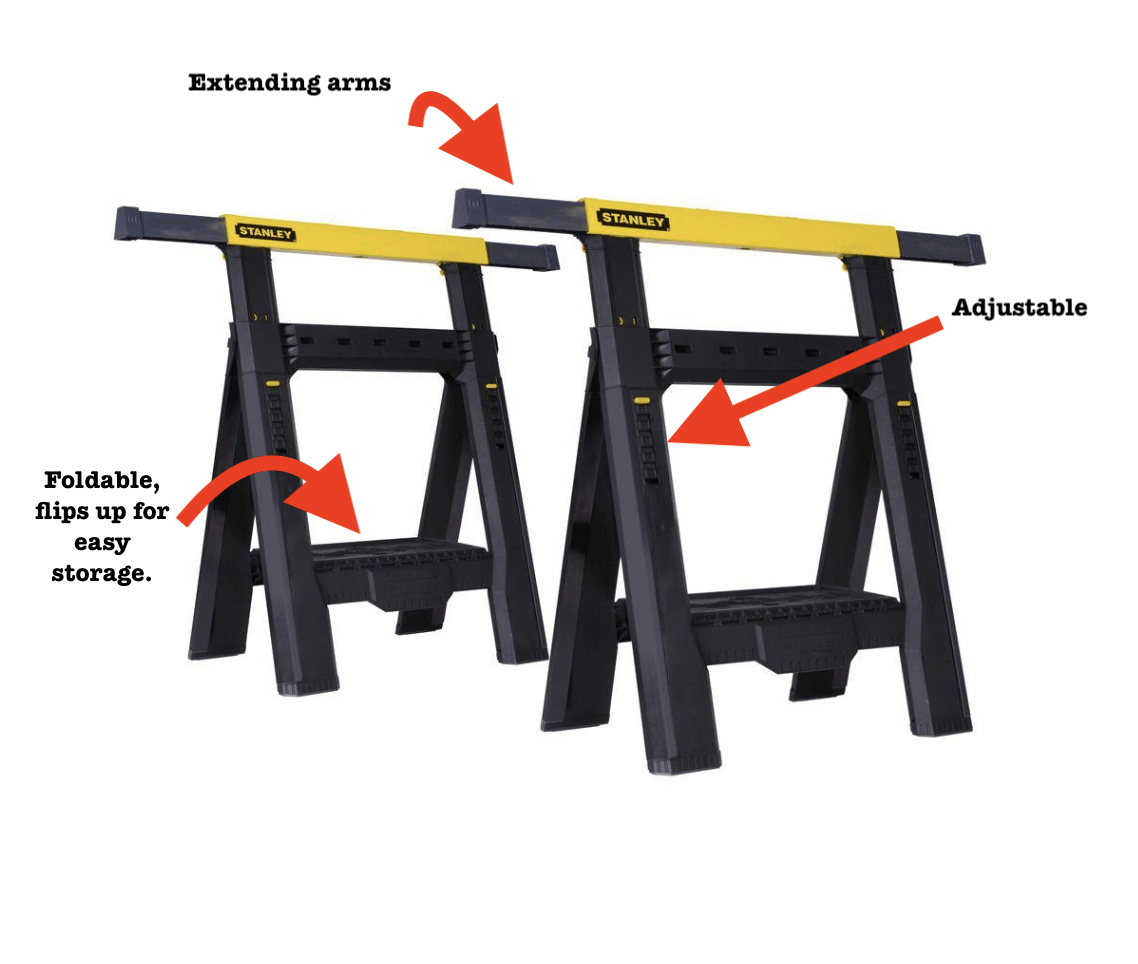
Image Source: thriftdiving.com
Exploring Different Sawhorse Types
The market offers a variety of sawhorse types, each designed to meet specific needs and preferences. Selecting the right sawhorse for your tasks is the first step towards maximizing their utility.
Solid Wooden Sawhorses
These are the classic, robust workhorses. Often built from sturdy lumber like 2x4s or 2x6s, they are known for their durability and stability.
- Pros:
- Incredibly strong and can handle heavy loads.
- Relatively inexpensive to build yourself (DIY sawhorse).
- Can be customized to specific heights or lengths.
- Cons:
- Heavy and bulky, making them less portable.
- Require a larger storage space.
- Can be time-consuming to assemble if building from scratch.
Metal Sawhorses
Metal saw horses, typically made from steel or aluminum, offer a blend of strength and lighter weight compared to their wooden counterparts.
- Pros:
- Excellent durability and resistance to warping or rotting.
- Often foldable for easier storage and transport, making them a great portable sawhorse option.
- Can support substantial weight.
- Cons:
- Can be more expensive than wooden ones.
- May be susceptible to rust if not properly maintained.
- Can be slippery surfaces for workpieces if not equipped with non-slip tops.
Plastic or Composite Sawhorses
These are lightweight and often weather-resistant, making them ideal for outdoor use or for those who need portability.
- Pros:
- Extremely lightweight and easy to carry.
- Resistant to moisture, rot, and insects.
- Many are foldable and compact.
- Often come with convenient features like tool trays or cord hangers.
- Cons:
- May not be as robust as metal or heavy-duty wooden saw horses for very heavy loads.
- Can be less stable on uneven surfaces.
Folding Sawhorses
These are designed for convenience, collapsing into a compact form for easy storage and transport. They are available in various materials, including metal and plastic.
- Pros:
- Excellent for small workshops or for users who need to transport their equipment frequently.
- Quick to set up and take down.
- Cons:
- The folding mechanisms can sometimes be a point of failure if not well-made.
- May have slightly less stability than fixed-leg models.
Adjustable Sawhorses
These saw horses allow you to change their height, offering greater flexibility for different working heights and materials.
- Pros:
- Versatile for various tasks and user heights.
- Can be adjusted to compensate for uneven floors.
- Cons:
- The adjustment mechanisms can add complexity and potential failure points.
- Often more expensive than fixed-height models.
Sawhorse Setup: Getting Started
Proper sawhorse setup is critical for safety and efficiency. A well-prepared workstation prevents accidents and ensures precise cuts.
Step-by-Step Sawhorse Assembly (for DIY or Foldable Models)
If you’ve purchased a sawhorse that requires assembly, follow these general steps. For DIY sawhorses, this is the process of building them.
For DIY Wooden Sawhorses:
- Gather Materials: You’ll need lumber (e.g., 2x4s), screws or bolts, and wood glue.
- Cut Your Pieces: Based on your chosen design, cut the legs, top supports, and bracing pieces. Ensure all cuts are square for maximum stability.
- Assemble the Legs: Create two A-frames by joining two legs at the top with a support piece. Use wood glue and screws for strong joints.
- Add Bracing: Connect the two A-frames with cross braces at the bottom to prevent the legs from splaying outwards.
- Attach the Top: Secure a sturdy top piece to the angled tops of the A-frames. This is where your workpiece will rest.
- Check for Squareness: Before the glue dries, ensure all connections are square and the entire structure is plumb.
For Foldable Sawhorses:
- Unfold the Legs: Carefully unfold the legs from their stored position.
- Deploy the Supports: If there are any support braces or locking mechanisms, ensure they are fully extended and locked into place.
- Check for Stability: Gently test the sawhorse for any wobble. Ensure all hinges and joints are secure.
Sawhorse Placement: Strategic Positioning
Where you place your sawhorses can make a significant difference in how stable your workpiece is and how comfortably you can work.
Key Considerations for Sawhorse Placement
- Distance Between Sawhorses: The ideal distance depends on the length and weight of the material you’re supporting. For longer pieces, place sawhorses closer to the ends to prevent sagging. For shorter, heavier pieces, ensure the sawhorses are spaced to adequately support the weight without being too close together, which can make cutting awkward. A good rule of thumb is to place them about two-thirds of the way in from the ends for longer boards, or close enough to comfortably support the item without it overhanging too much.
- Level Ground: Always place sawhorses on a flat, stable surface. Uneven ground can lead to instability and dangerous situations. If the ground is slightly uneven, you may need to use shims under the legs.
- Working Height: Adjust your sawhorses to a comfortable working height. This generally means the top of the sawhorse should be at or slightly below your hip bone. This allows you to use good posture and leverage when cutting. If your sawhorses are adjustable, take advantage of this feature.
- Clearance: Ensure there’s enough space around the sawhorses for you to move freely and safely. Avoid placing them where they can be easily bumped or tripped over.
- Material Orientation: Position the sawhorses so that the grain of the wood or the direction of your cuts is easily accessible. For crosscuts, you want the cut line to be positioned over one of the sawhorses or in a way that the offcut piece is supported.
Using Sawhorses for Cutting
Sawhorses are indispensable when it comes to cutting lumber. Their primary role is to hold the material steady so you can make a clean, accurate cut.
Best Practices for Sawhorse Use for Cutting:
- Support the Cut Line: Position the sawhorse so that the workpiece is supported on either side of your cut line. This prevents the piece from bending or pinching your saw blade, which can lead to kickback or a rough cut. Ideally, have the cut line positioned directly over the top of a sawhorse.
- Secure the Workpiece (Optional but Recommended): While sawhorses provide support, for longer or heavier pieces, or when making repetitive cuts, consider using clamps to secure the workpiece to the sawhorse. This adds an extra layer of stability and prevents the material from shifting.
- Blade Clearance: Ensure your saw blade has clearance to pass through the material without hitting the sawhorse itself. This is especially important when using power saws.
- Offcut Support: Make sure the offcut piece is also supported. As you cut, the offcut can shift or fall, potentially throwing off your cut or creating a safety hazard. Position the second sawhorse to catch the offcut.
- Blade Path: Plan your saw path. Ensure you have a clear line of sight and access to make the cut accurately.
Achieving Sawhorse Stability: A Foundation for Success
The stability of your sawhorses is paramount. An unstable setup is a recipe for disaster, leading to inaccurate cuts, damaged workpieces, and potential injury.
Factors Influencing Sawhorse Stability
- Build Quality: For DIY sawhorses, the quality of your joints and the materials used directly impact stability. Well-constructed, sturdy joints are crucial.
- Material Choice: Heavier materials like thick wood or steel generally offer greater inherent stability than lighter plastics.
- Leg Design: Legs that splay outwards (like an ‘A’ frame) provide more stability than straight, vertical legs. Wider stances are also more stable.
- Cross Bracing: Proper bracing between the legs is essential to prevent the sawhorse from racking or collapsing.
- Surface: As mentioned, a level and firm surface is critical. Soft ground can cause legs to sink, compromising stability.
- Load Distribution: Distributing weight evenly across the sawhorse and ensuring the load isn’t exceeding the sawhorse’s capacity is key.
Tips for Enhancing Sawhorse Stability
- Use Clamps: Clamp your workpiece to the sawhorses, especially when precise cuts are needed or when working with heavy or awkward materials.
- Shim Uneven Surfaces: If you absolutely must use sawhorses on slightly uneven ground, use sturdy shims (pieces of wood) to level out the legs. Avoid using flimsy materials that can compress.
- Consider a “Bridged” Setup: For very long or heavy pieces, you can place two sawhorses side-by-side and then span a sturdy plank or beam across their tops. This creates a wider, more stable platform for your workpiece.
- Check Your Sawhorses Regularly: Inspect your sawhorses for any signs of wear, loose joints, or damage. Repair or replace them as needed.
- Don’t Overload: Be mindful of the weight capacity of your sawhorses. Exceeding this limit can lead to failure.
The Versatility of Sawhorses in Woodworking
Saw horses are not just for cutting. Their application in woodworking extends to a multitude of tasks, making them incredibly versatile tools.
Supporting Projects During Assembly and Gluing
When joining pieces of wood, sawhorses provide a stable platform to hold the components in place while glue sets or while you apply clamps.
- Assembly Jig: You can even create simple jigs that attach to your sawhorses to help align pieces for complex assemblies.
- Clamping Support: Position your work so that clamps can be applied effectively without obstruction.
Holding Materials for Planing and Sanding
For tasks like hand planing or sanding, sawhorses elevate the workpiece to a comfortable height and keep it steady.
- Planing: Place the wood across the sawhorses and use clamps to secure it firmly. This allows you to apply downward pressure with your plane without the wood moving.
- Sanding: Similarly, sawhorses provide a stable surface for sanding. For larger pieces, you might use a jig or additional supports to keep the material flat and accessible.
Creating Temporary Workbenches
By placing plywood or planks across two pairs of sawhorses, you can quickly create a robust temporary workbench.
- Customizable Size: The length and width of your workbench can be easily adjusted by the number and spacing of the sawhorses and the size of the boards you use.
- Height Adjustment: If using adjustable sawhorses, you can set the workbench to your preferred working height.
Supporting Larger Sheet Goods
When working with large sheets of plywood or MDF, sawhorses are essential for keeping the material off the ground and at a manageable height for cutting.
- Multiple Supports: For very large sheets, you may need to use more than two sawhorses to prevent sagging in the middle.
- Edge Support: Ensure the edges of the sheet goods are well-supported, especially if you plan to cut them down the middle.
DIY Sawhorse: Building Your Own
Building your own sawhorses can be a rewarding and cost-effective way to get exactly what you need. It also provides a deeper appreciation for these essential tools.
Designing Your DIY Sawhorse
Consider the following when designing your DIY sawhorse:
- Load Capacity: How much weight do you anticipate needing to support? This will dictate the strength of your materials and joint design.
- Portability: Do you need them to be easily moved or stored? This might influence the size and whether you incorporate folding mechanisms.
- Height: Standard working height is around 30-36 inches, but you might prefer a different height based on your projects.
- Features: Do you want a top with a groove for clamping or a wider surface area?
Essential Tools for Sawhorse Assembly (DIY)
- Circular saw or Miter saw for cutting lumber.
- Drill/Driver for pre-drilling and driving screws.
- Tape measure and pencil for marking.
- Square for ensuring accurate cuts and assembly.
- Sandpaper or orbital sander for smoothing edges.
- Wood glue.
- Screws or bolts.
The Portable Sawhorse Advantage
For many woodworkers, especially those who work on-site or have limited workshop space, a portable sawhorse is a game-changer.
Features to Look for in a Portable Sawhorse
- Lightweight Materials: Aluminum or reinforced plastic are common.
- Folding Mechanism: A sturdy and easy-to-use folding design is crucial for portability and storage.
- Compact Size When Folded: It should be easy to fit into a truck, van, or storage closet.
- Carrying Handle: Many portable sawhorses include a handle for easier transport.
- Durability: While lightweight, they still need to be robust enough for your typical tasks.
Adjustable Sawhorse: Customizing Your Workspace
Adjustable sawhorses offer a level of flexibility that fixed-height models cannot match.
When to Choose Adjustable Sawhorses
- Varying Project Heights: If you work with a wide range of materials or have different user heights in your workshop.
- Uneven Floors: The ability to adjust leg heights is invaluable for compensating for uneven ground.
- Ergonomic Preferences: You can fine-tune the height for maximum comfort during specific tasks.
Maintaining Adjustable Sawhorses
- Keep Mechanisms Clean: Dust and debris can interfere with the smooth operation of adjustment mechanisms.
- Lubricate Moving Parts: Periodically lubricate any moving parts to ensure they function correctly.
- Check for Wear: Inspect the adjustment components for any signs of wear or damage.
Sawhorses for Woodworking: A Final Word
Saw horses are fundamental pieces of woodworking equipment. Mastering their use – from choosing the right type and ensuring proper sawhorse setup and placement, to prioritizing sawhorse stability and understanding their various applications – will elevate your woodworking capabilities. Whether you opt for a heavy-duty DIY sawhorse, a convenient portable sawhorse, or a versatile adjustable sawhorse, investing time in learning how to use them effectively will pay dividends in safety, efficiency, and the quality of your finished projects.
Frequently Asked Questions (FAQ)
Q1: How many sawhorses do I need?
A1: For most cutting tasks, two sawhorses are sufficient. However, for supporting long lumber, large sheet goods, or for creating a workbench, you might need four sawhorses.
Q2: What is the best material for sawhorses?
A2: The “best” material depends on your needs. Wood is strong and can be DIY’d. Metal is durable and often lighter. Plastic is very lightweight and weather-resistant. Consider the weight capacity, portability, and durability requirements for your typical tasks.
Q3: Can I use sawhorses on a slope?
A3: It is strongly advised against using sawhorses on a slope. This can lead to instability and dangerous situations. If absolutely necessary, ensure the ground is as level as possible and use sturdy shims to stabilize each leg individually, but it is still not recommended.
Q4: How high should my sawhorses be?
A4: A comfortable working height is typically at or slightly below hip level, allowing you to use good posture. This is often between 30 and 36 inches. Adjustable sawhorses allow you to customize this to your preference.
Q5: How do I clean and maintain my sawhorses?
A5: For wooden sawhorses, keep them dry and consider sealing them with a protective finish. For metal sawhorses, wipe them down and check for rust; touch up with paint if needed. For plastic sawhorses, a simple wipe-down with soap and water is usually sufficient. For any sawhorse with moving parts (like folding or adjustable ones), ensure those mechanisms are kept clean and occasionally lubricated.