
Image Source: contentgrid.homedepot-static.com
How To Wire A Circuit Breaker: Step-by-Step Guide
What is a circuit breaker and how do I wire one? A circuit breaker is a safety device that protects electrical circuits from damage caused by overcurrent or short circuits. Wiring a circuit breaker involves connecting it to the electrical system within your electrical panel to control and protect a specific circuit. This guide will walk you through the process, emphasizing safety at every step.
Can I wire a circuit breaker myself? While this guide provides detailed instructions, rewiring a breaker or performing a circuit breaker installation can be dangerous if not done correctly. It is highly recommended to consult a qualified electrician, especially if you are unfamiliar with residential wiring or breaker box wiring. Safety is paramount when dealing with AC power.
Why Proper Circuit Breaker Wiring Matters
A correctly wired circuit breaker is essential for preventing electrical fires, protecting your appliances, and ensuring the safety of your home’s electrical system. It acts as an automatic switch that cuts off power when it detects an overload or a fault, stopping potential hazards before they escalate.
Essential Tools and Materials
Before you begin, gather the necessary tools and materials. Having everything ready will make the process smoother and safer.
Tools:
- Voltage Tester: A non-contact voltage tester is crucial for confirming that the power is off.
- Screwdrivers: A set of Phillips and flathead screwdrivers in various sizes.
- Wire Strippers/Cutters: For safely removing insulation from wires and cutting them to the correct length.
- Pliers: Needle-nose pliers are useful for bending and manipulating wires.
- Wire Crimpers: For attaching connectors to wires if needed.
- Safety Glasses: To protect your eyes from debris.
- Gloves: Insulated gloves can provide an extra layer of protection.
- Flashlight or Headlamp: For illuminating the inside of the breaker box.
Materials:
- Correctly Rated Circuit Breaker: Ensure the new breaker matches the amperage and type required for the circuit it will protect. Check the existing wiring and the appliance it will serve.
- Wire Connectors (if needed): Such as wire nuts or terminal connectors.
- Electrical Tape: For insulating connections if necessary.
- Mounting Screws: For securing the breaker to the bus bar.
Safety First: Critical Precautions
Working with electricity can be hazardous. Prioritize safety by following these crucial steps.
- Turn Off the Main Power: This is the most critical step. Locate your main breaker (usually the largest breaker at the top of the electrical panel) and switch it to the “OFF” position. This cuts power to the entire house.
- Verify Power is Off: After switching off the main breaker, use your voltage tester to confirm that no power is present in the breaker box. Test all the bus bars and the incoming power wires.
- Wear Protective Gear: Always wear safety glasses and, if possible, insulated gloves.
- Work in a Dry Environment: Ensure the area around the electrical panel is dry. Water and electricity are a dangerous combination.
- Do Not Rush: Take your time and work methodically. Rushing can lead to mistakes and accidents.
- Consult an Electrician if Unsure: If at any point you feel uncomfortable or unsure about the steps, stop and call a qualified electrician.
Deciphering Your Electrical Panel
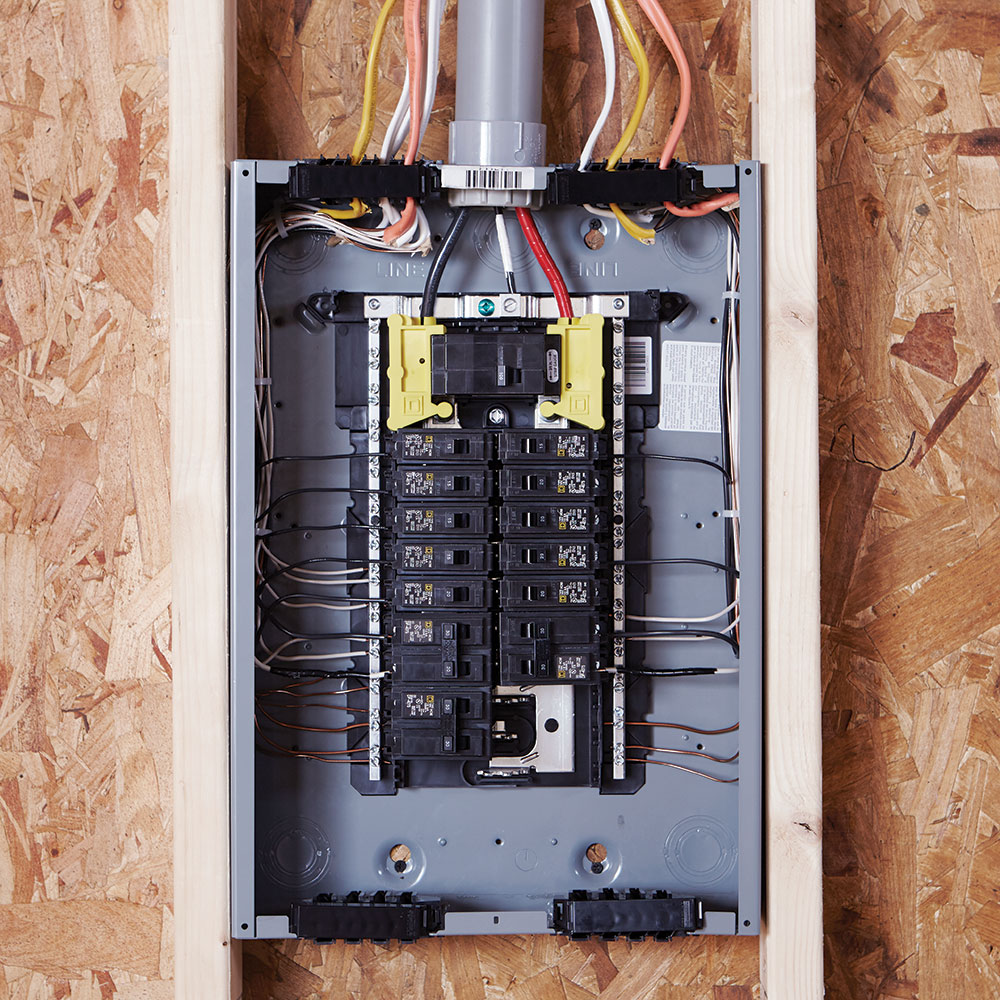
Before you can start wiring, you need to understand the layout of your electrical panel. This metal box houses all the circuit breakers that control the electricity in your home.
The Main Breaker
The main breaker is the primary switch for your entire electrical system. It’s typically located at the top of the panel and has a higher amperage rating than individual circuit breakers. When you flip the main breaker off, it disconnects the panel from the utility power source.
Individual Circuit Breakers
Each smaller breaker in the panel controls a specific circuit in your home, such as lighting, outlets, or appliances. They are rated in amps (e.g., 15A, 20A) to match the capacity of the wires and the devices on that circuit.
The Bus Bar
The bus bar is a metal strip inside the panel that distributes power from the main breaker to all the individual circuit breakers. It has slots where the breakers clip into place.
Wiring Diagram
Most breaker panels have a wiring diagram or a label inside the cover that indicates which breaker controls which circuit. This is invaluable for identifying the correct breaker you need to work with or replace.
Step-by-Step Guide to Wiring a Circuit Breaker
This guide assumes you are replacing an existing breaker or adding a new one to an existing panel with available slots and correctly sized wiring.
Step 1: Safely De-energize the Panel
As emphasized in the safety section, this is the most crucial step.
- Locate the main breaker in your electrical panel.
- Flip the main breaker to the “OFF” position.
- Use your non-contact voltage tester to confirm that power is completely off to all parts of the electrical panel. Test the bus bars where the breakers connect and the incoming hot wires.
Step 2: Accessing the Breakers
Once you’ve confirmed the power is off, you can safely remove the panel cover.
- Remove Panel Cover: Most breaker panels have screws holding the cover in place. Carefully unscrew and remove the cover to expose the circuit breakers.
Step 3: Identifying the Circuit and Existing Breaker (If Replacing)
If you are rewiring a breaker or replacing an old one, you need to identify the specific breaker.
- Consult the Panel Label/Wiring Diagram: Refer to the wiring diagram or label inside the panel door. It should indicate which breaker corresponds to which circuit (e.g., “Living Room Outlets,” “Kitchen Lights”).
- Turn Off the Target Breaker: Even though the main power is off, it’s good practice to ensure the specific breaker you’re working on is in the “OFF” position.
- Observe Wire Connections: Note how the wires are connected to the existing breaker. Typically, a hot wire connects to the breaker’s terminal screw, and a grounding wire connects to the grounding bus bar.
Step 4: Removing the Old Breaker (If Applicable)
If you’re replacing a breaker, you’ll need to remove the old one first.
- Disconnect the Hot Wire: Loosen the terminal screw on the breaker and carefully detach the hot wire.
- Release the Breaker: Circuit breakers clip onto the bus bar at the bottom and often have a clip at the top as well. Gently pry the breaker away from the bus bar to release it. Some breakers may require you to push the breaker handle towards the “OFF” position to release the clip at the top.
- Remove the Breaker: Once disconnected from the bus bar, pull the breaker straight out.
Step 5: Preparing the New Circuit Breaker
Ensure your new breaker is the correct type and amperage for the circuit.
- Check Breaker Type: Single-pole breakers are for 120V circuits, while double-pole breakers are for 240V circuits and take up two slots. Ensure you have the correct one.
- Check Amperage Rating: The breaker’s amperage rating must match or be lower than the wire gauge it’s connected to. For example, 14-gauge wire is typically used with 15-amp breakers, and 12-gauge wire with 20-amp breakers. Consult your wiring diagram and local electrical codes.
Step 6: Connecting the Hot Wire to the New Breaker
This is where the circuit breaker installation happens.
- Strip Wire Insulation: Use wire strippers to remove about 1/2 to 3/4 inch of insulation from the end of the hot wire.
- Secure the Wire: Insert the stripped end of the hot wire into the terminal screw on the new circuit breaker.
- Tighten the Screw: Use a screwdriver to firmly tighten the terminal screw. Ensure the wire is securely held and no bare copper is exposed outside the terminal. Do not overtighten, as this can damage the wire or the breaker.
Step 7: Installing the New Breaker into the Panel
Now, you’ll physically install the breaker into the electrical panel.
- Align with Bus Bar: Position the new breaker so that the metal clip at its bottom aligns with the bus bar in the electrical panel.
- Clip it In: Push the breaker firmly upwards until the bottom clip snaps securely onto the bus bar. You might hear a click.
- Secure the Top (If Applicable): Some breakers have a top clip that attaches to a mounting rail. Ensure this is also securely in place.
Step 8: Connecting the Grounding Wire
Proper grounding is essential for electrical safety.
- Locate the Grounding Bus Bar: This is a bar with screw terminals where all grounding wires (usually bare copper or green insulated) are connected.
- Connect the Grounding Wire: If your circuit has a grounding wire, ensure it is securely connected to an available terminal on the grounding bus bar. If you are adding a new circuit, run the grounding wire from the source to this bus bar and connect it. For existing circuits, the grounding wire will likely already be there, secured to the panel’s chassis or a dedicated grounding bus bar.
Step 9: Reassembling the Panel
Once all connections are made and checked, it’s time to put the panel cover back on.
- Replace the Panel Cover: Carefully place the cover back over the electrical panel.
- Secure the Cover: Screw the panel cover back into place.
Step 10: Testing the New Circuit
This is the moment of truth.
- Turn On the Main Breaker: Return to the main breaker and flip it back to the “ON” position.
- Turn On the New Breaker: Now, flip the newly wired circuit breaker to the “ON” position.
- Test the Circuit: Go to the area controlled by the new breaker and test the outlets or lights. Use a simple appliance like a lamp to confirm it’s working correctly. If anything seems amiss, immediately turn off the breaker and recheck your work or call an electrician.
Important Considerations for Specific Circuits
Different types of circuits may require specific breaker types or wiring considerations.
Dedicated Appliance Circuits
Appliances like refrigerators, microwaves, and washing machines often require dedicated circuits to prevent overloads. These circuits typically use heavier gauge wire and appropriately sized breakers (e.g., 20A or 30A).
GFCI and AFCI Breakers
- Ground Fault Circuit Interrupter (GFCI): These breakers are essential for areas where water is present, like bathrooms, kitchens, and outdoors. They protect against ground faults, which can cause electric shock.
- Arc Fault Circuit Interrupter (AFCI): AFCI breakers protect against electrical arcs, which can be a fire hazard. They are often required in bedrooms and living areas by modern building codes.
If you are installing or replacing a GFCI or AFCI breaker, follow the manufacturer’s specific instructions, as they have additional terminals for sensing and a test button.
Common Mistakes to Avoid
- Using the Wrong Size Breaker: Installing a breaker with a higher amperage than the wire can safely handle is extremely dangerous and a fire hazard.
- Not Turning Off the Main Power: This is the most common and dangerous mistake. Always de-energize the entire panel.
- Loose Connections: Poorly secured wires can cause arcing, overheating, and potential fires.
- Improper Grounding: Failing to connect the grounding wire can prevent the breaker from tripping during a fault, leaving you unprotected.
- Overfilling the Panel: Ensure there is adequate space and the panel is not overloaded with breakers, which can lead to overheating.
- Mixing Breaker Brands: While some brands are interchangeable, it’s always best to use breakers specifically designed for your panel’s brand and model to ensure proper fit and function.
When to Call a Professional Electrician
While this guide provides detailed steps, there are situations where professional help is essential.
- You are unsure about any step.
- Your electrical panel is old or shows signs of damage.
- You are dealing with aluminum wiring.
- You need to install a new circuit from scratch.
- You are not comfortable working with AC power.
- You encounter any unexpected issues during the process.
An experienced electrician has the knowledge and tools to ensure the job is done safely and correctly, adhering to all local residential wiring codes.
Frequently Asked Questions (FAQ)
Q1: How do I know what size breaker to use?
A1: The breaker size (amperage) is determined by the gauge of the wire it’s connected to and the electrical load it will serve. For example, 14-gauge copper wire is typically used with 15-amp breakers, and 12-gauge copper wire with 20-amp breakers. Always consult local electrical codes and the requirements of the appliance or circuit you are powering.
Q2: Can I put a higher amperage breaker in if my old one keeps tripping?
A2: No, this is extremely dangerous. A breaker trips to protect the circuit from overload. Putting in a higher amperage breaker will allow more current to flow than the wires can safely handle, creating a serious fire hazard. The tripping indicates an issue with the circuit that needs to be investigated by an electrician.
Q3: What is a tandem breaker?
A3: A tandem breaker (also known as a slimline or double-stuff breaker) is a breaker that fits into a single slot in the panel but provides two separate circuits. They are useful in panels with limited space but must be compatible with your panel’s brand and type.
Q4: Do I need to turn off the main breaker to replace just one breaker?
A4: Yes, absolutely. Even though you’re only replacing one breaker, the entire panel is still live when the main breaker is on. Always turn off the main breaker and verify power is off before working inside the electrical panel.
Q5: What is the difference between a single-pole and a double-pole breaker?
A5: A single-pole breaker is for 120-volt circuits and controls one hot wire and one neutral. A double-pole breaker is for 240-volt circuits and controls two hot wires, typically found in appliances like electric dryers, ovens, or central air conditioners. They take up two slots in the breaker panel.
Q6: Where does the grounding wire connect?
A6: The grounding wire (usually bare copper or green insulated) connects to the grounding bus bar within the electrical panel. This bus bar is connected to the metal casing of the panel and ultimately to the earth, providing a safe path for fault current.
By following these steps and prioritizing electrical safety, you can successfully wire a circuit breaker. Remember, when in doubt, always consult a qualified electrician.