
Can you replace an extension cord plug yourself? Yes, you can replace an extension cord plug yourself with the right tools and guidance. This guide will walk you through the process of wiring a new plug onto an extension cord, whether you’re performing an extension cord repair, replacing appliance plug ends, or dealing with a frayed cord. It’s a vital skill for maintaining your electrical tools and appliances, ensuring safety and functionality. We’ll cover everything from choosing the right plug to making the final connections.
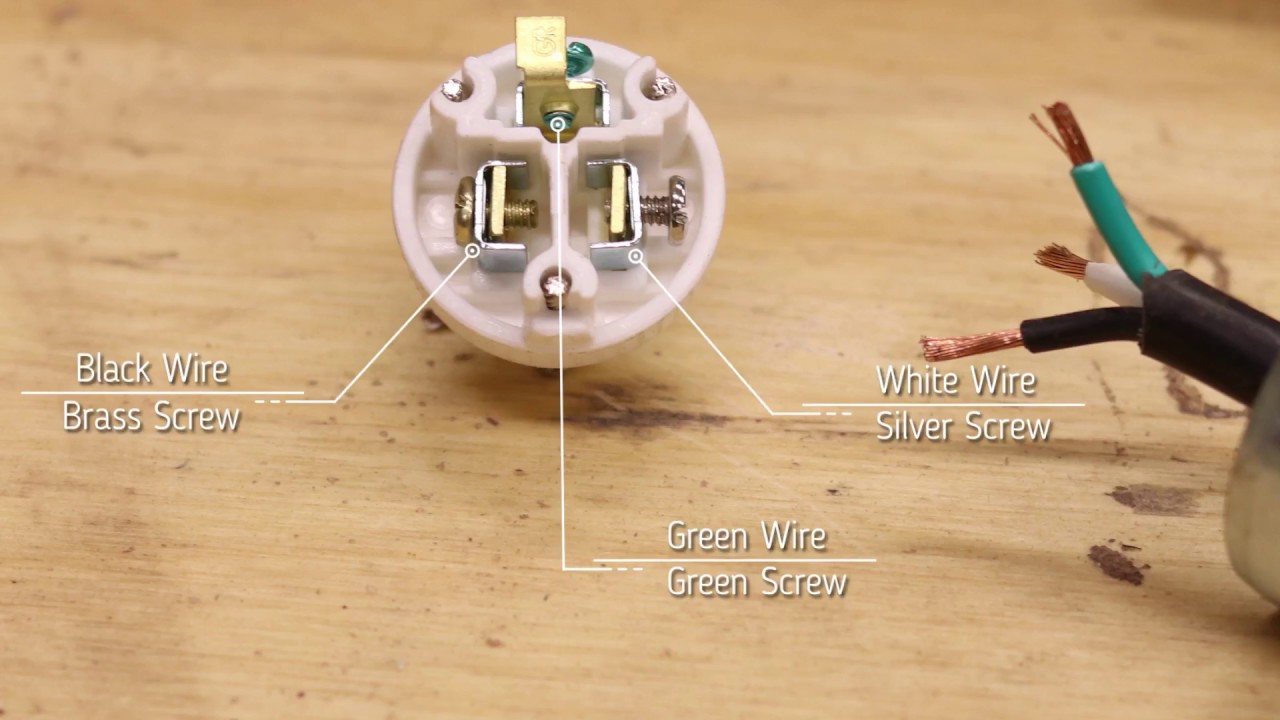
Image Source: i.ytimg.com
Why Wire a New Plug?
Extension cords are workhorses, but their plugs can take a beating. Physical damage, wear and tear, or simply a faulty connection can render an entire cord unusable. Instead of discarding a perfectly good cord, wiring a new plug is an economical and practical solution. This is also crucial when you need to adapt an existing cord for a different purpose or when a component like a grounded plug wiring is damaged. Sometimes, the appliance cord repair is as simple as a new plug at the end. This process is also known as outlet plug installation for the cord itself, giving it a new life.
Common Reasons for Plug Replacement:
- Physical Damage: Cracks, bends, or breaks in the original plug.
- Frayed Wires: Exposed wires at the connection point.
- Loose Connections: The plug wiggles or feels loose in outlets.
- Corrosion: Metal contacts may corrode, hindering conductivity.
- Outdated Plugs: Replacing older, non-polarized plugs with safer, polarized ones.
- Accidental Damage: The plug might get run over by equipment or caught on something.
Tools and Materials You’ll Need
Before you start wiring a new plug, gather all your tools and materials. Having everything ready ensures a smooth and safe repair.
Essential Tools:
- Wire Strippers/Cutters: For cutting and stripping insulation from wires.
- Screwdrivers: A Phillips head and a flathead screwdriver are usually needed to open the plug housing and secure wire connections.
- Pliers (Needle-nose): Helpful for gripping and manipulating wires, especially for bending them into loops.
- Utility Knife or Box Cutter: For carefully cutting away damaged outer insulation on the cord.
- Multimeter (Optional but Recommended): To test continuity and ensure connections are made correctly.
Materials:
- Replacement Plug: Ensure it matches the amperage rating and type (polarized or non-polarized) of the original cord. Look for plugs with a sturdy, impact-resistant housing.
- Heat Shrink Tubing or Electrical Tape: For insulating exposed wire splices if any part of the cord itself needs splicing electrical wire. This is crucial for extension cord repair where the wire itself might be compromised.
- Replacement Cord (If Necessary): If the cord itself is significantly damaged, you might need to perform a more extensive cord replacement.
Safety First: Essential Precautions
Electrical work, even on low-voltage cords, demands respect for safety. Electrical plug repair should never be rushed.
- Unplug Everything: ALWAYS ensure the extension cord is unplugged from any power source before you begin any work. This is the most critical step.
- Work in a Dry Area: Never attempt appliance cord repair or outlet plug installation in a damp or wet environment.
- Inspect the Cord: Before starting, examine the entire length of the cord for any nicks, cuts, or damage to the outer insulation. If the cord itself is damaged, it’s safer to replace the entire cord rather than just the plug.
- Use Proper Tools: Using the wrong tools can damage the wires or create unsafe connections.
- Match Amperage: Ensure your replacement plug is rated for the same amperage as the original cord. Overloading a plug can lead to overheating and fire hazards.
- Grounding: If you are working with a grounded plug (three prongs), ensure the new plug correctly connects the ground wire. This is key for grounded plug wiring.
Step-by-Step Guide to Wiring a New Plug
Let’s break down the process of wiring a new plug. This process is similar whether you’re wiring a new plug from scratch or doing an extension cord repair.
Step 1: Disassemble the Old Plug
- Locate the Seam: Most plugs have a seam where the two halves of the housing meet.
- Remove Screws: Use the appropriate screwdriver to remove any screws holding the plug housing together. These are often located on the side or bottom of the plug.
- Carefully Separate Halves: Gently pry apart the two halves of the plug housing. Sometimes, they might be a snug fit, so a bit of gentle wiggling or using a flathead screwdriver as a lever might be needed. Be careful not to damage the internal wire connections or the cord itself.
Step 2: Inspect and Prepare the Cord End
- Examine the Cord: Look at the end of the cord that was inside the old plug. If it’s frayed or damaged, you’ll need to trim it back.
- Cut Back Damaged Section: If the cord’s outer insulation is damaged, use a utility knife to carefully cut away the damaged section. Aim for a clean cut.
- Strip Outer Insulation: You’ll need to expose the individual insulated wires inside. The length you need to strip will depend on the new plug housing, but typically it’s about 1 to 1.5 inches. Use wire strippers set to the correct gauge for your cord. Make a shallow cut around the outer insulation and pull it off. Be careful not to nick the inner wires.
Step 3: Identify and Prepare the Wires
Most common extension cords have three wires:
- Hot (Black or Red): This wire carries the current from the power source.
- Neutral (White or Gray): This wire completes the circuit, returning current to the power source.
- Ground (Green or Bare Copper): This is a safety wire that provides a path for electricity in case of a fault.
Table 1: Wire Identification
| Wire Color | Function | Typical Purpose |
|---|---|---|
| Black or Red | Hot | Carries power from the outlet to the device. |
| White or Gray | Neutral | Returns power to the outlet, completing the circuit. |
| Green or Bare | Ground | Safety wire; protects against electric shock. |
- Strip Inner Wire Insulation: For each of the internal wires (hot, neutral, and ground), you need to strip about 0.5 inches of insulation from the end. Again, use wire strippers carefully to avoid cutting into the copper strands.
- Twist Wire Strands: Gently twist the exposed copper strands of each wire together to create a tight bundle. This makes it easier to secure them under the terminal screws.
- Form Loops (If Necessary): For screw terminals, you’ll need to form a small loop at the end of each wire. Use needle-nose pliers to bend the wire clockwise around the screwdriver tip. The loop should be large enough to fit around the terminal screw.
Step 4: Connect Wires to the New Plug
This is where grounded plug wiring is particularly important. The way you connect the wires is critical for safety.
-
Observe Terminal Placement: Look at the inside of your new plug. You’ll see screw terminals, usually color-coded or marked.
- Ground Screw: Typically a green screw, often at the bottom or center of the plug.
- Neutral Screw: Usually a silver or light-colored screw, often on one side.
- Hot Screw: Typically a brass or dark-colored screw, on the opposite side of the neutral screw.
-
Connect the Ground Wire: Take the green or bare copper wire and loop it clockwise around the green ground screw. Tighten the screw firmly with a screwdriver. Ensure the loop is snug and the wire is making good contact.
-
Connect the Neutral Wire: Take the white or gray wire and loop it clockwise around the silver/light-colored neutral screw. Tighten the screw firmly.
-
Connect the Hot Wire: Take the black or red wire and loop it clockwise around the brass/dark-colored hot screw. Tighten the screw firmly.
-
Check Connections: Gently tug on each wire to ensure it’s securely fastened under the screw terminal. The wires should not be loose or able to pull out. Make sure no stray strands of wire are touching other terminals or the metal casing of the plug (if any). This is a key part of outlet plug installation.
Step 5: Reassemble the Plug Housing
- Arrange Wires: Carefully tuck the wires into the designated channels within the plug housing. Ensure the insulation of the cord is held firmly by the strain relief clamp inside the plug. This clamp prevents the wires from being pulled directly from the terminals if the cord is tugged. This is a vital step for preventing further appliance cord repair needs.
- Align Housing Halves: Place the other half of the plug housing over the assembled wires and terminals. Ensure the cord is properly seated in its groove and the strain relief is clamping the outer cord jacket.
- Secure Housing: Reinsert and tighten the screws that hold the plug housing together. Make sure the housing is snug and secure, with no gaps.
Step 6: Test the New Plug
- Visual Inspection: Double-check that the plug is properly assembled, with no exposed wires and all screws tight.
- Continuity Test (Optional but Recommended): If you have a multimeter, set it to continuity mode (usually indicated by a beeping sound or resistance symbol).
- Test the connection between the hot terminal in the plug and one of the blades.
- Test the connection between the neutral terminal and the other blade.
- Test the connection between the ground terminal and the ground pin.
A beep or a low resistance reading indicates a good connection.
- Test with Power: Plug the newly wired extension cord into a known working outlet. Then, plug a low-power device (like a lamp) into the other end of the extension cord to verify it works. If it doesn’t work or you notice any sparks or strange smells, immediately unplug it and re-examine your connections.
Advanced Extension Cord Repair: Splicing Electrical Wire
Sometimes, the damage might be in the middle of the cord, requiring splicing electrical wire. This is a more complex repair and should only be attempted if you are comfortable with electrical work.
When is Splicing Necessary?
- A nick or cut in the outer insulation, but the inner wires are undamaged.
- A damaged section in the middle of a long cord that you want to shorten.
How to Splice Electrical Wire:
- Safety First: ALWAYS unplug the cord and cut the cord on either side of the damaged area to ensure you are working with completely de-energized wire.
- Prepare Wires: Carefully strip the outer insulation from both ends of the cord. Then, strip the inner insulation from the corresponding hot, neutral, and ground wires on both cut ends. You’ll effectively have four sets of wires to join.
- Connect Wires: Join corresponding wires using wire nuts or crimp connectors.
- Connect the hot wire from one side to the hot wire from the other side.
- Connect the neutral wire from one side to the neutral wire from the other side.
- Connect the ground wire from one side to the ground wire from the other side.
Ensure each connection is secure. For wire nuts, twist them on tightly until they won’t turn further. For crimp connectors, use a proper crimping tool.
- Insulate Each Splice: This is a critical step. Cover each individual wire connection with heat shrink tubing or sturdy electrical tape. If using heat shrink, slide it over the wire before connecting, then slide it back over the splice and heat it with a heat gun or lighter until it shrinks snugly around the connection.
- Reinforce the Cord: Once all individual splices are insulated, you can use a larger piece of heat shrink tubing or a rubber splice kit to cover the entire spliced area, providing mechanical strength and further insulation. This is essentially performing a cord replacement on a section of the wire.
Important Note: Splicing can weaken a cord if not done correctly. It’s generally safer to replace the entire cord if the damage is extensive or in multiple places.
Troubleshooting Common Issues
- No Power:
- Check if the breaker tripped at the outlet.
- Re-examine all connections in the new plug. Ensure wires are securely tightened under the screws.
- Verify the neutral and hot wires are connected to the correct terminals.
- Use a multimeter to check for continuity through the cord and the new plug.
- Cord Gets Hot:
- This is a serious sign of a poor connection or an overloaded cord.
- Immediately unplug the cord.
- Check all wire connections in the plug for tightness and proper contact.
- Ensure the cord’s amperage rating is sufficient for the device being powered.
- If the cord itself feels excessively hot along its length, it may be damaged internally or undersized.
- Sparks or Arcing:
- Immediately unplug the cord.
- This indicates loose wires, exposed copper touching the wrong parts, or a faulty plug.
- Disassemble the plug and carefully check all connections and wire placement.
Frequently Asked Questions (FAQ)
What is the difference between a polarized and non-polarized plug?
A polarized plug has one blade that is wider than the other. This ensures the device is plugged in the correct way, with the “hot” wire always connecting to the same terminal. This enhances safety by ensuring the switch on the appliance is connected to the hot side of the circuit.
Can I use electrical tape instead of heat shrink tubing for insulation?
While electrical tape can be used, heat shrink tubing or proper wire nuts are generally preferred for their durability and more reliable insulation. If using tape, wrap it tightly and ensure good overlap to prevent it from coming undone.
What if my cord has four wires?
Some heavy-duty or specialized cords may have four wires (e.g., for 240V appliances). You’ll need to identify the function of each wire (often indicated by color coding or manufacturer specifications) and ensure your replacement plug and wiring accommodate all connections. Always match the wiring configuration precisely.
Is it safe to repair a frayed cord by simply taping it?
No. Frayed cords indicate damaged insulation, which can lead to electrical shorts or shock hazards. While temporary electrical tape might cover the fray, it does not provide adequate protection. It’s best to perform an extension cord repair by replacing the plug or, if the cord itself is damaged, replacing the entire cord.
How do I know what amperage my extension cord is rated for?
The amperage rating (and voltage rating) is usually printed on the outer jacket of the extension cord itself, often near the plug. It will typically be indicated as “10A,” “15A,” or similar. Ensure your replacement plug matches this rating or is rated higher.
By following these steps, you can confidently perform extension cord repair and ensure your electrical cords remain safe and functional. Remember, when in doubt, always consult a qualified electrician.