
Can you wire an extension cord end yourself? Yes, you can absolutely wire an extension cord end yourself, and it’s a straightforward process when you follow safety guidelines. This guide will walk you through replacing a plug and repairing an extension cord so you can confidently tackle a cord end replacement. Whether you’re dealing with a frayed end or need to attach a new one, DIY extension cord repair is within your reach. We’ll cover rewiring a plug, attaching a new end, and even how to splice an extension cord safely.
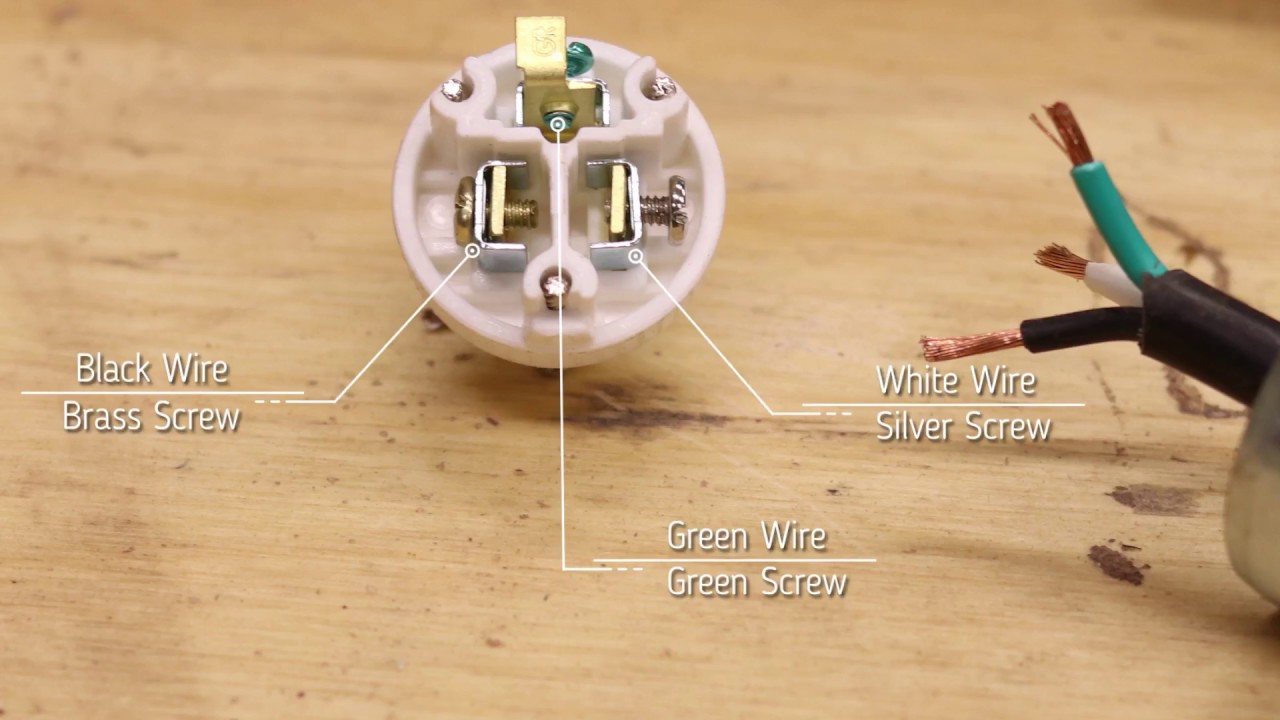
Image Source: i.ytimg.com
Why Repair Instead of Replace?
Sometimes, an extension cord looks perfectly fine, but the end is damaged. Maybe a prong is bent, the plastic housing is cracked, or the wires inside are exposed. In these cases, replacing a damaged plug is a much more economical and environmentally friendly option than buying a brand-new extension cord. It’s a practical skill that can save you money and reduce waste. This process falls under the umbrella of extension cord repair, and with the right tools and a bit of care, you can restore your cord to full working order.
Tools and Materials You’ll Need
Before you begin wiring a replacement plug, gather these essential items:
- New Replacement Plug: Make sure it’s rated for the same amperage and voltage as your extension cord. Look for a heavy-duty plug if your cord is for outdoor or high-power use.
- Wire Strippers/Cutters: These are crucial for safely stripping the insulation from the wires.
- Screwdriver Set: You’ll likely need a Phillips head and a flathead screwdriver to open and close the plug housing.
- Utility Knife or Small Knife: Useful for cutting away damaged outer sheathing if necessary.
- Wire Brush (Optional): To clean any corrosion off the wire strands.
- Electrical Tape or Heat Shrink Tubing (Optional): For extra insulation and strain relief.
- Safety Glasses: Always protect your eyes when working with tools and electricity.
- Work Gloves (Optional): For a better grip and protection.
Safety First: Essential Precautions
Working with electricity, even low voltage from an extension cord, demands respect. Always prioritize safety.
- Unplug the Extension Cord: This is the MOST important step. Ensure the cord is completely disconnected from any power source before you start. Double-check that it’s not plugged into an outlet.
- Work in a Dry Area: Never attempt extension cord repair in a wet or damp environment. Water and electricity are a dangerous combination.
- Inspect the Cord: Before attaching a new end, check the rest of the cord for any damage, such as cuts, abrasions, or brittle insulation. If the cord itself is severely damaged, it’s safer to discard it and buy a new one.
- Match the Plug Rating: Ensure the replacement plug you buy is rated for the same amperage and voltage as the original cord. Using an under-rated plug can cause overheating and fire hazards.
- Color Coding: Remember that electrical wiring has color codes. In North America, typically:
- Black wire: Hot (live)
- White wire: Neutral
- Green wire: Ground
- Other colors (like red or blue): Sometimes used for switched hot wires or in multi-conductor cables. Always refer to the original wiring if possible.
- Tight Connections: Loose connections are a major cause of electrical faults and overheating. Ensure all wire connections are secure.
Step-by-Step Guide: Replacing an Extension Cord Plug
Here’s how to perform a successful cord end replacement, making your extension cord safe and functional again. This process is also known as rewiring a plug.
Step 1: Disassemble the Old Plug
- Examine the Plug: Look at the plug that needs replacing. Most plugs have a housing that is held together by screws.
- Remove the Screws: Use the appropriate screwdriver to remove the screws securing the plug’s housing. There might be one or two screws. Keep these screws in a safe place.
- Open the Housing: Carefully pry open the plug housing. It might snap open or have internal clips. You may need to gently use a flathead screwdriver to help separate the halves.
- Expose the Wires: Once the housing is open, you will see the wires from the extension cord connected to the plug’s internal terminals.
Step 2: Detach the Old Wires
- Note the Wire Connections: Before disconnecting anything, take a clear picture or make a note of which wire goes to which terminal. This is critical for correct reassembly. Typically, the ground wire (green) connects to the green screw, the neutral wire (white) to the silver or white screw, and the hot wire (black) to the brass or black screw.
- Loosen the Terminals: Use your screwdriver to loosen the screws holding the wires to the terminals.
- Remove the Wires: Gently pull the wires free from the terminals.
- Remove the Strain Relief: Most plugs have a strain relief clamp that holds the outer jacket of the cord securely. Loosen or remove any screws holding this clamp. This clamp is important because it prevents the wires from being pulled directly from the terminals if the cord is tugged.
Step 3: Prepare the Extension Cord
- Trim Damaged End (If Necessary): If the end of the cord is frayed or damaged beyond just the plug, you might need to trim off a small section. Use a sharp utility knife to make a clean, straight cut. Be careful not to cut too deep and damage the inner wires.
- Strip the Outer Sheathing: Use your wire strippers or utility knife to carefully remove about 1 to 1.5 inches of the outer protective sheathing of the extension cord. Again, be cautious not to nick or cut the insulation of the inner wires.
- Strip the Inner Wires: Now, you need to strip about 0.5 to 0.75 inches of insulation from the end of each inner wire (black, white, and green). Use your wire strippers. Select the notch on the stripper that fits the wire gauge snugly. Twist the stripper slightly and pull to remove the insulation cleanly. Avoid nicking the copper wire itself. If you nicked the wire, trim the nicked portion off.
- Clean the Wire Ends (Optional): If the copper wires look dull or slightly corroded, gently use a wire brush to clean them. This ensures a good electrical connection.
Step 4: Connect Wires to the New Plug
- Install the Strain Relief: Slide the strain relief clamp onto the cord, ensuring it’s positioned to grip the outer sheathing firmly.
- Bend Wire Ends: For a secure connection, create a small J-hook at the end of each wire by bending it around a thin screwdriver or by hand. This hook will wrap around the terminal screw.
- Connect the Ground Wire: Wrap the end of the green ground wire clockwise around the green terminal screw. Tighten the screw firmly, ensuring the wire is snug.
- Connect the Neutral Wire: Wrap the end of the white neutral wire clockwise around the silver or white terminal screw. Tighten the screw firmly.
- Connect the Hot Wire: Wrap the end of the black hot wire clockwise around the brass or black terminal screw. Tighten the screw firmly.
- Double-Check Connections: Ensure no stray strands of wire are sticking out from under the terminals. These could cause a short circuit. Ensure each wire is wrapped around the screw in the direction that tightening the screw will pull the wire tighter.
Step 5: Reassemble the New Plug
- Position the Wires: Carefully tuck the wires into their respective spaces within the plug housing. Make sure no wires are pinched or strained in a way that could damage their insulation.
- Secure the Strain Relief: Position the strain relief clamp so it grips the outer sheathing of the cord, just as the insulation was stripped away. Tighten the screws holding the strain relief clamp firmly. This is crucial for preventing stress on the wire connections.
- Close the Housing: Carefully align the two halves of the plug housing and snap or press them together.
- Replace the Housing Screws: Insert and tighten the screws that hold the plug housing together. Don’t overtighten, as you could strip the plastic threads.
Step 6: Test the Repaired Cord
- Visual Inspection: Give the newly wired plug a good visual inspection. Ensure it looks neat, the housing is secure, and no wires are exposed.
- Plug It In: Carefully plug the repaired extension cord into a known working outlet.
- Test with a Device: Plug a small, low-power device (like a lamp) into the extension cord to verify it’s working correctly. If the device powers on, your DIY extension cord repair was successful!
How to Splice an Extension Cord: When the Cord Itself is Damaged
Sometimes, the damage isn’t to the plug but to the cord itself – a cut or abrasion exposing the wires within. How to splice an extension cord is a more advanced repair, but it can be done safely if you’re careful. This is a more involved form of extension cord repair.
Important Note: Splicing an extension cord should ideally be done with a waterproof connector rated for outdoor use if the cord is intended for such. For indoor repairs, robust electrical tape or heat shrink tubing can suffice, but always prioritize a secure and insulated connection.
Tools and Materials for Splicing
- Replacement Cord Section (if needed): If a significant length is damaged, you might need a matching gauge wire.
- Waterproof Wire Connectors (for outdoor use): Crimp-style connectors with built-in sealant.
- Electrical Tape: High-quality, weather-resistant tape.
- Heat Shrink Tubing: Especially large diameter tubing that can slide over the splice. A heat gun is needed for this.
- Wire Strippers/Cutters: As mentioned before.
- Utility Knife: For cutting the outer jacket.
- Crimping Tool: If using crimp connectors.
- Safety Glasses: Essential.
The Splicing Process
- Safety First: UNPLUG THE CORD. Ensure it’s completely disconnected.
- Assess the Damage: Determine how much of the cord is damaged. If it’s a small nick, you might be able to repair it with tape after ensuring insulation. If it’s a cut through all wires, you’ll need to splice.
- Cut Away Damaged Section: If the damage is significant, carefully cut away the damaged portion of the cord using a utility knife. Ensure you cut straight across.
- Prepare the Wires:
- Strip about 1 to 1.5 inches of the outer sheathing from both ends of the cord where you made your cuts.
- Strip about 0.5 to 0.75 inches of insulation from each of the inner wires (black, white, green).
- Connect the Wires:
- For Crimp Connectors:
- Insert the stripped end of the black wire from one side into a crimp connector.
- Insert the stripped end of the black wire from the other side into the same connector.
- Use a crimping tool to crimp the connector securely. Repeat for the white and green wires, using separate connectors.
- For Splicing Without Connectors (more difficult and less recommended for longevity):
- Twist the stripped ends of the corresponding wires together firmly (e.g., black to black, white to white, green to green).
- Secure each twisted connection with an electrical tape wrap.
- For Crimp Connectors:
- Insulate the Splice:
- With Heat Shrink Tubing: Slide a piece of heat shrink tubing over the entire splice area, ensuring it extends beyond the exposed wires. Use a heat gun to shrink the tubing tightly around the splice, creating a robust, insulated bond. If you have a three-wire cord, you may need to do this for each wire individually, or use a larger piece of tubing to cover all three.
- With Electrical Tape: Wrap each individual wire connection tightly with electrical tape. Then, wrap the entire splice area with multiple layers of electrical tape, ensuring a complete and secure seal. Overlap the tape generously to prevent moisture ingress.
- Test: Once the splice is complete and insulated, test the cord as described previously.
When to Call a Professional or Replace the Cord
While many extension cord repair tasks are manageable DIY projects, there are times when it’s best to seek professional help or simply buy a new cord.
- Severely Damaged Cord: If the cord’s outer jacket is brittle, cracked, or shows significant wear and tear along its entire length, it’s safer to replace the whole cord.
- Internal Wire Damage: If you suspect the internal wires are damaged beyond the connection point, or if you see signs of melting or charring on the cord itself, it’s a serious hazard.
- Uncertainty: If you are unsure about any step of the process or feel uncomfortable working with electricity, do not proceed. Call a qualified electrician or purchase a new, safe extension cord.
- High-Amperage or Special Purpose Cords: Cords for heavy machinery, generators, or those with specific safety certifications might require specialized plugs and expertise.
Frequently Asked Questions (FAQ)
Q: Can I replace just one prong on a plug if it’s broken?
A: While technically possible, it’s generally not recommended to replace individual prongs. The entire plug assembly is designed to be replaced for safety and to ensure proper strain relief and connection. Replacing a plug as a whole unit is the safer and more effective solution.
Q: What gauge wire should I use for my extension cord repair?
A: You should always match the wire gauge (thickness) of the new plug or splice to the original cord. The gauge is indicated by a number (e.g., 14 AWG, 12 AWG). Thicker wires (lower AWG numbers) can handle more amperage. Using wire that is too thin can lead to overheating and fire hazards.
Q: Is it safe to use electrical tape to repair a damaged cord?
A: For minor nicks in the outer jacket, high-quality electrical tape can provide a temporary fix. However, if the insulation of the inner wires is compromised, or if the damage is extensive, simply taping it is not a permanent or safe solution. Proper insulation with heat shrink tubing or a rated connector is necessary for extension cord repair.
Q: My extension cord sparks when I plug something into it. What should I do?
A: Stop using the cord immediately and unplug it. This is a sign of a faulty connection or internal damage. Do not attempt to use it until it has been properly inspected and repaired, or replaced. This could indicate a problem requiring replacing a damaged plug or a more serious issue.
Q: How do I know if my replacement plug is the right type?
A: Check the amperage rating on the original plug and the extension cord itself. The replacement plug must have an equal or higher amperage rating. Also, ensure it’s designed for the type of extension cord you have (e.g., indoor/outdoor, heavy-duty).
By following these detailed steps and safety precautions, you can confidently perform a cord end replacement or other DIY extension cord repair tasks, keeping your equipment functional and your home safe. Remember, when in doubt, err on the side of caution and replace the entire cord.