
Image Source: i.ytimg.com
How To Wire An Extension Cord Safely: A Step-by-Step DIY Guide
Can I wire my own extension cord? Yes, you can wire your own extension cord, but it requires careful attention to detail and adherence to safety guidelines. This guide will walk you through the process of how to wire an extension cord, focusing on safety and functionality, whether you’re looking for extension cord repair, aiming to create a DIY extension cord, needing to rewire extension cord sections, or performing an extension cord replacement. We’ll also cover extension cord gauge, electrical cord repair, appliance cord replacement, and considerations for heavy duty extension cord and outdoor extension cord wiring, along with essential cord safety tips.
Why Rewire an Extension Cord?
Extension cords, while incredibly useful, can sometimes suffer damage. This might include fraying, exposed wires, or a damaged plug or socket. Rather than discarding a perfectly good length of cable, you can often perform an extension cord repair or rewire extension cord sections. This is especially true for older appliances where the original appliance cord replacement might be hard to find or expensive. For those with specific needs, building a custom DIY extension cord can be a practical solution. This guide aims to empower you with the knowledge to safely undertake these tasks.
Safety First: Essential Precautions
Before we begin, safety is paramount. Working with electricity, even low voltage, carries risks.
- Always disconnect power. Ensure the extension cord is completely unplugged from any power source before you start working on it. Double-check that it’s not plugged into an outlet.
- Use the right tools and materials. Having the correct tools makes the job easier and safer.
- Wear safety glasses. Protect your eyes from stray wire fragments.
- Work in a dry area. Moisture and electricity are a dangerous combination.
- If you’re unsure, stop. It’s better to seek professional help than to risk injury or damage.
Tools and Materials You’ll Need
Gathering the right supplies before you begin is crucial for a smooth and safe extension cord repair or build.
- Replacement Plug and Socket: Ensure these match the extension cord gauge and type (e.g., indoor, outdoor). For a heavy duty extension cord, you’ll need heavy-duty components.
- Wire Strippers/Cutters: Essential for removing insulation and cutting wires.
- Screwdriver Set: Typically Phillips head and flathead screwdrivers for the plug and socket terminals.
- Pliers: Useful for gripping and twisting wires.
- Utility Knife: For more precise cuts if needed.
- Electrical Tape: For insulating connections if necessary.
- Heat Shrink Tubing: A cleaner and more robust alternative to electrical tape for insulating connections.
- New Extension Cord Cable (if rewiring or building from scratch): Ensure the extension cord gauge is appropriate for the intended use.
Deciphering Extension Cord Gauge and Type
The extension cord gauge refers to the thickness of the wire. A lower gauge number means a thicker wire, which can handle more current and is suitable for higher-wattage appliances.
- 18 AWG: Generally for light-duty indoor use (lamps, clocks).
- 16 AWG: Suitable for medium-duty use (power tools, holiday lights).
- 14 AWG: Good for heavy-duty indoor use (lawnmowers, shop vacuums).
- 12 AWG: Best for heavy duty extension cord applications, such as large power tools or when longer cord runs are needed for high-power devices.
Extension Cord Type is also important:
- Indoor Cords: Typically have thinner insulation and are not designed for exposure to moisture or extreme temperatures.
- Outdoor Cords: Feature thicker, weather-resistant insulation and are built to withstand the elements. When performing outdoor extension cord wiring, always use components specifically rated for outdoor use.
Table 1: Extension Cord Gauge and Typical Applications
| Gauge (AWG) | Maximum Amperage | Typical Use |
|---|---|---|
| 18 | 7-10 A | Light-duty electronics, lamps |
| 16 | 10-13 A | Medium-duty power tools, string lights |
| 14 | 13-15 A | Heavy-duty indoor use, larger power tools |
| 12 | 15-20 A | Heavy duty extension cord, high-power tools |
How to Rewire an Extension Cord: Step-by-Step
This section details the process of rewire extension cord sections or performing an extension cord replacement on a damaged plug or socket.
Step 1: Inspect the Cord and Identify the Damage
Before you start, carefully examine the entire length of the cord.
- Look for: Cuts, nicks, exposed wires, melted plastic, or any signs of wear and tear.
- Identify: Which end needs extension cord repair – the plug (male end) or the socket (female end).
Step 2: Prepare the New Plug or Socket
Most replacement plugs and sockets come apart easily.
- Unscrew: Carefully unscrew the retaining screws on the replacement plug or socket.
- Separate: Gently pull the housing apart to reveal the terminal screws.
Step 3: Prepare the Extension Cord Cable
This is where you’ll expose the wires for connection.
- Cut the Damaged End: If you’re replacing the entire plug or socket, cut off the old one cleanly with wire cutters, ensuring you leave enough cable to work with.
- Strip the Outer Jacket: Carefully use a utility knife or wire strippers to remove about 1-2 inches of the outer protective jacket. Be cautious not to nick the inner wires.
- Separate the Inner Wires: You’ll typically find two or three insulated wires inside:
- Hot (Black or Red): Carries the current from the power source.
- Neutral (White or Blue): Completes the circuit.
- Ground (Green or Bare Copper): Provides a safety path for electricity in case of a fault.
- Strip Inner Insulation: Using wire strippers, carefully remove about ½ to ¾ inch of insulation from the end of each inner wire.
Step 4: Connecting the Wires to the New Plug or Socket
This is the most critical step for a safe DIY extension cord.
- Identify Terminals: New plugs and sockets have clearly marked terminals.
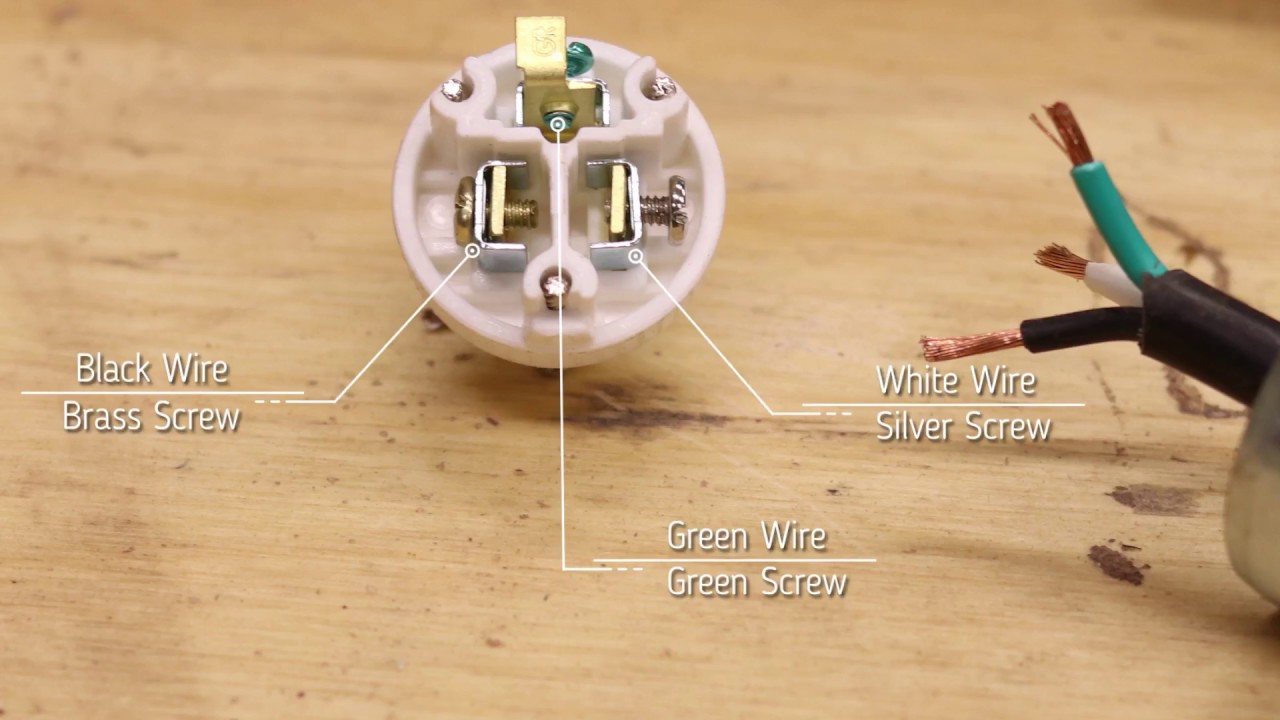
- Plug (Male End): The two prongs are connected to the hot and neutral wires. The ground pin (if present) is connected to the ground wire. The screws for these connections are usually colored: brass for hot, silver for neutral, and green for ground.
- Socket (Female End): The slots are connected similarly. The wider slot is typically for the neutral wire, the narrower for the hot wire, and the round hole for the ground.
- Wrap Wires Around Screws:
- For each wire, loop the bare copper end around the terminal screw in a clockwise direction. This ensures the wire tightens as the screw is driven in.
- Hot Wire: Connect to the brass-colored screw (usually on the narrower side of the plug or socket).
- Neutral Wire: Connect to the silver-colored screw (usually on the wider side of the plug or socket).
- Ground Wire: Connect to the green screw (usually on the round pin or in a separate grounding hole).
- Tighten Securely: Use a screwdriver to tighten the terminal screws firmly. Ensure no bare wire is exposed beyond the terminal, and that the insulation comes right up to the screw.
- Secure with Heat Shrink Tubing (Optional but Recommended): For a more robust connection, especially if using electrical tape is difficult, slide a piece of heat shrink tubing over each wire’s connection before tightening. Once the screw is tight, slide the tubing over the connection and use a heat gun (on a low setting) or a lighter (carefully) to shrink it. This provides excellent insulation.
Step 5: Assembling the New Plug or Socket
- Tuck Wires Neatly: Gently tuck the wires into their respective spaces within the new housing. Make sure no wires are pinched.
- Replace Housing: Carefully fit the two halves of the new plug or socket housing back together.
- Secure Housing: Screw the housing back together securely. Ensure all seams are flush.
Step 6: Testing the Repaired/Rewired Cord
Before plugging it into an outlet, test your work.
- Visual Inspection: Double-check all connections and ensure no bare wires are exposed anywhere.
- Continuity Test (Optional): If you have a multimeter, you can test for continuity between the plug prongs and the socket slots to ensure correct wiring.
- Low-Power Test: Plug the cord into a known working outlet and then plug a low-wattage device (like a small lamp) into the socket. If it works, your extension cord repair or DIY extension cord is successful.
Building a Custom DIY Extension Cord
For those who need a specific length or type of cord, building a DIY extension cord from scratch is a viable option. The process is similar to rewire extension cord sections, but you’ll be working with raw cable.
Step 1: Purchase the Right Materials
- Bulk Extension Cord Cable: Buy the desired length in the appropriate extension cord gauge and type (indoor/outdoor).
- Male Plug: A new DIY extension cord needs a starting point.
- Female Socket: The end of your custom cord.
Step 2: Prepare the Cable Ends
Follow the same steps as Step 2 and Step 3 from the rewiring section above to strip the outer jacket and inner wires on both ends of the bulk cable.
Step 3: Connect the Plug and Socket
This is where you attach the new male plug to one end of the cable and the female socket to the other. Follow Step 4 and Step 5 from the rewiring section for connecting the wires to the terminals and assembling the housings.
Step 4: Test Your Custom Cord
As with any extension cord repair, thorough testing is crucial.
Special Considerations for Heavy Duty and Outdoor Extension Cords
When dealing with a heavy duty extension cord or outdoor extension cord wiring, there are additional points to remember.
Heavy Duty Extension Cord Applications
- Gauge is Crucial: Always use the correct, thicker gauge wire (14 AWG or 12 AWG) for demanding applications. Using too thin a wire can cause overheating and fire hazards.
- Robust Components: Opt for heavy-duty replacement plugs and sockets designed to handle higher amperage and physical stress.
- Proper Connections: Ensure all connections are tight and secure, as a loose connection on a high-amperage circuit can generate significant heat.
Outdoor Extension Cord Wiring
- Weather-Resistant Components: Use plugs, sockets, and cable specifically rated for outdoor use. These have superior insulation and protection against moisture and UV damage.
- GFCI Protection: When using extension cords outdoors, especially near water sources, it’s highly recommended to plug them into a Ground Fault Circuit Interrupter (GFCI) protected outlet for an extra layer of safety.
- Avoid Damage: Keep outdoor cords away from foot traffic, sharp objects, and areas where they can be easily damaged.
Electrical Cord Repair for Appliances
The principles for electrical cord repair on appliances are largely the same.
- Appliance Cord Replacement: If the cord attached to an appliance is damaged, you can often replace it by following the steps for extension cord replacement.
- Identify Cord Type: Make sure the replacement cord has the correct extension cord gauge and plug type suitable for the appliance.
- Strain Relief: Many appliance cords have a built-in strain relief where the cord enters the appliance. Ensure your new cord has adequate strain relief or that the original strain relief mechanism is properly reattached to the new cord to prevent the wires from pulling out of the terminals.
Essential Cord Safety Tips
Reinforcing good habits is key to long-term safety.
- Regular Inspection: Periodically inspect all your extension cords for signs of damage.
- Proper Usage: Don’t overload extension cords. Check the appliance’s wattage against the cord’s rating.
- Avoid Daisy-Chaining: Do not plug multiple extension cords together.
- No Staples or Nails: Never secure cords with staples or nails, as this can damage the insulation and wires.
- Keep Away from Heat: Do not run cords near heat sources.
- Unplug When Not in Use: This is a simple yet effective cord safety tip.
Frequently Asked Questions (FAQ)
Q1: Can I use electrical tape for all wire connections?
A1: While electrical tape can be used, heat shrink tubing provides a more durable and professional insulation. If using tape, wrap it tightly, overlapping each layer.
Q2: What happens if I use the wrong extension cord gauge?
A2: Using a gauge that is too low for the application can cause the cord to overheat, melt the insulation, and pose a significant fire risk.
Q3: How do I know if I need to replace the entire cord or just the plug/socket?
A3: If the cable itself has cuts, frays, or damage to the outer jacket, it’s often safer to replace the entire cord. If only the plug or socket is damaged, extension cord repair or extension cord replacement of just that component is usually sufficient.
Q4: Is it safe to repair frayed wires on an extension cord?
A4: Minor fraying at the very end of a wire might be manageable by stripping a fresh section and reconnecting. However, significant fraying or exposed wires along the cord’s length indicates the cord should be replaced entirely.
Q5: What is the difference between a polarized and non-polarized plug?
A5: A polarized plug has one prong wider than the other. This ensures the cord is plugged in correctly, with the neutral wire always connected to the wider slot. If your original cord had a polarized plug, ensure your replacement plug is also polarized.
By following these steps and prioritizing safety, you can confidently perform extension cord repair, build a custom DIY extension cord, and ensure all your electrical cords are in safe working order.