
Image Source: deerassociation.com
How Do You Cut Down A Tree With A Chainsaw: Expert Guide
Yes, you can cut down a tree with a chainsaw, but it requires significant skill, knowledge, and adherence to strict safety protocols. Improper technique can lead to serious injury or death, and significant property damage. This comprehensive guide will walk you through the essential steps and considerations for safe and effective tree felling.
Preparing for the Task: Safety First
Before you even think about starting the chainsaw, safety must be your absolute priority. Tree removal chainsaw safety is paramount, and this begins with having the right gear and assessing the situation thoroughly.
Essential Personal Protective Equipment (PPE)
- Helmet with Face Shield and Hearing Protection: Protect your head from falling branches and your face from flying debris. Hearing protection is crucial to prevent permanent hearing damage from the chainsaw’s noise.
- Eye Protection: Even with a face shield, safety glasses or goggles offer an extra layer of defense against sawdust and small wood chips.
- Chainsaw Chaps or Protective Trousers: These are made from special materials that can stop a moving chain, preventing severe leg injuries. This is non-negotiable for safe chainsaw tree removal.
- Steel-Toe Boots: Protect your feet from falling logs and the chainsaw itself.
- Durable Work Gloves: Provide a better grip on the chainsaw and protect your hands.
Chainsaw Inspection and Maintenance
A well-maintained chainsaw is a safer chainsaw. Ensure your equipment is in top working order before you begin.
- Chain Sharpness: A sharp chain cuts efficiently and with less effort, reducing the risk of kickback. Dull chains force the saw to work harder, increasing fatigue and the chance of error.
- Chain Tension: The chain should be snug but able to be pulled around the bar by hand. Too loose and it can derail; too tight and it will damage the bar and engine.
- Chain Brake: Ensure the chain brake is functional. This is your primary safety device to stop the chain quickly.
- Bar and Chain Lubrication: Proper lubrication prevents overheating and premature wear. Check the oil level and ensure the oiler is working.
- Fuel and Oil Levels: Ensure you have enough fuel and bar oil for the job, but don’t overfill.
Assessing the Tree and Felling Area
This is arguably the most critical step in proper chainsaw tree cutting. A thorough assessment dictates your entire approach.
- Tree Health: Look for signs of rot, disease, or decay. These can weaken the tree and make it unpredictable during felling.
- Lean: Does the tree naturally lean in a particular direction? This natural lean will significantly influence your chainsaw felling direction. You’ll want to use this lean to your advantage.
- Branches: Are there large, dead, or heavy branches that could break off unexpectedly? Consider how these might affect the felling path.
- Obstacles: Identify any potential hazards in the felling path, such as buildings, fences, power lines, other trees, or vehicles.
- Wind Conditions: Never fell a tree in strong or gusty winds. Wind can dramatically alter the tree’s fall, making it impossible to control. A light breeze might be manageable, but anything more requires postponement.
- Escape Routes: Plan at least two clear escape routes, at approximately 45-degree angles away from the intended felling direction and behind the tree. You’ll need these to retreat quickly once the tree begins to fall.
Understanding Chainsaw Felling Techniques: The Art of the Cut
Chainsaw felling techniques are the core of this operation. The goal is to control the fall of the tree and ensure it lands where you intend. This involves making precise cuts.
The Notch (Face Cut)
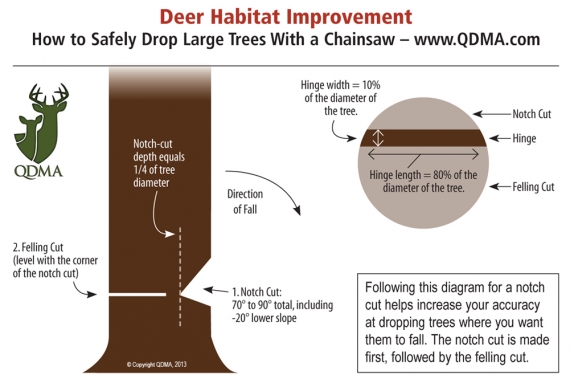
The notch, or face cut, determines the direction of fall. It’s made on the side of the tree facing the desired felling direction.
- Purpose: To prevent the tree from splitting or twisting as it falls and to guide its descent.
- Types of Notches:
- Conventional Notch: The most common, consisting of an overhead cut and an undercut.
- Overhead Cut: Made downwards at an angle, typically 45-70 degrees.
- Undercut: Made horizontally to meet the overhead cut.
- The Gap: The distance between the bottom of the overhead cut and the apex of the undercut should be about one-tenth of the tree’s diameter.
- Open-Face Notch: Features a wider angle (up to 90 degrees) between the two cuts, allowing the tree to fall more smoothly and with less risk of lodging.
- Conventional Notch: The most common, consisting of an overhead cut and an undercut.
Table 1: Notch Dimensions Based on Tree Diameter
| Tree Diameter (Inches) | Overhead Cut Angle (Degrees) | Undercut Depth (Inches) | Notch Gap (Inches) |
|---|---|---|---|
| 8-12 | 45-55 | 1-2 | 1-1.2 |
| 12-18 | 55-65 | 2-3 | 1.2-1.8 |
| 18+ | 65-75 | 3-4 | 1.8-2.4 |
Note: These are general guidelines. Adjust based on tree species, lean, and wind conditions.
- Making the Notch:
- Determine the chainsaw felling direction.
- Measure and mark the desired depth for the undercut.
- Make the overhead cut first, ensuring it meets the intended line.
- Make the horizontal undercut to meet the overhead cut precisely. Remove the wedge of wood. The notch should be deep enough to go about 1/4 to 1/3 of the way through the tree’s diameter.
The Back Cut (Felling Cut)
The back cut is made on the opposite side of the tree from the notch. This cut is made slightly above the level of the undercut.
- Purpose: To sever the remaining wood, allowing the tree to fall.
- The Hinge: This is the critical component of the back cut. The hinge is a band of uncut wood between the notch and the back cut. It controls the fall.
- Back Cut Height: The back cut should be made about 1-2 inches (2.5-5 cm) higher than the horizontal cut of the notch. This ensures the hinge is properly formed.
- Back Cut Depth: The back cut should be made to within about 1-2 inches (2.5-5 cm) of meeting the notch. This remaining wood forms the hinge.
Table 2: Back Cut vs. Notch Relationship
| Component | Location | Purpose |
|---|---|---|
| Notch | Side facing felling direction | Guides the fall, prevents splitting |
| Back Cut | Opposite side of the notch | Severs remaining wood |
| Hinge | Uncut wood between notch and back cut | Controls the direction and speed of the fall |
- Making the Back Cut:
- Position yourself safely on the side opposite the notch.
- Start the back cut, ensuring it’s level and slightly above the notch’s horizontal cut.
- Continue cutting, maintaining a consistent chainsaw tree cutting angles, until you are about 1-2 inches from meeting the notch.
- Crucially, do not cut through the hinge.
Using Felling Wedges
Felling wedges are indispensable tools for chainsaw tree cutting, especially for larger trees or when felling against a natural lean.
- Purpose: To prevent the chainsaw bar from getting pinched in the kerf and to help push the tree over in the desired direction.
- Placement: Insert wedges into the back cut as soon as there’s enough space to do so. Drive them in with a hammer or axe.
- Types: Plastic or aluminum wedges are commonly used. Steel wedges can damage the chain.
Advanced Chainsaw Tree Cutting Tips and Techniques
Beyond the basic cuts, several advanced chainsaw tree cutting tips can improve your efficiency and safety.
Dealing with Back Lean and Wind
If the tree has a natural lean against your intended felling direction (back lean) or if there’s a moderate wind pushing it the wrong way, you’ll need to adjust your technique.
- Using Wedges: Drive wedges deeper and more forcefully to help overcome back lean.
- Notch Angle Adjustment: A wider notch angle (open-face notch) can be more effective in controlling a tree with back lean.
- Ropes and Pulling: For significant back lean or when precise directional control is critical, consider using ropes, winches, or even a second saw operated by a skilled partner to pull the tree in the desired direction as you make the back cut. This requires careful coordination.
Methods for Specific Scenarios
- Felling a Dead Tree: Dead trees are unpredictable. They can be brittle, and sections can break off unexpectedly. Make shorter cuts and use wedges liberally. Consider a more controlled felling method if possible.
- Felling a Tree with Heavy Side Branches: These can act like levers, pulling the tree in an unintended direction. You might need to adjust your notch and back cut to compensate. Sometimes, removing heavy branches from the intended fall path beforehand can be beneficial.
Chainsaw Limbing Techniques
Once the tree is safely on the ground, you’ll need to limb it. Chainsaw limbing techniques require a different approach to safety and efficiency.
- Working from Base to Top: Start limbing from the base of the tree and work your way towards the top.
- Brace Yourself: Ensure you have stable footing. Don’t stand on uneven ground or on the trunk itself if it could roll.
- Avoid Cutting Underneath: Try to avoid cutting branches from underneath the trunk. This can lead to kickback or the branch falling on you.
- Cut Branches Away from You: Position yourself so that the branch you are cutting falls away from you.
- Support Heavy Branches: If a large branch is supported at both ends, cut about 1/3 of the way through from the top on the underside, then finish the cut from the top. This prevents pinching and tearing.
- Be Aware of Springboard Effect: Branches under tension can spring back when cut. Be prepared for this.
Chainsaw Bucking Techniques
Bucking is cutting the felled tree into manageable lengths. Chainsaw bucking techniques focus on making clean cuts without pinching the bar.
- Identify the Load: Determine how the log is supported. Is it resting on the ground at one end, both ends, or is it suspended?
- Cutting from the Top (Overbucking): If the log is supported at both ends or suspended, you can usually cut from the top all the way through.
- Cutting from the Bottom (Underbucking): If the log is supported at one end, or if it sags in the middle, you’ll need to cut from the bottom first (about 1/3 of the way through) to prevent pinching, then finish the cut from the top.
- Preventing Pinching: Use wedges or prop the log if necessary to keep the cut open and prevent the chainsaw bar from getting stuck.
Safety Beyond the Chainsaw: General Considerations
Tree removal chainsaw safety extends beyond just the immediate cutting process.
- Never Work Alone: Always have a spotter or assistant who is trained in basic chainsaw safety and first aid, and who knows your felling plan.
- First Aid Kit: Have a well-stocked first aid kit readily available, and know how to use it.
- Communication: Ensure you and your helper have a clear plan and communication method.
- Stay Hydrated and Rested: Chainsawing is physically demanding. Fatigue leads to mistakes. Take regular breaks.
- Clear the Area: Before starting, ensure everyone not involved in the felling is a safe distance away.
Frequently Asked Questions (FAQ)
Q1: Can I fell a tree with a chainsaw if I’ve never done it before?
A1: While technically possible, it is strongly advised against. Felling a tree with a chainsaw requires significant training and experience. For your first attempts, seek guidance from an experienced professional or take a certified chainsaw safety and felling course.
Q2: What is the most dangerous part of cutting down a tree with a chainsaw?
A2: Kickback is one of the most dangerous aspects. This occurs when the tip of the guide bar hits an object or gets pinched, causing the chainsaw to violently throw the bar and chain upward and backward toward the operator. Proper technique and awareness of the bar’s tip are crucial. Another danger is the tree not falling as intended or falling unexpectedly.
Q3: How do I know which way the tree will fall?
A3: You assess the tree’s natural lean, the direction of major branches, and wind conditions. The notch you cut is designed to guide the fall, but these other factors heavily influence the outcome.
Q4: How deep should the notch be?
A4: The notch should be deep enough to go about 1/4 to 1/3 of the way through the tree’s diameter to effectively guide its fall.
Q5: How high should the back cut be relative to the notch?
A5: The back cut should be made 1-2 inches higher than the horizontal cut of the notch to create the essential hinge.
Q6: What is a chainsaw hinge, and why is it important?
A6: The hinge is the band of uncut wood left between the notch and the back cut. It acts as a pivot, controlling the speed and direction of the tree’s fall. Without a proper hinge, the tree can fall erratically or split.
Q7: When should I use felling wedges?
A7: Felling wedges are essential when felling larger trees, when felling against a natural lean, or when you need to ensure the saw kerf doesn’t close and pinch the bar. They also help drive the tree over in the intended direction.
Q8: Is it safe to limb and buck a tree while it’s still partially supported by other trees?
A8: No, this is extremely dangerous. Always ensure the felled tree is completely free and on the ground before you begin limbing or bucking. Any tension from other trees can cause sudden, unpredictable movements.
Mastering the art of cutting down a tree with a chainsaw is a skill honed through practice and a deep respect for the power of the tool and the force of nature. Prioritizing safety, meticulous planning, and precise execution are the cornerstones of successful chainsaw tree felling. Always remember that when in doubt, consult a professional arborist.