
Can I connect a GFCI circuit breaker myself? Yes, if you have basic electrical knowledge and follow safety precautions. This guide will walk you through the process of connecting a GFCI circuit breaker, ensuring GFCI protection for your home. We’ll cover everything from GFCI breaker wiring to GFCI breaker troubleshooting, making GFCI breaker installation a manageable task.
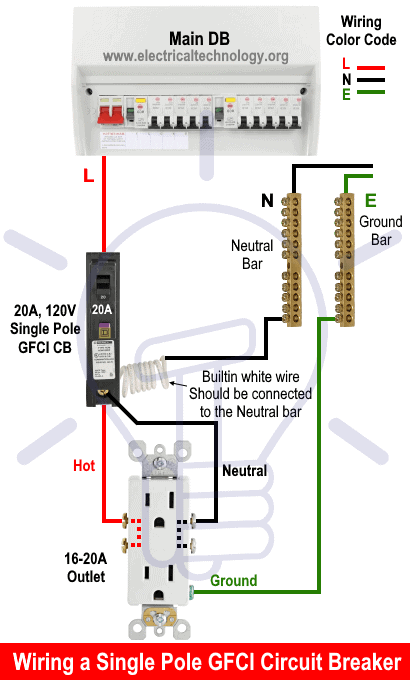
Image Source: www.electricaltechnology.org
What is GFCI Protection and Why Do You Need It?
Ground Fault Circuit Interrupter (GFCI) protection is a critical safety feature in modern homes. It’s designed to prevent electric shock. When a GFCI detects an imbalance in the electrical current flowing through a circuit, it quickly cuts off the power. This typically happens when electricity takes an unintended path, such as through a person. Areas like bathrooms, kitchens, garages, and outdoor outlets are prime locations where GFCI protection is essential due to the increased risk of contact with water.
The Importance of GFCI Protection in Wet Areas
Water is a conductor of electricity. In areas where water is present, the risk of electrocution increases significantly. A GFCI outlet or breaker acts as a safety net, detecting small leaks of current that could otherwise cause a severe or fatal shock. Installing GFCIs is not just a good idea; it’s often required by electrical codes in these damp locations.
Deciphering GFCI Breaker Types
Not all GFCI protection is the same. There are different ways to achieve GFCI protection, and each has its place. Knowing the GFCI breaker types will help you choose the right one for your needs.
Panel-Mounted GFCI Breakers
These are installed directly into your main electrical panel, replacing a standard circuit breaker. They provide GFCI protection for the entire circuit they serve, including all outlets and fixtures on that circuit. This is often the most convenient and comprehensive way to add GFCI protection to a new or existing circuit.
GFCI Outlets
These outlets have built-in GFCI protection. They are installed in place of a standard outlet. When a GFCI outlet is wired correctly, it can also protect any standard outlets downstream from it on the same circuit.
Portable GFCIs
These are plug-in devices that you can use with any standard outlet to provide GFCI protection for a temporary application or for a specific appliance.
Tools and Materials You’ll Need
Before you begin, gather all the necessary tools and materials to ensure a smooth and safe installation.
Essential Tools:
- Screwdrivers: Phillips head and flathead screwdrivers for various screws.
- Wire Strippers/Cutters: For safely removing insulation from wires and cutting them to length.
- Needle-Nose Pliers: Useful for bending wires and making connections.
- Voltage Tester: A non-contact voltage tester is crucial for ensuring the power is off before you start working.
- Wire Nut Connectors: For securely joining wires.
- Electrical Tape: For insulating connections and labeling.
- Safety Glasses: To protect your eyes from debris.
- Work Gloves: For added protection.
- Flashlight or Headlamp: To see clearly in dimly lit electrical panels.
Necessary Materials:
- GFCI Circuit Breaker: Ensure it’s the correct amperage and type for your panel.
- Appropriate Gauge Wire: If you are running new circuits or extending existing ones.
- Wire Nuts: Assorted sizes.
Safety First: Essential Precautions Before You Begin
Working with electricity can be dangerous. Prioritizing safety is paramount. Always follow these crucial precautions.
Turning Off the Power
- Locate Your Electrical Panel: Find your main electrical service panel.
- Identify the Correct Breaker: Determine which breaker controls the circuit you will be working on. If you’re unsure, it’s safer to turn off the main breaker for the entire house, though this will cut power to everything.
- Flip the Breaker to the “Off” Position: Ensure the breaker is firmly in the off position.
- Verify Power is Off: Use your non-contact voltage tester on the wires or the existing breaker to confirm that the power is indeed off. Test the tester on a known live circuit first to ensure it’s working.
Working in the Electrical Panel
- Never work on a live circuit. Double-check with your voltage tester.
- Keep the work area clean and dry.
- Do not wear loose clothing or jewelry.
- Be mindful of the metal panel. Avoid touching metal parts unnecessarily.
- If you are unsure about any step, consult a qualified electrician.
Step-by-Step GFCI Circuit Breaker Wiring
This section provides a detailed GFCI circuit breaker wiring guide. We will assume you are replacing an existing standard breaker with a GFCI breaker in a panel that supports GFCI breakers. If you are installing a new circuit, the process is similar but involves more steps related to wiring from the panel to the outlets.
Step 1: Prepare the Electrical Panel
- Open the Panel Door: Swing open the cover of your electrical panel.
- Remove the Panel Cover (if necessary): Some panels require you to unscrew and remove the outer cover to access the breakers.
- Locate the Existing Breaker: Find the standard circuit breaker you intend to replace.
Step 2: Remove the Old Breaker
- Disconnect Wires: You’ll see a wire connected to the terminal screw on the existing breaker. Use a screwdriver to loosen this screw and remove the wire.
- Release the Breaker: Most breakers clip onto a busbar within the panel. Gently pull the breaker away from the busbar to release it. Some breakers may have a clip on the front or back that you need to press.
- Remove the Old Breaker: Once the wire is disconnected and the breaker is released from the busbar, pull it out of the panel.
Step 3: Connect the GFCI Circuit Breaker Wiring
This is where understanding the GFCI circuit breaker diagram is essential. GFCI breakers have specific connection points.
- Line (or Input) Terminal: This is where the power from the main busbar in your panel connects. It’s usually a screw terminal.
- Load (or Output) Terminal: This is where the wires going to your outlets or fixtures connect. It’s also usually a screw terminal.
- Grounding Terminal: GFCI breakers typically have a connection for the ground wire from the circuit.
Typical GFCI Breaker Wiring Connections:
| Connection Point | What Connects Here | Notes |
|---|---|---|
| Line Terminal | Power from the panel’s busbar (usually a black wire) | This is the input side. It receives power from the main electrical supply. |
| Load Terminal | Wires going to the protected outlets/fixtures | This is the output side. Electricity flows from here to your devices. |
| Ground Screw | Ground wire from the circuit (bare copper or green) | This connects the circuit’s ground wire to the panel’s grounding system. |
Connecting the Wires:
- Identify the Hot Wire: This is typically the black wire that was connected to the old breaker. This wire is now live when the main breaker is on.
- Connect the Hot Wire to the “Line” Terminal: Strip about ½ inch of insulation from the hot wire. Loop the stripped end clockwise around the screw terminal labeled “Line” or often indicated by an arrow pointing towards the breaker. Tighten the screw securely.
- Connect the Load Wires: These are the wires that will power your outlets and fixtures. Identify the black wire(s) going to the circuit. Strip about ½ inch of insulation from these wires. Loop them clockwise around the screw terminal labeled “Load” or indicated with an arrow pointing away from the breaker. If you have multiple wires for the load, they can often be joined with a wire nut and connected to the terminal, or some breakers have multiple load terminals. Check the manufacturer’s instructions.
- Connect the Ground Wire: The ground wire (bare copper or green) from your circuit should be connected to the grounding screw on the GFCI breaker. If you have multiple ground wires, they should all be connected together with a wire nut, and a pigtail (a short length of wire) should run from the wire nut to the GFCI breaker’s ground screw.
- Connect the Neutral Wire (if applicable): Most GFCI breakers require a neutral connection. This is usually a white wire from the circuit. Connect this white wire to the designated neutral terminal on the GFCI breaker. This connection is critical for the GFCI to function.
Step 4: Secure the GFCI Breaker in the Panel
- Align the Breaker: Position the GFCI breaker so its clip aligns with the busbar in the panel.
- Push Firmly: Push down on the breaker until it securely snaps onto the busbar. Ensure it’s firmly seated.
Step 5: Reassemble and Test
- Replace the Panel Cover: Screw the panel cover back into place, ensuring all wires are neatly tucked away and not pinched.
- Turn On Power: Turn the main breaker back on, and then turn on the new GFCI breaker.
- Perform a GFCI Test: Every GFCI breaker and outlet has a “TEST” and “RESET” button.
- Press the “TEST” button. The breaker should trip (turn off).
- Press the “RESET” button firmly. The breaker should reset and turn back on.
If the breaker trips when you test it and resets when you press the reset button, it’s functioning correctly. If it doesn’t trip or doesn’t reset, or if other circuits lose power unexpectedly, turn the power off immediately and recheck your wiring, or consult an electrician.
GFCI Outlet Installation: An Alternative Approach
If your electrical panel doesn’t support GFCI breakers, or if you only need to protect a specific outlet and those downstream, GFCI outlet installation is a viable option.
Step 1: Turn Off Power
Just as with breaker installation, turn off the power to the circuit at the main panel and verify with a voltage tester.
Step 2: Remove the Old Outlet
- Unscrew the Outlet Cover Plate: Remove the screws holding the cover plate.
- Unscrew the Outlet: Remove the screws holding the outlet to the electrical box.
- Gently Pull Out the Outlet: Carefully pull the outlet out of the box, exposing the wires.
- Disconnect Wires: Loosen the terminal screws and remove the wires from the old outlet.
Step 3: Connect the GFCI Outlet
GFCI outlets have specific terminals for “LINE” and “LOAD” connections. This is crucial for protecting downstream outlets.
- LINE Terminals: These are for the wires coming from the power source (the breaker panel).
- LOAD Terminals: These are for the wires going to the next outlet or device in the circuit.
GFCI Outlet Wiring:
- Hot Wire (Black): Connect the incoming hot wire (from the panel) to the brass-colored “LINE” terminal screw.
- Neutral Wire (White): Connect the incoming neutral wire (from the panel) to the silver-colored “LINE” terminal screw.
- Load Hot Wire (Black): If you are protecting other outlets downstream, connect the outgoing hot wire to the brass-colored “LOAD” terminal screw.
- Load Neutral Wire (White): Connect the outgoing neutral wire to the silver-colored “LOAD” terminal screw.
- Ground Wire (Bare Copper or Green): Connect the ground wire to the green ground screw on the GFCI outlet.
Important Considerations for GFCI Outlets:
- Protecting Downstream Outlets: To protect outlets further down the circuit, you must connect the “LOAD” terminals correctly. If you only connect the “LINE” terminals, only the GFCI outlet itself will be protected.
- Testing After Installation: After connecting the wires and securing the GFCI outlet back into the box, restore power and test it using the “TEST” and “RESET” buttons.
Maintaining GFCI Protection: Regular Testing and Troubleshooting
Regularly testing your GFCI devices is essential for ensuring they are working correctly. Here’s how to perform a GFCI breaker test and address common GFCI breaker troubleshooting issues.
How to Perform a GFCI Test
- Locate the TEST and RESET Buttons: Find these on your GFCI breaker or outlet.
- Press the “TEST” Button: This should cause the breaker to trip or the outlet to stop providing power.
- Press the “RESET” Button: This should restore power.
Testing Frequency:
- Monthly testing is highly recommended.
- Test after any power outages or electrical work.
Common GFCI Breaker Troubleshooting
If your GFCI breaker is tripping frequently or not working as expected, consider these troubleshooting steps.
- Frequent Tripping:
- Overloaded Circuit: Too many appliances on the circuit may be drawing too much power.
- Faulty Appliance: An appliance plugged into the circuit may have an internal fault that is causing a ground fault. Try unplugging appliances one by one to identify the culprit.
- Incorrect Wiring: Ensure the LINE and LOAD connections are correct, and that neutral and ground wires are properly connected.
- Moisture: In damp locations, moisture can cause nuisance tripping. Ensure connections are dry and sealed.
- Damaged GFCI Breaker: The breaker itself may be faulty.
- GFCI Not Resetting:
- No Power: Ensure the main breaker is on and the GFCI breaker itself is receiving power.
- Wiring Issue: Check that the LINE and LOAD wires are connected correctly. A wiring error can prevent resetting.
- Faulty GFCI Breaker: The breaker may be defective and need GFCI breaker replacement.
- GFCI Not Tripping When Tested:
- Wiring Error: The LINE and LOAD connections might be reversed, or the neutral wire might not be connected correctly.
- Faulty GFCI Breaker: The internal mechanism for tripping may have failed.
When to Call a Professional:
If you’ve gone through these troubleshooting steps and are still experiencing issues, or if you’re uncomfortable working with electrical components, it’s always best to call a qualified electrician. They can diagnose the problem accurately and perform any necessary repairs or GFCI breaker replacement.
GFCI Breaker Wiring Code Considerations
Adhering to electrical codes is vital for safety and compliance. The GFCI circuit breaker wiring code ensures that GFCI protection is installed correctly and in the appropriate locations.
Key Code Requirements:
- Location: Codes typically mandate GFCI protection in bathrooms, kitchens (near sinks), garages, crawl spaces, unfinished basements, outdoors, and near laundry areas. Specific requirements can vary by local jurisdiction.
- Circuit Protection: A single GFCI breaker can protect an entire circuit, including all outlets and hardwired devices on that circuit.
- Wire Connections: All connections must be secure and made within approved electrical boxes.
- Amperage Rating: The GFCI breaker must be rated for the amperage of the circuit it protects.
Always consult the National Electrical Code (NEC) and your local building codes for the most up-to-date and specific requirements.
Upgrading to GFCI Protection: GFCI Breaker Replacement
If you have older circuits that lack GFCI protection, performing a GFCI breaker replacement is a highly recommended upgrade. This is often more straightforward than installing new GFCI outlets if your panel is compatible.
Factors to Consider Before Replacement:
- Panel Compatibility: Ensure your electrical panel is designed to accept GFCI circuit breakers. Some older panels may not have the necessary busbar configuration or space.
- Correct Amperage: Purchase a GFCI breaker with the same amperage rating as the breaker you are replacing.
- Circuit Load: Ensure the total load on the circuit does not exceed the rating of the GFCI breaker.
Frequently Asked Questions (FAQ)
Q1: Do I need GFCI protection on every circuit?
No, you don’t need GFCI protection on every circuit. It’s typically required for circuits in locations where water is present or there’s a risk of electric shock, as dictated by electrical codes.
Q2: Can I use a GFCI breaker to protect multiple circuits?
A single GFCI breaker is designed to protect only the circuit it is connected to. To protect multiple circuits, you would need a GFCI breaker for each circuit.
Q3: What is the difference between a GFCI breaker and a GFCI outlet?
A GFCI breaker provides protection for the entire circuit it serves, from the panel to all connected devices. A GFCI outlet protects itself and any standard outlets wired downstream from it on the same circuit.
Q4: My GFCI breaker keeps tripping. What could be the cause?
Frequent tripping can be due to an overloaded circuit, a faulty appliance drawing too much current, moisture in wiring, or a defective GFCI breaker. It’s important to identify the cause through troubleshooting.
Q5: How often should I test my GFCI protection?
It’s recommended to test GFCI protection monthly to ensure it’s functioning correctly.
Conclusion: Enhancing Home Safety with GFCI Protection
Connecting a GFCI circuit breaker, or installing GFCI outlets, is a significant step towards enhancing the safety of your home. By following this detailed GFCI circuit breaker installation guide, understanding the GFCI breaker wiring code, and performing regular testing and GFCI breaker troubleshooting, you can ensure reliable GFCI protection for your family and property. Remember, if at any point you feel unsure or unqualified, do not hesitate to contact a certified electrician. Safety should always be your top priority when dealing with electrical work.