
How To Wire Extension Cord End Safely: Step-by-Step Guide
Yes, you can wire an extension cord end yourself. This guide will show you how to safely replace a damaged plug end on an extension cord, allowing you to repair extension cord issues and attach a new plug. This process, often referred to as wiring a plug or cord end replacement, is crucial for electrical safety and can save you money on new cords. We’ll cover everything from choosing the right parts to the final inspection. If you’ve ever wondered about electrical plug repair or how to re-wire a cord, this comprehensive guide is for you. This applies to standard extension cords and even how to approach a heavy duty cord repair.
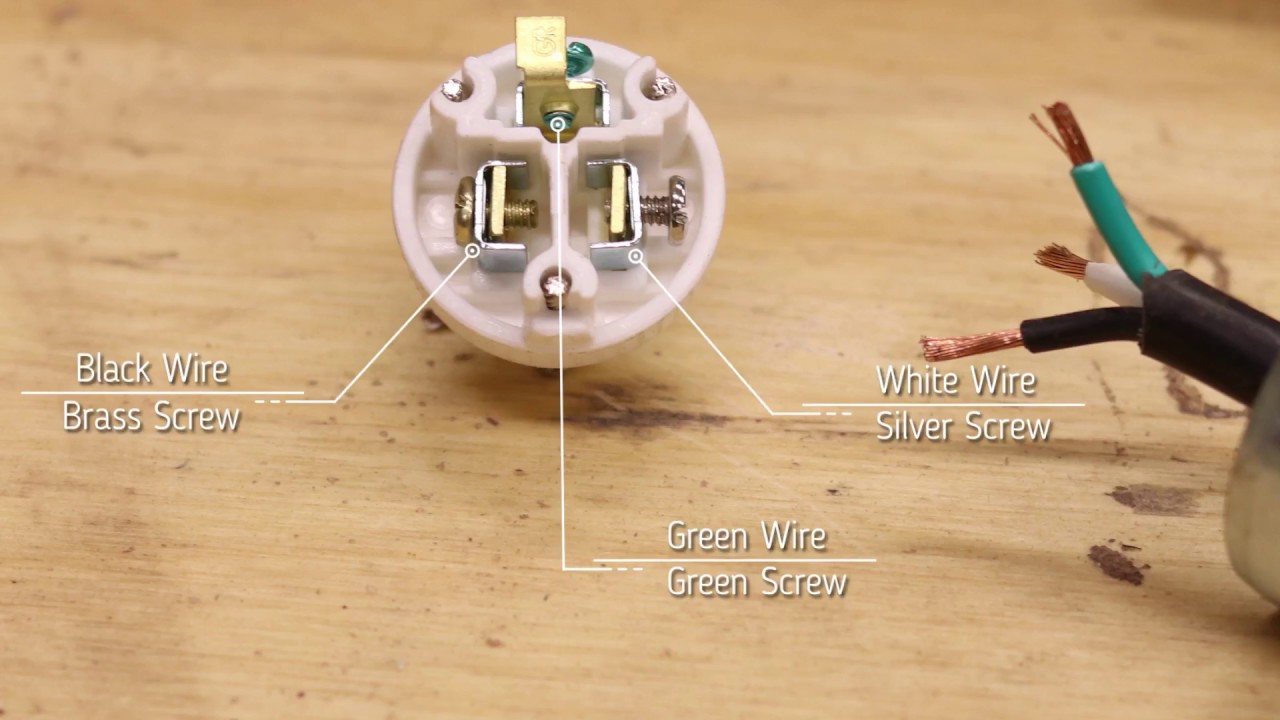
Image Source: i.ytimg.com
Why Repair an Extension Cord End?
Extension cords are workhorses. They power our tools, lights, and appliances. Over time, the ends can get damaged. This might be from being stepped on, run over, or simply from wear and tear. A damaged cord end isn’t just unsightly; it’s a serious safety hazard. Exposed wires can lead to shocks, short circuits, and even fires. Knowing how to repair extension cord ends or replace a damaged plug end yourself is a valuable skill. It allows you to extend the life of perfectly good cords, saving you money and reducing waste. This article focuses on the practical steps for wiring a plug, covering cord end replacement for various types of cords. We’ll also touch on situations where you might need to consider a socket replacement if the issue is with the female end of the cord.
What You’ll Need: Tools and Materials
Before you start wiring a plug, gather all your tools and materials. Having everything ready makes the job smoother and safer. This list covers what you’ll need for a typical cord end replacement.
Essential Tools:
- Wire Strippers/Cutters: These are vital for cutting the cord to the correct length and stripping the insulation from the wires. Look for a pair with a good grip and clearly marked gauge sizes.
- Screwdriver Set: You’ll likely need a Phillips head and a flathead screwdriver to open the new plug housing and secure the wires. Make sure the screwdrivers fit the screws in the replacement plug.
- Pliers: Needle-nose pliers can be helpful for bending wire ends into loops or gripping small parts.
- Utility Knife (Optional): For carefully scoring and removing larger sections of outer insulation if needed.
- Multimeter (Optional but Recommended): To test the continuity of the connection after you’ve finished wiring. This ensures your repair is safe and effective.
Necessary Materials:
- Replacement Plug End: This is the most crucial part. You need a plug end that matches the type and gauge of your extension cord.
- Type: Is it a standard 2-prong or 3-prong plug? Does it need to be polarized (one prong wider than the other)?
- Amperage Rating: The new plug must have an amperage rating equal to or greater than the original cord and any equipment you intend to use with it. Check the cord itself for its rating (e.g., 10A, 13A, 15A).
- Material: Look for durable materials like PVC or rubber for the housing.
- For Heavy-Duty Cords: If you’re working on a heavy duty cord repair, ensure the replacement plug is rated for the higher amperage and thicker gauge wire of that cord.
- Heat Shrink Tubing (Optional but Recommended): This provides extra insulation and a clean finish around the wire connections. You’ll need a heat gun or even a lighter (used carefully) to shrink it.
- Electrical Tape (Optional): For added insulation if heat shrink is not used.
Step-by-Step Guide to Wiring an Extension Cord End
Let’s get started with the process of replacing the plug end. Safety is paramount. Always double-check that the cord is unplugged.
Step 1: Prepare the Extension Cord
First, you need to prepare the end of the extension cord that you will be re-wiring.
- Inspect the Damage: Carefully examine the cord. If the damage extends far up the cord, you might need to cut off a larger section.
- Cut the Cord: Using sharp wire cutters or the cutting edge of your wire strippers, make a clean, straight cut across the cord. Do this a few inches up from the damaged end. This ensures you’re working with fresh, undamaged wire.
- Strip the Outer Jacket: Now, you need to remove the outer protective jacket of the cord. Be careful not to nick the inner wires.
- Set your wire strippers to the correct gauge for your cord.
- Gently clamp the strippers around the outer jacket, about 1 to 1.5 inches from the cut end.
- Rotate the cord slightly while holding the strippers in place.
- Gently pull off the stripped section of the outer jacket.
- If you cut too deep and nicked the inner wires, you may need to cut off another small section of the cord.
Step 2: Identify and Prepare the Wires
Extension cords typically have at least two insulated wires inside: a hot wire (usually black or brown) and a neutral wire (usually white or blue). A third wire, the ground wire (usually green or green with yellow stripes), provides a safety path for electricity.
- Separate the Wires: Gently separate the three insulated wires from each other. You might need to twist them slightly to get them to spread apart.
- Strip the Inner Wire Insulation: Now, you need to strip about half an inch of insulation from the end of each individual wire.
- Use your wire strippers. Select the correct gauge for the wires.
- Place the end of a wire into the appropriate notch on the strippers.
- Gently squeeze the handles to cut the insulation without cutting the wire strands.
- Pull the stripped insulation off the wire.
- Repeat for all wires (hot, neutral, and ground). Ensure you don’t leave any bare wire exposed beyond the insulation.
Step 3: Wiring the New Plug End
This is where you attach the new plug. Pay close attention to which wire goes to which terminal. The new plug will have screw terminals, usually colored or labeled.
- Examine the New Plug: Open the housing of your new replacement plug. You’ll see screw terminals.
- Ground Terminal: This is typically a green screw. The ground wire (green or green/yellow) always connects here.
- Neutral Terminal: This is usually a silver or white screw. The neutral wire (white or blue) connects here.
- Hot Terminal: This is normally a brass or black screw. The hot wire (black or brown) connects here.
- Polarization: If your cord is polarized (has one wider prong), the neutral wire will connect to the terminal that lines up with the wider prong slot on the plug.
- Loop the Wires: For a secure connection, it’s best to loop the stripped end of each wire around the terminal screw.
- Using needle-nose pliers, gently create a small hook or loop at the end of each stripped wire. The loop should be big enough to go around the screw terminal.
- Ensure the loops are formed in a clockwise direction so they tighten around the screw when the screw is tightened.
- Connect the Wires:
- Ground Wire: Place the loop of the green (or green/yellow) wire around the green screw terminal. Tighten the screw firmly. Make sure the wire is snug and no bare copper is showing outside the terminal.
- Neutral Wire: Place the loop of the white (or blue) wire around the silver or white screw terminal. Tighten the screw firmly.
- Hot Wire: Place the loop of the black (or brown) wire around the brass or black screw terminal. Tighten the screw firmly.
- Check Connections: Give each wire a gentle tug to ensure it’s securely fastened to its terminal. No bare wire should be visible.
Step 4: Secure the Cord and Assemble the Plug
Now it’s time to make sure the wires are properly secured and the plug is put back together.
- Strain Relief: Most replacement plugs have a strain relief mechanism. This is usually a clamp or a screw that grips the outer jacket of the cord. This is crucial to prevent the wires from being pulled directly off the terminals if the cord is tugged.
- Position the outer jacket of the cord so that it is firmly secured by the strain relief clamp.
- Tighten the screws for the strain relief. Ensure the jacket is held tightly, but don’t overtighten to the point of crushing the cord.
- Neaten the Wires: Neatly arrange the wires inside the plug housing. If you’re using heat shrink tubing, slide a piece over each wire connection before you close the plug. Then, use a heat gun (or carefully a lighter) to shrink it tightly around the connections. This adds an extra layer of protection.
- Close the Plug Housing: Carefully place the top half of the plug housing back onto the bottom half. Make sure no wires are pinched.
- Secure the Housing: Insert and tighten the screws that hold the plug housing together.
Step 5: Test the Repaired Cord
Before plugging in any appliances, it’s essential to test your repaired cord.
- Visual Inspection: Look over the plug. Ensure all screws are tight and no bare wire is exposed. The outer jacket should be securely held by the strain relief.
- Continuity Test (Using a Multimeter): This is the safest way to verify your work.
- Set your multimeter to the continuity setting (often indicated by a speaker symbol or Ω).
- Touch one probe to the metal pin of the plug you just wired.
- Touch the other probe to the corresponding terminal inside the plug (e.g., touch the hot pin and then the hot terminal screw). You should get a beep or a low resistance reading.
- Test all three connections (hot to hot, neutral to neutral, ground to ground).
- Functional Test: Plug the cord into a known working outlet. Then, plug in a simple, low-power device like a lamp to confirm it works correctly. For a heavier duty cord repair, test with a tool that draws significant power.
Important Considerations for Safety
Wiring an extension cord end involves working with electricity. Always prioritize safety.
Safety Precautions:
- Always Unplug: Ensure the extension cord is completely unplugged from any power source before you begin any work.
- Work in a Dry Area: Never attempt electrical repairs in damp or wet conditions.
- Use the Right Replacement Parts: Using a plug that doesn’t match the cord’s gauge or amperage rating is dangerous. Check the cord’s specifications.
- Don’t Overcrowd the Plug: Make sure the wires fit neatly inside the plug housing without being pinched or forced.
- Proper Strain Relief: This is critical. Without it, a tug on the cord can pull the wires off the terminals, creating a shock or fire hazard.
- Inspect Regularly: Periodically check your extension cords, especially those used outdoors or in high-traffic areas, for any signs of damage.
- When in Doubt, Don’t: If you feel uncomfortable or unsure at any point, it’s best to consult a qualified electrician or purchase a new extension cord.
Common Issues and Troubleshooting
Even with careful work, things can sometimes go wrong. Here are a few common problems you might encounter when wiring a plug.
Loose Connections:
- Problem: The appliance works intermittently or not at all.
- Cause: The wire is not securely attached to the terminal screw.
- Solution: Open the plug housing again. Check that the wire is looped correctly around the screw and that the screw is tightened firmly. Re-strip the wire if necessary to get a clean connection.
Exposed Wire:
- Problem: You see bare copper wire outside the terminal or housing.
- Cause: Wire insulation was stripped too far, or the wire slipped out of the terminal.
- Solution: Open the plug. Trim back any excess exposed wire. Re-strip the insulation to the correct length (about 1/2 inch) and re-secure the wire to the terminal. Consider using heat shrink tubing for extra security.
Plug Not Fitting Together Properly:
- Problem: The housing won’t close, or it feels like wires are being pinched.
- Cause: Wires are not routed neatly, or the strain relief isn’t positioned correctly.
- Solution: Carefully re-arrange the wires inside the plug. Ensure the outer jacket is correctly seated in the strain relief clamp. Make sure no excess wire is bunching up in a way that prevents the housing from closing.
Appliance Trips Breaker:
- Problem: The appliance works for a moment, then the circuit breaker trips.
- Cause: This often indicates a short circuit. A hot wire might be touching the ground wire or the plug casing.
- Solution: This is a critical safety issue. Unplug the cord immediately. Open the plug and meticulously inspect all connections. Ensure no bare wires are touching each other or metal parts of the plug. Double-check that the hot and neutral wires are connected to the correct terminals. If the problem persists, the appliance itself might have an issue, or the cord may be damaged internally.
Can You Repair Any Extension Cord?
While you can repair most extension cord ends, there are limitations. If the cord itself (the outer insulation or inner wires) is severely damaged, frayed, or brittle along its length, it’s often safer and more practical to replace the entire cord. A heavy duty cord repair might be more complex due to the thicker gauge wires and more robust construction. If the internal wiring is compromised beyond just the end plug, a simple cord end replacement might not be sufficient to guarantee safety.
When to Consider Socket Replacement
While this guide focuses on replacing the plug end (the male connector that goes into the wall outlet), sometimes the issue might be with the female receptacle end of an extension cord, especially with multi-outlet cords or cord sets. If the sockets are cracked, loose, or corroded, a socket replacement might be necessary. This process is similar in principle, involving opening the housing, identifying the terminals for each socket, and carefully wiring new sockets. However, multi-outlet cords can be more complex, and if you’re unsure, replacing the entire cord is usually the safest option.
Replacing the Plug End: A Summary of Key Steps
- Safety First: Always unplug the cord.
- Cut and Strip: Remove the damaged end and strip the outer jacket and then the inner wire insulation.
- Identify Wires: Know which wire is hot, neutral, and ground.
- Connect Securely: Loop wires clockwise around the correct screw terminals (ground to green, neutral to silver/white, hot to brass/black).
- Strain Relief: Secure the outer jacket with the plug’s strain relief mechanism.
- Assemble: Close and screw the plug housing shut.
- Test: Visually inspect and, if possible, test with a multimeter before use.
By following these steps for cord end replacement, you can safely and effectively repair many damaged extension cords, extending their life and ensuring your electrical connections are sound. Remember, accurate wiring a plug is essential for preventing electrical hazards. This process of re-wire cord can save you time and money.
Frequently Asked Questions (FAQ)
Q1: Is it safe to re-wire an extension cord end myself?
A1: Yes, it is safe if you follow proper procedures, use the correct parts, and prioritize safety by ensuring the cord is unplugged and making secure connections.
Q2: What is the difference between a 2-prong and 3-prong plug?
A2: A 2-prong plug has a hot and neutral wire, while a 3-prong plug includes a ground wire for added safety, typically used for appliances with metal casings.
Q3: Can I use a plug end with a higher amperage rating than my cord?
A3: Yes, using a plug with a higher amperage rating than your cord is generally safe, as it won’t restrict the flow of electricity. However, you should never use a plug with a lower rating, as it can overheat and become a fire hazard.
Q4: How do I know if my extension cord needs a heavy duty cord repair?
A4: A heavy duty cord repair might be needed if the cord is thick (e.g., 12 or 10 gauge), designed for high-power tools or appliances, and shows significant damage or wear. Ensure your replacement plug is also rated for heavy-duty use.
Q5: What if the new plug doesn’t look exactly like the old one?
A5: Replacement plugs can vary in design. The most important thing is that the terminal connections (hot, neutral, ground) are correctly identified and wired, and that the new plug is rated for your cord’s amperage and gauge.
Q6: Can I repair a damaged socket on an extension cord?
A6: Yes, you can perform a socket replacement if the damage is limited to the female end of the cord. The process is similar to replacing the plug end, focusing on secure wiring to the socket terminals. However, for complex multi-outlet cords, professional help or replacement might be advisable.