
Can you cut tile with a wet saw? Yes, a wet saw is an excellent tool for cutting tile, especially harder materials like porcelain tile.
Cutting tile can seem daunting, but with the right tools and techniques, it’s a manageable task for DIY enthusiasts and seasoned professionals alike. A wet tile cutter, often referred to as a wet saw, is the go-to equipment for achieving precise and clean cuts, particularly when dealing with challenging materials. This guide will walk you through the process of using a wet saw, covering everything from setup to safety and various cutting techniques.
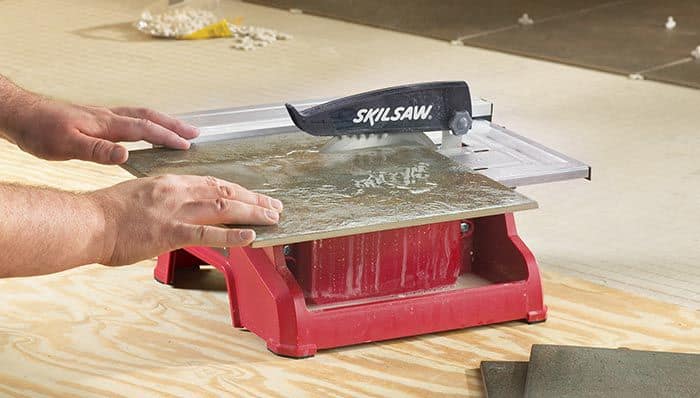
Image Source: mobileimages.lowes.com
Why Use a Wet Saw for Tile Cutting?
Wet saws utilize a diamond blade that spins at high speed, while a reservoir of water cools the blade and lubricates the cutting surface. This combination is crucial for several reasons:
- Dust Suppression: Traditional dry cutting methods create fine silica dust, which is a serious health hazard. The water in a wet saw captures this dust, making the cutting process much safer and cleaner.
- Blade Longevity: The water acts as a coolant, preventing the diamond blade from overheating. Overheating can damage the blade, reducing its lifespan and cutting efficiency.
- Chip-Free Cuts: The lubrication from the water helps to reduce chipping and splintering on the edges of the tile, resulting in a much cleaner and more professional finish. This is especially important for porcelain tile cutting, which is a harder material and more prone to chipping.
- Precision and Accuracy: Wet saws, especially those with a tile cutting guide, allow for very precise cuts, including straight lines, miter cuts, and bevel cuts.
Essential Components of a Wet Saw
Before we dive into the cutting process, it’s important to familiarize yourself with the main parts of a wet saw:
- Motor: Powers the spinning blade.
- Water Pump: Circulates water from the reservoir to the blade.
- Water Reservoir: Holds the water for cooling and dust suppression.
- Blade Guard: Protects the user from the spinning blade.
- Cutting Table/Surface: Where the tile is placed for cutting.
- Miter/Rip Guide: An adjustable fence that helps make straight and parallel cuts.
- Diamond Blade: The cutting element.
Choosing the Right Diamond Blade
The diamond blade is the heart of your wet saw. The type of blade you choose will depend on the type of tile you’re cutting.
Blade Types for Different Tiles
| Tile Type | Recommended Blade Type | Description |
|---|---|---|
| Ceramic Tile | Continuous Rim Blade | Best for smoother cuts on softer materials like ceramic. Minimizes chipping. |
| Porcelain Tile | Porcelain tile cutting Blade (Segmented) | Designed for harder materials. The segmented edge helps to clear debris and reduce heat buildup. |
| Natural Stone | Specific Stone Blade (often segmented) | Varies based on stone type; some blades are for granite, others for marble. Look for a blade suited to your stone. |
| Glass Tile | Glass Blade (continuous rim) | Similar to ceramic blades but often finer and designed for glass to prevent cracking. |
| Mosaic Tile | Multi-Purpose Blade (often continuous rim) | Can handle various materials found in mosaics, but check manufacturer recommendations. |
Key considerations when selecting a blade:
- Diameter: Ensure the blade diameter is compatible with your wet saw. Common sizes are 7 inches, 10 inches, and 12 inches.
- Arbor Size: The hole in the center of the blade must match the arbor size of your saw.
- Blade Thickness: Thicker blades are generally more durable but can result in a wider kerf (the width of the cut), meaning more material is removed. Thinner blades are ideal for precise cuts and minimizing material waste.
Setting Up Your Wet Saw
Proper setup is crucial for both safety and effective cutting.
1. Safety First: Tile Saw Safety Precautions
Before you even plug in the saw, prioritize safety.
- Wear Safety Gear: Always wear safety glasses or goggles to protect your eyes from water spray and debris. Water-resistant gloves are also recommended.
- Appropriate Footwear: Wear closed-toe, slip-resistant shoes.
- Ventilation: While wet saws significantly reduce dust, it’s still a good idea to work in a well-ventilated area.
- Electrical Safety: Ensure the power outlet is GFCI (Ground Fault Circuit Interrupter) protected, especially when working with water. Keep the power cord away from water.
- Blade Installation: Make sure the blade is installed correctly and securely. The direction of the blade rotation should match the markings on the saw.
- Keep Hands Clear: Never place your hands directly in front of the blade path.
2. Filling the Water Reservoir
- Water Type: Use clean water. Some manufacturers recommend distilled water to prevent mineral buildup, but tap water is generally acceptable.
- Fill Level: Fill the reservoir according to your saw’s manual. Typically, the water level should be high enough to keep the blade fully submerged during operation.
3. Installing and Aligning the Blade
- Blade Installation: Turn off and unplug the saw. Refer to your wet saw’s manual for specific instructions on how to remove and install the blade. Ensure the blade is seated correctly on the arbor and the retaining nut is tightened securely.
- Blade Alignment: Most modern wet saws have self-aligning blades. However, it’s good practice to check for any wobble or deviation.
4. Setting Up the Tile Cutting Guide
- Rip Guide: If you’re making straight cuts along the length of the tile, adjust the rip guide to the desired measurement. Ensure it’s parallel to the blade.
- Mitering and Beveling: For miter cuts (angled cuts) and bevel cuts (cuts along the edge of the tile), you’ll typically adjust a tilting table or a specialized miter guide. Familiarize yourself with your saw’s specific angle adjustment mechanisms.
How to Cut Tile with a Wet Saw: Step-by-Step
Now that your saw is set up and ready, let’s get cutting.
1. Preparing the Tile
- Removing Grout: If you are cutting tiles that are already installed, you will need to carefully remove the grout surrounding the tile. Tools like a grout saw, oscillating multi-tool with a grout blade, or a utility knife can be used. This step is crucial to prevent the grout from interfering with the cut or damaging the tile.
- Marking Your Cut Line: Use a pencil or a permanent marker to draw a clear line on the tile where you want to cut. For intricate patterns or complex cuts, consider using painter’s tape on the tile surface to help guide the blade and reduce chipping.
2. Making Straight Cuts
This is the most common type of cut.
- Positioning the Tile: Place the tile flat on the cutting table, ensuring the marked line is aligned with the blade.
- Engaging the Blade: Turn on the wet saw and allow the blade to reach full speed.
- Feeding the Tile: Gently and steadily push the tile through the blade. Do not force it. Let the blade do the work.
- Completing the Cut: Continue feeding the tile until the cut is complete. Turn off the saw once the tile has passed through.
3. Making Miter Cuts
Miter cuts are used for creating angled joints, often in corners or around obstacles.
- Adjusting the Angle: Most wet saws have an adjustable table or miter gauge. Set the desired angle (e.g., 45 degrees) according to your project needs.
- Securing the Tile: Ensure the tile is held firmly against the miter guide or table to prevent movement during the cut.
- Cutting: Feed the tile through the blade as you would for a straight cut, maintaining the angle.
4. Making Bevel Cuts
Bevel cuts create an angled edge on the tile, often used for decorative purposes or to create a smoother transition.
- Adjusting the Blade Angle: Many higher-end wet saws allow you to tilt the blade itself. If your saw has this feature, adjust the blade to the desired bevel angle.
- Positioning for the Cut: Place the tile on the cutting surface, aligning the edge to be beveled with the blade. You might need to adjust the rip guide or use specialized jigs for precise bevel cuts.
- Cutting: Feed the tile through the blade, maintaining the bevel angle.
5. Cutting Curves and Shapes
For more intricate shapes, such as around pipes or for decorative elements, a specialized wet tile cutter with a sliding or tilting head can be very useful. Some professionals use smaller handheld wet saws or angle grinders with diamond blades for highly detailed work, but this requires advanced skill and careful tile saw safety.
- Marking: Clearly mark the desired curve or shape on the tile.
- Incremental Cuts: For curves, you’ll often make a series of small, straight cuts that approximate the curve.
- Freehand Cutting: With practice, you can guide the tile freehand around the marked line, making small adjustments as you go.
Tips for Achieving Perfect Cuts
- Practice Makes Perfect: If you’re new to using a wet saw, practice on scrap tiles before cutting your actual project tiles.
- Don’t Force the Tile: Applying too much pressure can chip the tile or damage the blade. Let the saw do the work.
- Keep the Blade Cool: Ensure the water reservoir is adequately filled and the pump is working efficiently. If you notice the water level dropping significantly, top it up.
- Clean the Blade: Periodically rinse the diamond blade to remove any buildup that could affect its performance.
- Use the Tile Cutting Guide: For accurate straight cuts, always use the rip guide. Ensure it’s clean and free of debris.
- Check for Water Splash: Be mindful of water spray, especially when making angled cuts. Position yourself to avoid getting sprayed directly.
- Maintenance: After each use, clean the water reservoir, the cutting table, and the blade to prolong the life of your saw and blade.
Maintaining Your Wet Saw
Regular maintenance ensures your wet saw performs optimally and lasts longer.
Cleaning the Saw
- After Each Use: Drain the water reservoir. Clean out any tile slurry or debris that has accumulated. Rinse the reservoir thoroughly.
- Wipe Down: Wipe down the cutting table, motor housing, and other surfaces to remove water spots and dust.
- Blade Cleaning: Clean the diamond blade with a brush to remove any residue. Some specialized blade cleaners are available.
Blade Care
- Inspect Regularly: Check the diamond blade for wear and tear. If the diamond segments appear worn down or uneven, it’s time for a new blade.
- Proper Storage: Store your blades in a dry place, away from moisture, to prevent rust.
Common Problems and Solutions
| Problem | Cause | Solution |
|---|---|---|
| Excessive Chipping | Dull blade, forcing the tile, wrong blade for the material, dry cut | Use a sharper blade, don’t force, use the correct blade (e.g., porcelain tile cutting blade for porcelain), ensure adequate water flow. |
| Blade Wobble | Loose blade, warped blade, bent arbor | Tighten the blade securely, replace a warped blade, check the saw’s arbor for damage. |
| Uneven Cuts | Unstable tile, misaligned guide, inconsistent feed rate | Ensure the tile is stable on the table, check the alignment of the rip/miter guide, maintain a steady, consistent pace when feeding the tile. |
| Saw Overheating | Insufficient water, clogged water system, prolonged continuous use | Ensure the water reservoir is full, clean the pump and water channels, allow the saw to cool down periodically. |
| Poor Water Flow | Clogged pump, low water level, debris in the reservoir | Clean the pump intake, ensure the reservoir is filled adequately, remove debris from the reservoir. |
| Loud Noise | Dry bearing, loose parts, damaged blade | Check for dry bearings and lubricate if recommended by the manufacturer, ensure all parts are tightened, inspect the blade for damage. |
Frequently Asked Questions (FAQ)
Q1: How often do I need to change the water in my wet saw?
A1: The water should be changed when it becomes cloudy or contains too much tile slurry, which can hinder performance and potentially damage the pump. For most projects, changing it every few hours of cutting is a good practice.
Q2: Can I use my wet saw for ceramic tile cutting?
A2: Absolutely. Wet saws are ideal for ceramic tile cutting, providing cleaner edges and less chipping compared to dry cutting methods.
Q3: What are miter cuts and bevel cuts?
A3: A miter cut is an angled cut, typically at 45 degrees, used to create corner joints. A bevel cut is a cut made at an angle along the edge of the tile, not through its thickness, often for decorative purposes or to create a transition.
Q4: How do I handle the water while cutting?
A4: Wet saws are designed to contain most of the water. However, some splashing is inevitable. Always wear protective eyewear and consider working on a waterproof surface or using a splash guard if your saw doesn’t have one.
Q5: Can I cut glass tile with a standard wet saw blade?
A5: While some multi-purpose blades can handle glass, it’s best to use a blade specifically designed for glass tile to ensure the cleanest cuts and prevent cracking.
Q6: What’s the best way to start cutting a long tile?
A6: Ensure the tile is firmly on the cutting table and aligned with the tile cutting guide. Slowly bring the tile to the spinning blade, then feed it steadily.
Q7: Is it safe to cut tile indoors?
A7: Yes, wet saws are designed to be used indoors due to their dust suppression capabilities. However, ensure good ventilation and protect your flooring from water spills.
Q8: How do I prepare a wall tile for cutting if it has existing grout?
A8: You’ll need to carefully remove the grout surrounding the tile using a grout saw or similar tool before attempting to cut. This process is known as removing grout.
Q9: What if my wet saw isn’t cutting straight?
A9: Check that the rip guide or tile cutting guide is clean, properly adjusted, and parallel to the blade. Ensure the tile is held flat against the guide and the cutting surface.
Q10: How do I get a smooth edge on my cut tiles?
A10: A sharp, high-quality diamond blade and a steady, consistent feed rate are key. Allowing the water to properly lubricate the cut also helps significantly. For an even smoother edge, you can use a rubbing stone or a fine-grit sandpaper to lightly smooth the cut edge after it’s made.
By following these guidelines and prioritizing tile saw safety, you can confidently use a wet saw to achieve professional-looking cuts for your tiling projects. Whether you’re tackling porcelain tile cutting or simpler ceramic tile cutting, the precision of a wet saw will make a noticeable difference.