
Can you sharpen a Stihl chainsaw chain at home? Yes, absolutely! With the right tools and a bit of practice, you can effectively sharpen your Stihl chainsaw chain at home, saving money and ensuring your saw runs at its best. This guide will walk you through the entire process of chainsaw chain sharpening for your Stihl.
Maintaining your Stihl chainsaw is crucial for its performance and longevity. Proper Stihl chainsaw maintenance includes keeping the chain sharp. A dull chain struggles to cut, requires more force, overheats the engine, and can be dangerous. Learning how to sharpen Stihl chainsaw blade teeth is a fundamental skill for any chainsaw owner.
This in-depth guide will cover everything from choosing the right tools to the actual filing technique. We’ll explore both manual and electric sharpening methods, and even touch on specifics for models like the Stihl 026 chainsaw sharpening.
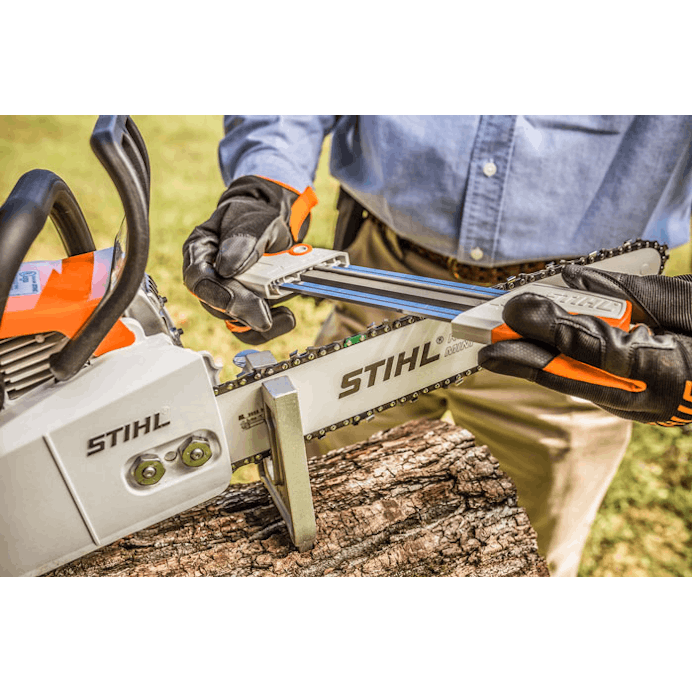
Image Source: stihlusa-images.imgix.net
Why Sharpening Your Stihl Chainsaw Chain Matters
A sharp chainsaw chain is more than just convenient; it’s essential for safety and efficiency. Think of your chainsaw as a tool with many tiny knives working together. When these knives are dull, they don’t cut cleanly. Instead, they tear and rip through the wood. This has several negative consequences:
- Reduced Cutting Efficiency: A dull chain makes your chainsaw work much harder. You’ll find yourself pushing down more, and the saw will bog down. This means slower work and more frustration.
- Increased Risk of Kickback: Kickback is a sudden, violent upward and backward motion of the chainsaw. It happens when the nose of the guide bar hits an object, or when the chain is pinched in the cut. A sharp chain cuts cleanly and reduces the chance of pinching, thereby lowering the risk of kickback.
- Damage to the Saw: When your chainsaw has to work harder, its engine and other components experience more stress. This can lead to premature wear and tear, overheating, and potentially costly repairs.
- Poor Cut Quality: A dull chain leaves a ragged edge on the wood, unlike the clean, sawdust-like chips produced by a sharp chain. This can be problematic for precise cutting tasks.
- User Fatigue: The extra effort required to use a dull chain tires you out faster. This can lead to mistakes and increase the risk of accidents.
Therefore, regular chainsaw chain sharpening is a core part of Stihl chainsaw maintenance.
Tools You’ll Need for Chainsaw Sharpening
Before you start, gather the necessary tools. Having the right equipment makes the job much easier and ensures a better result.
Manual Sharpening Tools
Manual sharpening is the most common and accessible method.
- Round File: This is the primary tool for sharpening the cutting teeth. The correct size is crucial. For most Stihl chains, a Stihl chainsaw file size of 5/32″ (4.0mm) or 3/16″ (4.8mm) is standard, but always check your chainsaw’s manual or the chain itself for the exact recommendation.
- Flat File: Used to file down the depth gauges (also known as rakers).
- Chainsaw File Guide: This is an invaluable tool. It’s a small jig that fits over the chain and holds the round file at the correct angle and depth. It ensures consistency across all teeth. Using a chainsaw file guide is highly recommended for beginners.
- Depth Gauge Tool (or Raker Gauge): A special tool designed to measure the height of the depth gauge relative to the cutting tooth.
- Bench Vise or Clamp: To securely hold the guide bar while you work on the chain.
- Rag or Cloth: For wiping the chain and files.
- Gloves: To protect your hands.
Electric Chainsaw Sharpeners
For those who sharpen chains frequently or want maximum consistency with less physical effort, an electric sharpener is a good investment.
- Electric Chainsaw Sharpener: These units typically have a grinding stone that spins at high speed. They come with various grinding stone sizes to match different chain types. While faster, they require careful setup to avoid overheating or removing too much metal.
Understanding Chainsaw Chain Anatomy for Sharpening
Before diving into the sharpening process, it’s helpful to know the parts of the chain you’ll be working with.
- Cutting Tooth (Cutter): This is the part that actually cuts the wood. It has a top plate and a side plate that form the cutting edge.
- Depth Gauge (Raker): Located in front of each cutting tooth, this metal protrusion controls how deep the cutter bites into the wood. If it’s too high, the cutter won’t bite properly. If it’s too low, the chain will cut aggressively and can lead to overheating.
- Gage: The distance between the drive links. This determines how the chain fits on the bar.
- Drive Link: The part of the chain that sits in the groove of the guide bar and is engaged by the drive sprocket.
Manual Chainsaw Sharpening: Step-by-Step
Manual sharpening is the most common method for chainsaw tooth filing. It’s precise and effective when done correctly.
Step 1: Secure the Chainsaw
- Place the chainsaw on a stable, flat surface.
- Engage the chain brake to prevent the chain from moving accidentally.
- Use a vise or clamp to firmly secure the guide bar. This allows you to work on the chain without it moving.
Step 2: Identify the Starting Tooth
- Locate the shortest cutting tooth. This will be your starting point. Chains are designed to have alternating left and right cutting teeth.
- Note whether it’s a left or right tooth. You’ll alternate your filing direction for each side.
Step 3: Set Up Your Chainsaw File Guide
- A chainsaw file guide is essential for consistent results. It has markings to help you set the correct chainsaw sharpening angle.
- Most Stihl chains require a chainsaw sharpening angle of 25 to 35 degrees. The file guide will have indicators for these angles.
- Place the file guide over the chain, ensuring the round file fits snugly into the gullet (the curved part) of the cutting tooth.
Step 4: File the Cutting Teeth
- Position the round file so it’s parallel to the ground and at the correct angle relative to the top plate of the tooth. The file guide will help greatly here.
- With firm, even pressure, push the file forward across the tooth. Use long, smooth strokes.
- Lift the file on the backward stroke to avoid dulling the tooth.
- Aim for about 3-5 strokes per tooth, or until you see a bright, sharp edge. The goal is to remove only the dull metal.
- Once you’ve filed one tooth, move to the next tooth on the same side. Continue this pattern for all teeth on that side.
Step 5: File the Opposite Side Teeth
- Now, move to the other side of the chain. You’ll need to adjust the chainsaw file guide to file the teeth on this side.
- Again, start with the shortest tooth on this side.
- Apply the same filing technique (3-5 strokes, smooth forward motion, lift on backstroke) at the correct chainsaw sharpening angle.
- Continue filing all teeth on this side.
Step 6: Check the Depth Gauges (Rakers)
- The depth gauges control how much the cutter bites. If they are too high, the chain won’t cut well. If they are too low, the chain will be too aggressive.
- Use a depth gauge tool (like a Stihl Raker Gauge) or a flat file with a filing jig designed for depth gauges.
- Place the tool over the chain so the gauge is resting on the top of the depth gauge.
- If the depth gauge protrudes above the slot on the tool, you need to file it down. Use a flat file or the appropriate part of your filing jig.
- File the depth gauge until it is flush with the slot on the tool. Be careful not to file too much.
- Important: The depth gauge should be filed before the cutter it precedes. Always file the depth gauge for the next cutter you’ll be sharpening.
- Repeat this process for every depth gauge on the chain.
Step 7: Final Checks and Cleanup
- Inspect the teeth. They should all look uniform and have a sharp, shiny edge.
- Wipe down the chain and bar with a clean cloth.
- Carefully disengage the chain brake and remove the chainsaw from the vise.
Sharpening Specific Stihl Models: The Stihl 026 Chainsaw Sharpening Example
The process for Stihl 026 chainsaw sharpening is the same as outlined above, but it’s a good example to illustrate the importance of using the correct file size. The Stihl 026 often uses a 3/8″ pitch chain, which typically requires a 5/32″ (4.0mm) or 3/16″ (4.8mm) round file. Always consult your owner’s manual for the exact specifications for your specific model and chain.
If your Stihl 026 has a different pitch chain, you’ll need to adjust the Stihl chainsaw file size accordingly. For instance, a .325″ pitch chain might use a 7/32″ (5.5mm) file.
Electric Chainsaw Sharpeners: A Faster Alternative
An electric chainsaw sharpener can significantly speed up the process, especially for those who sharpen chains regularly.
How Electric Sharpeners Work
Electric sharpeners typically have a motor that spins a grinding stone. You position the sharpener over the chain and guide the stone into the gullet of the cutting tooth. The spinning stone grinds away the dull metal, restoring the sharp edge.
Using an Electric Chainsaw Sharpener: Key Considerations
- Choosing the Right Grinding Stone: Electric sharpeners come with various stone sizes and shapes. You need to select the one that matches the specifications of your chain (gullet shape, tooth angle).
- Setup and Adjustment: Before you start, you’ll need to adjust the sharpener’s angle guide and depth stop to match your chain’s specifications. This is critical for a proper sharpening job.
- Consistency is Key: Move the sharpener steadily from tooth to tooth, ensuring you apply consistent pressure and don’t dwell too long on any one tooth. Overheating the tooth can damage its temper.
- Depth Gauge Adjustment: Most electric sharpeners don’t adjust the depth gauges. You’ll still need to use a separate tool or flat file for this important step.
- Practice: Electric sharpeners can be aggressive. It’s wise to practice on a junk chain first to get a feel for how much pressure to apply and how long to hold the stone on each tooth.
Table: Manual vs. Electric Chainsaw Sharpening
| Feature | Manual Sharpening | Electric Sharpening |
|---|---|---|
| Cost | Low (initial tool purchase) | Moderate to High (initial sharpener purchase) |
| Speed | Slower | Faster |
| Consistency | Requires practice to achieve | Easier to achieve with proper setup |
| Portability | Highly portable, can be done in the field | Requires power source, less portable |
| Learning Curve | Moderate | Moderate (setup and technique) |
| Risk of Damage | Lower (if done correctly) | Higher if not set up or used properly |
| Depth Gauges | Requires separate filing | Requires separate filing |
Tips for Maintaining Sharpness Longer
- Avoid Cutting Dirt and Rocks: These can quickly dull your chain. Try to cut clean wood whenever possible.
- Proper Chain Tension: Ensure your chain is tensioned correctly. A loose chain can flop around and hit the bar or casing, causing damage and dulling. A too-tight chain can cause premature wear.
- Lubrication: Always use good quality bar and chain oil. This lubricates the chain and bar, reducing friction and heat, which helps maintain sharpness and prolongs the life of both components.
- Regular Checks: Inspect your chain for dullness or damage before each use. A quick touch-up with a file can prevent a full sharpening session.
When to Sharpen Your Stihl Chainsaw Chain
It’s better to sharpen too often than not enough. Here are signs your chain needs sharpening:
- Sawdust vs. Shavings: If your saw is producing fine sawdust instead of clean wood shavings, the chain is likely dull.
- Saw Drags to the Side: A sharp chain cuts straight. If your saw pulls to one side, the cutters are uneven or dull.
- More Force Required: You shouldn’t have to force the saw through the wood. If you do, it’s time to sharpen.
- Visible Dullness: Look at the cutting teeth. If the tips are rounded or blued (from heat), they are dull.
- Sparks When Cutting: This is a definite sign of extreme dullness or contact with metal or rocks.
Frequently Asked Questions (FAQ)
Q: How often should I sharpen my Stihl chainsaw chain?
A: This depends heavily on usage. For light home use, sharpening every few hours of actual cutting time might be sufficient. For heavy professional use, you might need to sharpen multiple times a day. A good rule of thumb is to sharpen when you notice a decline in cutting performance.
Q: What is the correct chainsaw sharpening angle for a Stihl chain?
A: Most Stihl chains require a chainsaw sharpening angle between 25 and 35 degrees. Always check your specific chain or owner’s manual for the exact recommended angle.
Q: Can I use a regular metal file to sharpen my chainsaw chain?
A: No, you must use a round file specifically designed for chainsaw chains. These files are shaped to fit the gullet of the cutting tooth and have the correct coarseness. A regular metal file will not give you the proper edge.
Q: How do I know if I’m removing too much metal when sharpening?
A: Look at the cutter teeth. If you see a significant difference in the size of the teeth after sharpening, or if you’re filing more than 3-5 strokes per tooth, you might be removing too much metal. The goal is to restore the sharp edge, not to reshape the tooth entirely unless it’s severely damaged.
Q: What is the difference between a 5/32″ and a 3/16″ file for Stihl chains?
A: These refer to the diameter of the round file. The Stihl chainsaw file size you choose depends on the pitch of your chainsaw chain. A 5/32″ (4.0mm) file is common for .325″ pitch chains, while a 3/16″ (4.8mm) file is often used for 3/8″ pitch chains. Using the wrong size file will result in an incorrect sharpening angle and edge.
Q: My Stihl chainsaw isn’t cutting well, but I just sharpened it. What could be wrong?
A: Several things could be the cause:
* Dull Depth Gauges: If the depth gauges (rakers) are too high, the cutters won’t bite effectively.
* Incorrect Sharpening Angle: The angle might be off.
* Uneven Filing: Some teeth might be sharp, while others are dull.
* Chain Damage: The chain might be bent or have damaged teeth.
* Chain Tension: The chain might be too loose or too tight.
* Bar Issues: The guide bar groove could be dirty, or the bar itself might be worn.
Q: Can I sharpen a chain that has hit concrete or rocks?
A: If the damage is minor (just a few dull spots), you can try to sharpen it. However, if the teeth are chipped, bent, or severely dulled, it might be impossible to restore a proper edge through filing. In such cases, it’s safer and more effective to replace the chain.
Q: What is the best way to maintain my Stihl chainsaw chain between sharpenings?
A: Regular cleaning, proper lubrication with good quality bar and chain oil, and ensuring correct chain tension are key. Also, avoid cutting into the dirt or debris as much as possible.
By following these steps and tips, you can master the art of chainsaw chain sharpening for your Stihl and keep your equipment performing at its peak. Consistent Stihl chainsaw maintenance like this will save you time, money, and make your work safer and more enjoyable.