
Can you read a tape measure? Yes, with this quick guide, you’ll be able to read a tape measure like a pro. This guide is designed to make learning the basics of using a tape measure easy and fast, even if you’ve never held one before. We’ll cover everything you need to know, from the numbers you see to how to measure accurately. Let’s dive into the world of tape measure basics!
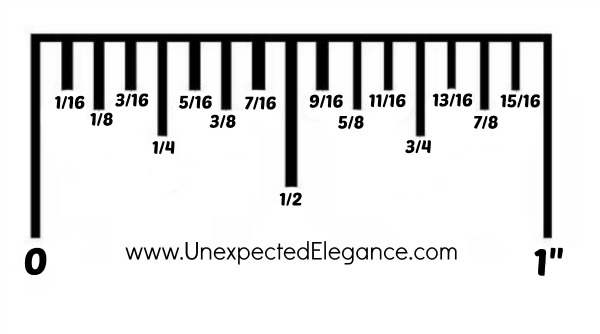
Image Source: www.unexpectedelegance.com
What’s on a Tape Measure?
Tape measures are simple tools, but they hold a lot of information. They help us know how long or wide something is. They are used for all sorts of tasks, from building a birdhouse to hanging a picture. This guide will help you grasp the essential tape measure markings and use them correctly.
The Numbers You See
When you look at a tape measure, you’ll see different numbers and lines. These all mean something important.
- The Big Numbers: These usually show the whole feet. If you see a “1”, that means one foot. If you see a “2”, that’s two feet.
- The Lines: Between the big numbers, you’ll see lines of different lengths. These lines show the inches.
Imperial Measurements Explained
Most tape measures in countries like the United States use imperial measurements. This system uses feet and inches.
- Feet: A foot is a standard unit of length. On a tape measure, feet are usually marked with larger numbers. There are 12 inches in 1 foot.
- Inches: An inch is a smaller unit of length. Most tape measures show inches clearly.
Metric Measurements: A Look
Some tape measures also have metric measurements on the other side. This system uses centimeters and millimeters.
- Centimeters (cm): These are the bigger numbers on the metric side.
- Millimeters (mm): These are the smaller lines between the centimeter marks. There are 10 millimeters in 1 centimeter.
- Meters (m): A meter is a larger unit. You’ll usually see meters marked by a different color or a longer line, especially on longer tape measures. There are 100 centimeters in 1 meter.
For this guide, we’ll focus mainly on imperial measurements, as they are the most common for everyday DIY tasks in many places.
Getting to Know Your Tape Measure: The Markings
Let’s break down the different markings you’ll find on a tape measure. This is key to accurate measuring.
The Inch Marks
Between each foot marking (like 1 foot, 2 feet, etc.), you’ll find marks representing inches.
- The Longest Lines: These mark the full inches. You’ll see a “1”, “2”, “3”, and so on, up to “12”. The “12” mark will also be the beginning of the next foot.
- Shorter Lines: The lines between the full inches show parts of an inch. These are crucial for reading fractions on a tape measure.
Deciphering Fractions on a Tape Measure
Fractions are how we measure parts of an inch. Tape measures show these fractions with lines.
- Half Inch (1/2): This is usually the second longest line between the full inch marks. It’s right in the middle of the inch.
- Quarter Inches (1/4, 3/4): These lines are shorter than the half-inch line. There are two quarter-inch marks in every inch:
- The 1/4 inch mark is halfway between the beginning of the inch and the 1/2 inch mark.
- The 3/4 inch mark is halfway between the 1/2 inch mark and the next full inch.
- Eighth Inches (1/8, 3/8, 5/8, 7/8): These lines are even shorter. They divide each quarter inch in half.
- Sixteenth Inches (1/16, 3/16, 5/16, 7/16, 9/16, 11/16, 13/16, 15/16): These are the shortest lines on most standard tape measures. They divide each eighth inch in half.
Here’s a simple way to think about it:
Imagine an inch is a pizza.
- The 1/2 mark cuts the pizza in half.
- The 1/4 and 3/4 marks cut each of those halves in half again.
- The 1/8 marks cut each of those quarters in half.
- The 1/16 marks cut each of those eighths in half.
Visual Aid: The Inch Breakdown
Let’s look at one inch and all its divisions:
| Mark | Fraction | How to Read It |
|---|---|---|
| 1 | 1/1 | One full inch |
| (1/2) | 1/2 | Halfway between 0 and 1 inch |
| (1/4) | 1/4 | Quarter way between 0 and 1 inch |
| (3/4) | 3/4 | Three-quarters way between 0 and 1 inch |
| (1/8) | 1/8 | One-eighth way between 0 and 1 inch |
| (3/8) | 3/8 | Three-eighths way between 0 and 1 inch |
| (5/8) | 5/8 | Five-eighths way between 0 and 1 inch |
| (7/8) | 7/8 | Seven-eighths way between 0 and 1 inch |
| (1/16) | 1/16 | One-sixteenth way between 0 and 1 inch |
| (3/16) | 3/16 | Three-sixteenths way between 0 and 1 inch |
| (5/16) | 5/16 | Five-sixteenths way between 0 and 1 inch |
| (7/16) | 7/16 | Seven-sixteenths way between 0 and 1 inch |
| (9/16) | 9/16 | Nine-sixteenths way between 0 and 1 inch |
| (11/16) | 11/16 | Eleven-sixteenths way between 0 and 1 inch |
| (13/16) | 13/16 | Thirteen-sixteenths way between 0 and 1 inch |
| (15/16) | 15/16 | Fifteen-sixteenths way between 0 and 1 inch |
Simplifying Fractions: Just like in math class, you’ll see some fractions that can be written more simply. For example, 2/4 is the same as 1/2. On a tape measure, you’ll usually see the simplest form of the fraction.
Reading Feet and Inches Together
This is where reading inches and reading feet come together.
- Example: If you see the number “2” and then the mark for 3/4 inch, you are measuring 2 feet and 3/4 inches.
- Example: If you see the number “5” and then the mark for 1/2 inch, you are measuring 5 feet and 1/2 inch.
Most tape measures will clearly show the foot numbers. The inches are counted from the start of the tape measure.
Special Markings: What Do They Mean?
Some tape measures have extra marks that are helpful for certain jobs.
- Stud Marks: You might see red diamonds or other symbols every 16 inches or 24 inches. These are called “stud marks” and are useful for framing walls. They show where wall studs are typically located.
- Black Diamonds: These often appear at 19.2 inches, another common stud spacing.
- Color Coding: Sometimes, every 1/16th of an inch is marked with a different color. This can make it easier to see the smaller fractions.
How to Use a Tape Measure: A Step-by-Step Guide
Now that you know what the markings mean, let’s learn how to use a tape measure.
Step 1: Get Ready to Measure
- Unroll the Tape: Pull the tape measure out from its case. Most have a button to lock the tape in place.
- Find the End: The very beginning of the metal tape, where it has a hook, is your zero point. Make sure the hook is flat against the edge of the object you are measuring.
Step 2: Position the Tape
- Against the Object: Place the hook of the tape measure firmly against the start of the item you want to measure.
- Keep it Straight: For accurate results, ensure the tape measure is pulled straight and taut across the surface. No sagging!
Step 3: Read the Measurement
- Where to Look: Find the mark on the tape that aligns with the end of the object you are measuring.
- Read the Numbers: Look at the last full foot number you passed. Then, count the inches and fractions of an inch past that foot mark.
Let’s practice reading some common measurements:
- Measuring 10 inches: Find the “10” mark. That’s 10 inches.
- Measuring 1 foot 6 inches: Find the “1” (for 1 foot), then move to the “6” inch mark.
- Measuring 3 feet 3/4 inch: Find the “3” (for 3 feet), then find the line that represents 3/4 of an inch.
Step 4: Marking and Cutting
- Make a Mark: Once you know the measurement, you might need to mark the tape measure itself or the object. Some tape measures have a little slot or hole on the side of the hook for marking. You can also use a pencil.
- For Cutting: If you are cutting something, make sure your mark is precise.
Step 5: Retracting the Tape
- Release the Lock: If your tape measure has a lock, release it.
- Carefully Retract: Let the tape measure wind back into its case slowly. Don’t let it snap back, as this can be dangerous and damage the tape.
Using a Tape Measure for Common Tasks
Here are some ideas on how to use a tape measure for everyday things:
Hanging Pictures
- Measure the Wall: Decide where you want the picture. Measure the distance from the ceiling or floor.
- Measure the Picture: Find the center of the picture frame or the hanging wire.
- Mark the Spot: Use your tape measure to mark exactly where the nail or hook should go on the wall.
Furniture Placement
- Measure the Space: Know the dimensions of the room where you want to put furniture.
- Measure the Furniture: Check the width and depth of the piece.
- Visualize: This helps you see if the furniture will fit and leave enough walking space.
DIY Projects
- Cutting Wood: Measure the length of wood you need for a project. Make a clear mark using your tape measure.
- Building Shelves: Measure the space where the shelves will go. Measure the shelves themselves to ensure a good fit.
Tips for Accurate Measuring
- Keep it Flat: Always pull the tape measure straight. Don’t let it bend or curve.
- Use the Hook: Start with the hook flush against your starting point.
- Read from the Top: Look at the tape measure from directly above the mark you are reading. This avoids errors caused by looking at an angle.
- Zero In: Make sure you are reading from the correct zero point.
- Measure Twice, Cut Once: This old saying is true! Double-check your measurements before you cut or drill.
- Clean Your Tape: Keep your tape measure clean so the markings are easy to see.
- Check for Damage: If the hook is bent or the tape is creased, your measurements might be off.
Troubleshooting Common Tape Measure Issues
Sometimes, using a tape measure can be a little tricky. Here are a few common problems and solutions.
Issue: The tape measure hook feels loose.
- Why it happens: The hook is designed to be a little flexible to account for its own thickness when measuring inside or outside.
- Solution: When measuring an outside dimension (like the length of a table), push the hook firmly against the edge. The hook’s play will be pushed out. When measuring an inside dimension (like the width of a drawer), hook the tape onto the edge, and the hook’s play will add its own thickness, giving you the correct measurement.
Issue: The tape is sagging in the middle.
- Why it happens: You’re trying to measure a distance longer than the tape can easily span without support.
- Solution: For longer measurements, have someone help you hold the tape taut. If you’re working alone, you might need a laser measure or a longer tape measure. You can also try to keep the tape as close to the surface as possible.
Issue: The numbers are hard to read.
- Why it happens: Poor lighting or worn-out markings.
- Solution: Ensure you have good light. If the markings are faded, consider getting a new tape measure, or if it’s a common size like 16ths, you might be able to estimate based on their positions.
Frequently Asked Questions (FAQ)
Q1: What is the difference between imperial and metric measurements on a tape measure?
A1: Imperial measurements use feet and inches, common in the US and a few other countries. Metric measurements use meters, centimeters, and millimeters, used worldwide in science and in many countries.
Q2: Can I measure in both inches and centimeters on the same tape measure?
A2: Yes, many tape measures are dual-marked, showing both imperial and metric systems. Just be sure you’re reading the correct side for your needs.
Q3: Who needs to learn how to read a tape measure?
A3: Anyone who does DIY projects, builds furniture, hangs decorations, or needs to measure anything accurately for practical purposes. It’s a fundamental life skill!
Q4: What does the number ‘0’ mean on a tape measure?
A4: The ‘0’ is the starting point. Usually, it’s the end of the hook where you place it against an object.
Q5: How do I measure something that is longer than the tape measure itself?
A5: You can mark the end of your tape measure on the object, then carefully move the tape, placing the hook at your mark, and continue measuring from there. Keep track of how many full tape lengths you’ve used.
Q6: What is the common spacing for studs in a wall?
A6: The most common spacing for wall studs is 16 inches on center (meaning from the center of one stud to the center of the next). You might also find them spaced at 24 inches. The stud marks on your tape measure help with this.
This tape measure guide should give you a solid foundation. With a little practice, you’ll be measuring confidently in no time! Remember, the key to using a tape measure effectively is practice and paying attention to the details. Happy measuring!