
A table saw crosscut sled is a valuable table saw jig that significantly improves the accuracy and safety of your cuts. Can you build a reliable crosscut sled yourself? Absolutely! This guide will walk you through constructing a shop-made jig that will allow for precise crosscuts on your table saw. This woodworking sled is essential for achieving perfectly square cuts on a variety of projects.
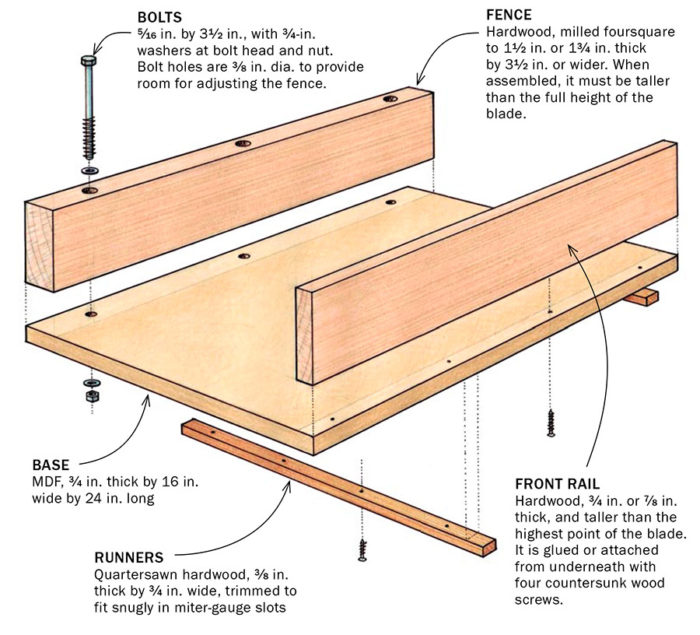
Image Source: images.finewoodworking.com
Why You Need a Crosscut Sled
Table saws, while powerful tools, can be tricky for making perfectly square cuts, especially on wider boards. The fence on a table saw guides the wood, but it can be slightly out of alignment, or the blade might not be perfectly perpendicular to the table. Relying solely on the miter gauge often leads to slightly angled cuts, which are frustrating and can ruin a project.
A crosscut sled solves this problem by providing a stable and square platform for your workpiece. It rides in the table saw’s miter slots, ensuring that your blade is always cutting at a perfect 90-degree angle to the edge of your board. This is crucial for everything from simple box construction to more complex furniture making.
Benefits of Using a Crosscut Sled:
- Precision: Achieves perfectly square cuts every time.
- Safety: Holds your workpiece securely, reducing the risk of kickback.
- Versatility: Can handle small and large pieces of wood.
- Repeatability: Allows for making multiple identical cuts quickly and accurately.
- Dust Collection: Can be designed with dust collection ports for a cleaner workspace.
What is a Zero Clearance Insert?
While not strictly part of the sled itself, a zero clearance insert for your table saw is a great complement to a crosscut sled. A zero clearance insert has a small opening around the blade that closely matches the blade’s thickness. This helps support the wood fibers right next to the blade, reducing tear-out and splintering, especially on delicate woods or veneers. When building or using a crosscut sled, ensuring your blade is properly aligned and that you have a good zero clearance setup will further enhance the quality of your cuts.
What is a Dado Sled?
A dado sled is a specialized type of sled designed for cutting dadoes (grooves) or rabbets (shoulder cuts) across the grain of a workpiece. While a standard crosscut sled can be adapted for this, dedicated dado sleds often have features to support the blade guard or allow for easy adjustment of the dado stack width. For making standard crosscuts, a regular crosscut sled is sufficient.
What is a Miter Sled?
A miter sled is designed to make angled cuts, or miter cuts, across the grain. While a basic crosscut sled is built for 90-degree cuts, you can modify its design or build a separate miter sled to achieve precise angles. The fundamental principle of a sled riding in the miter slots to guide the cut remains the same.
Materials and Tools You’ll Need
Building a quality crosscut sled doesn’t require exotic materials or specialized tools. You can likely find most of what you need in a well-equipped home workshop.
Essential Materials:
- Base Plywood: A sheet of good quality ¾-inch thick plywood (Baltic Birch is excellent if available, but cabinet-grade plywood will also work). This will form the main platform of your sled.
- Runner Material: A sturdy, straight piece of hardwood (oak, maple, or poplar are good choices) that is exactly ¾-inch thick and at least 3 inches wide. This will be the runner that glides in the table saw’s miter slot. You’ll need enough to create two runners, one for each miter slot.
- Fence Material: Another piece of ¾-inch thick plywood or MDF, typically 3-4 inches wide. This forms the fence against which you’ll push your workpiece.
- Fasteners: Wood screws (1 ¼-inch or 1 ½-inch) for assembling the main components.
- Glue: Strong wood glue for strong joints.
- Optional (for advanced builds):
- Acrylic or Clear Polycarbonate: For a zero-clearance throat plate on the sled.
- Hold-downs or Clamps: For securing smaller workpieces.
- Dust Collection Port: A fitting and hose for connecting to your shop vacuum.
Essential Tools:
- Table Saw: The tool you’re building the sled for!
- Table Saw Blade: A sharp, flat-top grind (FTG) blade is often preferred for crosscuts, as it makes a cleaner kerf.
- Circular Saw or Jigsaw: For breaking down larger plywood sheets if needed.
- Measuring Tape: For accurate measurements.
- Pencil: For marking cut lines.
- Straight Edge or Combination Square: For ensuring squareness.
- Drill and Drill Bits: For pilot holes and countersinking.
- Screwdriver or Drill Driver Bit: To drive screws.
- Router (Optional but Recommended): For trimming the runner for a perfect fit and for creating a zero-clearance insert.
- Block Plane or Sandpaper: For fine-tuning the runner fit.
- Safety Glasses: Always wear safety glasses when operating power tools.
- Hearing Protection: Recommended when using the table saw for extended periods.
Planning Your Crosscut Sled Design
Before you start cutting, a little planning goes a long way. The most common and effective design for a DIY table saw jig is a simple rectangular sled with a fence mounted perpendicular to a base.
Key Design Considerations:
- Size: The base of your sled should be large enough to support the widest workpieces you anticipate cutting, but not so large that it becomes unwieldy. A common size is around 18 inches wide by 24 inches long.
- Runner Fit: The runners that slide in the miter slots are critical. They need to be perfectly straight and fit snugly but not too tightly. A runner that’s too loose will result in inaccurate cuts. A runner that’s too tight can cause binding or make the sled difficult to move.
- Blade Clearance: Ensure there’s enough clearance between your blade and the fence to accommodate your workpiece thickness. You’ll also need to account for the kerf of the blade.
- Squareness: The fence must be precisely 90 degrees to the runners. This is the most crucial aspect for accurate cuts.
Basic Structure:
A typical crosscut sled consists of three main parts:
- Base: A flat, sturdy platform, usually made from ¾-inch plywood.
- Runners: Two identical strips that fit into the table saw’s miter slots. These are typically ¾-inch thick and can be made from hardwood or a dense composite material.
- Fence: A long strip, usually of ¾-inch plywood or MDF, attached to the base and running parallel to the blade. It needs to be perfectly square to the runners.
Step-by-Step Construction Guide
Let’s get building! This guide assumes you have a standard table saw with two parallel miter slots.
Step 1: Prepare the Base
- Cut the Plywood: Cut a piece of ¾-inch plywood to your desired dimensions for the base. For example, 18 inches wide by 24 inches long. Ensure your cuts are as square as possible.
- Mark the Miter Slots: Place your base plywood on your workbench. Carefully align your table saw’s miter slot template or an actual runner piece onto the plywood, leaving a small gap on either side of the intended runner location. Mark the exact width and position of both miter slots onto the base. It’s crucial to get these lines accurate.
Step 2: Cut the Miter Slot Grooves
This is where accuracy is paramount. You have a few options for creating the grooves for your runners.
Option A: Using a Router with a Straight Bit and Edge Guide
This is generally the most accurate method if you have a router.
- Set up the Router: Install a straight cutting bit in your router.
- Create an Edge Guide: Attach a piece of scrap wood to your router’s base plate, creating an offset guide. The distance from the edge of the straight bit to the edge of your guide should be the exact width of your table saw’s miter slot.
- Make Multiple Passes: Position the guide along your marked lines on the plywood base. Start with a shallow cut. Increase the depth of the cut incrementally with each pass, until you reach a depth of ¾ inch, or slightly less than the height of your runner material. Make sure the guide stays firmly against the edge of the plywood.
- Test the Fit: After cutting the grooves, test the fit of your runner material. It should slide smoothly without wobbling.
Option B: Using a Table Saw with a Dado Blade (for Dado Sleds or Advanced Users)
If you have a dado blade set, you can cut the grooves directly on the table saw. This requires extreme caution and a stable setup.
- Set Up the Dado Blade: Install your dado blade stack and adjust it to the width of your miter slot.
- Use a Crosscut Sled for the Cut: This sounds counterintuitive, but to cut the dadoes for your runners, you’ll need to use another stable jig or a very carefully managed cut. The goal is to ensure the dado blade is perfectly parallel to the blade you’ll be using for crosscuts.
- Make the Cuts: Feed the plywood base through the dado blade, using a fence to guide the plywood, ensuring the dado is cut perfectly parallel to the intended blade line of your sled. This method is more advanced and requires a very stable setup.
Option C: Using a Table Saw and Multiple Blade Passes
This method requires a very straight and stable fence on your table saw.
- Set Blade Height: Set your table saw blade to the height of your runner material (¾ inch).
- Align the Fence: Place your plywood base against the table saw fence. The distance between the fence and the blade should be the exact width of your miter slot.
- Make the Cut: Carefully push the plywood base through the blade, ensuring it stays firmly against the fence. You will only cut a kerf at this stage.
- Adjust Fence and Repeat: Move the fence slightly further away from the blade (by the width of the kerf) and make another cut. Repeat this process until the gap between the cuts is the width of your miter slot. This can be tedious and requires extreme precision.
Step 3: Prepare the Runners
- Cut Runner Stock: Cut two pieces of your hardwood runner stock. These should be slightly longer than the base of your sled.
- Ensure Straightness: The absolute straightness of your runners is paramount. If your stock isn’t perfectly straight, you may need to mill it flat or use a jointer.
- Test Fit in Miter Slot: Slide your runner stock into the miter slots of your table saw. It should fit snugly.
- Fine-Tune the Fit (Crucial Step):
- Router Method: If you have a router, you can trim the runners to fit perfectly. Place a runner flat on the table saw, with the edge that will contact the miter slot facing up. Use a router with a straight bit and an edge guide to trim the width of the runner until it slides smoothly in the miter slot without any play. Alternatively, use a router table with a flush trim bit and a template of your miter slot.
- Block Plane/Sandpaper Method: If you don’t have a router, you can carefully use a block plane or sandpaper to shave down the edges of the runners until they achieve a perfect fit. Work slowly and check the fit frequently.
Step 4: Attach the Runners to the Base
- Position the Runners: Lay your plywood base flat. Place the two runners into the grooves you cut. Ensure they are flush with the bottom of the base.
- Apply Glue: Apply wood glue to the bottom of the runners where they meet the plywood base.
- Secure with Screws: Drill pilot holes through the runners and into the base. The pilot holes should be slightly smaller than your screws to prevent splitting. Countersink the holes so the screw heads will be flush or below the surface of the runner. Drive 1 ¼-inch or 1 ½-inch wood screws to secure the runners. Use several screws along the length of each runner.
- Check for Squareness: Before the glue dries, use a large framing square or machinist’s square to ensure the runners are perfectly parallel to each other and perpendicular to the intended blade line.
Step 5: Attach the Fence
This is where you ensure the sled’s accuracy. The fence must be perfectly square to the runners.
- Prepare the Fence Material: Cut a piece of ¾-inch plywood or MDF to the desired length for your fence. This should be long enough to extend across the width of your sled base and provide a good support surface. A good width is 3-4 inches.
- Align the Fence: Stand the fence material on its edge, perpendicular to the base. Align it so that its bottom edge is flush with the back edge of the base plywood.
- Square the Fence (Most Important Step):
- Method 1: Using a Framing Square: Place a large framing square against one of the runners and the fence. Adjust the fence until it is precisely 90 degrees to the runner. This is critical.
- Method 2: Using a Table Saw Blade: With the blade raised just slightly above the surface of the base (and the sled unplugged or turned off), position the fence against the blade. Ensure the fence is held firmly against the blade along its entire length. This method relies on your table saw being perfectly calibrated.
- Temporarily Secure: Once you are confident the fence is square, temporarily clamp it in place.
- Drill and Screw: Drill pilot holes through the fence and into the base plywood. Space them every 6-8 inches. Countersink the holes in the fence.
- Apply Glue: Apply wood glue to the bottom edge of the fence where it meets the base.
- Drive Screws: Drive wood screws through the pilot holes to permanently attach the fence to the base.
Step 6: Trim the Fence with the Table Saw Blade
This is the final and most critical step to guarantee the accuracy of your crosscut sled.
- Ensure Squareness: Double-check that your fence is perfectly square to the runners.
- Set Blade Height: Raise your table saw blade so it cuts through the fence just above the base. Make sure the blade is perfectly 90 degrees to the miter slots (and therefore, the runners).
- Position the Sled: Place the sled on your table saw, with the runners in the miter slots. Position it so that the blade will trim off a very thin sliver of the fence.
- Make the Cut: Turn on the table saw and carefully push the sled through the blade. The blade will trim the end of the fence, making it perfectly square to the sled’s runners.
- Discard the Trimmed Piece: The piece trimmed off the fence will be waste.
Step 7: Testing and Calibration
- Test Cuts: Take a piece of scrap wood. Place it against the newly trimmed fence of your sled. Make a cut.
- Check for Squareness: Take the cut piece and place it against a framing square. The cut should be perfectly 90 degrees. You can also measure the diagonals of the cut end; they should be identical.
- Refine Runner Fit (If Needed): If the sled is too tight or too loose, you may need to slightly adjust the runner fit.
- Too Tight: Carefully shave a tiny bit more off the runners with a block plane or sandpaper.
- Too Loose: You might need to add a thin shim (like a piece of veneer or a few layers of packing tape) to the side of the runner that contacts the miter slot.
Step 8: Optional Enhancements
- Zero Clearance Insert: For even cleaner cuts, you can create a zero-clearance insert for your sled. Trace the blade kerf onto the sled base, then carefully cut out a slightly larger opening. Glue in a piece of thin material (like 1/16-inch hardboard or acrylic) with a slot cut precisely to match your blade. This supports the wood fibers right at the cut line.
- Hold-downs: For small workpieces, adding a toggle clamp or a simple screw-type hold-down can increase safety and accuracy by preventing the workpiece from shifting during the cut.
- Dust Collection: Drill a hole in the back of the fence and attach a dust collection fitting. This can significantly improve your shop’s air quality.
- Stop Block: You can attach a T-track to the fence to add adjustable stop blocks for making repeatable cuts.
Using Your New Crosscut Sled
Now that you’ve built your woodworking sled, it’s time to put it to work!
- Placement: Place the sled on your table saw, ensuring the runners are in the miter slots.
- Position Workpiece: Place your workpiece against the fence of the sled. Ensure the face of the workpiece that you want to be against the fence is firmly seated there.
- Advance Safely:
- For smaller pieces, you might want to use hold-downs or clamp the workpiece to the sled.
- For larger pieces, hold the workpiece firmly against the fence with one hand, keeping it flat on the sled base. Your other hand should be on the push pad or handle of the sled, pushing it forward. Keep your hands well away from the blade path.
- Make the Cut: Gently feed the sled and workpiece through the spinning blade. Do not force the cut. Let the blade do the work.
- Complete the Cut: Continue pushing the sled until the blade has fully cleared the workpiece and the sled.
- Remove Workpiece: Turn off the table saw and wait for the blade to stop completely before removing the sled and your cut piece.
Frequently Asked Questions (FAQ)
Q: How wide should my crosscut sled be?
A: The width depends on the typical size of the wood you’ll be cutting. A common and versatile size is around 18 inches. You need enough width to support your workpieces, but not so much that it becomes difficult to manage.
Q: Can I use MDF for the fence?
A: Yes, MDF can be used for the fence. It’s stable and consistent, but ensure it’s held very securely to the base. Plywood can offer more rigidity.
Q: My runners are too tight. What should I do?
A: The best solution is to use a router with a flush trim bit and a template of your miter slot, or carefully shave down the edges with a block plane or sandpaper until they slide smoothly.
Q: My fence isn’t perfectly square. How can I fix it?
A: The most reliable way to ensure a perfectly square fence is to trim its end with the table saw blade itself after it’s attached to the base. This guarantees the fence is square to the runners.
Q: How do I make angled (miter) cuts with a sled?
A: You would need to build a separate miter sled or modify your crosscut sled design to incorporate an adjustable angle. For a standard crosscut sled, all cuts will be at 90 degrees.
Q: What kind of table saw blade is best for a crosscut sled?
A: A sharp blade with a high tooth count and a flat-top grind (FTG) is generally recommended for clean crosscuts.
Q: How do I prevent tear-out when cutting?
A: Using a sharp blade, making slower cuts, and employing a zero-clearance insert on your sled can greatly reduce tear-out. You can also place a piece of painter’s tape or sacrificial wood on the cut line before cutting.
By following these steps, you can build a robust and accurate shop-made jig that will serve you well for countless projects. A well-built crosscut sled is one of the most essential woodworking jigs you can have in your shop, elevating the quality and precision of your work.