
Changing a Stanley utility knife blade is a straightforward process. Can I sharpen a Stanley utility knife blade? Yes, you can sharpen a Stanley utility knife blade, but replacement is often more practical for optimal performance.
A dull utility knife blade can turn a simple cutting task into a frustrating and dangerous ordeal. Knowing how to replace Stanley knife blade models correctly is essential for safety, efficiency, and achieving clean cuts. This guide will walk you through the process for common Stanley utility knives, offering tips for a smooth and secure blade change. We’ll cover everything from identifying when a blade needs changing to ensuring the new blade is firmly in place. Whether you own a classic fixed-blade utility knife or a Stanley retractable knife blade change model, these instructions will help you perform this vital maintenance.
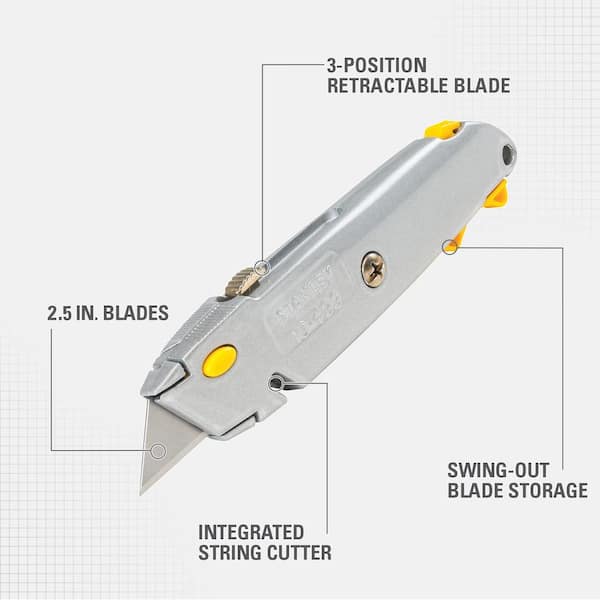
Image Source: images.thdstatic.com
When is it Time to Change Your Stanley Utility Knife Blade?
Several signs indicate it’s time to replace Stanley knife blade units. Ignoring these signs can lead to uneven cuts, increased effort, and potential accidents.
Common Indicators for Blade Replacement:
- Dullness: The most obvious sign is a blade that no longer cuts cleanly. If you need to saw or apply excessive pressure, the blade is likely dull.
- Ragged Cuts: Instead of a smooth line, you get frayed edges or torn material. This is particularly noticeable on paper, cardboard, or fabric.
- Blade Chipping or Bending: If you notice small chips or bends in the blade’s edge, it’s compromised and should be replaced immediately for safety.
- Difficulty Penetrating Material: The knife struggles to pierce the material it’s designed to cut, requiring more force.
- Visible Wear: Even without performing cuts, a close inspection might reveal microscopic damage or a rounded edge on the blade.
Types of Stanley Utility Knives and Their Blade Change Mechanisms
Stanley offers a variety of utility knives, each with slightly different mechanisms for blade changes. The most common types include:
1. Classic Fixed-Blade Utility Knives
These are often the simplest. They typically feature a thumb screw or a lever that loosens the handle to allow access to the blade.
2. Auto-Retracting Utility Knives
Safety is paramount here. The blade automatically retracts into the handle when not in use, and the blade change mechanism is designed to prevent accidental exposure.
3. Snap-Off Blade Utility Knives (Stanley Snap-Off Knife Blade)
These knives use segmented blades. When a segment becomes dull, you can snap off the used portion to reveal a fresh, sharp edge. This is a quick way to maintain sharpness without full blade replacement.
How to Change a Stanley Utility Knife Blade: A Step-by-Step Guide
Let’s dive into the detailed steps for changing a blade, focusing on the most common types.
H3: Changing a Blade on a Classic Stanley Utility Knife (Fixed Blade)
This is perhaps the most common scenario. The key is to loosen the mechanism that holds the blade securely.
H4: Tools You Might Need
While often tool-free, having these handy can sometimes simplify the process:
- A clean cloth or rag
- Replacement Stanley utility knife blades (ensure they are the correct type for your knife)
- A small container for the used blade
H4: The Blade Changing Process
-
Safety First: Retract or Remove the Existing Blade (If Applicable)
- If your knife has any form of retraction, ensure the blade is fully retracted.
- For knives without retraction, carefully position the knife so the blade is not pointing towards you or anyone else.
-
Loosen the Blade Retaining Mechanism
- Look for a thumb screw or a wing nut on the side or back of the knife handle.
- Turn this screw counter-clockwise. You may not need to remove it completely; just loosen it enough to allow the handle to open or the blade carriage to slide.
-
Open the Knife Handle or Blade Carriage
- Once loosened, you should be able to pry open the handle halves. Some knives have a small latch or hinge.
- Gently separate the handle to expose the blade. Be careful, as the old blade might still be sharp.
-
Remove the Old Blade
- Using your fingers (with caution, or a cloth for protection), lift the old blade out.
- Place the used blade immediately into a designated container or wrap it securely in a cloth. Never leave used blades lying around.
-
Install the New Blade (How to Install Stanley Knife Blade)
- Take a new, sharp blade from its packaging. Handle it by the blunt edge or the sides.
- Align the new blade with the slot or groove in the knife’s mechanism. The sharp edge should face the cutting direction.
- Ensure the blade sits flush and correctly in its designated position.
-
Close the Knife Handle
- Carefully bring the handle halves back together.
- Ensure no part of the blade is protruding outside the handle in an unsafe way.
-
Secure the Blade Retaining Mechanism
- Tighten the thumb screw or wing nut clockwise.
- Tighten it firmly, but do not overtighten, as this could strip the threads or damage the handle. The goal is to secure Stanley utility knife blade firmly so it doesn’t move during use.
-
Test the Blade
- Before using it on your project, test the blade on a scrap piece of material.
- Check that it cuts cleanly and that the blade feels stable and secure.
H3: How to Perform a Stanley Retractable Knife Blade Change
Stanley retractable knives are designed for enhanced safety. The blade change process often involves a specific release mechanism.
H4: Key Features of Retractable Knives
- Automatic Retraction: The blade disappears when pressure is released.
- Blade Storage: Many models have internal compartments for spare blades.
- Tool-Free Design: Most are engineered for easy, tool-free blade changes.
H4: The Retractable Blade Changing Process
-
Ensure the Blade is Retracted
- This is the most critical safety step. Make sure the blade slider is in the fully retracted position.
-
Locate the Blade Release Mechanism
- This varies by model. Common locations include:
- A button or slider on the top or side of the knife.
- A mechanism that requires you to push the blade slider forward while pressing a release.
- Some models might require a small screw to be loosened, but many are completely tool-free.
- This varies by model. Common locations include:
-
Eject the Old Blade
- Follow the specific instructions for your model. This might involve:
- Pushing a button to eject the blade holder.
- Sliding a release while pulling the blade out.
- Opening a compartment that houses the blade.
- Follow the specific instructions for your model. This might involve:
-
Dispose of the Old Blade Safely
- As with fixed blades, immediately place the used blade in a safe disposal container.
-
Load the New Blade (How to Install Stanley Knife Blade)
- Many retractable knives have an internal magazine for spare blades.
- Load a new blade into this magazine or directly into the blade holder mechanism.
- Ensure the new blade is oriented correctly with the sharp edge facing the intended cutting direction.
-
Secure the New Blade
- Once the new blade is in place, slide the blade mechanism back into the knife.
- You should hear or feel a click as the new blade locks into position. The blade should extend and retract smoothly.
-
Test Functionality
- Extend the blade fully. It should feel secure and not wobble.
- Test the retraction mechanism to ensure it works correctly.
H3: Changing a Stanley Snap-Off Knife Blade
These knives are excellent for maintaining a sharp edge with minimal downtime.
H4: The Snap-Off Blade Mechanism
- Segmented Blades: The blades are scored into multiple segments.
- Breaking Mechanism: Usually integrated into the knife handle or a separate tool.
H4: How to Swap Segments
-
Identify the Dull Segment
- When cutting becomes difficult, examine the blade tip.
- Locate the first scored segment that appears dulled or damaged.
-
Prepare to Snap
- Most Stanley snap-off knives have a built-in breaking mechanism. This is often a sturdy piece of metal or plastic at the end of the handle.
- If your knife doesn’t have one, you’ll need a pair of pliers and a sturdy surface (like a workbench) to carefully snap the segment.
-
Snap the Dull Segment
- With Built-in Mechanism:
- Extend the blade to expose the segment you want to break off.
- Hook the scored line of the blade tip into the breaking slot on the knife.
- Gently but firmly pull the blade backward or push the handle down against the breaking point. The segment should snap cleanly.
- Without Built-in Mechanism:
- Use pliers to grip the blade securely just behind the scored line.
- Place the blade tip against a firm edge (like a workbench).
- Apply firm, steady pressure downwards or sideways to snap the segment. Be extremely careful when doing this, as the snapped segment can fly off.
- With Built-in Mechanism:
-
Dispose of the Broken Segment Safely
- Dispose of the snapped-off segment immediately in a sharps container or secure wrapping.
-
Advance to the Next Segment
- After snapping off the dull part, the blade mechanism will automatically expose a fresh, sharp segment of the blade.
- This is how you sharpen Stanley utility knife usage by simply breaking off the worn portion.
Stanley Knife Blade Maintenance and Care
Proper maintenance ensures your utility knife is always ready and safe to use.
H4: Keeping Your Blades Sharp (and Knowing When to Replace)
- Regular Inspection: Always check blades for dullness, chips, or bends before starting a project.
- Use the Right Blade: Ensure you’re using blades appropriate for the material you’re cutting.
- Snap-Off Advantage: For snap-off knives, regularly breaking off segments is the easiest way to maintain a sharp edge.
- When to Replace: Even with snap-off knives, eventually, you’ll use all the segments. When a blade is completely used up, dispose of it properly and insert a new one. For fixed blades, replace them as soon as they show signs of dullness.
H4: Storing Blades and Knives
- Safe Storage: Always store utility knives with the blade retracted or capped. Keep them out of reach of children.
- Blade Cases: New blades come in protective cases. Keep these for storing used blades if you don’t have a dedicated sharps container.
- Dry Environment: Store blades in a dry place to prevent rust, which can degrade their sharpness and structural integrity.
H4: Cleaning Your Utility Knife
- Wipe Down: After use, wipe down the handle and blade mechanism with a dry cloth.
- Lubrication (Occasional): For retractable mechanisms, a tiny drop of light oil on the moving parts can help maintain smooth operation. Do this sparingly and wipe away any excess.
Tips for the Easiest Way to Change Stanley Utility Knife Blade
- Read Your Knife’s Manual: Every model can have slight variations. The manual is your best friend for specific instructions.
- Use a Well-Lit Area: Ensure you can clearly see the blade and the mechanism.
- Work on a Stable Surface: This prevents the knife from slipping.
- Handle Blades with Care: Always treat used and new blades as sharp objects.
- Keep Spare Blades Handy: Have replacements ready before you start a project.
Ensuring a Secure Stanley Utility Knife Blade
A loose blade is a major safety hazard. Here’s how to ensure your blade is always secure:
H5: Proper Tightening
- Feel the Resistance: When tightening a thumb screw or wing nut, you’ll feel it become snug. Stop there. Overtightening can strip threads.
- Check for Wobble: After tightening, gently try to wiggle the blade. It should feel solid and immovable.
H5: Correct Blade Seating
- Visual Check: Ensure the blade is seated fully in its groove or against the stopping point within the knife mechanism.
- Retractable Lock: For retractable knives, confirm that the blade locking mechanism has engaged properly. If the blade feels loose after installation, remove it and try again, ensuring it clicks into place.
Frequently Asked Questions (FAQ)
Q1: Can I use blades from other brands in my Stanley utility knife?
A1: While some blades may fit, it’s always best to use Stanley-brand replacement blades. They are designed to fit Stanley knives precisely, ensuring proper seating and secure operation. Using incompatible blades can be unsafe and may damage your knife.
Q2: How often should I change my Stanley utility knife blade?
A2: This depends entirely on usage and the material being cut. For general cardboard, a blade might last for several hours of cutting. For tougher materials or frequent use, you might need to change or snap segments more often. Listen to your knife – if it’s not cutting cleanly, it’s time for a change.
Q3: What’s the best way to dispose of old utility knife blades?
A3: Old blades are considered sharps and can cause injury. The safest way is to use a designated sharps container. If you don’t have one, wrap the used blade securely in thick paper or cardboard and then place it in a sturdy bag before putting it in the trash. Never leave loose blades lying around.
Q4: My Stanley retractable knife blade won’t retract. What should I do?
A4: First, ensure no debris is obstructing the mechanism. Try to gently clear any visible obstructions. If that doesn’t work, check if the blade is properly seated. If the issue persists, the internal mechanism might be damaged, and you may need to consider replacing the entire knife.
Q5: Is it possible to sharpen a Stanley snap-off knife blade after all segments are used?
A5: No, once all segments of a snap-off blade have been used and snapped off, the blade is at the end of its life and must be replaced with a new snap-off blade. You cannot sharpen the remaining stub.
Q6: How do I ensure I’m using the correct Stanley knife blade replacement?
A6: Check the model number of your Stanley utility knife. This information is usually printed on the knife itself. Then, look for replacement blades specifically listed for that model or type of knife. Most Stanley utility knives use standard trapezoidal or beak-point blades, but verifying is always best.
Changing a Stanley utility knife blade is a fundamental skill for anyone who uses these versatile tools. By following these steps, you can perform blade changes safely and efficiently, ensuring your tool is always ready for the job at hand. Remember, a sharp blade is a safe blade!