
Can you change a circular saw blade yourself? Yes, you absolutely can change a circular saw blade yourself with a few simple tools and by following some safety guidelines. This guide will walk you through the entire process, from gathering your supplies to safely installing a new blade.
Changing your circular saw blade might seem like a daunting task if you’ve never done it before. However, it’s a crucial part of circular saw maintenance and a skill every DIYer and professional should possess. A dull or damaged blade can lead to poor cuts, kickback, and even serious injury. Knowing how to perform a circular saw blade replacement correctly ensures you get the best performance from your tool and, most importantly, stay safe. This comprehensive guide will break down changing circular saw blade into easy-to-follow steps, offering expert tips to make your power saw blade swap a breeze. We’ll cover everything you need to know about circular saw blade removal and how to install new circular saw blade with confidence.
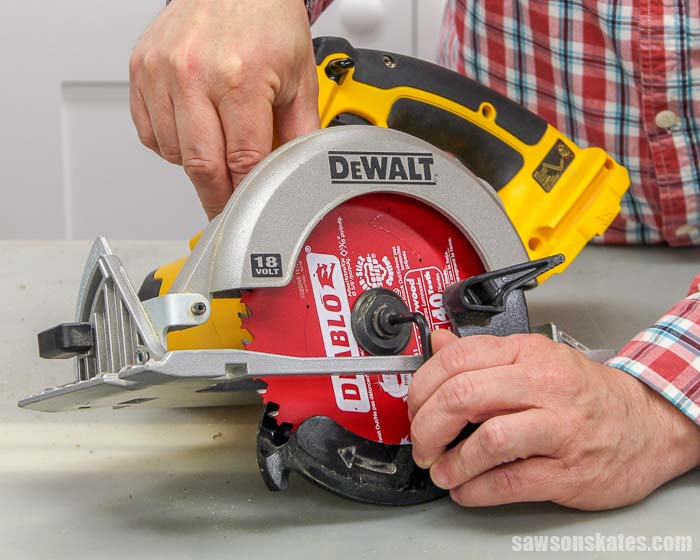
Image Source: sawsonskates.com
Preparing for Your Circular Saw Blade Change
Before you even think about touching your circular saw, preparation is key. Gathering the right tools and ensuring a safe environment are the first steps in a successful saw blade change.
Essential Tools and Supplies
To successfully complete a circular saw blade replacement, you’ll need a few specific items. Having these on hand will make the process smooth and efficient.
- New Circular Saw Blade: Ensure the new blade is the correct size (diameter) and has the appropriate arbor size for your specific circular saw. Check the saw’s manual or the existing blade for this information. Consider the type of material you’ll be cutting when choosing a new blade. For general wood cutting, a 24-tooth or 40-tooth blade is common. For finer cuts, more teeth are better. For ripping lumber, fewer teeth (like 24) are often preferred.
- Blade Wrench or Socket Set: Most circular saws come with a specific wrench designed to fit the arbor nut. If you’ve lost yours, a socket wrench with the correct size socket will work. The size is usually stamped on the saw or in the manual.
- Gloves: Heavy-duty work gloves are essential for protecting your hands from sharp edges and preventing slips.
- Safety Glasses or Goggles: Always wear eye protection to guard against flying debris or metal fragments.
- Rag or Cloth: A clean rag can be useful for wiping down the arbor and blade surfaces.
- Optional: Arbor Bolt or Nut (if needed): In rare cases, the arbor bolt or nut might be damaged or lost, requiring a replacement.
- Optional: Compressed Air: For cleaning dust and debris from the saw.
Setting Up a Safe Work Area
Safety should always be your top priority when working with power tools. Creating a safe environment is the most critical step before replacing circular saw blade.
- Unplug the Saw: This is the absolute most important step. Ensure the circular saw is completely disconnected from its power source (unplugged from the wall or battery removed) before starting any work. Double-check this!
- Stable Surface: Place the circular saw on a stable, flat, and well-lit workbench or surface. Avoid working on uneven or slippery surfaces.
- Clear the Area: Remove any flammable materials, sawdust, or clutter from your immediate workspace to prevent fire hazards and tripping.
- Adequate Lighting: Make sure you have good lighting so you can clearly see what you’re doing.
- No Distractions: Minimize distractions. Inform others in your household that you are working with a power tool.
Step-by-Step Guide to Circular Saw Blade Removal
Now that you’re prepared and your workspace is safe, let’s dive into the actual process of circular saw blade removal.
Step 1: Ensure the Saw is Unplugged
We can’t stress this enough. Before proceeding, confirm the power cord is unplugged or the battery is removed. This is non-negotiable for blade changing safety.
Step 2: Locate the Arbor Lock Mechanism
Most circular saws have a spindle lock button or lever that prevents the arbor from spinning while you loosen the blade nut. This is usually found near the blade guard. It might be a button you press in or a lever you push.
Step 3: Engage the Spindle Lock
While holding the spindle lock mechanism engaged, you’ll be able to loosen the blade nut. The lock mechanism essentially jams the spindle, preventing it from turning. You might need to apply some pressure.
Step 4: Loosen the Arbor Nut
Place the appropriate wrench or socket onto the arbor nut. The arbor nut is the bolt that holds the blade onto the spindle. It’s usually located on the outside of the blade.
- Direction: Remember the “lefty-loosey, righty-tighty” rule. For most circular saws, you will turn the wrench counter-clockwise to loosen the arbor nut. However, always double-check your saw’s specific design, as some might have reverse threading.
- Pressure: Apply steady, firm pressure. If the nut is stuck, you can try gently tapping the wrench with a rubber mallet, but avoid excessive force that could damage the saw. Sometimes, the lock mechanism needs to be firmly held in place.
Step 5: Remove the Arbor Nut and Outer Flange
Once the arbor nut is loosened, unscrew it completely by hand. After the nut is off, there will typically be an outer flange (a metal washer or plate) that sits on top of the blade. Remove this flange as well. Be careful as the blade can now be removed.
Step 6: Remove the Old Blade
Carefully slide the old blade off the spindle. Be mindful of its sharp edges. It’s often best to slide it off towards the side where the arbor nut was.
Installing the New Circular Saw Blade
With the old blade removed, it’s time to put on your fresh blade. This part of how to swap circular saw blade is just as important for safety and performance.
Step 1: Inspect the Arbor and New Blade
Before installing the new blade, inspect the saw’s arbor (the shaft the blade mounts on) for any debris, rust, or damage. Clean it with a rag. Also, inspect the new blade for any defects or damage. Ensure the teeth are sharp and the blade is flat.
Step 2: Position the New Blade
Align the new blade with the spindle. The direction of the teeth on the blade is crucial. The teeth should point forward in the direction of the saw’s rotation, which is typically towards the front of the saw. Most blades have an arrow indicating the correct rotation direction. Match this arrow with the direction the saw spins when it’s on. If you’re unsure, consult your saw’s manual.
Step 3: Place the Outer Flange
Slide the outer flange back onto the spindle, ensuring it sits flush against the new blade. The flange usually has a larger hole that fits over the spindle.
Step 4: Thread the Arbor Nut
Screw the arbor nut back onto the spindle by hand. Make sure it threads smoothly. If it feels cross-threaded, unscrew it and try again.
Step 5: Tighten the Arbor Nut
Now, it’s time to secure the new blade.
- Engage Spindle Lock: Once again, engage the spindle lock mechanism to prevent the arbor from spinning.
- Tighten: Using your wrench or socket, tighten the arbor nut firmly in a clockwise direction (“righty-tighty”). You want it snug, but avoid overtightening, which can damage the blade or the arbor. A good rule of thumb is to tighten it until it stops easily, then give it another quarter turn.
- Check Rotation: Once tightened, disengage the spindle lock and give the blade a gentle spin by hand to ensure it moves freely and doesn’t wobble excessively.
Advanced Tips and Best Practices for Circular Saw Blade Changes
Beyond the basic steps, there are several expert tips that can improve your experience with circular saw maintenance and ensure longevity for your tool.
Choosing the Right Blade for the Job
The type of blade you use significantly impacts cut quality and safety.
| Blade Type | Teeth Count | Best For | Cut Quality |
|---|---|---|---|
| Ripping Blade | 10-24 | Cutting along the grain of wood | Rougher |
| Crosscut Blade | 40-60 | Cutting across the grain of wood | Smoother |
| Combo Blade | 24-40 | General purpose, both ripping & crosscutting | Moderate |
| Specialty Blades | Varies | Metal, laminate, tile, concrete, etc. | Varies |
- Teeth Count: Generally, more teeth mean a smoother cut but slower cutting speed. Fewer teeth mean faster cutting but a rougher finish.
- Blade Material: Carbide-tipped blades are the most common and durable, offering good performance for various materials.
- Blade Kerf: The kerf is the width of the cut made by the blade. Thin kerf blades remove less material, requiring less power from your saw and producing less sawdust.
Maintaining Your Circular Saw
Regular circular saw maintenance extends the life of your tool and ensures safety.
- Keep it Clean: After each use, especially after cutting dusty materials like MDF or drywall, clean your circular saw. Use compressed air to blow out dust from the motor housing and blade area. A brush can also help.
- Blade Storage: Store your blades properly. Avoid just tossing them into a toolbox where they can get chipped or damaged. Blade cases or specially designed storage solutions are recommended.
- Inspect Regularly: Periodically inspect your saw for any loose screws, damaged cords, or wear and tear on the blade guard and shoe.
Safety Precautions During the Swap
Reinforce these points for every saw blade change:
- Never force a blade: If a blade doesn’t seem to fit or the nut won’t thread, don’t force it. There might be an alignment issue or the wrong blade.
- Check blade orientation: Always ensure the teeth are facing the correct direction for the saw’s rotation. An incorrectly installed blade can cause kickback.
- Guard function: Make sure the blade guard operates smoothly and covers the blade when it’s not actively cutting.
- Wear appropriate clothing: Avoid loose clothing, jewelry, or anything that could get caught in the saw. Tie back long hair.
What If the Arbor Nut is Stuck?
Sometimes, the arbor nut can be incredibly difficult to loosen. Here are some tricks for circular saw blade removal when it’s stubborn:
- Penetrating Oil: Apply a small amount of penetrating oil (like WD-40) to the threads of the arbor nut and let it sit for 10-15 minutes. This can help break down rust or grime.
- Heat (with caution): In extreme cases, a heat gun or hair dryer can be used to slightly expand the nut, making it easier to turn. Be very careful not to overheat the saw’s components or the blade itself. This is an advanced technique and should be done with extreme caution.
- Better Leverage: Ensure your wrench is fully seated on the nut. If possible, use a longer-handled wrench or a breaker bar for more leverage.
Frequently Asked Questions (FAQ) about Circular Saw Blade Replacement
Q1: How often should I change my circular saw blade?
You should change your circular saw blade when it becomes dull, damaged, or starts to produce rough cuts. A dull blade requires more force, can lead to tear-out, and increases the risk of kickback. This can happen after cutting a certain amount of lumber or if the blade hits a nail or hard object.
Q2: Can I use a blade from a different brand of circular saw?
Generally, yes, as long as the diameter and arbor size match your saw’s specifications. The blade itself is a consumable accessory, and brand compatibility is usually not an issue as long as the physical dimensions are correct. Always check your saw’s manual for recommended blade sizes.
Q3: What is kickback, and how can I prevent it when changing or using a circular saw blade?
Kickback is a sudden, violent backward and upward thrust of the saw. It occurs when the blade binds in the material being cut. To prevent it:
* Ensure your blade is sharp and properly installed.
* Always use the correct blade for the material.
* Support your workpiece properly.
* Don’t force the saw; let the blade do the work.
* Be aware of the blade guard’s function and don’t bypass it.
* Maintain a firm grip on the saw.
Q4: My saw didn’t come with a wrench. What size socket do I need?
The size of the socket needed for the arbor nut varies between circular saw models. Most often, it’s a common size like 1/2 inch, 5/8 inch, or 14mm. Check your saw’s manual or measure the nut if possible. If you’ve lost the original wrench, it’s usually best to purchase a replacement designed for your specific saw model to ensure a proper fit and avoid damaging the nut.
Q5: Is it safe to cut metal with a wood blade?
No, it is not safe or effective to cut metal with a blade designed for wood. You need a specialized metal-cutting blade for your circular saw, which often has fewer teeth and is made of a harder material. Using a wood blade on metal can damage the blade, the saw, and create a significant safety hazard due to sparking and potential binding.
By following these detailed steps and expert tips, you can confidently and safely perform a circular saw blade replacement. Regular attention to your tools, including proper circular saw maintenance and timely blade changes, will not only enhance your cutting results but also significantly contribute to your overall safety in the workshop. Happy cutting!