
Image Source: sawsonskates.com
How To Put A Blade In A Circular Saw: Easy Guide
Can you change a circular saw blade yourself? Yes, you absolutely can! With a few simple steps and the right safety precautions, changing a circular saw blade is a task any DIYer can master. This guide will walk you through the entire process of circular saw blade installation, from gathering your tools to safely securing the new blade. We’ll cover everything you need to know about circular saw blade replacement, ensuring you can perform this essential piece of circular saw maintenance with confidence.
Why and When to Change Your Circular Saw Blade
Over time, even the best circular saw blades lose their sharpness and effectiveness. A dull blade doesn’t just make your cuts rougher; it can also be dangerous. A dull blade requires more force to push through the material, increasing the risk of the saw kicking back or veering off course. This is a critical aspect of safety circular saw blade usage.
You’ll likely need to change your blade when:
- You notice splintering or tearing: If your cuts are no longer clean and you’re getting a lot of tear-out on the wood surface, it’s a sign the blade is dull.
- The saw struggles to cut: If you have to force the saw to get through the material, the blade is likely dull. This can also strain the motor.
- You’re switching materials: Different materials require different types of blades. For example, a blade designed for ripping lumber won’t perform well when cutting metal or masonry. Using the correct blade for the job is crucial for both performance and safety.
- The blade is damaged: Look for bent teeth, cracks, or missing teeth. Any visible damage means the blade should be replaced immediately.
Essential Tools for Blade Replacement
Before you start how to change saw blade, gather these necessary items:
- The New Circular Saw Blade: Ensure it’s the correct size (diameter and arbor size) for your saw and suitable for the material you’ll be cutting.
- Your Circular Saw: Of course!
- Blade Wrench (usually included): Most circular saws come with a specific wrench to loosen and tighten the blade nut.
- Safety Glasses: Absolutely non-negotiable. Sawdust and metal fragments can fly.
- Work Gloves: To protect your hands and provide a better grip.
- A Flat, Stable Work Surface: To safely place the saw while you work.
- A Rag or Cloth: For wiping down components.
- Optional: Pliers: In rare cases, you might need them if the blade nut is particularly stubborn.
Step-by-Step Guide to Circular Saw Blade Installation
Performing a blade change on a circular saw is straightforward when you follow these steps carefully.
Step 1: Safety First! Disconnect Power
This is the most critical step. Always disconnect the power source before attempting any maintenance or circular saw blade removal.
- Corded Saws: Unplug the saw from the electrical outlet. Ensure the cord is out of the way so it can’t accidentally get plugged back in.
- Cordless Saws: Remove the battery pack from the saw. This completely isolates the saw from any power source.
Step 2: Access the Blade Guard and Blade
Circular saws have a retractable blade guard that covers the blade for safety. You’ll need to temporarily hold this guard back to access the blade and its mounting hardware.
- Locate the Blade Guard: This is the metal cover that spins around the blade.
- Hold the Guard Back: Many saws have a lever or a way to manually push the lower blade guard up and out of the way. Some models might have a mechanism that automatically retracts the guard when you place the saw on the material. For a circular saw blade mount access, you’ll need to keep it retracted.
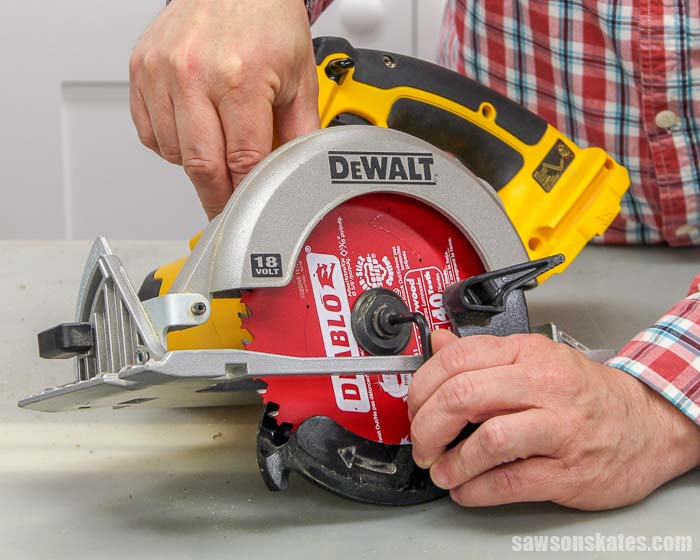
Step 3: Secure the Saw and Locate the Arbor Nut
You need to prevent the blade from spinning while you loosen the nut.
- Position the Saw: Place the circular saw on your flat work surface with the blade facing upwards. Ensure it’s stable.
- Find the Arbor: The arbor is the shaft that the blade mounts onto. You’ll see a nut that holds the blade in place on the end of the arbor.
- Identify the Arbor Lock Button: Most circular saws have an arbor lock button or pin. This button engages a mechanism inside the saw that locks the arbor from rotating. It’s usually located near the arbor shaft itself. Press and hold this button firmly.
Step 4: Loosen and Remove the Old Blade
Now it’s time to take off the old blade.
- Attach the Wrench: Place the blade wrench onto the arbor nut. Make sure it’s seated securely.
- Turn the Wrench: Remember the rule: “Righty tighty, lefty loosey.” To loosen the nut, you’ll turn the wrench counter-clockwise (to the left). You might need to apply a good amount of force, especially if the nut is tight.
- Hold the Arbor Lock: Continue to hold down the arbor lock button while you loosen the nut.
- Remove the Nut and Outer Flange: Once loosened, unscrew the arbor nut completely. Then, carefully remove the outer flange that sits on top of the blade. This flange often has a raised section that fits into a corresponding recess on the blade.
- Lift Off the Old Blade: With the nut and outer flange removed, you can now carefully lift the old blade off the arbor. Pay attention to the direction the blade was mounted – the teeth should be facing the correct way for cutting.
Step 5: Prepare for the New Blade
Before installing the new blade, take a moment to inspect and clean the components.
- Inspect the Arbor: Check the arbor shaft for any debris, rust, or damage.
- Clean the Flanges: Wipe down the inner and outer flanges with a clean rag. Ensure there’s no sawdust or build-up that could prevent the new blade from sitting flat.
- Check the Arbor Lock: Give the arbor lock button a quick test to ensure it’s still functioning correctly.
Step 6: Install the New Blade
This is the core of circular saw blade installation.
- Orient the New Blade: This is crucial for proper cutting and safety. Most circular saw blades have markings on them indicating the direction of rotation. Look for an arrow on the blade itself. This arrow should point in the same direction the saw blade spins when the saw is running. Generally, when looking at the blade from the side of the saw where the arbor nut is, the teeth should angle forward, towards the front of the saw.
- Place the Blade on the Arbor: Slide the new blade onto the arbor shaft. Ensure it sits flush against the inner flange. The recess on the blade (if present) should align with the raised section on the inner flange, or vice versa.
- Position the Outer Flange: Place the outer flange back onto the arbor shaft, over the blade. Make sure its orientation matches the inner flange, if applicable.
Step 7: Secure the New Blade
Tightening the arbor nut correctly is vital.
- Thread the Arbor Nut: Screw the arbor nut back onto the arbor shaft by hand. Turn it clockwise until it’s snug.
- Hold the Arbor Lock: Press and hold the arbor lock button again.
- Tighten the Nut with the Wrench: Using the blade wrench, tighten the arbor nut firmly. Again, turn clockwise. You want it to be secure, but don’t overtighten to the point where you could strip the threads or damage the components. A good, firm tightening is sufficient.
- Check for Wobble: Give the blade a gentle spin with your hand (after removing the wrench and ensuring the arbor lock is released). It should spin smoothly without any side-to-side play.
Step 8: Re-engage the Blade Guard and Test
The final steps involve making sure everything is safe and working.
- Release the Blade Guard: Allow the retractable blade guard to spring back into its normal position. Ensure it moves freely.
- Inspect Your Work: Double-check that the blade is securely in place, the guard operates smoothly, and all tools are removed from the saw’s vicinity.
- Reconnect Power (Carefully): Plug the saw back into the outlet or reinsert the battery.
- Test Cut: Make a test cut on a scrap piece of material. Listen for any unusual noises and check the quality of the cut. If everything sounds and feels normal, you’ve successfully completed your circular saw blade replacement!
Choosing the Right Circular Saw Blade
Selecting the correct blade is as important as knowing how to install it. Different blades are designed for specific tasks and materials.
Blade Tooth Count and Material
The number of teeth on a blade, and the material they’re made from, significantly impact the cut quality and speed.
- Low Tooth Count (e.g., 18-24 teeth): These blades are designed for fast rip cuts (cutting with the grain of the wood). They remove material quickly but produce a rougher finish.
- Medium Tooth Count (e.g., 30-40 teeth): These are all-purpose blades suitable for both ripping and cross-cutting (cutting across the grain). They offer a good balance of speed and finish.
- High Tooth Count (e.g., 60+ teeth): These blades are ideal for fine cross-cuts and producing a very smooth finish. They cut slower than lower-tooth-count blades.
- Carbide-Tipped Blades: The vast majority of modern circular saw blades have carbide tips brazed onto steel teeth. Carbide is extremely hard and wears much slower than steel, allowing the blade to stay sharp longer and cut through harder materials.
Specialized Blades
Beyond tooth count, various blades are designed for specific applications:
- Wood Blades: The most common type. Available in various tooth counts for ripping, cross-cutting, and general-purpose use.
- Plywood Blades: Often have a higher tooth count to minimize splintering when cutting plywood and laminates.
- Metal Cutting Blades: Specifically designed with a high tooth count and made from hardened steel to cut through various metals safely. Never use a wood blade to cut metal.
- Masonry Blades: These are not toothed but have a continuous rim or segmented diamond edge to cut through concrete, brick, and tile. These require different installation procedures and often a different type of saw (like a tile saw or angle grinder).
- Drywall Blades: Designed to cut through drywall efficiently.
Blade Diameter and Arbor Size
- Diameter: Circular saws are designed for specific blade diameters (e.g., 7-1/4 inch, 8-1/4 inch, 10 inch). Using a blade of the wrong diameter can be dangerous and damage the saw. Always check your saw’s manual for the correct diameter.
- Arbor Size: The arbor is the hole in the center of the blade that fits onto the saw’s spindle. Common arbor sizes are 5/8 inch, 1 inch, and sometimes 20mm. The arbor size of your new blade must match the arbor size of your saw. Some blades come with adapter rings to fit different arbor sizes.
Table 1: Common Blade Specifications
| Blade Diameter | Typical Tooth Count | Best Use |
|---|---|---|
| 7-1/4 inch | 24 | Fast Rip Cuts |
| 7-1/4 inch | 40 | All-Purpose (Rip & Cross-cuts) |
| 7-1/4 inch | 60 | Fine Cross-cuts, Plywood, Laminates |
| 10 inch | 60 | Fine Cross-cuts, Plywood, Laminates |
| Specialty | Varies | Metal, Masonry, Drywall, Specialty Wood |
Circular Saw Maintenance Beyond Blade Changes
Proper circular saw maintenance extends the life of your tool and ensures safe operation.
- Keep it Clean: Regularly blow or brush away sawdust and debris from the motor vents and the blade guard mechanism.
- Inspect the Cord/Battery: For corded saws, check the power cord for any damage. For cordless saws, ensure batteries are charged and in good condition.
- Lubricate (if necessary): Some saws may have lubrication points, but most modern tools are maintenance-free in this regard. Consult your owner’s manual.
- Blade Storage: Store spare blades in their original protective sleeves or cases to prevent damage and accidental contact.
Troubleshooting Common Blade Installation Issues
While how to change saw blade is generally simple, you might encounter a few snags.
- Stubborn Arbor Nut: If the arbor nut is difficult to loosen, try tapping the end of the wrench lightly with a rubber mallet. Ensure you are still holding the arbor lock firmly. If it’s still stuck, apply a penetrating lubricant (like WD-40, but be sure to wipe it off the blade and flanges thoroughly before use) and let it sit for a few minutes.
- Blade Won’t Sit Flat: This is usually due to debris on the arbor or flanges. Clean them thoroughly. Sometimes, a slightly warped blade can cause this.
- Arbor Lock Not Engaging: If the arbor lock button doesn’t seem to be working, the internal mechanism might be jammed with debris. Try gently wiggling the blade and arbor while holding the button. If it persists, the saw may need professional servicing.
Frequently Asked Questions (FAQ)
Q1: How often should I replace my circular saw blade?
A1: There’s no set schedule, as it depends on usage and the type of materials you cut. As a general rule, replace it when you notice a decline in cut quality, increased effort required to cut, or visible damage. For frequent use, a blade might last anywhere from a few months to a year or more.
Q2: Can I use any blade in my circular saw?
A2: No. You must use a blade that matches your saw’s specified diameter and arbor size. Also, use blades designed for the material you are cutting (wood, metal, etc.).
Q3: What does the arrow on a circular saw blade mean?
A3: The arrow indicates the direction of rotation for the blade. It should point towards the front of the saw, aligning with the direction the motor spins the blade when the saw is operating. Installing it backward will result in poor cuts and potential safety hazards.
Q4: How tight should the arbor nut be?
A4: It needs to be snug and secure enough to prevent the blade from loosening during operation, but not so tight that you risk stripping the threads or damaging the arbor or blade. Tighten it firmly with the wrench while holding the arbor lock engaged.
Q5: My new blade is wobbling. What could be wrong?
A5: This usually indicates that the blade is not seated properly on the arbor or that there is debris on the arbor or flanges. Ensure the arbor lock is engaged, remove the blade, clean the arbor and flanges thoroughly, and reinstall the blade carefully. Check that the outer flange is also seated correctly.
Performing a circular saw blade replacement is a fundamental skill for any power tool user. By following these detailed instructions and prioritizing safety circular saw blade practices, you can ensure your circular saw remains a safe and effective tool for all your cutting projects. Remember that proper circular saw maintenance includes not just changing circular saw blade but also keeping your tool clean and in good working order. This guide to circular saw blade installation should empower you to tackle this task with ease.