
Can I change the blade on my circular saw myself? Yes, you absolutely can change the blade on your circular saw yourself with a few simple tools and by following a few safety steps. This guide will walk you through the entire process of circular saw blade replacement, making it easy and safe.
Changing a circular saw blade is a fundamental skill for any DIY enthusiast or professional woodworker. A sharp, well-maintained blade is crucial for clean cuts, efficient work, and, most importantly, your safety. Over time, even the best blades become dull, less efficient, and can even be dangerous. Knowing how to perform a power tool blade change correctly ensures you can keep your saw in top working condition. This comprehensive guide focuses on circular saw servicing, providing a step-by-step approach to replacing your blade safely and easily, covering everything from preparation to the final checks.
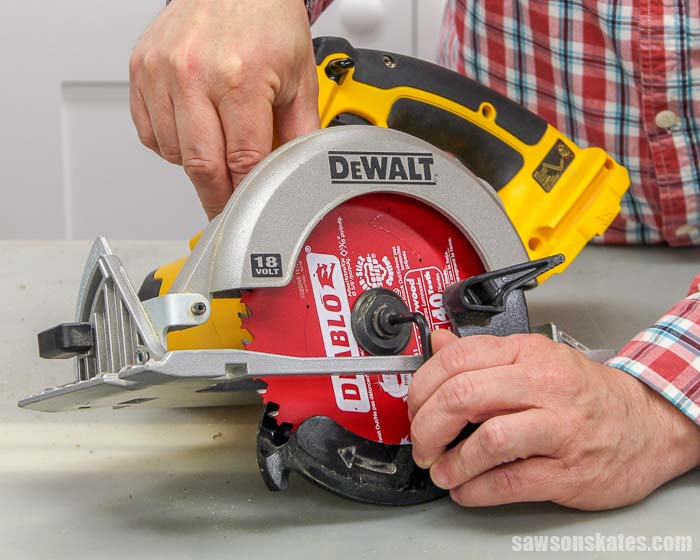
Image Source: sawsonskates.com
When It’s Time for a Circular Saw Blade Replacement
Several indicators signal that your circular saw blade needs changing. Regularly checking your blade is part of good saw blade maintenance.
Signs Your Blade Needs Replacing:
- Rough Cuts: If your cuts are no longer smooth, leaving jagged edges, splintering, or burn marks, it’s a clear sign the blade is dull.
- Excessive Effort: When you have to push much harder than usual to guide the saw through the material, the blade’s teeth are likely worn.
- Unusual Noises: A dull blade can cause the saw to vibrate more and produce a grinding or screaming sound during operation.
- Smoke Production: While some heat is normal, excessive smoke during a cut indicates friction from a dull blade.
- Visible Damage: Cracked, chipped, or bent teeth are immediate red flags. Never use a blade with visible damage.
Essential Tools and Materials for Changing the Blade
Before you begin changing your circular saw blade, gather these necessary items:
What You’ll Need:
- New Circular Saw Blade: Ensure it’s the correct size and tooth count for your saw and the materials you’ll be cutting.
- Spanner Wrench: Most circular saws come with a specific wrench for loosening and tightening the blade arbor nut. If you’ve lost yours, a socket wrench that fits the nut will work.
- Work Gloves: These protect your hands from sharp edges and provide a better grip.
- Safety Glasses: Always protect your eyes.
- Flathead Screwdriver (Optional): Sometimes needed to help secure the blade or pry off the arbor washer.
- Rag or Shop Towel: For cleaning the arbor and surrounding areas.
- Compressed Air (Optional): For blowing away sawdust from the blade housing.
- A Stable Work Surface: A workbench or sturdy table is ideal.
Safety First: Crucial Circular Saw Safety Tips
Safety is paramount when performing any power tool blade change. Following these circular saw safety tips will prevent injuries.
Top Safety Precautions:
- Unplug the Saw: This is the absolute most important step. Always disconnect the power cord from the electrical outlet before attempting to change the blade. Double-check that it’s unplugged.
- Wear Safety Gear: Always wear safety glasses to protect your eyes from flying debris. Work gloves are essential for a firm grip and to prevent cuts.
- Stable Work Surface: Place the saw on a flat, stable surface where it won’t wobble or shift during the blade change process.
- Keep Fingers Clear: Be mindful of where your fingers are at all times. The blade, even when not spinning, is extremely sharp.
- Know Your Saw: Familiarize yourself with your specific circular saw model. Different saws have slightly different mechanisms for blade changes. Consult your owner’s manual if you’re unsure.
- Blade Guard: Ensure the blade guard functions correctly and isn’t obstructed.
- No Distractions: Avoid changing the blade when you are tired, distracted, or under the influence of anything that could impair your judgment.
Step-by-Step Guide: How To Remove Saw Blade
This section details how to safely remove the old circular saw blade.
Removing the Old Blade:
Step 1: Prepare Your Workspace and Safety Gear
- Ensure your circular saw is unplugged.
- Lay the saw on its side on your stable work surface, with the blade facing upwards.
- Put on your safety glasses and work gloves.
Step 2: Engage the Spindle Lock
- Most circular saws have a spindle lock button or lever. This is usually located near the blade housing.
- Press and hold the spindle lock. This will prevent the arbor from spinning while you loosen the nut.
Step 3: Loosen the Arbor Nut
- Place the spanner wrench (or the correct-sized socket wrench) onto the arbor nut. The arbor nut is the large nut that holds the blade in place.
- Turn the wrench counter-clockwise to loosen the nut. It might be tight, so a firm, steady pressure is needed. Remember, “righty-tighty, lefty-loosey.”
- Continue turning until the nut is completely removed. Keep the nut and any washers safely together.
Step 4: Remove the Blade Washers
- Once the arbor nut is off, you’ll see an outer washer. Gently slide this washer off the arbor.
- Sometimes there’s an inner washer that remains on the arbor. You might need to carefully slide the old blade off to reveal it, or it might be held by a small screw or clip depending on your saw model.
Step 5: Carefully Remove the Old Blade
- Grasp the old blade by its center hole with your gloved hand.
- Slide the blade off the arbor.
- Important: Place the removed blade immediately into a safe place, like its original packaging or a designated blade storage container, to prevent accidental cuts.
How To Install a New Circular Saw Blade
Now that the old blade is off, let’s look at installing a new one. This is a key part of power tool blade change.
Installing the New Blade:
Step 1: Inspect the Arbor and New Blade
- Before installing the new blade, inspect the saw’s arbor for any debris or rust. Clean it with a rag if necessary.
- Examine your new circular saw blade. Check that it’s the correct size (diameter) and that the arbor hole matches your saw’s arbor shaft.
- Look for an arrow or markings on the blade indicating the direction of rotation. This is crucial for proper installation.
Step 2: Position the New Blade Correctly
- Place the new blade onto the arbor. Ensure the rotation arrow on the blade points in the same direction as the saw’s motor rotation. This is typically clockwise when viewed from the motor side. If you install it backward, it will cut poorly and potentially be dangerous.
- Align the center hole of the blade with the arbor shaft.
Step 3: Replace the Blade Washers
- Slide the inner washer back onto the arbor if you removed it.
- Place the outer washer over the blade, aligning its center hole with the arbor.
Step 4: Re-attach the Arbor Nut
- Thread the arbor nut back onto the arbor by hand. Turn it clockwise until it’s snug.
- Crucial: Engage the spindle lock again.
Step 5: Tighten the Arbor Nut
- Using the spanner wrench (or socket wrench), tighten the arbor nut securely. Turn it clockwise.
- Tighten it firmly, but do not overtighten, as this can damage the blade, washers, or arbor. It should be snug enough that the blade doesn’t move.
Step 6: Spin Test (Optional but Recommended)
- Once the nut is tightened and the spindle lock is released, give the blade a gentle spin with your gloved hand to ensure it moves freely and doesn’t wobble excessively.
Replacing a Dull Saw Blade: Tips for Longevity
Proper care extends the life of your saw blades and ensures they perform optimally. Replacing a dull saw blade is more than just swapping it out; it’s about maintaining your tools.
Blade Maintenance and Care:
- Use the Right Blade for the Job: Different materials (wood, metal, plastic) and types of cuts (crosscuts, rip cuts) require different blade types and tooth configurations. Using the wrong blade can lead to premature dulling and poor performance.
- Avoid Cutting Nails or Metal: Unless you have a blade specifically designed for metal, avoid cutting through materials containing nails or screws. This will instantly dull or damage your blade.
- Keep Blades Clean: Sawdust and sap can build up on the blade, affecting its cutting ability and generating heat. Clean blades regularly with a stiff brush or solvent.
- Store Blades Properly: Store blades in a dry place, preferably in their original sleeves or blade cases, to prevent damage and accidental contact.
- Know When to Sharpen or Replace: Even with good care, blades will eventually dull. Consider professional blade sharpening services for your high-quality blades. If a blade is damaged (chipped teeth, cracks), it must be replaced immediately.
- Regular Servicing: Incorporate blade checks into your overall circular saw servicing routine.
Table: Common Circular Saw Blade Types and Their Uses
Choosing the right blade is key to efficient cutting and blade longevity.
| Blade Type | Teeth Count (Typical) | Primary Use | Cut Quality | Speed |
|---|---|---|---|---|
| General Purpose | 24-30 | Rough cuts in dimensional lumber, framing, general | Fair to Good | Fast |
| Fine Finish | 40-80 | Plywood, laminates, hardwoods, trim, where smooth finish | Excellent | Slower |
| Carbide Tipped | Varies (24-80+) | Durable, designed for specific materials, long-lasting | Varies by TPI | Varies |
| Metal Cutting | High TPI (60+) | Metal, plastic, non-ferrous materials | Good | Slower |
| Rip Blade | 10-24 | Cutting with the grain of wood, fast rough cuts | Rough | Very Fast |
| Dado Blade | Varies | Creating wide grooves (requires a dado blade set) | N/A (grooves) | N/A |
Frequently Asked Questions (FAQ)
Here are some common questions related to changing a circular saw blade.
FAQ: Circular Saw Blade Changes
Q1: How often should I change my circular saw blade?
A1: The frequency depends on usage and material. A good rule of thumb is to replace or sharpen your blade when you notice a decline in cut quality, increased effort required, or excessive heat/smoke during cuts. For heavy use, this could be every few months; for light DIY, it might be years.
Q2: Can I use a blade designed for a different brand of circular saw?
A2: Yes, as long as the diameter and arbor hole size match your saw’s specifications. The brand of the blade generally doesn’t matter, but the physical dimensions and tooth count are critical. Always check your saw’s manual for blade size requirements.
Q3: What happens if I install the blade backward?
A3: If installed backward, the blade’s teeth will be facing the wrong way relative to the direction of rotation. This will result in very poor cuts, excessive splintering, burning, and can cause the saw to bind or kickback, which is extremely dangerous. Always check the rotation arrow on the blade.
Q4: Is it normal for the blade to wobble slightly after changing it?
A4: No, a properly installed blade should not wobble. If it wobbles, double-check that the arbor nut is tightened correctly, the blade is seated flush against the washers, and the blade itself is not warped or damaged.
Q5: My spanner wrench doesn’t fit the arbor nut. What should I do?
A5: If you’ve lost the original wrench, measure the arbor nut. You can then purchase a correctly sized socket wrench or an adjustable wrench. However, a spanner wrench designed for your saw model is the best tool to ensure a proper fit and prevent damage to the nut.
Q6: Can I clean the blade without removing it?
A6: For light dust, you might be able to brush it off carefully with the saw unplugged. However, for sap or stubborn residue, it’s much safer and more effective to remove the blade for thorough cleaning.
By following these detailed steps and safety tips, you can confidently perform a circular saw blade replacement, ensuring your tool is always ready for action and your cutting is precise and safe. This proactive approach to tool maintenance guide and saw blade maintenance will serve you well for years to come. Remember, a sharp blade is a safe blade.