
Image Source: www.mrrooter.com
How To Fix Water Hammering: Silence Loud Pipes
What causes water hammering? Water hammering, often heard as a loud banging or thumping sound in your pipes, is typically caused by a sudden stoppage or change in water flow. Can I fix water hammering myself? Yes, many water hammering issues can be fixed by homeowners with basic DIY skills and the right tools.
Water hammering, also known as plumbing shock, is a common and often annoying problem that can plague any home with running water. That sudden, jarring pipe banging sound you hear when a faucet is turned off quickly or a washing machine fills can be more than just a nuisance; it can also indicate underlying issues within your plumbing system. This article will delve deep into water hammer causes, explore water hammer effects, and provide practical, step-by-step solutions to help you stop pipe noise and enjoy a quieter home. We’ll cover everything from simple fixes to more involved plumbing maintenance that can prevent this disruptive plumbing shock.
Fathoming the Roots of Water Hammering
The phenomenon of water hammering originates from a fundamental principle of physics: momentum. Water, like any moving object, possesses momentum. When the flow of this moving water is abruptly halted, its momentum doesn’t just disappear. Instead, it transforms into a pressure wave that travels through the pipes. This pressure wave can reach speeds of over 1,000 miles per hour. When this wave bounces off the ends of pipes or elbows, it creates a shockwave that reverberates back and forth, causing the characteristic pipe banging and vibration.
Several common scenarios trigger this abrupt change in water flow:
- Quickly Closing Valves: This is the most frequent culprit. When you shut off a faucet, a toilet fill valve, or a washing machine’s water inlet valve rapidly, the water inside the pipe is forced to a standstill almost instantly.
- Appliance Cycles: Dishwashers, washing machines, and ice makers often have solenoid valves that open and close rapidly to control water flow. The quick shut-off of these valves can initiate water hammering.
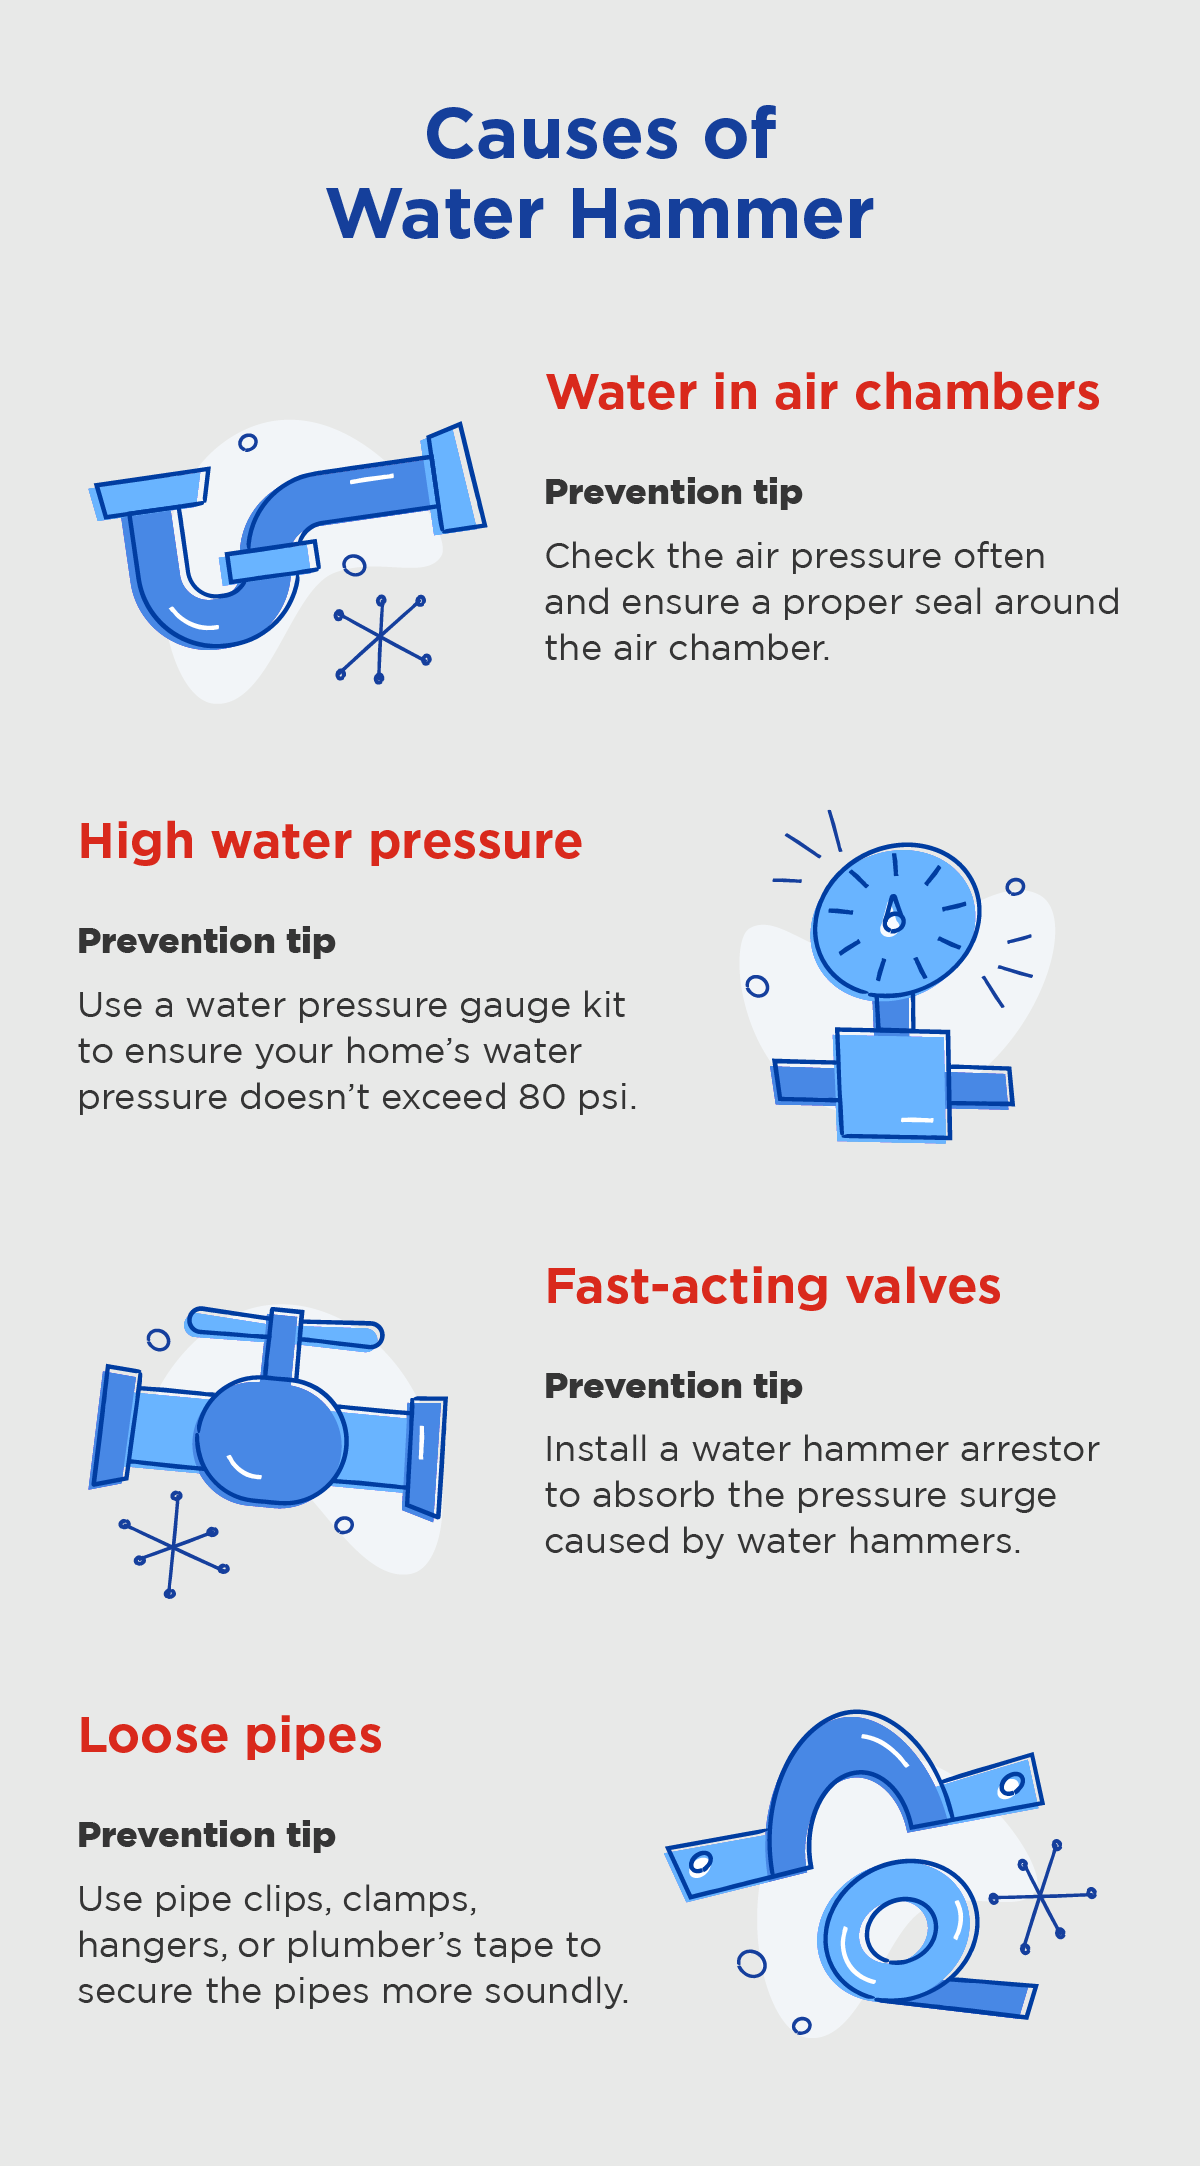
- Air in the System: Air trapped in the water lines can also contribute. Air is compressible, unlike water. When water surges against a pocket of air, it compresses the air, and as the air expands, it can cause a series of vibrations.
- High Water Pressure: Homes with excessively high water pressure are more susceptible to water hammering. Greater pressure means faster-moving water, which in turn creates more forceful shockwaves when flow is interrupted.
- Loose Pipes: Pipes that are not properly secured to walls or joists can vibrate and bang against surrounding structures when water hammer occurs.
- Worn or Faulty Valves: Older or damaged valves might not close smoothly, leading to a more abrupt shut-off and thus, a greater likelihood of water hammering.
The Ripple Effects of Plumbing Shock
While the sound of water hammering is often the most immediate concern, the persistent plumbing shock can have more significant water hammer effects on your plumbing system:
- Damage to Pipes and Fittings: Repeated shockwaves can stress pipe joints, leading to leaks. They can also cause pipes to crack or connections to loosen over time.
- Wear and Tear on Appliances: The sudden jolts can strain internal components of water-using appliances like washing machines and dishwashers, potentially shortening their lifespan.
- Damage to Valves: The constant hammering can damage valve seats and stems, leading to leaks or malfunctions.
- Loose Pipe Supports: The vibrations can gradually loosen the clamps and straps that hold pipes in place, exacerbating the problem by allowing more pipe movement.
- Annoyance and Disruption: For homeowners, the loud noises can be incredibly disruptive, especially at night.
Your Toolkit for Silencing Pipes: A Step-by-Step Guide
Addressing water hammering often involves a combination of identifying the source and implementing appropriate solutions. Here’s a comprehensive approach to stop pipe noise:
Step 1: Pinpointing the Source of the Noise
Before you can fix the problem, you need to know where it’s coming from.
- Listen Carefully: Try to identify which specific fixtures or appliances trigger the noise. Does it happen when you turn off a particular faucet? When the dishwasher runs? When the toilet refills?
- Test Each Fixture: Turn on and off various faucets, including hot and cold, to see if the hammering occurs with each. Run the washing machine or dishwasher and note when the sounds appear.
Step 2: Implementing Simple Fixes
Often, the simplest solutions are the most effective.
-
Secure Loose Pipes:
- Action: Gently try to wiggle the pipes. If they move freely, they need to be secured.
- How-to: Use pipe clamps or straps to firmly attach the pipes to wall studs, joists, or other solid framing members. Ensure the clamps are not overtightened, as this can restrict water flow or damage the pipe. Leave a small amount of space for expansion and contraction.
- Frequency: This is a preventative maintenance task that can be done periodically as part of your plumbing maintenance.
-
Adjust Water Pressure:
- Action: High water pressure is a major contributor to water hammering.
- How-to: Locate your home’s main shut-off valve, usually where the water line enters your house. Near this valve, you may find a Pressure Reducing Valve (PRV). If you don’t have one, consider having one installed by a plumber. If you do have a PRV, you can adjust it to a lower pressure. The ideal water pressure for most homes is between 40 and 60 psi. Use a water pressure gauge (available at hardware stores) to test your pressure. Adjust the PRV screw clockwise to increase pressure and counter-clockwise to decrease it.
- Note: Always consult your local plumbing codes and consider professional help if you are unsure about adjusting the PRV.
-
Replace Worn Valves:
- Action: Old, worn-out valves can cause abrupt shut-offs.
- How-to: If you suspect a faulty valve is the culprit, especially at a frequently used faucet, consider replacing it. Turn off the main water supply, drain the line, and then carefully remove and replace the old valve with a new one. If you’re not comfortable with this, call a plumber.
Step 3: Installing Water Hammer Arrestors (The Primary Water Hammer Solution)
For persistent water hammering, especially those caused by appliance valves, installing water hammer arrestors is the most effective water hammer solution. These devices are designed to absorb the shockwave.
-
What is a Water Hammer Arrestor?
A water hammer arrestor is a small device that contains a piston or a diaphragm separating a chamber of air or gas from the water in the pipe. When a sudden surge of pressure occurs, the piston or diaphragm moves, compressing the air and absorbing the shock. -
Types of Water Hammer Arrestors:
- Piston Type: These are common and effective. They have a piston that moves within a cylinder.
- Diaphragm Type: These use a flexible diaphragm to absorb the shock.
-
Where to Install Them:
- Near the Source: The best place to install an arrestor is as close as possible to the valve that causes the hammering, such as near the washing machine’s water inlet valves or the dishwasher’s water supply.
- For Individual Fixtures: You can install smaller arrestors directly onto the shut-off valves for specific faucets or appliances.
- For Whole House Protection: Larger arrestors can be installed on the main water line to offer protection throughout the house, though localized arrestors are often more effective for specific appliance issues.
-
Installation Guide for a Washing Machine Arrestor (A Common Scenario):
Materials Needed:
* Water hammer arrestor (designed for washing machines, usually with a ¾” garden hose thread)
* Adjustable wrench
* Teflon tape (pipe thread sealant tape)
* Bucket and towels (for catching residual water)Steps:
- Turn Off Water Supply: Locate the shut-off valves for your washing machine (usually behind the machine) and turn them off completely.
- Disconnect Hoses: Place a bucket and towels underneath the valves to catch any dripping water. Unscrew the water supply hoses from the washing machine’s inlet ports.
- Prepare the Arrestor: Wrap the threaded end of the water hammer arrestor with Teflon tape, applying it in the direction of the threads. This ensures a watertight seal.
- Install the Arrestor: Screw the arrestor onto the hot or cold water inlet port of the washing machine. Hand-tighten it first, then use an adjustable wrench to snug it up – do not overtighten, as this can damage the threads.
- Reconnect Hoses: Reattach the water supply hoses to the newly installed arrestor and the machine’s inlet ports.
- Turn Water Back On: Slowly turn the water supply valves back on. Check for any leaks at the connection points.
- Test: Run the washing machine through a fill cycle. Listen for any water hammering. If the noise persists, you may need to install an arrestor on the other inlet or check the installation.
- Important Note: If you are installing arrestors on copper pipes or other plumbing systems, you might need different types of arrestors and potentially adaptors. Always read the manufacturer’s instructions carefully and, if unsure, hire a qualified plumber.
Step 4: Addressing Air in the Lines
If your hammering is accompanied by sputtering or spitting water, you might have air trapped in your lines.
- Bleeding the Lines:
- Action: Open the highest faucet in your house (e.g., a second-floor bathroom sink or bathtub faucet) and the lowest faucet (e.g., a basement sink or outdoor spigot) simultaneously.
- How-to: Turn on the lowest faucet first, then the highest. Let the water run until all the air is expelled and a steady stream of water flows from both. Close the lowest faucet first, then the highest. This process helps to push out any trapped air.
- Frequency: This can be done periodically if you notice air in the lines.
Step 5: Considering Professional Help
Some plumbing maintenance issues are best left to the experts. If you’ve tried the basic fixes and the pipe noise persists, or if you’re uncomfortable with any of the steps, it’s time to call a plumber. They have specialized tools and experience to diagnose and repair more complex water hammer causes and can ensure the work is done safely and correctly.
Preventive Measures: Proactive Plumbing Maintenance
- Regularly Inspect Your Plumbing: Periodically check for loose pipes or connections.
- Monitor Water Pressure: Ensure your home’s water pressure remains within the recommended range (40-60 psi).
- Install Arrestors Proactively: If you know you have appliances prone to water hammering, consider installing arrestors before the problem starts.
- Maintain Valves: Ensure all valves operate smoothly. If a valve feels stiff or difficult to turn, it might need servicing or replacement.
Table of Common Water Hammering Scenarios and Solutions
| Scenario | Likely Cause | Primary Solution | Secondary Solutions |
|---|---|---|---|
| Loud bang when washing machine fills. | Solenoid valve shuts off abruptly. | Install a water hammer arrestor on the washing machine’s water inlet valves. | Check and potentially replace the washing machine’s internal fill valve. |
| Thumping when toilet fills. | Ballcock valve shuts off water quickly. | Install a water hammer arrestor on the toilet’s fill valve supply line. | Replace the toilet’s fill valve with a newer, quieter model. |
| Hammering when faucets are shut off. | Quick valve closure, high water pressure, or loose pipes. | Install arrestors on individual faucet supply lines. Reduce overall house water pressure if too high. | Secure loose pipes. Replace old or worn faucet cartridges/valves. |
| Random banging throughout the house. | High water pressure or air in the lines. | Install a whole-house water hammer arrestor on the main water line. Adjust PRV to lower water pressure. | Bleed air from the plumbing system. Secure any identified loose pipes. |
| Sputtering water followed by banging. | Air trapped in the water lines. | Bleed air from the plumbing system by opening faucets at different elevations. | Check for leaks in the water supply that might be introducing air. |
Frequently Asked Questions (FAQ)
-
Q1: How long do water hammer arrestors last?
A1: When installed correctly, water hammer arrestors can last for many years, often for the lifetime of the plumbing system. However, like any mechanical device, they can eventually wear out or lose their effectiveness. -
Q2: Can water hammering damage my water heater?
A2: Yes, the repeated shockwaves can put stress on the water heater’s tank, valves, and connections, potentially leading to premature failure or leaks. -
Q3: Is it dangerous to ignore water hammering?
A3: While not immediately dangerous in most cases, persistent water hammering can cause cumulative damage to your plumbing system, leading to costly repairs for leaks or burst pipes. It’s best to address it promptly. -
Q4: What is the difference between a water hammer arrestor and a surge arrester?
A4: In the context of plumbing, the terms are often used interchangeably. However, “water hammer arrestor” specifically refers to devices designed to counteract the shockwaves caused by water flow interruption. “Surge arrester” can be a broader term, but for plumbing applications, they serve the same purpose. -
Q5: Can I use standard plumbing fittings to fix water hammering?
A5: Standard fittings are not designed to absorb shockwaves. You need specialized devices like water hammer arrestors. Using incorrect parts could exacerbate the problem or create new ones.
By taking a systematic approach and employing the right solutions, you can effectively silence those disruptive pipe noises and protect your plumbing system from the damaging effects of water hammering. Consistent plumbing maintenance and proactive intervention are key to a quieter, more robust home.