
A circular saw is a versatile power tool used for cutting wood. Can you make straight cuts with a circular saw? Yes, with the right techniques and accessories, you can achieve precise, straight cuts. This guide will walk you through the essentials of using a circular saw safely and effectively, from choosing the right blade to performing various cutting techniques.
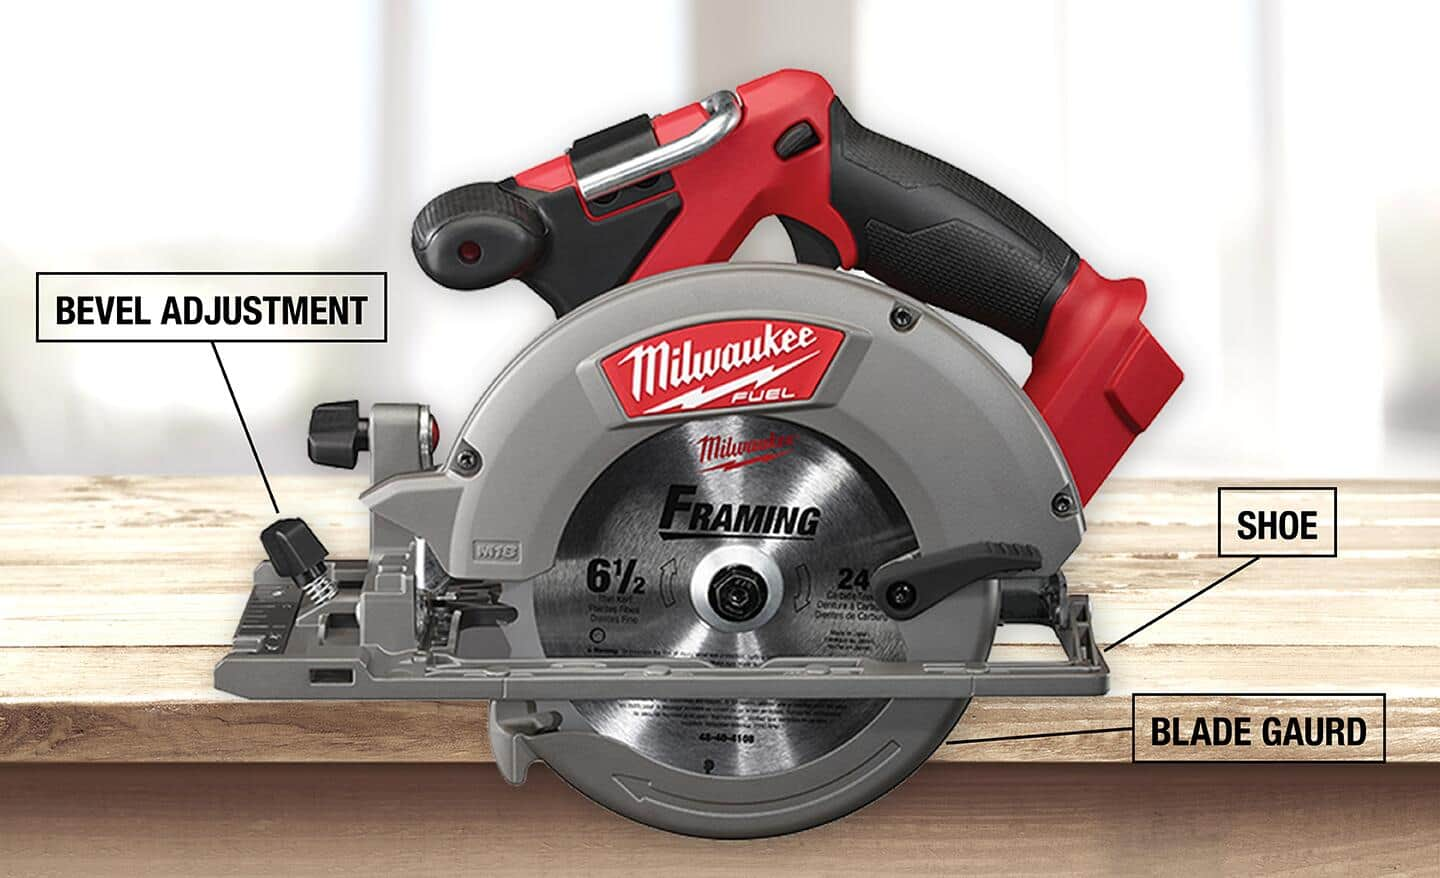
Image Source: dam.thdstatic.com
Getting Started: Your First Steps with a Circular Saw
Before you even plug in your circular saw, it’s crucial to get familiar with its parts and functions. Think of it as getting to know your new tool. This familiarity is the first step towards safe and effective use.
Essential Circular Saw Parts
- Blade: The cutting component that spins at high speed.
- Guard: A spring-loaded cover that automatically retracts as you cut and covers the blade when not in use. This is a critical safety feature.
- Base Plate (Skate): The flat metal surface that rests on the material you’re cutting. It helps guide the saw and stabilize it.
- Depth Adjustment: A lever or knob that controls how deep the blade extends below the base plate.
- Bevel Adjustment: Allows you to tilt the base plate and blade to cut angles.
- Trigger Lock: A safety feature that prevents accidental starting.
- Handle: For firm grip and control.
- Cord/Battery: Power source.
Choosing the Best Circular Saw for Beginners
If you’re new to using power tools, selecting the right circular saw can make a big difference. Look for a saw that is lightweight, easy to handle, and has good safety features. Corded models are often simpler to operate and more affordable for beginners. Battery-powered saws offer more portability but can be heavier.
Key features to look for in a beginner-friendly circular saw:
- Electric Brake: Stops the blade quickly when you release the trigger.
- Spindle Lock: Makes changing blades easier.
- Dust Collection Port: Helps keep your work area cleaner.
- Ergonomic Grip: For comfortable handling.
Mastering Circular Saw Safety: Your Top Priority
Circular saw safety is paramount. A mistake with this powerful tool can lead to serious injury. Always treat your circular saw with respect and follow these guidelines religiously.
Personal Protective Equipment (PPE)
Never operate a circular saw without the proper safety gear.
- Safety Glasses or Goggles: Essential to protect your eyes from flying sawdust and debris.
- Hearing Protection: Circular saws are loud. Earplugs or earmuffs will protect your hearing.
- Dust Mask or Respirator: Sawdust can be harmful to your lungs.
- Work Gloves: Improve grip and protect your hands.
- Sturdy Footwear: Protect your feet from dropped tools or materials.
- Close-Fitting Clothing: Avoid loose clothing that could get caught in the blade.
Pre-Operation Safety Checks
Before each use, perform a quick inspection:
- Blade Condition: Ensure the blade is sharp, free from damage, and the correct type for your material.
- Guard Function: Make sure the blade guard moves freely and springs back into place.
- Cord/Battery: Check for any damage to the power cord or ensure the battery is securely seated and charged.
- Work Area: Clear the area of clutter, obstructions, and flammable materials. Ensure good lighting.
- Material Stability: Make sure the material you are cutting is securely supported and won’t shift during the cut.
Understanding and Preventing Circular Saw Kickback
Circular saw kickback prevention is a critical skill. Kickback happens when the blade binds in the material, causing the saw to be violently thrown back towards the operator.
Causes of Kickback:
- Blade Binding: The blade gets pinched in the cut, often due to the kerf (the space the blade makes) closing behind it. This can happen if the material sags or if the user twists the saw during the cut.
- Contact with Nails or Other Obstructions: Hitting metal can cause the blade to stop abruptly and bind.
- Twisting the Saw: Forcing or twisting the saw off the intended cutting line.
- Using a Dull or Damaged Blade: A dull blade requires more force and is more prone to binding.
- Improper Blade Depth: Setting the blade depth too deep can increase the risk.
How to Prevent Kickback:
- Set the Correct Blade Depth: The blade should extend only about one tooth depth below the material being cut.
- Use a Sharp Blade: A sharp blade cuts cleanly and reduces the chance of binding.
- Support Your Material: Ensure the workpiece is stable and supported on both sides of the cut, especially for long cuts or when cutting sheet goods. Use clamps where necessary.
- Maintain a Firm Grip: Hold the saw firmly with both hands.
- Keep the Saw on the Line: Don’t force or twist the saw. Let the blade do the work.
- Avoid Cutting Warped or Twisted Wood: These materials are more prone to binding.
- Use a Blade Insert or Splinter Guard: Some saws have these features to help support the material and prevent the kerf from closing.
- Be Aware of the Rear of the Blade: Never allow the rear of the blade to contact anything or be pinched.
Achieving Precision: Cutting Techniques and Adjustments
Knowing how to operate the saw is one thing; using it effectively to make precise cuts is another. This involves understanding adjustments and mastering techniques.
Circular Saw Depth Adjustment
Proper circular saw depth adjustment is vital for both safety and cut quality.
- How to Adjust: Most circular saws have a lever or knob on the front of the base plate. Loosen this, lift or lower the saw body, and then retighten the lever.
- Ideal Depth: For most cutting applications, the blade should extend about one tooth depth below the material. This minimizes the amount of exposed blade, reducing the risk of kickback and providing a cleaner cut.
- Cutting Thicker Materials: For very thick materials, you may need the blade to extend slightly more, but always aim for the minimum exposure necessary.
Cutting Wood with a Circular Saw: Step-by-Step
Cutting wood with a circular saw requires a methodical approach.
- Mark Your Cut Line: Use a pencil and a straight edge (like a speed square or ruler) to draw a clear cutting line on your wood.
- Position the Saw: Place the circular saw on the edge of the wood, aligning the blade with your cut line. Many saws have a guide mark on the base plate that indicates where the blade will cut. Use this to align precisely.
- Support the Material: Ensure the workpiece is well-supported. For long pieces, you might need sawhorses or saw horses. For sheet goods, ensure the waste side of the cut is adequately supported to prevent it from falling and binding the blade.
- Start the Saw: Squeeze the trigger and let the blade reach full speed before contacting the wood.
- Begin the Cut: Gently guide the saw forward, maintaining steady pressure. Let the saw do the work; don’t force it.
- Follow the Line: Keep the saw aligned with your cut line.
- Complete the Cut: Continue cutting through the entire piece of wood. As you reach the end, maintain support for the cut-off piece.
- Release and Wait: Release the trigger and wait for the blade to stop spinning completely before lifting the saw from the material.
How to Make Straight Cuts with a Circular Saw
Achieving perfectly straight cuts is a common goal.
Using the Base Plate as a Guide:
- Align Carefully: For shorter cuts, you can often rely on the saw’s base plate and the guide marks. Ensure the blade’s kerf is precisely on your pencil line.
Using a Speed Square or Combination Square:
- Clamp Securely: For shorter crosscuts, a speed square can act as a handy guide. Clamp the square firmly to the workpiece, ensuring the fence of the square is against the edge of the wood and the blade aligns with your cut line.
- Guide the Saw: Rest the saw’s base plate against the square and guide the saw along it.
Employing a Circular Saw Guide Rail:
- Maximum Accuracy: For the most accurate and straight cuts, especially on sheet goods or long rip cuts, a circular saw guide rail (also called a track saw guide or cutting guide) is invaluable.
- Setup: These guides are essentially long, straight aluminum extrusions with a T-slot for attaching the saw. You clamp the guide rail to your workpiece, aligning it with your cut line.
- Benefits: The guide rail acts as a perfect straight edge, and the saw often has an adapter that rides in the T-slot, ensuring the saw stays perfectly on track with no deviation. Many guide rails also have anti-splinter strips to keep the cut edge clean.
Bevel Cuts and Angle Cuts
- Adjust the Bevel: Locate the bevel adjustment lever or knob, usually at the front of the base plate. Loosen it, tilt the base plate to your desired angle (often marked on a scale), and then retighten the lever.
- Test Cuts: Before cutting your main piece, make a test cut on scrap wood to ensure the angle is correct.
- Support: Be extra mindful of material support when making bevel cuts, as the angle can make the workpiece less stable.
Exploring Different Circular Saw Blade Types
The right circular saw blade types can dramatically affect the quality and ease of your cuts. Blades are designed for specific materials and cutting tasks.
| Blade Type | Teeth Count | Common Uses | Best For | Notes |
|---|---|---|---|---|
| General Purpose Blades | 24-30 | Framing, rough cuts, general carpentry | Fast, rough cuts | Good all-around blades for framing and general construction. Can leave a slightly rougher finish. |
| Fine Finish Blades | 40-60 | Trim work, shelving, fine woodworking, plywood | Smooth, clean cuts | Higher tooth count creates less tear-out and a smoother finish. Ideal for visible surfaces. May cut slower through thick lumber. |
| Plywood Blades | 60-80 | Plywood, laminates, melamine | Plywood, particleboard, laminates | Specifically designed to minimize tear-out on veneered surfaces. Very high tooth count. |
| Carbide-Tipped Blades | Varies | All-purpose, wood, some metal, masonry | Durability and versatility | Teeth are tipped with extremely hard carbide. They stay sharp longer and can cut a wider range of materials (though specialized blades are better for each). |
| Wood/Metal Combination Blades | Varies | Wood with nails, light gauge metal, plastic, wood | Cutting through mixed materials | Designed to handle both wood and nails without dulling quickly. Teeth are often shaped differently. Ensure your saw is powerful enough for metal cutting. |
| Plunge Cut Blades | Lower tooth | Creating pockets or cutouts within a panel | Inset cuts, creating openings | These blades have a unique design that allows the saw to be plunged directly into the material without starting from an edge. Requires precise control and proper safety. |
| Diamond/Abrasive Blades | N/A | Masonry, tile, concrete | Cutting hard, abrasive materials | These are not typical wood blades and require specialized saws or specific circular saw attachments. They wear down with use and create a lot of dust. |
Important Considerations for Blade Selection:
- Arbor Size: Ensure the blade’s arbor hole matches your saw’s arbor shaft.
- Blade Diameter: Use the diameter recommended for your saw (e.g., 7-1/4 inch, 10-inch).
- Kerf Width: Thin kerf blades remove less material, requiring less power, but can be less stable. Standard kerf blades are more robust.
Advanced Circular Saw Techniques
Once you’re comfortable with the basics, you can explore more advanced circular saw techniques.
Making Rip Cuts
Rip cuts are cuts made parallel to the grain of the wood.
- Setup: This is where a circular saw guide rail truly shines for accuracy. If you don’t have a guide rail, you can mark your line and use a clamped-on straight edge (like a level or a wide metal ruler) as a guide.
- Support: Ensure the long piece of wood is well-supported and doesn’t sag.
- Blade Depth: Set for proper depth as usual.
- Technique: Guide the saw smoothly along your marked line or guide.
Cutting Sheet Goods (Plywood, MDF, Particle Board)
Sheet goods can be tricky due to their size and tendency to splinter.
- Support is Key: Always support the majority of the sheet. If cutting in half, support both halves. If cutting a strip off, support the main piece and the strip. You can use sawhorses, saw horses, or dedicated sheet goods stands.
- Minimize Tear-Out:
- Use a fine-finish or plywood-specific blade.
- Place a strip of masking tape along the cut line and score it with a utility knife before cutting.
- Use a splinter guard or a guide rail with an anti-splinter strip.
- If possible, cut with the “good” side of the material facing down, as the blade guard will help support the uncut fibers on the top. For a guide rail, the saw will usually run on the “good” side, so the tear-out will be on the bottom.
Cutting Curves (Limited)
Circular saws are not designed for cutting curves. However, for very gentle, shallow curves, you can try:
- Pilot Hole: Drill a starter hole.
- Gentle Guidance: Slowly and carefully guide the saw, making small adjustments to follow the curve.
- Use a Jigsaw: For any significant curves, a jigsaw is the correct tool.
Circular Saw Maintenance: Keeping Your Tool in Top Shape
Proper circular saw maintenance ensures longevity, safety, and optimal performance.
Cleaning Your Saw
- Disconnect Power: Always unplug corded saws or remove batteries from cordless saws before cleaning.
- Remove Sawdust: Use a brush and a vacuum cleaner to remove sawdust from the motor housing, vents, blade guard, and base plate.
- Check Vents: Ensure the air vents are clear to prevent overheating.
Blade Care
- Clean Blades: Remove pitch and sap buildup from blades with a brush and solvent (like citrus cleaner or mineral spirits).
- Inspect for Damage: Check for bent teeth, missing teeth, or cracks.
- Sharpening: Have dull blades professionally sharpened or replace them. A dull blade makes the saw work harder and increases kickback risk.
Lubrication and Storage
- Check Manual: Consult your saw’s manual for any lubrication requirements. Most modern tools don’t require user lubrication.
- Proper Storage: Store your circular saw in a dry, clean place, preferably in its original case or a dedicated tool bag. Protect the blade from damage.
Frequently Asked Questions (FAQ)
Q: What is the most important safety rule when using a circular saw?
A: Always wear appropriate personal protective equipment (PPE), including safety glasses, hearing protection, and a dust mask. Never operate a circular saw without the blade guard functioning correctly.
Q: Can I cut metal with a regular wood blade?
A: No, you should not cut metal with a standard wood-cutting circular saw blade. Use blades specifically designed for cutting metal, and ensure your circular saw is rated for such use and has sufficient power.
Q: How often should I replace my circular saw blade?
A: Replace your blade when it becomes dull, damaged, or starts producing rough cuts. A dull blade increases the risk of kickback and makes the saw work harder.
Q: My saw is making a lot of dust. What can I do?
A: Ensure your saw has a dust collection port and connect it to a vacuum cleaner or dust collection system. Using a blade designed for dust reduction can also help.
Q: What is a good circular saw for DIY projects around the house?
A: For most DIYers, a 7-1/4 inch corded or cordless circular saw from a reputable brand is a good choice. Look for features like electric brakes and good ergonomics.
Q: How do I make a cut that goes all the way through a thick piece of lumber?
A: Properly set the blade depth so it extends about one tooth past the bottom of the wood. Ensure the material is well-supported and guide the saw smoothly.
Q: Can I use a circular saw to cut PVC pipe?
A: Yes, you can cut PVC pipe with a circular saw. Use a fine-tooth blade designed for plastic or a general-purpose wood blade. Secure the pipe well to prevent it from moving.
By following these guidelines for circular saw safety and mastering various circular saw techniques, you’ll be well on your way to making clean, accurate cuts with confidence. Remember, practice and patience are key to becoming proficient with any power tool.