
Can you install a smart light switch yourself? Yes, you can! This guide will walk you through the process step-by-step, making smart home wiring accessible even for beginners. Installing a smart light switch is a fantastic way to upgrade your home’s functionality and efficiency. You can control your lights with your voice, a smartphone app, or set schedules, all without needing an electrician. This comprehensive smart switch installation guide is designed to help you achieve a seamless wireless light switch replacement.
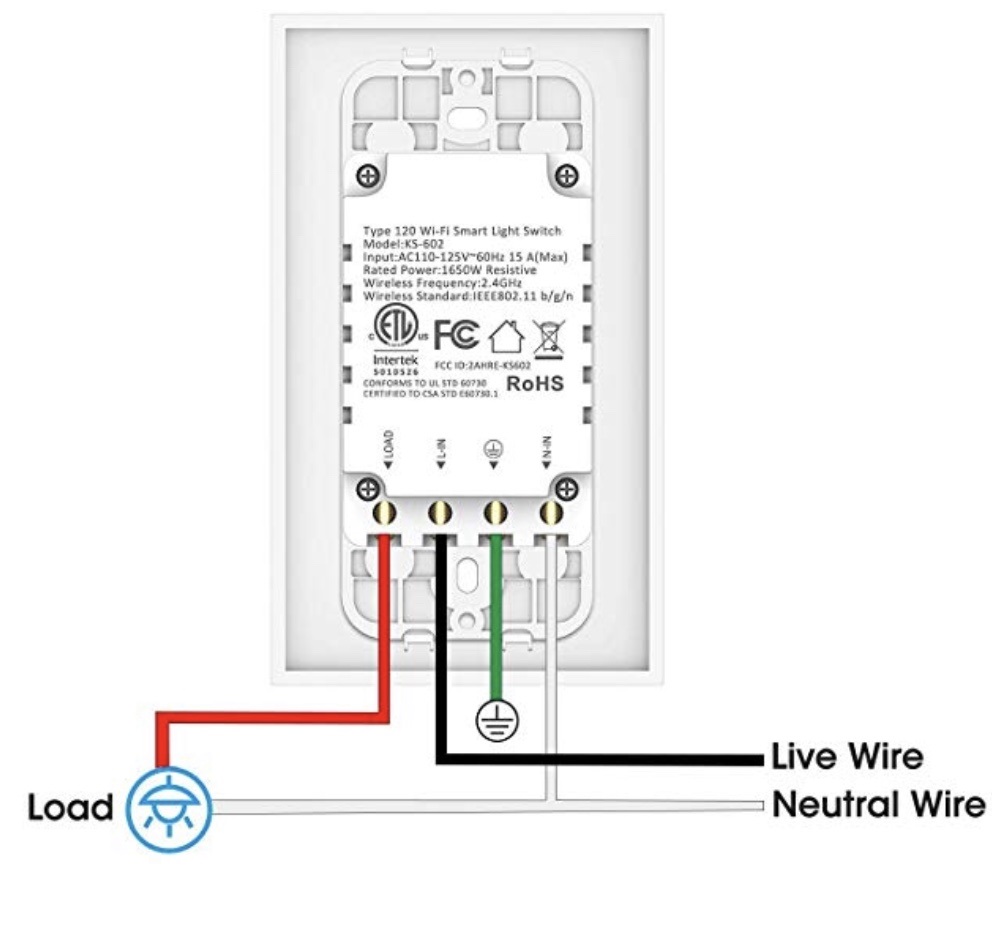
Image Source: www.digitaltrends.com
Why Upgrade to a Smart Light Switch?
Smart light switches offer a host of benefits that go beyond simple illumination control. They bring convenience, energy savings, and enhanced security to your fingertips.
Convenience at Your Fingertips
Imagine never having to get out of bed to turn off a light. Or arriving home to a softly lit house. Smart switches make this a reality. You can control lights remotely, set them to turn on and off automatically, and even integrate them with other smart devices. This ease of use transforms your daily routine.
Energy Efficiency
By scheduling your lights or ensuring they’re turned off when not in use, smart switches can significantly reduce your energy consumption. Some smart switches even monitor your energy usage, helping you identify areas where you can save more. A smart light dimmer setup can further enhance this by allowing you to adjust brightness levels, using less electricity.
Enhanced Security
Smart switches can make your home appear occupied even when you’re away. You can program lights to turn on and off at random times, deterring potential intruders. You can also turn lights on remotely if you forget to leave one on for a family member or a pet.
Mood and Ambiance
With a smart light dimmer setup, you can create the perfect ambiance for any occasion. Dim the lights for a cozy movie night or brighten them for reading. This level of control personalizes your living space.
Before You Begin: Essential Preparations
Before you start pulling wires, it’s crucial to be prepared. This section covers everything you need to know to ensure a safe and successful smart switch installation.
Check Your Existing Wiring
Most smart switches require a neutral wire. Your existing switch might not have one readily available at the switch box.
Identifying a Neutral Wire
- What is a neutral wire? In most home wiring systems, the neutral wire completes the electrical circuit by carrying current back to the power source. It’s typically white.
- How to check: Turn off the power at the breaker box. Remove the wall plate and unscrew the existing light switch. Gently pull the switch out from the box. Look for a white wire that is connected to nothing or capped off. This is likely your neutral wire.
- If no neutral wire is present: Some smart switches work without a neutral wire, but they may have limitations or require a specific type of installation. Always check the smart switch manufacturer’s instructions. You might need to consult an electrician if a neutral wire is essential and not present.
Smart Switch Compatibility
Not all smart switches are created equal. It’s vital to ensure the switch you choose is compatible with your existing electrical setup and your smart home ecosystem.
Types of Smart Switches
- Single-Pole: Controls a light fixture from one location.
- Three-Way: Controls a light fixture from two locations (e.g., at the top and bottom of stairs).
- Four-Way: Controls a light fixture from three or more locations (requires a specific type of smart switch for these setups).
- Smart Dimmers: Allow you to adjust light brightness.
Smart Home Ecosystem Compatibility
- Wi-Fi: Connects directly to your home Wi-Fi network.
- Z-Wave/Zigbee: Requires a separate hub (like SmartThings, Hubitat, or Alexa with a built-in hub) to communicate. These protocols can be more reliable and create a mesh network for better coverage.
- Bluetooth: Usually has a shorter range and may require your phone to be nearby.
Bulb Compatibility
- Incandescent bulbs: Generally compatible with most smart switches.
- LED and CFL bulbs: Many smart switches and dimmers are designed to work with these energy-efficient bulbs, but it’s essential to check the manufacturer’s specifications. Some older smart switches might not work well with LEDs or could cause flickering. A smart light dimmer setup is particularly important for LED compatibility, as specific dimming technologies are needed.
Gather Your Tools and Materials
Having the right tools will make the DIY smart switch installation much smoother and safer.
Essential Tools
- Voltage Tester: Crucial for ensuring the power is off. A non-contact voltage tester is highly recommended.
- Screwdrivers: Phillips head and flathead, in various sizes.
- Wire Strippers/Cutters: For preparing wires.
- Wire Nuts: To secure wire connections.
- Pliers: Needle-nose pliers are useful for manipulating wires.
- Electrical Tape: For insulating connections.
- New Smart Switch: Ensure it’s the correct type for your needs.
- Owner’s Manual/Instructions: Always keep the manufacturer’s guide handy.
Safety First!
- Turn Off Power: The most critical step. Locate the circuit breaker that controls the light switch you’re replacing and flip it to the “OFF” position.
- Verify Power is Off: Use your voltage tester to confirm that there is no power at the switch box. Test all wires in the box.
- Work in a Well-Lit Area: Ensure you have adequate lighting, but be mindful of the power being off to the main area.
- Never Work on Live Wires: This cannot be stressed enough.
Step-by-Step Smart Switch Installation Guide
This section provides a detailed walkthrough of how to wire a smart switch, making your wireless light switch replacement a reality.
Step 1: Turn Off Power and Verify
As mentioned, this is the most important safety step.
1. Go to your home’s electrical panel.
2. Find the breaker that controls the light fixture or room where you’ll be working.
3. Flip the breaker to the “OFF” position.
4. Return to the switch. Use your non-contact voltage tester near the switch and wires to confirm the power is indeed off.
Step 2: Remove the Old Switch
- Remove the Wall Plate: Unscrew the screws holding the existing wall plate in place.
- Unscrew the Switch: You’ll see two mounting screws holding the switch to the electrical box. Unscrew these.
- Gently Pull Out the Switch: Carefully pull the switch out from the electrical box. The wires will still be connected.
Step 3: Identify and Label the Wires
This is where careful observation is key for a successful smart home wiring upgrade.
-
Observe Wire Connections: Look at how the wires are connected to your old switch. Typically, you’ll see:
- Line/Hot Wire(s): These are usually black and bring power from the breaker box. There might be one or two.
- Load Wire(s): This black wire goes from the switch to the light fixture.
- Ground Wire: Usually bare copper or green.
- Neutral Wire(s): Usually white. These might be bundled together with a wire nut or connected to the old switch (less common).
-
Take Pictures: Before disconnecting anything, take clear photos of how the wires are connected to your old switch. This is an invaluable reference.
-
Label Wires: Use small pieces of electrical tape and a pen to label each wire according to its function (Line, Load, Ground, Neutral). This prevents confusion during reassembly.
Step 4: Disconnect the Old Switch
- Loosen Terminal Screws or Release Push-In Connections: Your old switch will have wires connected either by screws or pushed into holes on the back.
- Disconnect Wires: Loosen the terminal screws and unwrap the wires. If wires are pushed into holes, there’s usually a small slot next to the hole to insert a small screwdriver or wire to release the connection.
Step 5: Connect the New Smart Switch
This is the core of the smart switch installation. Always refer to your specific smart switch’s wiring diagram.
-
Prepare Wires: If the ends of the wires are not clean or stripped properly, use wire strippers to expose about 1/2 to 3/4 inch of bare copper.
-
Connect Wires According to Diagram: This is where your labels and photos come in handy. Generally, you’ll connect:
- Line/Hot Wire(s): Connect to the “Line” or “Hot” terminal on the smart switch.
- Load Wire(s): Connect to the “Load” terminal on the smart switch.
- Ground Wire: Connect to the green or bare copper ground screw/terminal on the smart switch.
- Neutral Wire: Connect to the “Neutral” terminal on the smart switch. If your smart switch doesn’t have a designated neutral terminal, it might require connecting the neutral wire to the existing bundle of neutral wires using a wire nut. Crucially, if your smart switch does require a neutral and you don’t have one, you cannot proceed with this switch without rewiring.
-
Secure Connections:
- Screw Terminals: Wrap the stripped wire clockwise around the terminal screw and tighten securely. Ensure no bare wire is exposed beyond the screw terminal.
- Push-In Connections: Push the wire firmly into the correct terminal hole until it’s snug.
- Wire Nuts: If you need to join wires together (e.g., connecting the neutral wires to the switch’s neutral pigtail), twist the bare ends of the wires together, then twist a wire nut onto them securely. Give a gentle tug to ensure it’s tight.
-
Use Electrical Tape: For extra security, wrap electrical tape around screw terminals where wires are attached, ensuring the tape covers the metal terminals and the wire insulation.
Step 6: Mount the Smart Switch and Wall Plate
-
Gently Push Wires Back: Carefully fold the wires back into the electrical box. You might need to push them in sequence to avoid kinks. Ensure no bare wires are touching each other or the metal electrical box.
-
Mount the Switch: Align the smart switch with the screw holes in the electrical box. Secure it with the provided mounting screws.
-
Attach the Wall Plate: Place the new wall plate over the switch and secure it with its screws.
Step 7: Restore Power and Test
-
Turn Power Back On: Go back to your breaker box and flip the breaker to the “ON” position.
-
Test the Switch:
- Manual Test: Manually press the buttons or toggle the switch to ensure the light turns on and off correctly. If you installed a smart light dimmer setup, test the dimming function.
- App/Voice Control: Follow the manufacturer’s instructions to connect your smart switch to your Wi-Fi network or smart home hub. Download the associated app and try controlling the light through the app or a voice command (if applicable).
Smart Switch Troubleshooting Tips
Even with careful installation, you might encounter issues. Here are common smart switch troubleshooting steps.
Light Doesn’t Turn On
- Check Power: Ensure the breaker is on.
- Check Wiring: Turn off power again. Double-check all wire connections. Are they secure? Are the Line and Load wires in the correct terminals?
- Bulb Issue: Try a different light bulb.
- Faulty Switch: If all else fails, the smart switch itself might be defective.
Flickering Lights (Especially with LEDs)
- Compatibility: Ensure your LED bulbs are compatible with your smart dimmer switch. Some LEDs are not dimmable or require specific types.
- Minimum Load: Some smart dimmers have a minimum wattage requirement. If your bulbs use very little power, this could be the issue.
- Loose Connections: Check all wire connections for tightness.
Smart Switch Not Connecting to Wi-Fi or Hub
- Network Issues: Ensure your Wi-Fi network is working. Is the switch within range of your router?
- Password Incorrect: Double-check your Wi-Fi password.
- 2.4GHz vs. 5GHz: Most smart home devices only work on the 2.4GHz Wi-Fi band. Make sure your router is broadcasting on this band.
- Hub Proximity: If using Z-Wave or Zigbee, ensure the switch is close enough to the hub during the pairing process.
- Reset the Switch: Most smart switches have a reset button or a sequence of button presses to factory reset the device. Refer to your manual.
Switch Not Responding to App or Voice Commands
- App/Hub Status: Check if your smart home app or hub is online and functioning correctly.
- Device Offline: In the app, see if the switch is listed as “offline.”
- Re-pair Device: You might need to remove the switch from your smart home system and re-pair it.
Overheating Switch
- Overload: Ensure you are not exceeding the wattage rating of the smart switch.
- Ventilation: Make sure the electrical box is not overcrowded with wires, which can impede airflow.
- Faulty Switch: If the switch is getting excessively hot, turn off the power immediately and consider replacing it.
Advanced Smart Home Wiring Considerations
Once you’ve mastered the basic smart switch installation, you might explore more complex setups.
Three-Way and Four-Way Switches
Replacing standard three-way or four-way switches with smart ones requires specific companion switches or carefully matched wiring.
- Companion Switches: Many smart switch brands offer a “main” switch and a “remote” or “companion” switch. The companion switch typically doesn’t require line and load wires, only traveler wires and a neutral.
- Wiring Diagrams: Always consult the manufacturer’s specific wiring diagrams for three-way and four-way setups. Incorrect wiring here can lead to the switch not working or even electrical hazards.
Smart Dimmer Setup Best Practices
Achieving the perfect smart light dimmer setup involves more than just installation.
- Dimmer Compatibility: As mentioned, check bulb compatibility. Not all bulbs dim well, and some smart dimmers are better suited for specific bulb types (like LEDs).
- Minimum Load: Some dimmers need a minimum load to function correctly. If you’re dimming just a single low-wattage LED, you might experience flickering or the dimmer not working.
- Smooth Dimming: Look for dimmers that offer adjustable dimming ranges or fade-in/fade-out features for a more sophisticated control experience.
Integrating with Voice Assistants
Connecting your smart switch to platforms like Amazon Alexa, Google Assistant, or Apple HomeKit unlocks powerful voice control.
- Skill/Action Enablement: You’ll typically need to enable a “skill” or “action” for your smart switch brand within your voice assistant’s app.
- Device Naming: Give your lights clear, easy-to-remember names (e.g., “Living Room Lamp,” “Kitchen Overhead”) for seamless voice commands.
Frequently Asked Questions (FAQ)
Here are answers to common questions about smart switch installation.
Q1: Do I need a neutral wire for all smart switches?
A: Most smart switches require a neutral wire. However, some manufacturers offer “no-neutral” smart switches, which are great for older homes where neutral wires might not be available at the switch box. Always check the product specifications.
Q2: Can I replace a dimmer switch with a smart switch?
A: Yes, you can. You can replace an existing dimmer with a smart switch that also has dimming capabilities, or you can replace it with a standard on/off smart switch if dimming isn’t a priority.
Q3: What happens if I wire the smart switch incorrectly?
A: Incorrect wiring can lead to the smart switch not functioning, blowing a fuse, damaging the switch, or creating a fire hazard. Always turn off power at the breaker and double-check your wiring against the manufacturer’s instructions.
Q4: How do I connect a smart switch to my Wi-Fi?
A: Typically, you’ll need to download the manufacturer’s app on your smartphone or tablet. The app will guide you through connecting the smart switch to your home Wi-Fi network, usually by putting the switch in pairing mode and entering your Wi-Fi credentials.
Q5: Can I use different brands of smart switches together?
A: Generally, yes, especially if they work with a common smart home hub or platform (like Alexa, Google Home, or HomeKit). However, for complex setups like three-way switches, it’s often best to stick with the same brand for compatibility.
Q6: What is smart home wiring?
A: Smart home wiring refers to the electrical setup that enables smart devices, such as smart switches, smart plugs, and smart bulbs, to communicate and be controlled remotely or automatically. It often involves ensuring the presence of neutral wires and a reliable Wi-Fi or Z-Wave/Zigbee network.
Q7: Is it safe to do a wireless light switch replacement myself?
A: Yes, it is safe for most DIY enthusiasts if you follow proper safety procedures, especially turning off the power at the breaker and using a voltage tester. If you are uncomfortable working with electricity, it’s always best to hire a qualified electrician.
Conclusion
Installing a smart light switch is a rewarding DIY project that can significantly enhance your home’s comfort, efficiency, and security. By following this comprehensive smart switch installation guide, preparing thoroughly, and adhering to safety protocols, you can confidently perform a wireless light switch replacement and enjoy the many benefits of a modern smart home. Remember to always consult your specific smart switch’s manual for precise wiring instructions, and when in doubt, don’t hesitate to seek professional help. Happy smartening!