
What is a tape measure? A tape measure is a flexible ruler used for measuring distance or size. Can I use any tape measure? While many tape measures exist, using the right one for the job and knowing how to read it correctly ensures measuring tape accuracy. Who is this guide for? This guide is for everyone, from DIY enthusiasts to seasoned professionals in using measuring tape for construction.
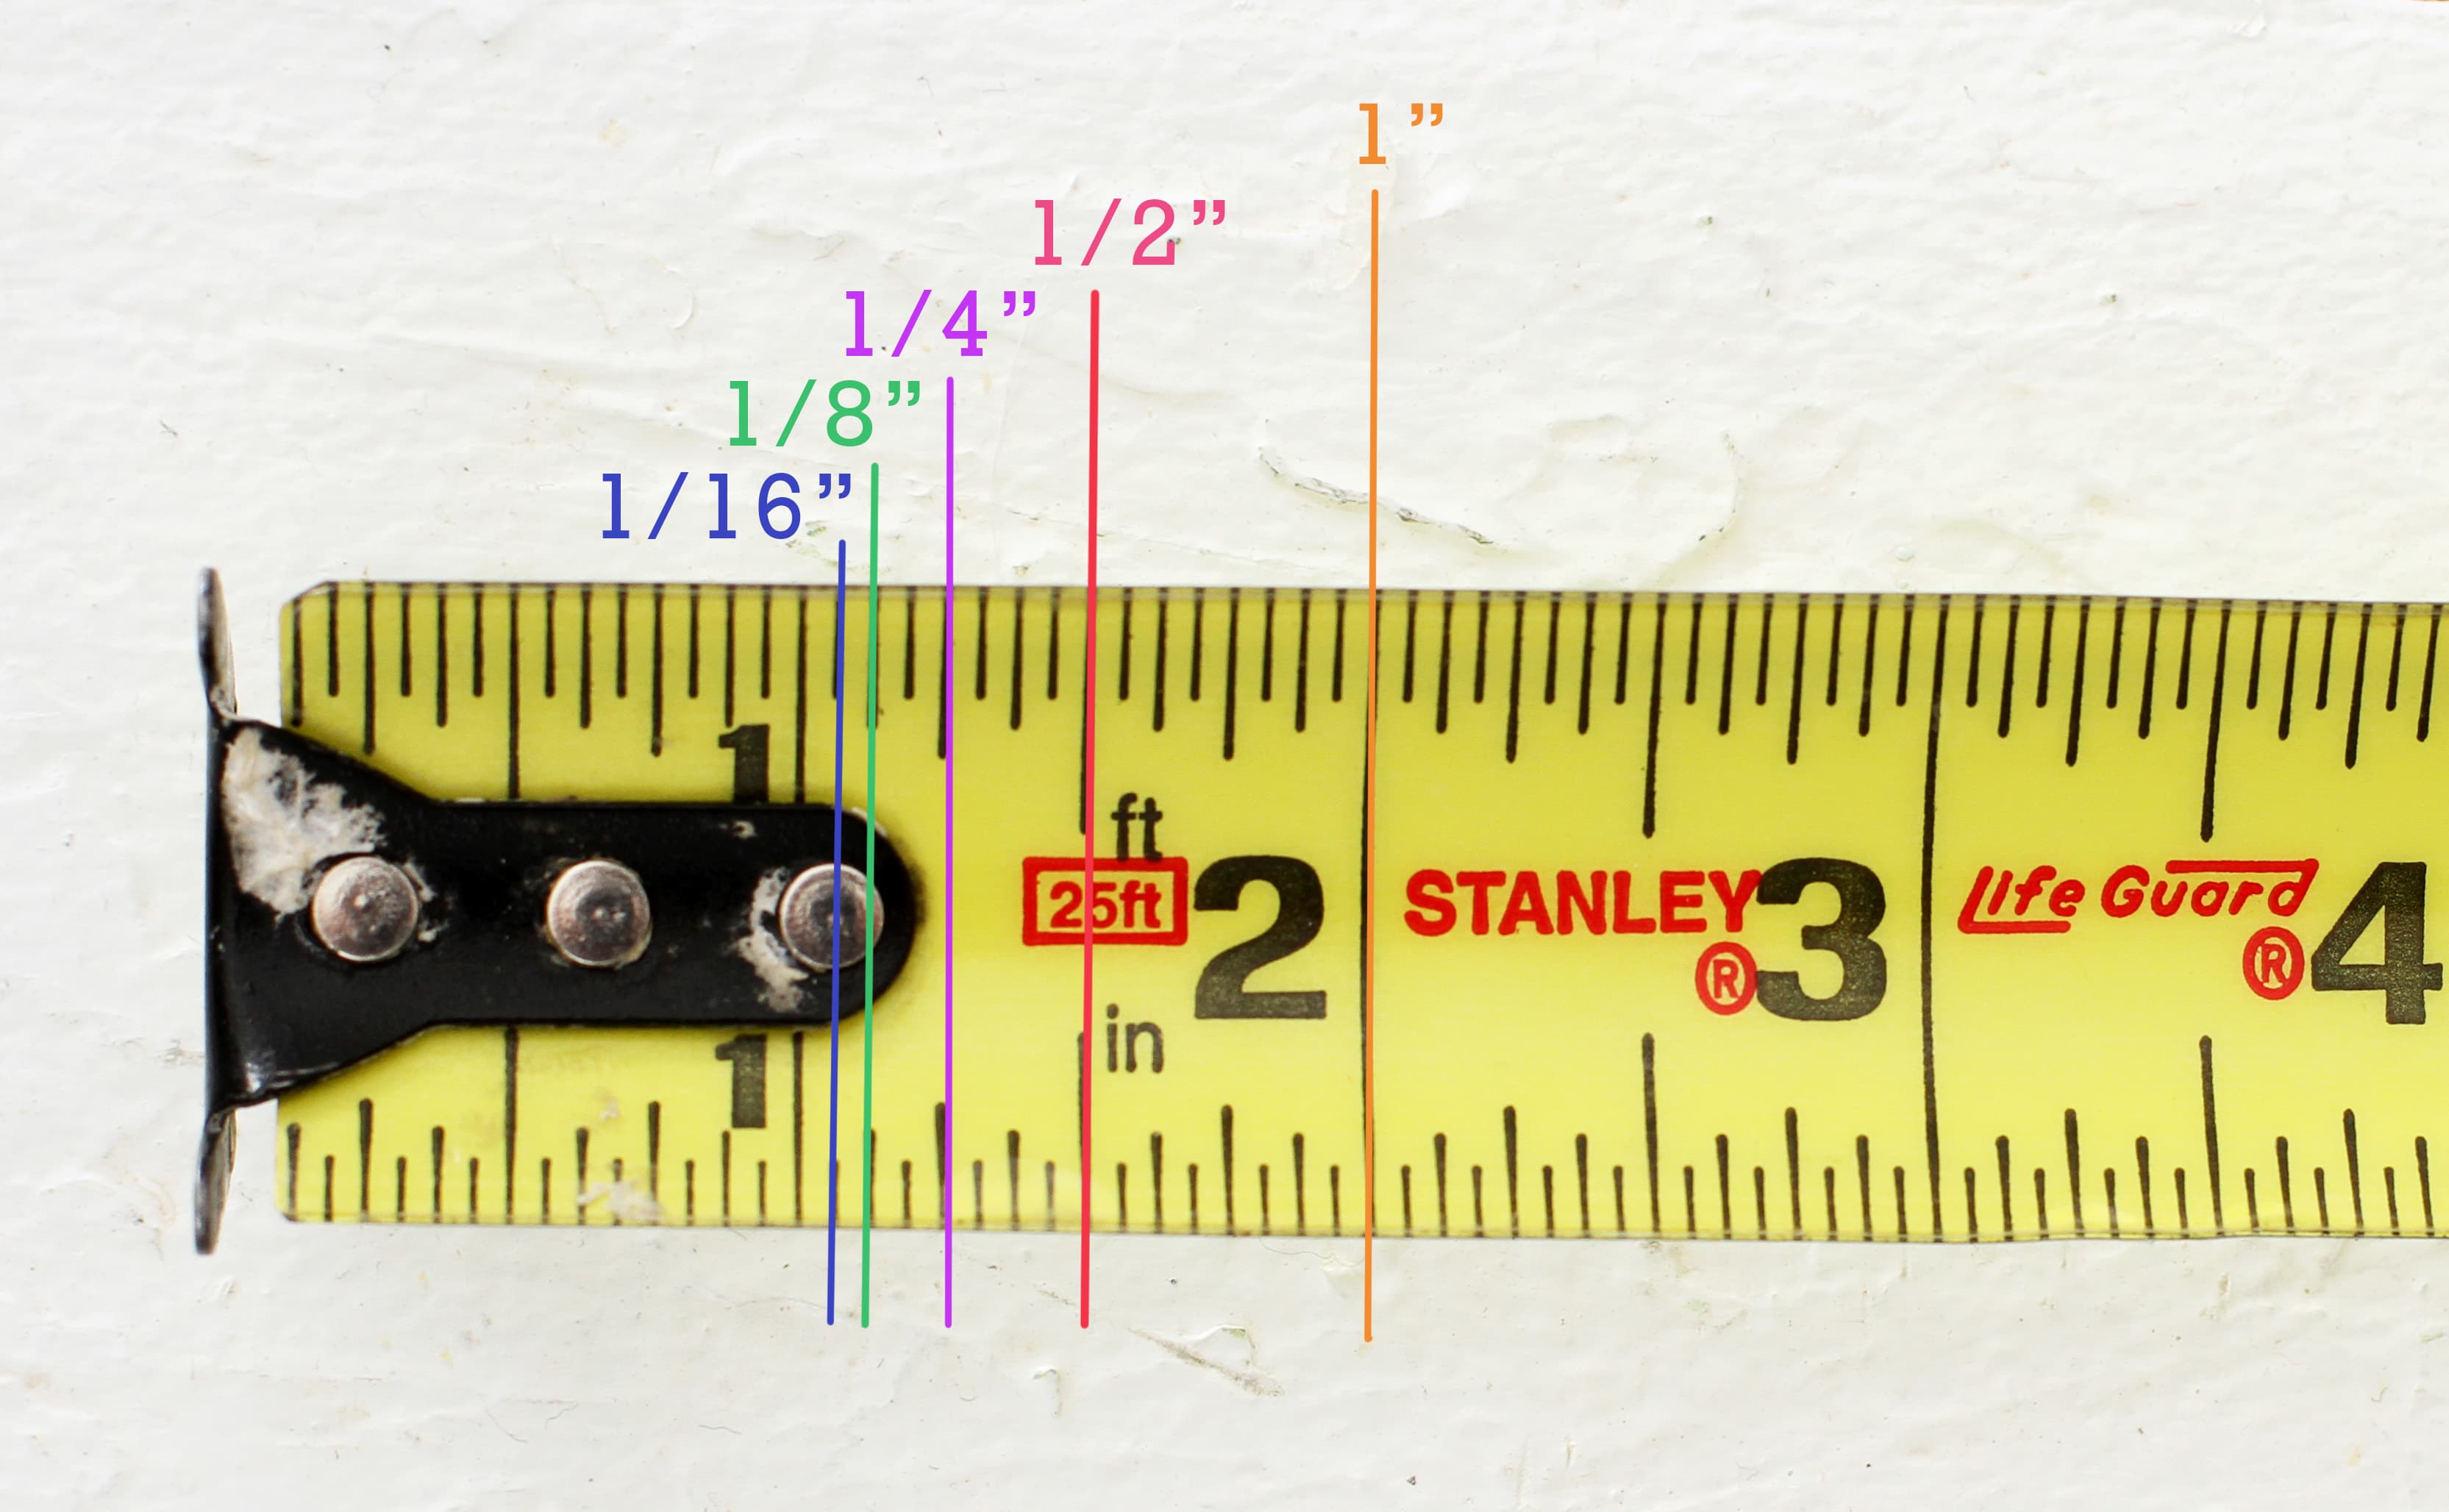
Image Source: cdn.apartmenttherapy.info
The Fundamentals of Tape Measure Markings
Before you can effectively measure, you need to deciphering tape measure markings. This is crucial for measuring length accurately. Whether you’re working with an imperial tape measure or a metric tape measure, the core principles of reading a tape measure remain consistent.
Imperial Tape Measure Markings
An imperial tape measure uses inches and feet.
- The Big Numbers: These represent whole feet (e.g., 1, 2, 3).
- The Smaller Numbers: These represent inches (e.g., 1, 2, 3… up to 12, then it repeats for the next foot).
- The Lines (Gradations): These are the key to precision.
- Longest lines: Mark each whole inch.
- Medium lines: Mark half-inches (1/2″).
- Shorter lines: Mark quarter-inches (1/4″).
- Even shorter lines: Mark eighth-inches (1/8″).
- The shortest lines: Mark sixteenth-inches (1/16″).
Tip: Many tape measures will also have a red diamond or mark every 16 inches, which is a common stud spacing in construction.
Metric Tape Measure Markings
A metric tape measure uses centimeters and millimeters.
- The Big Numbers: These represent whole centimeters (e.g., 10, 20, 30). Remember that 100 centimeters equals 1 meter.
- The Lines (Gradations):
- Longest lines: Mark each whole centimeter.
- Shorter lines: Mark each millimeter (there are 10 millimeters in 1 centimeter).
Tip: Look for markings indicating decimeters (every 10 cm), which can be helpful for quicker estimations.
Essential Tape Measure Techniques
Proper technique is vital for measuring tape accuracy. Here are some fundamental tape measure techniques that will improve your results.
Holding the Tape Measure
-
For External Measurements (measuring across an object):
- Place the metal end hook firmly against the edge of the object you are measuring.
- Pull the tape taut. Avoid letting it sag.
- Read the measurement where the tape crosses the other edge.
-
For Internal Measurements (measuring the inside of a space, like a window frame):
- Place the metal end hook firmly against one inside edge.
- Pull the tape across to the other inside edge.
- Crucial Point: The metal end hook adds about 1/8 to 1/4 inch (or a few millimeters) to your measurement when it’s pressed against an edge. For internal measurements, you need to add this hook’s thickness to the reading on the tape. So, if the tape reads 36 inches, and the hook adds 1/4 inch, the actual internal measurement is 36 and 1/4 inches. Many tape measures are designed so the hook’s thickness is accounted for if you “push” against it for inside measurements. Check your tape measure’s design.
-
Measuring Longer Distances:
- Extend the tape as far as needed.
- Mark the point on the tape where you want to stop.
- Retract the tape.
- Note the marked measurement.
- Reposition the hook at the new starting point and measure the remaining distance, adding it to your initial marked measurement.
Keeping the Tape Straight and Taut
Sagging tape measures are a primary cause of measuring tape accuracy issues.
- Keep it Taut: For most measurements, pull the tape straight and tight. If the tape has a good stand-out (how far it can extend without bending), use it.
- Use a Helper: For very long distances, a helper can hold the end of the tape taut and at the correct mark.
- Support the Tape: If the tape needs to span a gap without support, try to keep it as level and straight as possible. Sometimes, you might need to prop it up or have someone hold it.
Reading the Measurement Accurately
This is where reading a tape measure truly comes into play.
- Look at the Correct Line: Identify the longest line that is less than or equal to your measurement point.
- Consider the Fractions: If your measurement falls between lines, identify the fraction of an inch or millimeter it represents.
- Practice: The more you practice measuring length accurately, the easier this becomes.
Advanced Tape Measure Techniques and Applications
Beyond basic measuring, there are specific tape measure techniques for different scenarios, especially in using measuring tape for construction.
Measuring Angles and Curves
While a tape measure isn’t ideal for precise angle measurements, you can get approximations.
- For Curves: Lay the tape along the curve as best as possible. This will give you a measurement along the curve’s path. For a more accurate measurement of the curve’s arc length, you might need specialized tools.
- Estimating Angles: You can measure the lengths of two sides of a triangle and the distance between their endpoints to start calculating angles using trigonometry, but this is more advanced.
Using the Tape Measure for Layout
In construction and woodworking, precise layout is critical.
- Marking Lines: Use a pencil or chalk line in conjunction with your tape measure. Hold the tape firmly at your starting point, extend it to your desired length, and make a clear mark at that point.
- Squaring Corners: For a perfectly square corner (90 degrees), use the Pythagorean theorem (a² + b² = c²).
- Measure 3 feet along one edge from the corner. Mark this point.
- Measure 4 feet along the other edge from the corner. Mark this point.
- Measure the distance between these two marks. If it’s exactly 5 feet, your corner is perfectly square. You can use other multiples (e.g., 6, 8, 10 feet) for larger layouts.
Measuring and Marking Material
- Cutting: When cutting materials like wood, drywall, or pipe, ensure you mark your cut line precisely on the material.
- Repeatability: If you need to cut multiple pieces of the same length, measure and mark the first piece carefully, then use it as a template for subsequent pieces if possible, or ensure you measure each piece accurately from a consistent reference point.
Common Measuring Tape Errors and How to Avoid Them
Even with the best intentions, common measuring tape errors can occur. Being aware of them helps ensure measuring tape accuracy.
1. The Sagging Tape
- The Problem: The tape measure droops between the start and end points, leading to a shorter measurement than the actual distance.
- The Solution: Always pull the tape taut. If the distance is greater than the tape’s stand-out, use a helper or break the measurement into shorter, manageable sections.
2. The Overlooked Hook Play
- The Problem: The metal hook at the end of the tape can move slightly. This is usually accounted for in the design for external measurements (pushing the hook against the edge). However, for internal measurements, if you don’t account for this “play,” your measurement will be off.
- The Solution: For external measurements, ensure the hook is firmly seated against the edge. For internal measurements, either press the tape into the hook (if designed for it) or add the hook’s thickness to your reading.
3. Parallax Error
- The Problem: Looking at the tape measure from an angle instead of directly perpendicular to the markings. This can make the measurement appear slightly different.
- The Solution: Always position your eye directly in front of the measurement marking you are reading.
4. Reading the Wrong Mark
- The Problem: Mistaking a 1/4 inch mark for a 1/8 inch mark, or misinterpreting the fractions.
- The Solution: Take your time and be deliberate when reading the tape. Familiarize yourself with the tape measure markings for your specific tape.
5. Incorrect Starting Point
- The Problem: Not starting the measurement from the absolute beginning of the tape, or misaligning the hook.
- The Solution: Ensure the hook is securely against the starting edge or point. If the hook is damaged, the measuring tape accuracy will be compromised.
6. Environmental Factors
- The Problem: Extreme temperatures can cause metal tape measures to expand or contract slightly, affecting accuracy. While usually negligible for most DIY tasks, it can be a factor in precision work.
- The Solution: Be mindful of extreme conditions. For highly sensitive projects, consider using a specialized measuring tool.
7. Damaged Tape Measures
- The Problem: A bent, kinked, or otherwise damaged tape measure will not provide accurate readings.
- The Solution: Inspect your tape measure regularly. Replace it if it shows signs of wear and tear that compromise its integrity.
Best Practices for Tape Measure Usage
To consistently achieve accurate measurements, adopt these best practices for tape measure use.
1. Know Your Tape Measure
- Read the Manual (if applicable): Some advanced tape measures have specific features.
- Familiarize Yourself: Spend time simply reading the markings on your imperial tape measure or metric tape measure. Measure known objects to confirm your ability to read a tape measure correctly.
2. Double-Check Your Measurements
- Measure Twice, Cut Once: This old adage is gold. Always verify your initial measurement by measuring again, perhaps from the opposite direction or using a slightly different method.
3. Use the Right Tool for the Job
- While a standard tape measure is versatile, for extremely precise measurements, consider laser measures, digital calipers, or specialized rulers.
4. Keep it Clean and Well-Maintained
- Wipe down your tape measure after use, especially if it’s been used in dusty or damp conditions.
- Ensure the retraction mechanism works smoothly.
5. Use Pencil or Chalk for Marks
- When marking a measurement, use a fine-tipped pencil or chalk line. A thick marker can obscure the exact measurement point, leading to errors.
6. Consider Material Properties
- When using measuring tape for construction, remember that materials can shift. Measure at the point of assembly or where the most critical dimension is required.
Working with Different Types of Tape Measures
While the core principles are the same, different tape measures have distinct features.
Standard Retracting Tape Measures
These are the most common. They have a metal case, a locking mechanism, and a spring-loaded retraction.
Tailor’s Tapes (Soft Tape Measures)
Made of cloth or flexible plastic, these are used for measuring body parts or curved surfaces. They typically don’t have a rigid stand-out and are not ideal for rigid measurements.
Laser Distance Measures
These electronic devices use lasers to calculate distance. They are very accurate for longer distances and can often perform calculations, but they rely on battery power and a clear line of sight.
Digital Tape Measures
These combine a traditional tape with a digital display, often offering instant conversions between units and memory functions.
Frequently Asked Questions (FAQ)
Q: How do I ensure my tape measure is accurate?
A: Regularly check for damage. Measure a known length (like a standard piece of lumber or a tile) to confirm your tape’s readings. Ensure the hook is secure and not loose.
Q: What if the tape measure reading is slightly off the end of the tape?
A: You need to break down the measurement. Measure the part you can see and note the measurement. Then, reposition the tape measure, starting from the last marked point, and measure the remaining distance. Add the two measurements together.
Q: Can I trust the 16-inch markings on my tape measure for framing?
A: Yes, these markings (often indicated by red diamonds) are designed for standard stud spacing. However, always verify the actual spacing required for your project and local building codes.
Q: My tape measure retracts too quickly. Is this dangerous?
A: Yes, a tape that retracts with excessive force can snap back and cause injury. If this happens, it’s best to replace the tape measure.
Q: What’s the best way to measure something that is longer than my tape measure?
A: Use a helper to hold the tape taut at the desired point, or use the method of marking the tape and repositioning the hook as described above. For very long distances, a laser measure or a longer measuring wheel might be more suitable.
By diligently applying these tape measure techniques and adhering to best practices for tape measure use, you’ll significantly improve your ability to measure accurately for any task, from simple home repairs to complex using measuring tape for construction projects. Mastering your tape measure is a foundational skill that pays dividends in precision and efficiency.