
Have you ever heard a loud bang or a series of thumps coming from your pipes after you turn off a faucet or appliance? This is likely water hammer, and it can cause damage to your plumbing over time. The good news is, you can often fix this yourself. Can you install a water hammer arrestor without a plumber? Yes, in most cases, with basic tools and this guide, you can successfully install a water hammer arrestor. This guide will walk you through everything you need to know to stop pipe banging and achieve silent pipe hammer in your home. We’ll cover what water hammer is, why it happens, and the simple steps to install a residential plumbing shock arrestor.
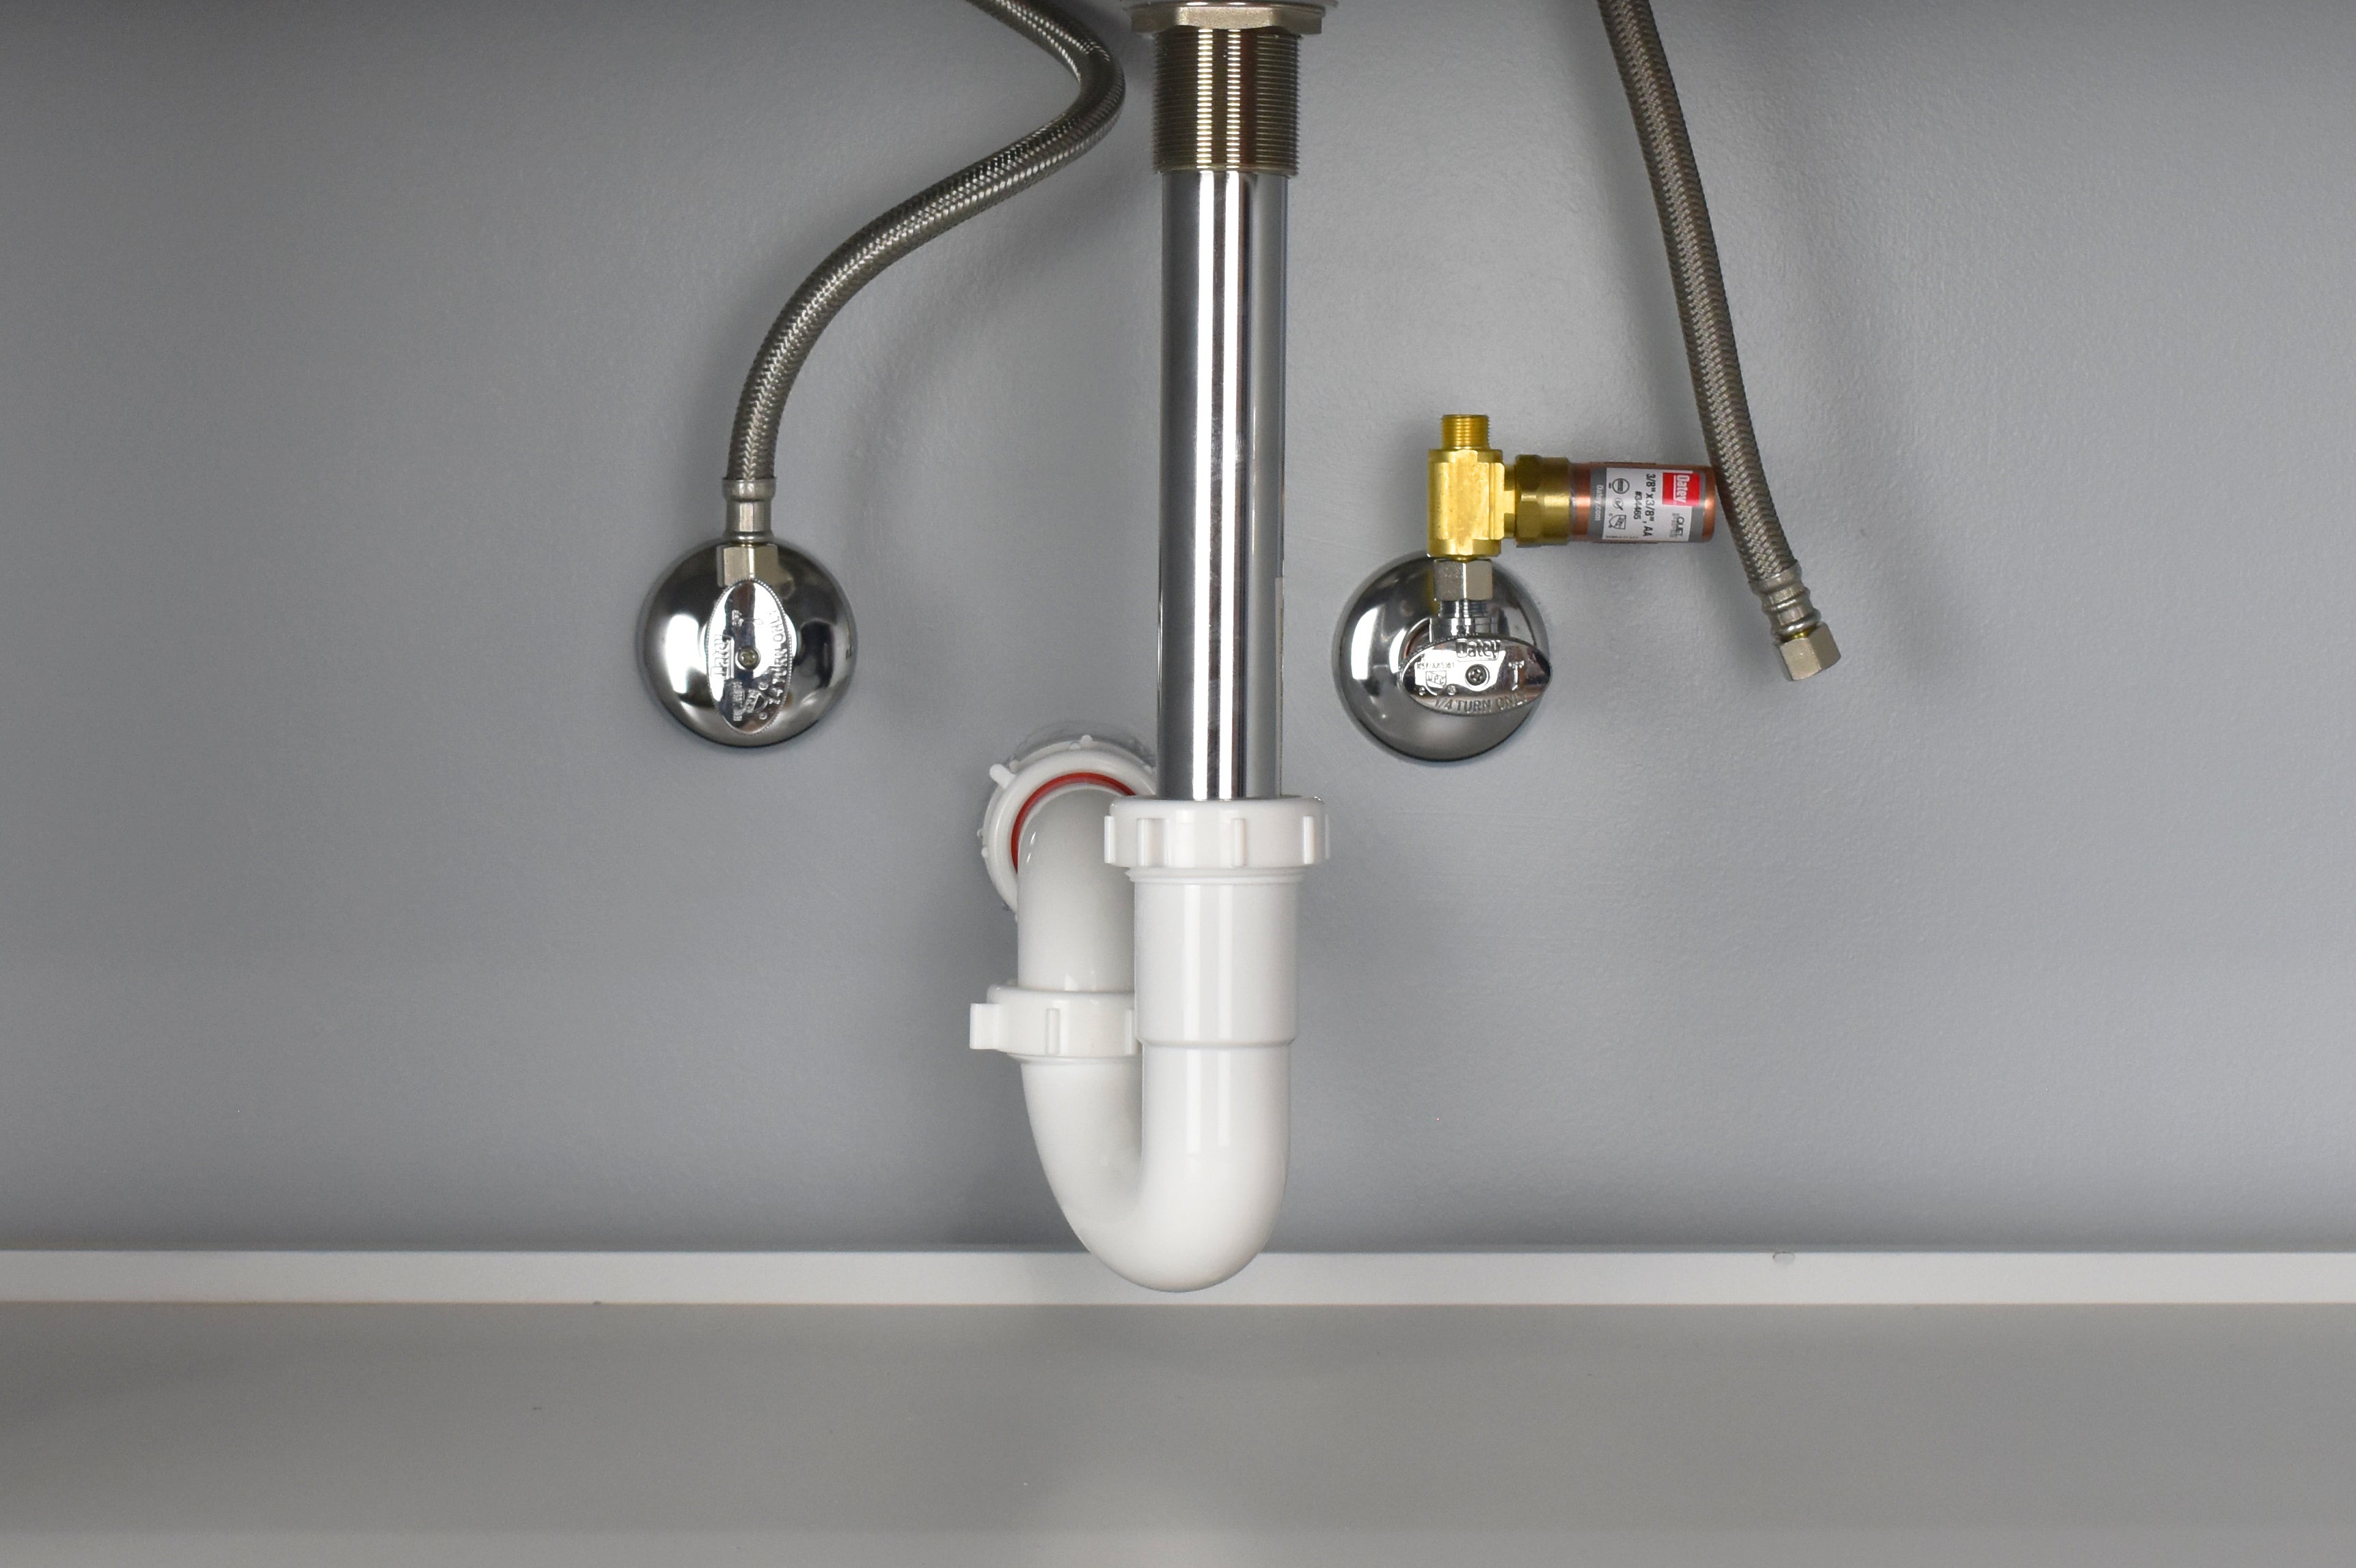
Image Source: www.oatey.com
Deciphering Water Hammer: The Bang Behind the Bang
Water hammer, also known as hydraulic shock, occurs when water flowing rapidly through pipes is suddenly stopped. Think of it like a car suddenly slamming on its brakes – the inertia of the water has nowhere to go, causing a shockwave to travel back through the pipes. This shockwave creates the banging or thumping sound you hear.
Several things can cause this sudden stop:
- Quick-closing valves: Solenoid valves found in washing machines, dishwashers, and ice makers are common culprits. When they shut off abruptly, they create a pressure surge.
- Fast-acting faucets: Some faucets, especially older or worn-out ones, can shut off very quickly.
- High water pressure: If your home’s water pressure is too high (above 80 PSI), it exacerbates the effects of water hammer.
- Partially closed valves: Even a valve that isn’t fully open can create turbulence, leading to hammer.
Why It Matters: Beyond the Annoying Noise
While the noise is certainly disruptive, water hammer can lead to more serious problems:
- Leaking pipes and fittings: The repeated shockwaves can loosen joints and fittings, leading to leaks.
- Damaged appliances: The stress can damage internal components of water-using appliances.
- Loose pipes: The banging can shake pipes loose from their supports, causing them to rattle against walls or framing.
- Burst pipes: In severe cases, the extreme pressure spikes can cause pipes to burst.
Your DIY Solution: The Water Hammer Arrestor
A water hammer arrestor is a simple device designed to absorb these shockwaves and prevent the banging. It works by creating a cushion of air or gas between the moving water and the pipe system. When the water flow is suddenly stopped, the air or gas compresses, absorbing the shock. This is a fantastic DIY water hammer solution.
There are a few types of arrestors, but the most common and effective for DIY installation are:
- Piston-type arrestors: These have a sealed chamber with a spring-loaded piston. The piston moves to absorb the shock.
- Diaphragm-type arrestors: These have a flexible diaphragm separating the water from a pocket of air or gas. The diaphragm flexes to absorb the shock.
Both types are effective, but the piston type is generally considered more robust for long-term use. When you’re looking to add arrestor to washing machine hose or other appliance connections, these are typically what you’ll find.
Selecting the Right Arrestor
When choosing an arrestor, consider these factors:
- Size: Most residential applications use a standard ½-inch or ¾-inch NPT (National Pipe Thread) connection.
- Type: Piston types are generally preferred for durability.
- Brand: Reputable brands like Sioux Chief, Watts, and Chicago Faucets offer reliable products.
Step-by-Step Guide: Installing a Water Hammer Arrestor
Ready to silence those pipes? Here’s how to install a water hammer arrestor. This process is straightforward and a great way to perform plumbing shock arrestor installation.
Tools and Materials You’ll Need
Before you start, gather these items:
- Water hammer arrestor(s)
- Adjustable wrench or pipe wrench
- Plumber’s tape (PTFE tape)
- Teflon pipe joint sealant (optional, but recommended for threaded connections)
- Bucket or towels (to catch residual water)
- Safety glasses
- Work gloves
Pre-Installation Checks and Preparation
- Identify the Source: Try to pinpoint where the banging is loudest. This will help you decide where to install the arrestor. Often, it’s near appliances with quick-closing valves like washing machines or dishwashers.
- Turn Off Water Supply: This is the most crucial step. Locate the main water shut-off valve for your house and turn it completely off. If you’re targeting a specific appliance, you might be able to shut off the water supply valve to that appliance only. Usually, these are located behind the appliance.
- Drain the Lines: Open a faucet at the lowest point of your house (like a basement sink or outdoor spigot) to relieve pressure and drain the water from the pipes. Do the same for a faucet at the highest point to ensure complete draining. You’ll want to drain enough water so that when you disconnect a pipe, minimal water will spill out. Keep a bucket or towels handy for any residual water.
Installing the Arrestor: Location, Location, Location
The best place to install an arrestor is as close as possible to the source of the water hammer. For appliances like washing machines or dishwashers, installing it directly on the supply line to the appliance is ideal.
Installing on an Appliance Supply Line (e.g., Washing Machine)
This is a common and effective placement for installing shock absorber pipe functionality.
- Disconnect Existing Supply Hose: Once the water is off and the lines are drained, use your wrench to carefully disconnect the water supply hose from the appliance. Be prepared for a small amount of water to drain out.
- Prepare the Arrestor Threads: Clean the threads on both the arrestor and the appliance inlet. Wrap plumber’s tape tightly around the male threads of the arrestor (usually 3-4 wraps). If using pipe joint sealant, apply it according to the manufacturer’s instructions.
- Attach the Arrestor: Screw the arrestor onto the appliance’s water inlet fitting. Hand-tighten it first, then use your wrench to snug it up. Be careful not to overtighten, which can damage the threads or fitting. Aim for a snug fit that prevents leaks.
- Reconnect the Supply Hose: Connect the appliance’s water supply hose to the outlet port of the water hammer arrestor. Again, hand-tighten and then use your wrench to snug it up.
- Consider a T-Fitting for Washing Machines: For washing machines, you might want to install a T-fitting to allow for both the arrestor and the supply hose to connect. In this case, you would:
- Disconnect the supply hose from the wall valve.
- Screw the T-fitting onto the wall valve.
- Attach the arrestor to one of the T-fitting’s outlets.
- Reconnect the supply hose to the other outlet of the T-fitting.
- This setup ensures the arrestor is positioned directly on the line supplying water to the machine, ideal for add arrestor to washing machine hose scenarios.
Installing on Fixture Supply Lines (e.g., Sinks, Toilets)
For faucets or toilets that exhibit water hammer, you can install arrestors on the flexible supply lines.
- Locate Shut-off Valve: Find the small shut-off valve behind the sink or toilet.
- Disconnect Supply Line: Use a wrench to disconnect the flexible supply line from the shut-off valve. Have a bucket or towel ready for any residual water.
- Attach the Arrestor: Clean the threads on the shut-off valve outlet. Wrap plumber’s tape around the valve’s threads. Screw the arrestor onto the valve outlet. Hand-tighten, then snug with a wrench.
- Reconnect Supply Line: Connect the flexible supply line to the arrestor’s outlet. Hand-tighten and then snug with a wrench.
Installing on Main Lines (Less Common for DIY)
While less common for typical DIY installations, arrestors can be installed on larger main lines. This usually involves cutting into the pipe and using compression fittings or soldering, which requires more specialized skills and tools. If you suspect water hammer originating from your main water line, it’s often best to consult a professional plumber. They will know how to properly install a plumbing valve arrestor or a larger inline arrestor.
Turning the Water Back On and Testing
- Slowly Turn On Water: Go back to the main water shut-off valve and slowly turn the water back on.
- Check for Leaks: Carefully inspect all connections you made for any signs of leaks. Tighten slightly if necessary.
- Test the Appliance/Fixture: Operate the appliance or fixture that was causing the noise. Turn the faucet on and off quickly, or run the washing machine through a fill cycle. Listen for the banging.
- Troubleshooting: If the banging persists, check that the arrestor is installed correctly and that there are no other sources of water hammer in the system. You might need to install additional arrestors at other locations.
Water Hammer Prevention Tips: Proactive Measures
Beyond installing arrestors, several water hammer prevention tips can help keep your plumbing quiet and healthy:
- Check Water Pressure: Use a water pressure gauge (available at hardware stores) to check your home’s water pressure. If it consistently exceeds 80 PSI, install a pressure-reducing valve (PRV) on your main water line. This is a more involved installation, so consider a plumber if you’re not comfortable.
- Secure Loose Pipes: If pipes are rattling against joists or framing, secure them with pipe straps or hangers. This won’t stop the hammer itself but will prevent the pipes from vibrating loudly.
- Repair Leaky Faucets: A faucet that drips constantly can sometimes cause minor water hammer.
- Consider Slow-Close Valves: For areas where you frequently experience water hammer, consider replacing quick-closing valves with slower-acting ones if possible.
- Air Chambers: Older homes sometimes have air chambers – vertical sections of capped pipe at the top of risers – designed to trap air and prevent hammer. These can become waterlogged over time. If you have them and they aren’t working, a plumber might be able to recharge them, or installing modern arrestors is a better solution.
Frequently Asked Questions (FAQ)
Q1: How many water hammer arrestors do I need?
A1: Typically, you only need one arrestor per appliance or fixture that causes the noise. If you have multiple sources of water hammer, you’ll need an arrestor for each.
Q2: Can I install a water hammer arrestor myself?
A2: Yes, for most residential applications on appliance supply lines or fixture lines, you can install a water hammer arrestor yourself with basic tools and following these steps.
Q3: Where is the best place to install a water hammer arrestor?
A3: The best location is as close as possible to the source of the water hammer, usually on the supply line feeding the appliance or fixture causing the noise (like a washing machine, dishwasher, or fast-closing faucet).
Q4: What is the difference between a water hammer arrestor and a shock absorber for pipes?
A4: These terms are often used interchangeably. A water hammer arrestor is a specific type of device designed to absorb the shock from water hammer. “Shock absorber for pipes” is a more general term that describes the function.
Q5: My washing machine is causing the banging. Can I just add an arrestor to the hose?
A5: Yes, this is a very common and effective solution. You’ll typically install the arrestor between the wall shut-off valve and the washing machine’s supply hose.
Q6: How do I know if my water pressure is too high?
A6: You can purchase a water pressure gauge that screws onto an outdoor faucet or hose bib. Test the pressure when no water is being used in the house. If it’s consistently above 80 PSI, it’s considered high.
Q7: Will a water hammer arrestor make my pipes silent forever?
A7: For most cases, yes. It effectively absorbs the shockwaves that cause the banging. However, if there are other underlying plumbing issues or extremely high water pressure not addressed by a PRV, some residual noise might still occur.
Q8: Do I need to shut off the water to the entire house?
A8: It’s the safest practice to shut off the main water supply. If you are working on a specific fixture with its own shut-off valve, and you are confident in your ability to drain the line sufficiently from that point, you might be able to get away with just shutting off that fixture’s valve. However, for peace of mind and to prevent any unexpected water release, shutting off the main supply is recommended.
Q9: What happens if I overtighten the arrestor?
A9: Overtightening can strip the threads, crack the fitting, or damage the arrestor itself, leading to leaks. Always hand-tighten first and then use a wrench for just a snug turn.
Q10: Can I install arrestors on my main water line?
A10: While possible, installing arrestors on main lines typically requires more advanced plumbing skills, like cutting pipe and using specific fittings. For main line issues, it’s often best to consult a professional plumber.
Conclusion
Experiencing water hammer can be a nuisance and a potential threat to your plumbing system. Fortunately, with a few basic tools and this comprehensive DIY guide, you can effectively stop pipe banging and enjoy a quieter, more reliable plumbing system. By correctly installing a residential plumbing shock arrestor, you’re not just quieting the noise; you’re protecting your pipes and appliances from the damaging effects of hydraulic shock. Whether you’re looking to add arrestor to washing machine hose or address noise from other fixtures, this guide provides the knowledge you need to tackle the job with confidence. Remember to always prioritize safety by turning off the water supply before you begin. Happy plumbing!