
Image Source: i.ytimg.com
Mount Your Power Strip Securely: How To
Can you mount a power strip? Yes, absolutely! Mounting a power strip is a great way to keep your space tidy, prevent tripping hazards, and protect your valuable electronics. This guide will walk you through various methods to securely mount your power strip, whether you want to attach it to a desk, a wall, or even under a shelf. We’ll cover everything from simple adhesive solutions to more permanent mounting options, ensuring your power strip stays put and your cables are managed effectively.
Why Mount Your Power Strip?
Keeping your power strip off the floor offers several significant benefits. Firstly, it dramatically reduces clutter. Tangled cords are not only unsightly but can also become a safety hazard, leading to trips and falls. By mounting your power strip, you create a cleaner, more organized workspace or living area.
Secondly, securing your power strip can help protect your electronic devices. When a power strip is lying on the floor, it’s more susceptible to spills, dust accumulation, and accidental damage from kicks or vacuum cleaners. Mounting it in a protected location safeguards your electronics.
Finally, it makes accessing outlets much easier. Instead of fumbling around on the floor, you have your power strip readily accessible at a convenient height. This is especially true when you want to mount a power outlet in a specific, easy-to-reach location.
Methods to Mount Your Power Strip
There are numerous ways to secure a power strip, catering to different surfaces and user preferences. We’ll explore the most common and effective methods.
1. Adhesive Mounts: The Quick and Easy Solution
For a no-fuss, non-permanent solution, adhesive mounts are an excellent choice. These typically involve strong double-sided tape or specialized adhesive strips designed to hold weight.
Using Double-Sided Tape
Many power strips come with pre-attached adhesive strips, or you can purchase heavy-duty double-sided tape separately.
Steps:
- Clean the Surface: Ensure the area where you plan to mount the power strip is clean, dry, and free of dust or grease. Use an alcohol wipe for best results.
- Prepare the Power Strip: If your power strip doesn’t have built-in adhesive, carefully apply strips of strong double-sided tape to the back of the power strip. Make sure the tape covers a significant portion of the surface for maximum hold.
- Position and Press: Carefully align the power strip with the desired mounting location. Once positioned, press firmly for at least 30 seconds to ensure good adhesion. For extra security, you can add the tape to the sides of the power strip as well.
Pros:
* Very easy and quick to install.
* No tools required.
* Non-permanent, making it ideal for renters or temporary setups.
Cons:
* Adhesive strength can vary depending on the brand and surface.
* May not be suitable for heavy power strips or in high-traffic areas where it might get bumped.
* Adhesive residue can sometimes be left behind when removed.
Using Hook-and-Loop Fasteners (Velcro)
Hook-and-loop fasteners offer a slightly more robust adhesive solution than plain tape and also allow for easier removal and reattachment.
Steps:
- Clean Surfaces: Clean both the back of the power strip and the mounting surface thoroughly.
- Attach Fasteners: Stick one side of the hook-and-loop fastener to the back of the power strip and the corresponding loop side to the desired mounting location.
- Connect: Align the power strip with the mounted loop and press firmly.
Pros:
* Allows for easy detachment and reattachment of the power strip.
* Can handle a decent amount of weight.
* Reduces the risk of adhesive residue on the mounting surface.
Cons:
* Requires cleaning both surfaces for optimal adhesion.
* The adhesive on the fasteners can weaken over time.
2. Cable Management Clips and Ties: For Desk and Surface Mounting
These are excellent for attaching a power strip to a desk, shelf, or even the underside of a cabinet. They are specifically designed to manage cables and keep them organized.
Adhesive Cable Clips
Small clips with adhesive backing can be used to hold a power strip in place, often attached to the side of a desk or shelf.
Steps:
- Clean: Clean the desk or shelf where you’ll attach the clips.
- Apply Clips: Stick the adhesive clips to the underside or side of your desk/shelf, spaced appropriately to support the power strip.
- Insert Power Strip: Slide the power strip into the clips.
Pros:
* Keeps the power strip off the desk surface, maximizing usable space.
* Excellent for cable management.
* Relatively easy to install.
Cons:
* Adhesive strength can be a limitation for heavier power strips.
* May only work for specific types of power strip casings.
Desk Mounts / Power Strip Holders
These are specialized accessories designed to clamp or screw onto the edge of a desk, providing a secure bracket for your power strip.
Steps (Vary by product):
- Choose a Mount: Select a desk mount that fits the size of your power strip.
- Attach to Desk: Follow the manufacturer’s instructions, which usually involve tightening clamps or screws.
- Secure Power Strip: Place your power strip into the holder, often with additional straps or clips to keep it firmly in place.
Pros:
* Very secure and stable, especially for heavier power strips.
* Keeps power strip easily accessible and off the desk.
* Often includes cable management features.
Cons:
* Can be more expensive than other methods.
* Requires a suitable desk edge for clamping or screwing.
3. Screw Mounts: The Most Secure and Permanent Solution
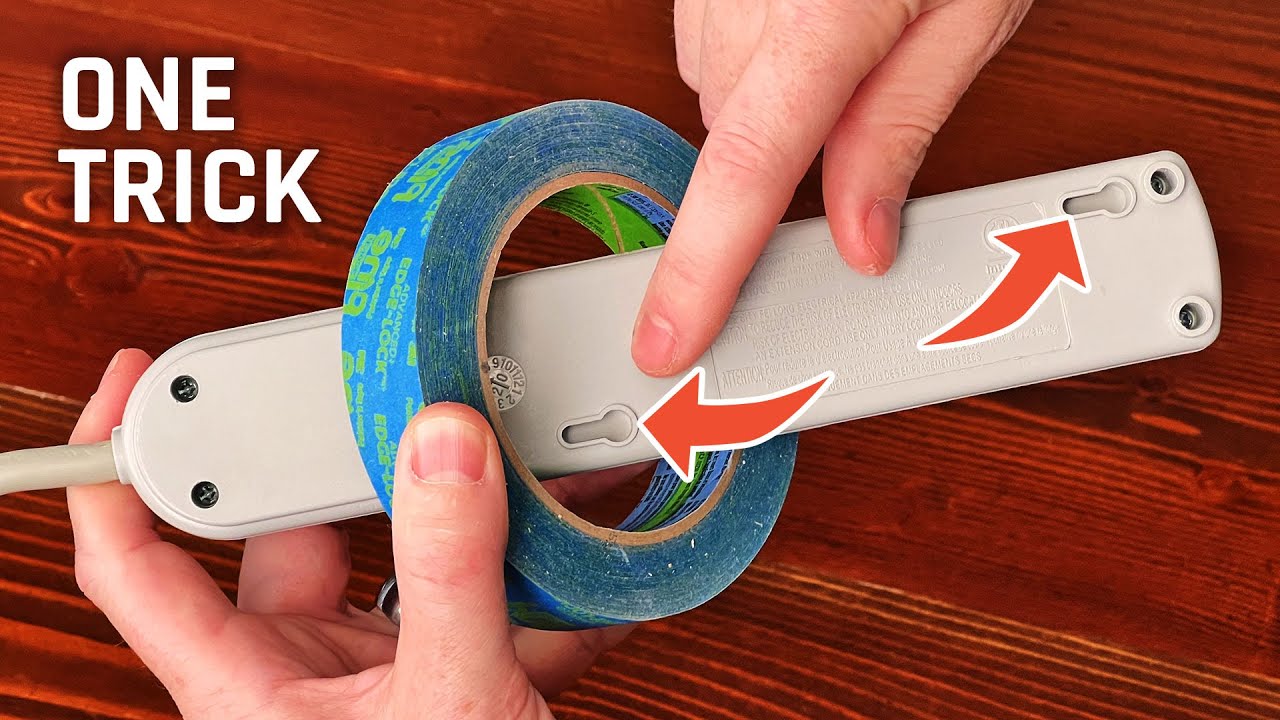
For a truly secure power strip that will not budge, screw mounts are the way to go. This method involves drilling small holes and using screws to fix the power strip in place. This is often the best approach to attach a surge protector if it has mounting holes.
Mounting Power Strips with Built-in Mounting Holes
Many power strips, especially those designed for professional use or for mounting, come with pre-drilled holes on the sides or back.
Steps:
- Position: Hold the power strip against the desired mounting surface (wall, desk, workbench) and mark the screw hole locations with a pencil.
- Drill Pilot Holes (Optional but Recommended): For hard surfaces like wood or drywall, drilling small pilot holes can prevent the material from splitting and make screwing easier. Use a drill bit slightly smaller than your screws.
- Attach Power Strip: Align the power strip with the pilot holes and use screws to firmly fix the power strip to the surface. Ensure the screws are long enough to get a good grip but not so long that they go through the other side of the surface.
Pros:
* Extremely secure and durable.
* Can support even the heaviest power strips.
* Ideal for permanent installations.
Cons:
* Requires tools (drill, screws, screwdriver).
* Creates holes in the mounting surface, making it a permanent installation.
Using Wall Mount Brackets
If your power strip doesn’t have built-in mounting holes, you can use separate mounting brackets. These are metal or plastic brackets that you screw to the wall or surface, and then the power strip slots or clips into them.
Steps:
- Select Brackets: Choose brackets that are sized to fit your power strip and can support its weight.
- Mark and Drill: Position the brackets on the wall or surface, mark the screw holes, and drill pilot holes if necessary.
- Attach Brackets: Screw the brackets securely to the surface.
- Mount Power Strip: Place your power strip into the attached brackets. Some brackets have screws to further secure the power strip.
Pros:
* Provides a very strong and reliable mounting solution.
* Can accommodate power strips without built-in mounting holes.
* Keeps the power strip off the floor and organized.
Cons:
* Requires tools and drilling.
* Involves an extra step of attaching the brackets.
4. Zip Tie and Velcro Straps: For Temporary and Versatile Mounting
These methods are great for mounting a power strip to things like desk legs, bed frames, or even electrical posts, offering a high degree of flexibility.
Zip Ties
Zip ties are a simple yet effective way to mount an extension cord or power strip to various structures.
Steps:
- Position: Wrap the power strip around the desired object (e.g., a desk leg).
- Secure with Zip Ties: Thread zip ties through any available slots on the power strip and around the object. Tighten them firmly. Use multiple zip ties for added security.
- Trim: Trim off any excess zip tie length.
Pros:
* Extremely versatile and can be used on almost any object.
* Very affordable.
* Can be easily undone and redone.
Cons:
* May not look as tidy as other methods.
* The weight capacity depends on the strength of the zip ties and how they are applied.
Velcro Straps
Similar to zip ties, Velcro straps offer a reusable and adjustable way to secure a power strip.
Steps:
- Position: Place the power strip around the object.
- Wrap Straps: Loop the Velcro straps through any openings on the power strip and around the object.
- Fasten: Press the Velcro firmly to secure.
Pros:
* Reusable and adjustable.
* Gentler on surfaces than some other methods.
* Easy to install and remove.
Cons:
* Adhesive on the Velcro can wear out over time.
* May not be as secure as screws for very heavy power strips.
Choosing the Right Mounting Location
The best place to install a power strip depends on your specific needs and the environment. Consider the following:
- Accessibility: You want your power strip to be easy to reach for plugging and unplugging devices.
- Safety: Keep power strips away from water sources (sinks, bathtubs) and direct heat. Avoid placing them in areas where they can be easily damaged by foot traffic or pets.
- Aesthetics: Consider how the mounted power strip will look and how it fits with your overall decor.
- Cable Management: Think about how the cords will run from the power strip to your devices. Mounting it strategically can minimize visible cords.
Mounting a Power Strip to a Desk
Attaching a power strip to a desk is a popular choice for home offices and workstations. This keeps your workspace clean and your devices powered up conveniently.
- Under the Desk: This is perhaps the most common and discreet method. You can use adhesive mounts, Velcro, or screw-in brackets to attach the power strip to the underside of your desk. This keeps it out of sight and prevents it from taking up valuable desk real estate.
- Back Edge of the Desk: Some desks have built-in cable management systems or channels on the back edge, perfect for housing a power strip. If yours doesn’t, you can often attach a power strip holder or use adhesive methods to secure it to the back.
- Side of the Desk: For quick access, mounting on the side of your desk can be useful, especially if you frequently plug and unplug devices. Use adhesive clips or Velcro straps for this.
Mounting a Power Strip to a Wall
Mounting a power strip to a wall is ideal for creating clean entertainment centers, tidy charging stations, or securing power for tools in a workshop.
- Near Outlets: If you’re mounting a power strip to provide more outlets in a room, position it near an existing wall outlet. Use screw mounts for a secure, long-lasting installation.
- Entertainment Centers: Mount a power strip behind your TV or audio equipment to neatly manage all the power cords. This prevents a messy tangle of wires and makes it easier to unplug devices for maintenance or moving.
- Workshops/Garages: Securely mount a power strip to a workbench or wall in your workshop to provide easy access to power for tools and equipment. Screw mounts are highly recommended here for durability.
Mounting a Power Strip Under a Shelf or Cabinet
This is a great way to hide a power strip and keep cables organized, especially in kitchens or craft rooms.
- Kitchen Counter Areas: Mount a power strip under upper cabinets to power small appliances or charging devices without cluttering the countertop. Ensure it’s kept away from sinks or areas prone to splashes.
- Craft Rooms/Workstations: Secure a power strip under a workbench or shelf to keep tools and machines powered without taking up valuable workspace.
Tips for Success When Mounting a Power Strip
- Weight Distribution: If you have a heavy power strip with many bulky adapters, consider using multiple mounting points or a more robust method like screw mounts.
- Surface Material: The type of surface you’re mounting to will influence the best method. Drywall, wood, metal, and plastic all have different adhesive and drilling requirements. Always use appropriate anchors for drywall if screwing.
- Cable Strain Relief: When plugging in devices, try to avoid putting excessive strain on the power strip’s cord or the outlets themselves. Mounting the strip can help organize cords and reduce strain.
- Check Manufacturer Recommendations: Some power strips may have specific mounting instructions or limitations. Always refer to the product’s manual.
- Consider Heat: Ensure your mounted power strip has adequate ventilation. Don’t enclose it in a tight space where heat can build up, especially if you’re plugging in high-power devices.
Popular Power Strip Mounting Accessories
Here’s a quick look at some handy accessories that can help you mount your power strip:
| Accessory Type | Description | Best For | Mounting Methods Supported |
|---|---|---|---|
| Heavy-Duty Adhesive Strips | Strong double-sided tape (e.g., Command Strips, VHB tape) | Light to medium weight power strips, smooth surfaces | Adhesive mount |
| Velcro Straps | Reusable hook-and-loop fasteners | Temporary mounting, versatile object attachment | Zip tie/Velcro strap, adhesive |
| Cable Management Clips | Small clips with adhesive backing to hold cables or power strips | Desk edges, shelves, organizing cables | Adhesive mount, clip mount |
| Power Strip Mounts/Brackets | Metal or plastic brackets designed to hold power strips | Secure, heavy-duty mounting, various surfaces | Screw mount, bracket mount |
| Desk Clamps | Devices that clamp onto the edge of a desk to hold accessories | Desks, workstations, portable setups | Desk mount |
| Zip Ties | Plastic cable ties for securing items | Posts, legs, poles, any structure with openings | Zip tie/Velcro strap |
Frequently Asked Questions (FAQ)
Q1: What is the best way to attach a power strip to a wall?
The most secure and reliable way to attach a power strip to a wall is by using screws. If the power strip has built-in mounting holes, align these with the wall and screw them in place. If not, use wall mount brackets that can be screwed to the wall, and then the power strip can be secured to the brackets. For less permanent solutions, heavy-duty adhesive strips can work on clean, smooth walls, but they may not hold as long or as securely as screws.
Q2: Can I mount a power strip using Velcro?
Yes, you can mount a power strip using Velcro, especially if it’s not excessively heavy. You’ll need to attach one side of the Velcro (hook or loop) to the back of the power strip and the other side to the mounting surface. Ensure both surfaces are clean and dry for the best adhesion. This method is good for temporary mounting or when you need to remove the power strip easily.
Q3: How do I mount a power strip to the underside of my desk?
There are several ways to attach a power strip to your desk underside. You can use strong double-sided adhesive tape, screw-in brackets that attach directly to the desk, specialized under-desk power strip holders that clamp or screw on, or even strong Velcro straps. The best method depends on the desk material, the weight of the power strip, and whether you want a permanent or temporary solution.
Q4: What if my power strip doesn’t have mounting holes?
If your power strip lacks built-in mounting holes, you have a few options. You can use adhesive mounts (like heavy-duty double-sided tape or Velcro with adhesive backing), or you can purchase separate power strip mounting brackets or holders that you screw or clamp to your desired surface, and then the power strip slots into or attaches to these. Cable management clips with adhesive backing can also sometimes hold a power strip in place on desk edges or undersides.
Q5: Is it safe to mount a power strip above a kitchen sink?
No, it is generally not safe to mount a power strip above a kitchen sink or any area where it could be exposed to water or moisture. Electrical devices and water are a dangerous combination. If you need to mount a power strip in a kitchen area, choose a location that is well away from sinks, stovetops, dishwashers, and any other potential water sources. Ensure the mounting is secure and the power strip is protected from splashes.
By following these methods and tips, you can effectively mount your power strip securely, transforming your space into a more organized, safe, and functional environment. Whether you need to fix a power strip to a workbench or simply want to tidy up your home office, there’s a mounting solution for every situation.