
Image Source: i.ytimg.com
How To Remove A Blade From A Skill Saw Step-by-Step
Can you remove a blade from a Skill Saw yourself? Yes, absolutely! With a few simple tools and careful attention to safety, you can easily remove and replace the blade on your Skill Saw. This guide will walk you through the entire process, ensuring you can perform this essential bit of skill saw maintenance with confidence.
Changing a blade on a circular saw, often referred to as a Skill Saw due to the popular brand name, is a common task for DIYers and professionals alike. Whether your current blade is dull, you need a specialized blade for a different material, or you’re simply performing routine skill saw maintenance, knowing how to properly remove and install a blade is crucial. This process not only ensures the longevity of your tool but also guarantees safe and effective operation.
This comprehensive guide will cover everything you need to know about saw blade replacement, from gathering your tools to safely securing a new blade. We’ll break down each step clearly, making the circular saw blade change accessible even for beginners. Let’s get started on how to remove a blade from a Skill Saw.
Gathering Your Essential Tools
Before you begin the saw blade installation or removal, it’s vital to have the right tools on hand. Having everything ready will make the process smoother and safer.
Here’s what you’ll need:
- Your Skill Saw: Ensure it’s unplugged and the battery is removed (if it’s a cordless model).
- Blade Removal Tool: Many circular saws come with a specific blade removal tool, often a spanner or wrench designed to fit the saw’s arbor nut. If you don’t have the original tool, a hex wrench for saw saw blade or an adjustable wrench might work, but the specific tool is always best.
- Gloves: Thick work gloves will protect your hands from sharp blades and potential debris.
- Safety Glasses: Essential for protecting your eyes from flying dust or metal fragments.
- A Clean, Flat Surface: A workbench or sturdy table is ideal for working.
- Rag or Cloth: To wipe down parts and keep things clean.
Having these items prepared will make the removing circular saw blade process much more efficient.
Preparing Your Skill Saw for Blade Removal
Safety is paramount when working with power tools. Before you even think about touching the blade, take these crucial preparation steps.
Ensuring the Saw is Safe to Work On
- Unplug the Saw: If you have a corded Skill Saw, always disconnect it from the power outlet. This is the most critical safety step to prevent accidental startup.
- Remove the Battery: For cordless Skill Saws, detach the battery pack completely. This eliminates any chance of the saw powering on unexpectedly.
- Wait for the Blade to Stop: Even after unplugging or removing the battery, the blade might still have some momentum. Allow it to come to a complete stop on its own before proceeding. Never try to stop it with your hands or any objects.
Adjusting the Blade Guard
The blade guard on your Skill Saw is a vital safety feature. For blade removal and installation, you’ll need to manipulate it.
- Lower the Guard: Most Skill Saws have a spring-loaded retractable guard. You’ll need to push this guard back, out of the way, to access the blade nut. Some saws have a lever or a slot designed for this purpose.
- Hold the Guard in Place: You’ll likely need to hold the guard in its retracted position while you loosen the blade nut. Be mindful of your fingers’ proximity to the blade’s teeth.
Proper blade guard adjustment is key to accessing the blade securely and safely.
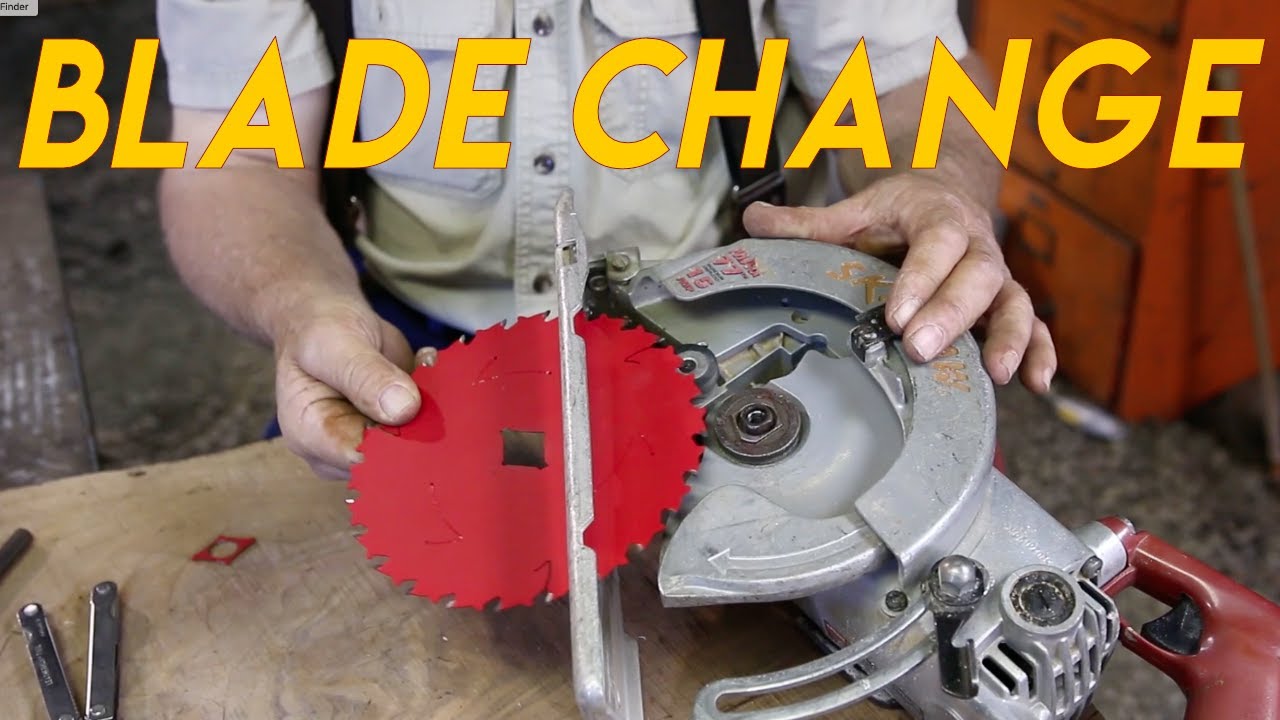
The Step-by-Step Process of Removing the Blade
Now that your saw is prepared and safe, let’s dive into the actual removing circular saw blade process.
Step 1: Locate the Arbor Nut
The arbor nut is the fastener that holds the blade onto the saw’s spindle. It’s typically located on the side of the saw blade, closest to the motor housing.
Step 2: Engage the Spindle Lock (If Applicable)
Many Skill Saws have a spindle lock button or pin. This mechanism locks the spindle in place, preventing it from spinning while you try to loosen the arbor nut.
- Locate the Button: Look for a small button, often red or black, on the body of the saw, usually near the blade housing.
- Press and Hold: Press and hold this button firmly. You might hear or feel a click as the spindle locks.
This step is crucial because it prevents the arbor nut from turning with the spindle, making it much easier to loosen.
Step 3: Loosen the Arbor Nut
This is where your blade removal tool or appropriate wrench comes in.
- Fit the Tool: Place the correct end of your blade removal tool or hex wrench onto the arbor nut. Ensure it fits snugly to avoid stripping the nut.
- Turn Counter-Clockwise: To loosen the nut, you need to turn it counter-clockwise (lefty-loosey). Apply steady, firm pressure. Remember to keep the spindle lock engaged if your saw has one.
- Remove the Nut: Once loosened, unscrew the arbor nut completely by hand. Be careful not to drop it, as it’s a small but important part.
Step 4: Remove the Outer Flange or Washer
After removing the arbor nut, you’ll typically find an outer flange or washer sitting against the blade.
- Slide it Off: Gently slide this flange off the spindle. It should come off easily. Sometimes, a bit of wiggling might be necessary.
Step 5: Remove the Old Blade
With the arbor nut and outer flange removed, the old blade is now free.
- Grasp the Blade Carefully: Using your gloved hands, carefully grasp the blade.
- Pull it Away: Pull the blade straight off the spindle. Be mindful of the sharp teeth.
- Place it Safely: Immediately place the removed blade in a safe location, perhaps in its original packaging or a designated blade holder, to prevent injury.
Congratulations! You have successfully removed the blade from your Skill Saw. This is the most involved part of changing a skill saw blade.
Table: Common Skill Saw Blade Sizes and Their Applications
| Blade Diameter (Inches) | Common Applications | Tooth Count (Typical Range) | Material Focus |
|---|---|---|---|
| 7 1/4 | General carpentry, framing, plywood, dimensional lumber, basic cuts | 24-40 | Wood |
| 6 1/2 | Smaller corded saws, compact cordless saws, lighter duty cutting, plywood | 24-40 | Wood |
| 8 1/4 | Larger corded saws, heavier duty cutting, thicker lumber, construction sites | 24-40 | Wood |
| 10 | Larger portable saws, specialized applications, often for fine woodworking | 40-80 | Wood, Plywood, Laminates |
| Specialty Blades | Masonry, metal, plastic, demolition blades with varying tooth counts and materials | Varies Widely | Specific Materials |
This table provides a general overview. Always check your Skill Saw’s manual for the specific blade sizes it supports.
Preparing for Saw Blade Installation
Once the old blade is off, you might want to do a quick inspection and cleaning before putting on a new one.
Inspecting the Spindle and Components
- Check the Spindle: Look at the spindle where the blade mounts. Ensure it’s clean, free from rust or damage, and the threads are in good condition.
- Examine the Flanges: Check the inner and outer flanges for any nicks, dents, or debris. Clean them with a rag.
Cleaning the Blade Area
- Wipe Down: Use a clean rag to wipe away any sawdust, debris, or oil that might have accumulated on the spindle, flanges, or inside the blade guard. A clean mounting surface ensures a secure fit.
The Step-by-Step Process of Installing a New Blade
Saw blade installation is essentially the reverse of removal. Follow these steps carefully.
Step 1: Place the New Blade Onto the Spindle
- Identify Blade Direction: Most circular saw blades have an arrow indicating the direction of rotation. This arrow should point in the direction the saw blade spins when the saw is running (usually towards the front of the saw).
- Mount the Blade: Carefully place the new blade onto the spindle, ensuring it sits flush against the inner flange.
Step 2: Reattach the Outer Flange
- Position the Flange: Slide the outer flange back onto the spindle, on top of the blade. Make sure it’s seated correctly and the blade is still properly aligned.
Step 3: Screw on the Arbor Nut
- Start Threading: Begin threading the arbor nut onto the spindle by hand. Turn it clockwise (righty-tighty).
- Hand-Tighten: Tighten the nut as much as you can by hand.
Step 4: Tighten the Arbor Nut with the Tool
This is the critical step to ensure the blade is securely fastened.
- Engage Spindle Lock (Again): If your saw has a spindle lock, press and hold it.
- Use the Blade Removal Tool: Fit your blade removal tool or appropriate wrench onto the arbor nut.
- Turn Clockwise: Turn the nut clockwise to tighten it firmly. You don’t need to overtighten it to the point of stripping the threads, but it needs to be snug and secure. A good tightening motion should suffice.
- Release Spindle Lock: Once the nut is tight, release the spindle lock.
Circular saw blade change is now complete!
Step 5: Test the Blade Guard and Spindle
- Check Guard Operation: Gently push the blade guard back and ensure it retracts smoothly and springs back into place when released.
- Spin the Blade (Manually): With the saw still unplugged/battery removed, manually spin the blade to ensure it rotates freely and doesn’t wobble. Also, check that it doesn’t rub against the blade guard or other parts of the saw.
Safety Checks After Blade Installation
Before you power up your Skill Saw, perform these final safety checks.
- Double-Check Tightness: Give the arbor nut one last check with the tool to ensure it’s still snug.
- Blade Clearance: Make sure the blade is not rubbing against the blade guard or the saw base at any point during its rotation.
- No Loose Parts: Ensure no tools or rags are left near the blade or in the saw’s housing.
Common Issues and Troubleshooting During Blade Removal/Installation
While the process is straightforward, you might encounter a few snags.
Stubborn Arbor Nut
If the arbor nut is very tight or corroded:
- Penetrating Oil: Apply a small amount of penetrating oil (like WD-40) to the threads of the arbor nut and let it sit for a few minutes.
- Impact: Sometimes, a gentle tap on the wrench while applying pressure can help break it loose.
- Professional Help: If it still won’t budge, it might be time to consult a professional tool repair service. Forcing it too hard can damage the spindle.
Stripped Arbor Nut or Spindle Threads
If the threads on the nut or spindle are damaged:
- Replace Parts: You will need to replace the arbor nut and potentially the spindle itself. This can be a more involved repair.
Blade Wobble After Installation
If the blade wobbles:
- Recheck Flanges: Ensure the inner and outer flanges are seated correctly and are not warped or damaged.
- Blade Centering: Verify the blade is centered on the spindle.
- Blade Quality: The blade itself might be defective. Try a different blade to see if the issue persists.
Maintaining Your Skill Saw for Longevity
Proper skill saw maintenance goes beyond just changing the blade.
- Regular Cleaning: After each use, brush or blow away sawdust and debris from the saw, especially around the blade and motor vents.
- Blade Care: Keep your blades clean and sharp. A dull blade not only cuts poorly but also puts more strain on your saw motor. Store blades properly to prevent damage.
- Lubrication: Some parts of your saw may require occasional lubrication, as specified in your owner’s manual.
- Inspect Cord/Battery: For corded saws, check the power cord for any damage. For cordless saws, ensure the battery contacts are clean and the battery holds a charge.
Frequently Asked Questions About Skill Saw Blade Changes
Q1: How often should I change my Skill Saw blade?
A1: You should change your Skill Saw blade when it becomes dull. Signs of a dull blade include slower cutting, excessive heat generation, rough cut edges, and the saw straining to cut through materials. This can depend on usage frequency and the types of materials you cut.
Q2: Can I use any circular saw blade on my Skill Saw?
A2: No, you must use a blade that is the correct diameter and arbor hole size for your specific Skill Saw model. Check your owner’s manual for compatibility. Using the wrong size can be dangerous and damage your saw.
Q3: What is a blade guard adjustment tool?
A3: A blade guard adjustment tool typically refers to a specialized tool designed to help you safely retract and hold the blade guard out of the way to access the blade for removal or installation. Some saws have built-in mechanisms, while others may require a separate tool or simply your hand to push the guard back.
Q4: Do Skill Saws come with a tool to remove the blade?
A4: Most Skill Saws, especially newer models, do come with a dedicated blade removal tool, often a spanner wrench that fits the arbor nut, or a hex wrench for a specific type of arbor bolt. If you can’t find it, it might be stored with the saw or battery charger.
Q5: How tight should the saw blade nut be?
A5: The saw blade nut should be tightened firmly, but not so much that you strip the threads. The spindle lock mechanism is designed to help secure the blade, so once it feels snug and secure with the spindle lock engaged, it’s usually tight enough. Over-tightening can damage the threads or the spindle.
By following these detailed steps, you can confidently perform saw blade replacement on your Skill Saw, ensuring your tool is always ready for your next project and that your skill saw maintenance is up to par. Remember, safety first, and happy cutting!