
Can I wire a 220 circuit breaker myself? Yes, with proper knowledge, safety precautions, and the right tools, you can wire a 220 circuit breaker yourself. However, electrical work can be dangerous, and if you’re unsure at any point, it’s best to consult a qualified electrician. This guide will walk you through the process of wiring a double-pole breaker and help you with 220V home wiring.
Powering your home with 220 volts opens up possibilities for larger appliances like electric dryers, ovens, and welders. This guide provides a detailed 220 circuit wiring guide to help you safely and correctly install a 220-volt circuit. We’ll cover everything from selecting the right breaker to making the final connections for 240 volt appliance wiring.
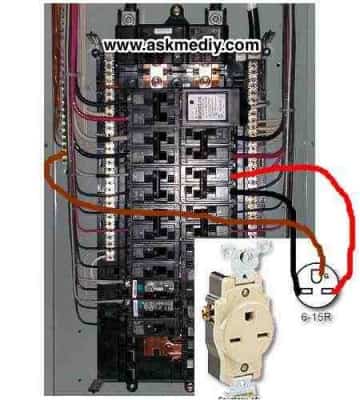
Image Source: www.askmediy.com
Deciphering the Basics of 220 Volt Circuits
Before we begin, let’s clarify what “220 volt” really means in residential wiring. In North America, the standard household voltage is 120/240 volts. This split-phase system uses two “hot” wires, each carrying 120 volts relative to a neutral wire, and they are 180 degrees out of phase with each other. When these two 120-volt “hot” wires are combined, you get 240 volts. Therefore, when we talk about 220V, we’re generally referring to a 240-volt circuit.
Key Components for Your 220V Project
- Circuit Breaker: This is the safety device that protects your wiring and appliances from overcurrents. For a 240-volt circuit, you’ll need a double-pole breaker.
- Wire: The size of the wire (gauge) depends on the amperage of the circuit and the appliance you’re powering.
- Conduit (Optional but Recommended): Protects the wiring, especially in exposed areas.
- Electrical Box: Houses the breaker and wire connections.
- Connectors/Wire Nuts: For securing wire splices.
- Tools: Wire strippers, screwdrivers, voltage tester, pliers, fish tape (if running wire through walls).
Why a Double-Pole Breaker?
A single-pole breaker handles one “hot” wire and provides 120 volts. A double-pole breaker has two poles, meaning it connects to both “hot” wires from your electrical panel. This allows it to switch off both hot wires simultaneously, interrupting the 240-volt supply. This is crucial for safety, ensuring both sides of the 240-volt circuit are de-energized.
Planning Your 220 Circuit Installation
Proper planning is the most critical step. Rushing this phase can lead to errors and dangerous situations. This section helps you plan for 220 amp breaker wiring and other 240-volt needs.
Determining Your Appliance’s Needs
The first step is to know what appliance you’re connecting. Check the appliance’s nameplate or manual for its voltage and amperage requirements. This will dictate the breaker size and wire gauge you need. For example, a standard electric dryer might need a 30-amp 240-volt circuit, while an electric range could require a 50-amp 240-volt circuit. This is essential for 240 volt appliance wiring.
Selecting the Right Wire Gauge
Wire gauge is measured in American Wire Gauge (AWG), where lower numbers indicate thicker wires. Thicker wires can carry more current with less resistance, preventing overheating.
Table 1: General Wire Gauge and Breaker Size Recommendations (Based on NEC guidelines for copper wire)
| Amperage | Minimum Copper Wire Gauge (AWG) | Maximum Circuit Breaker Size |
|---|---|---|
| 15A | 14 | 15A |
| 20A | 12 | 20A |
| 30A | 10 | 30A |
| 40A | 8 | 40A |
| 50A | 6 | 50A |
| 60A | 6 | 60A |
| 70A | 4 | 70A |
| 80A | 4 | 80A |
| 90A | 3 | 90A |
| 100A | 2 | 100A |
- Important Note: Always consult the National Electrical Code (NEC) or local building codes for the most accurate and up-to-date requirements. The wire gauge must be sized appropriately for the breaker’s rating. For instance, if your appliance requires 30 amps, you’ll use a 30-amp breaker and 10-gauge wire. This is crucial for wire a dryer outlet or any other 240V appliance.
Locating Your Electrical Panel
You’ll be installing a circuit breaker panel or adding a breaker to an existing one. Ensure your panel has sufficient capacity and available slots for a double-pole breaker. If your panel is full or old, you might need an electric panel upgrade 220.
Choosing the Breaker Location
Decide where the new outlet or appliance connection will be. This might involve running new wire from the panel to the desired location. Consider the path of the wire and whether you’ll need conduit for protection.
Safety First: Essential Precautions
Electricity is powerful and dangerous. Always prioritize safety.
- Turn Off Power: Before touching any wiring, always switch off the main power to your electrical panel at the main breaker. Verify the power is off using a non-contact voltage tester.
- Wear Safety Gear: Use insulated gloves, safety glasses, and wear non-conductive footwear.
- Work in a Dry Area: Ensure the work area is dry and free from moisture.
- Know Your Limits: If you’re not comfortable with any part of the process, hire a qualified electrician. This is vital for any 220V home wiring project.
Step-by-Step Guide to Wiring a 220 Circuit Breaker
This section details the process of wiring a double-pole breaker and connecting a 240v outlet.
Step 1: Shutting Off Power to the Panel
This is the absolute first step. Locate the main breaker in your electrical panel and switch it to the “OFF” position. Double-check with your voltage tester on the main bus bars inside the panel to confirm that the power is indeed off.
Step 2: Opening the Electrical Panel
Carefully remove the panel cover. You’ll see rows of single-pole breakers and possibly some double-pole breakers.
Step 3: Installing the Double-Pole Breaker
- Locate Two Adjacent Slots: Double-pole breakers are wider than single-pole breakers and occupy two adjacent slots in the panel. These slots are designed to accept the breaker’s clip.
- Snap the Breaker into Place: Align the breaker with the two open slots and press firmly until it snaps securely onto the panel’s bus bar. Ensure it’s seated properly. The breaker’s handle should be in the “OFF” position.
Step 4: Running the Wiring
This is where the planning from earlier comes into play. You’ll be running the appropriate gauge wire from the electrical panel to the location of your new 240-volt outlet or appliance.
- Wire Types: For most 240V circuits, you’ll use NM-B cable (non-metallic sheathed cable) or use individual wires (THHN) within conduit.
- Color Coding: In modern wiring, the two “hot” wires are typically black and red. The ground wire is bare copper or green. If you’re using older wiring, hot wires might be black and white (where the white wire is re-identified as hot with black tape).
- Securing the Wire: Use cable staples to secure the wire to studs or joists as you run it, following code requirements. If running wire through walls, use a fish tape if necessary.
Step 5: Connecting the Wires to the Double-Pole Breaker
This is a critical step for 240 volt breaker installation.
- Identify Breaker Terminals: A double-pole breaker has two terminal screws on top for the “hot” wires and a common clip or linkage that connects the two poles.
- Connect the Hot Wires: Strip the insulation from the ends of your two “hot” wires (usually black and red). Connect one hot wire to each terminal screw on the breaker. Tighten the screws securely. Ensure the wires are properly seated under the screw heads.
- Connect the Ground Wire: The ground wire (bare copper or green) connects to the ground bus bar in the panel. This is a separate bar that runs along the side of the panel. Locate an available terminal on the ground bus bar and connect the ground wire securely.
Step 6: Connecting the Outlet or Appliance
Now, you’ll connect the wires to the receptacle or directly to the appliance.
Connecting a 240V Outlet (Receptacle)
- Outlet Terminals: A 240-volt outlet will have terminals for the two hot wires, a ground terminal, and sometimes a neutral terminal (though many 240V-only appliances do not use a neutral).
- Strip Wires: Strip the ends of the two hot wires and the ground wire.
- Connect Hot Wires: Connect the two hot wires (black and red) to the two brass or dark-colored terminals on the outlet. The exact position may vary by outlet type, but typically the two hot wires go to the two “hot” terminals.
- Connect Ground Wire: Connect the ground wire to the green ground screw on the outlet.
- Secure the Outlet: Carefully push the wired outlet back into the electrical box and secure it with screws. Attach the cover plate.
This is how you achieve connecting a 240v outlet.
Direct Appliance Connection
Some appliances, like water heaters or HVAC units, may not use a standard receptacle. Instead, they might have a junction box where you directly connect the wiring. Follow the appliance manufacturer’s instructions and the wiring diagram provided. Ensure all connections are secure using appropriate connectors (like wire nuts) and that the ground wire is properly connected.
Step 7: Final Checks and Turning On Power
- Double-Check Connections: Review all your connections to ensure they are tight and correct. Make sure no bare wires are exposed except for the ground.
- Replace Panel Cover: Once you’re confident all connections are secure, replace the electrical panel cover.
- Restore Power: Go back to your main breaker and switch the main power back on.
- Test the Circuit: Turn on the newly installed double-pole breaker. Use your voltage tester to confirm you have 240 volts at the outlet or appliance connection.
Specific Scenarios: Wiring a Dryer Outlet and More
Let’s look at common applications for 220V home wiring.
How to Wire a Dryer Outlet
For a typical electric dryer, you’ll need a 240-volt, 30-amp circuit.
- Breaker: Install a 30-amp double-pole breaker in your panel.
- Wire: Run 10-gauge, 3-wire cable (two hot wires, one ground) from the panel to the dryer location. If your dryer also requires 120V for controls, you might need a 4-wire cable (two hot, one neutral, one ground), which will require a different breaker configuration and outlet.
- Outlet: Install a NEMA 10-30 (older, 3-prong) or NEMA 14-30 (newer, 4-prong) 240-volt, 30-amp receptacle in a dryer box.
- Connections: Connect the two hot wires (black and red) to the brass terminals. Connect the ground wire (bare copper) to the green terminal. For a 4-wire connection, the neutral wire (white) connects to the silver terminal.
240 volt appliance wiring for Electric Ranges and Ovens
Electric ranges and ovens typically require a higher amperage, often 40 or 50 amps, and might have specific wiring requirements. Always refer to the appliance’s manual. You’ll likely use a 40-amp or 50-amp double-pole breaker and appropriately sized wire (8-gauge for 40A, 6-gauge for 50A) for 240 volt appliance wiring.
Adding a Circuit to an Existing Panel
If your panel has space and capacity, the process involves:
1. Turning off the main breaker.
2. Removing the panel cover.
3. Installing the double-pole breaker in two adjacent slots.
4. Running the new circuit wires from the panel to the appliance location.
5. Connecting the hot wires to the breaker terminals.
6. Connecting the ground wire to the ground bus bar.
7. Connecting the other end of the wires to your outlet or appliance.
8. Replacing the panel cover and restoring power.
Electric Panel Upgrade 220 Considerations
If your existing panel is old, undersized, or lacks space, you might need a complete electric panel upgrade 220. This is a more involved process that typically requires a licensed electrician. It ensures your home has adequate power for modern appliances and meets current safety codes.
Common Issues and Troubleshooting
- Breaker Trips Immediately: This indicates a short circuit. Double-check your wiring for any accidental contact between wires or between a wire and the metal box. Ensure hot wires are not touching the ground or neutral.
- No Power: Verify the main breaker is on and the double-pole breaker is fully engaged. Use a voltage tester to trace the power flow. Check all connections.
- Overheating Wires/Breaker: This usually means the wire gauge is too small for the amperage, or the breaker is undersized, or there’s a loose connection. Turn off power immediately and re-evaluate your wire and breaker choices.
Frequently Asked Questions (FAQ)
- Q: What is the difference between 220V and 240V?
A: In residential settings, these terms are often used interchangeably to refer to the higher voltage supplied by two 120-volt “hot” wires. The actual standard voltage is 240 volts. - Q: Can I use a single-pole breaker for a 240V circuit?
A: No, a single-pole breaker only switches one hot wire. A 240V circuit requires a double-pole breaker to safely disconnect both hot wires simultaneously. - Q: Do I need a neutral wire for all 240V circuits?
A: Not necessarily. Appliances that use only 240V, like some heaters or motors, do not require a neutral wire. Appliances that need both 240V and 120V (like a modern electric dryer or range with electronic controls) will require a neutral. This will dictate using a 4-wire cable and a different type of outlet. - Q: How do I know what wire gauge to use?
A: Always check the amperage requirements of your appliance and the recommendations in the National Electrical Code (NEC) or local building codes. The table provided in this guide offers general recommendations, but always verify for your specific application. - Q: Is it safe to wire a 220V circuit myself?
A: It can be safe if you follow all instructions, safety precautions, and code requirements. However, electrical work carries inherent risks. If you are not confident or experienced, it is always best to hire a licensed electrician.
By carefully following these steps and prioritizing safety, you can successfully wire a 220 circuit breaker for your home’s needs. Remember that correct 240 volt breaker installation is crucial for the safety and proper functioning of your appliances.