
Can I wire an extension cord plug myself? Yes, with the right tools, knowledge, and adherence to safety precautions, you can safely wire an extension cord plug. This guide will walk you through the process of wiring a new plug onto an extension cord, whether you’re rewiring a power cord, looking to replace an appliance plug, or need to know how to fix a frayed extension cord by installing a new cord end. We’ll cover everything from gathering your supplies to making the final connections for reliable electrical cord repair and ensuring proper electrical safety plug replacement.
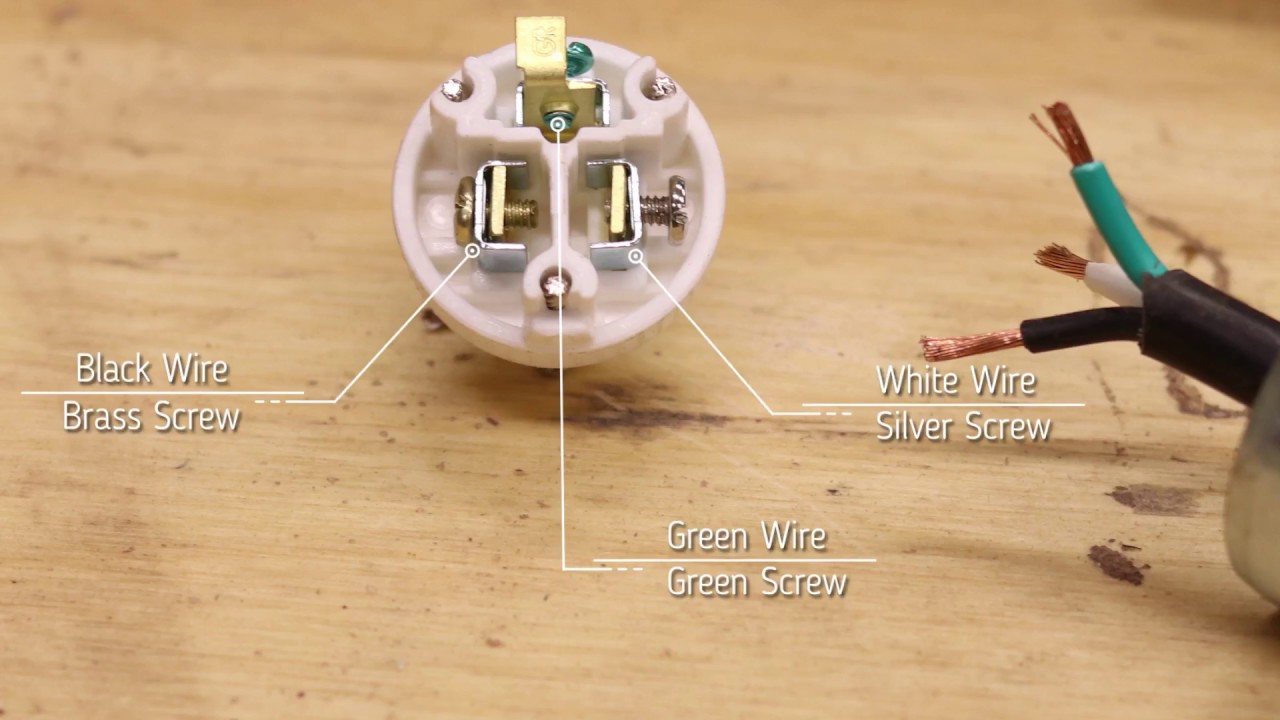
Image Source: i.ytimg.com
Why You Might Need to Wire a New Plug
Extension cords are workhorses, but they can suffer wear and tear. A damaged plug is a common issue that can render an otherwise perfectly good cord useless, and more importantly, dangerous.
- Physical Damage: Plugs can crack, break, or have their prongs bent or snapped off due to accidental impacts or improper use.
- Frayed Wires: The connection point where the cord enters the plug is susceptible to fraying over time, exposing bare wires. This is a serious safety hazard.
- Corrosion: In damp environments, the metal contacts within the plug can corrode, leading to poor conductivity or failure.
- Outdated Plugs: Older appliances or cords might have plugs that don’t meet current safety standards or have polarized prongs that are necessary for certain devices.
When you encounter these issues, installing a new cord end is often a more economical and environmentally friendly solution than buying a whole new extension cord. This process is also key when you need to replace appliance plug components on devices that have integrated cords.
Gathering Your Tools and Materials
Before you begin wiring a male plug or connecting extension cord wires, ensure you have all the necessary items. Safety first!
Essential Tools:
- Wire Strippers/Cutters: These are crucial for safely removing insulation from wires without damaging the conductors. Look for ones with sharp, precise blades.
- Screwdriver Set: You’ll likely need a Phillips head and a flathead screwdriver, often small ones, to open and close the plug housing.
- Pliers (Needle-nose): Useful for bending wire loops and gripping small components.
- Utility Knife or Box Cutter: For making initial cuts on the outer jacket of the extension cord if needed.
- Heat Shrink Tubing or Electrical Tape: For insulating individual wire connections if you’re not using pre-made connectors.
- Multimeter (Optional but Recommended): To test continuity and ensure proper connections after the repair.
Materials:
- Replacement Plug: This is the most critical component. Ensure it’s rated for the amperage and voltage of your extension cord. For most common household extension cords, a 15-amp plug is standard. Look for plugs designed for electrical cord repair or connecting extension cord wires specifically. They often have screw terminals for easy wire attachment.
- New Extension Cord (if replacing the entire cord): If the cord itself is damaged beyond repair, you’ll need a new cord rated for the intended use.
Safety Precautions: Prioritizing Your Well-being
Working with electricity, even low-voltage AC, demands respect and caution.
Crucial Safety Rules:
- Unplug Everything: Always unplug the extension cord from the power source before starting any work. This cannot be stressed enough.
- Work in a Dry Area: Ensure your workspace is dry and well-lit. Avoid working in damp basements, garages, or outdoors during rain.
- Inspect the New Plug: Make sure the replacement plug is in good condition and suitable for the cord’s gauge (thickness) and intended use.
- Know Your Wire Colors: Standard household wiring in North America typically uses Black (hot), White (neutral), and Green or Bare Copper (ground). Understanding this is vital for connecting extension cord wires correctly.
- Don’t Overload: Never use an extension cord or plug that is rated for lower amperage than the appliance it’s powering.
- If in Doubt, Don’t Do It: If you feel uncomfortable or unsure at any point, it’s best to consult a qualified electrician or purchase a new, pre-assembled extension cord.
Step-by-Step Guide: Wiring Your Extension Cord Plug
This section details the process of wiring a male plug and installing a new cord end.
Step 1: Inspect and Prepare the Extension Cord
If you’re rewiring a power cord or fixing a frayed end, you’ll need to address the damage.
- Identify the Damaged End: Locate the plug that needs replacement or the section of the cord that is damaged.
- Cut the Old Plug Off (if necessary): If the plug is severely damaged, you’ll need to cut it off cleanly. Use sharp cutters or a utility knife. Cut the cord about an inch or two behind the old plug, ensuring you’re working with undamaged cord material.
- Strip the Outer Jacket: Carefully use a utility knife or wire strippers to remove the outer rubber or plastic jacket of the extension cord. You want to expose enough of the inner wires to work with, typically about 1 to 1.5 inches. Be careful not to nick the insulation of the individual wires inside.
- Examine Inner Wires: You should now see three insulated wires: typically black (hot), white (neutral), and green or bare copper (ground). Check that these inner wires and their insulation are also in good condition. If they are damaged, you might need to cut back further or consider replacing the entire cord.
Step 2: Preparing the Wires for Connection
This is where precision is key for a secure connection.
- Strip Inner Wire Insulation: Using your wire strippers, carefully remove about ½ to ¾ inch of insulation from the end of each of the three inner wires (black, white, and ground). Ensure you only strip the insulation, not the metal conductor itself.
- Twist Strands (if applicable): If the wire conductors are stranded (made of many thin strands), twist them together tightly. This prevents stray strands from causing short circuits.
- Form Loops (for screw terminals): Most replacement plugs use screw terminals. For a secure connection, you’ll want to form a small hook or loop at the end of each wire conductor that can wrap around the screw terminal. Use needle-nose pliers to help create these loops. The loop should be formed in a clockwise direction so that when you tighten the screw, it pulls the loop tighter.
Step 3: Connecting the Wires to the New Plug
This is the core of connecting extension cord wires and performing electrical safety plug replacement.
- Open the New Plug Housing: Most replacement plugs have a housing that can be unscrewed to reveal the terminals.
- Identify Terminals: Look inside the plug. You’ll typically find three screw terminals:
- Hot (Black Wire): This is usually connected to the terminal screw that is closest to the narrower blade of the plug (if it’s a polarized plug) or the right-hand side blade as you look at the face of the plug. Often, this terminal is brass or dark-colored.
- Neutral (White Wire): This connects to the terminal screw that is closest to the wider blade of a polarized plug or the left-hand side blade. This terminal is often silver or lighter colored.
- Ground (Green or Bare Copper Wire): This connects to the terminal screw associated with the round ground pin. This terminal is almost always green.
- Attach the Ground Wire First: Wrap the loop of the ground wire (green or bare copper) around the green screw terminal in a clockwise direction. Tighten the screw firmly. Ensure no bare copper wire is exposed outside the terminal.
- Attach the Neutral Wire: Wrap the loop of the white wire around the silver (or lighter colored) screw terminal, again in a clockwise direction. Tighten the screw securely.
- Attach the Hot Wire: Wrap the loop of the black wire around the brass (or darker colored) screw terminal. Tighten the screw firmly.
- Check for Stray Strands: After tightening all screws, visually inspect that no individual wire strands are sticking out and touching other terminals or the metal casing of the plug. This is a critical step for preventing short circuits.
Step 4: Securing the Cord and Reassembling the Plug
Proper strain relief is essential to prevent wires from being pulled loose.
- Secure the Cord Clamp: Most plugs have a cord clamp or strain relief mechanism inside the housing. This is designed to grip the outer jacket of the cord, so the wires themselves are not bearing the strain if the cord is tugged. Position the outer jacket of the cord so that it is held firmly by this clamp.
- Tighten Clamp Screws: If your plug has a clamp with screws, tighten them securely onto the outer jacket. Ensure the jacket is gripped tightly but not so hard that it damages the cord.
- Close the Plug Housing: Carefully place the housing back over the internal components and screw it together. Make sure no wires are pinched between the housing halves.
- Final Inspection: Once the plug is reassembled, give it a gentle tug to ensure it feels secure and the cord clamp is holding the cord properly.
Step 5: Testing Your Work
This is the moment of truth to confirm your electrical cord repair was successful.
- Use a Multimeter (Recommended):
- Set your multimeter to the continuity setting (often indicated by a sound wave symbol or “beep”).
- With the plug disconnected from power, test continuity between the corresponding blades of the plug and the wires inside the cord. For example, touch one probe to the hot blade and the other to the end of the black wire inside the cord (if accessible, or you can carefully probe the conductor if you know where it terminates inside the device). You should get a beep or a low resistance reading. Repeat for the neutral and ground wires.
- Test for shorts: Ensure there is no continuity between the hot and neutral wires, hot and ground wires, or neutral and ground wires.
- Power Test: Plug the newly wired extension cord into a known working outlet. Then, plug a small, low-power device (like a lamp) into the extension cord. If the device powers on, your repair is likely successful.
When to Seek Professional Help
While rewiring a power cord or replacing appliance plug components can be a manageable DIY task, there are instances where professional help is necessary.
- Heavy-Duty Cords: Cords for high-power equipment (like welders, large shop tools, or RVs) often use thicker gauge wires and different types of plugs and receptacles that may require specialized tools and knowledge.
- Damaged Cord Interior: If the damage extends to the inner wires (nicks, cuts, or brittleness), it’s safer to replace the entire cord.
- Unfamiliarity with Wiring: If you are uncertain about wire colors, terminal identification, or the overall process, it’s always better to err on the side of caution and hire an electrician.
- Sparking or Overheating: If you encounter sparking or excessive heat when using the cord after the repair, unplug it immediately and seek professional assistance.
Frequently Asked Questions (FAQ)
Here are some common questions related to wiring extension cord plugs:
Q1: What is the most common mistake people make when wiring a plug?
A1: The most common mistakes are incorrect wire connections (connecting hot to neutral, etc.) and failing to secure the cord clamp properly, which can lead to wires pulling loose and creating a hazardous situation.
Q2: Can I use crimp connectors for extension cord wires?
A2: While crimping wire connectors is a valid method for joining wires in some electrical applications, it’s generally recommended to use screw terminals directly on the plug for connecting extension cord wires to the plug itself. If you must splice wires within the cord, use appropriately rated wire nuts or butt connectors with heat shrink tubing, ensuring they are rated for outdoor use or the specific environment if applicable.
Q3: How do I know if my extension cord is the correct gauge for my appliance?
A3: Extension cords are rated in gauge (AWG – American Wire Gauge). Thicker wires have a lower AWG number. Heavy-duty appliances require thicker cords (lower AWG numbers, e.g., 12 or 10 gauge) to handle the current safely. Check the appliance’s power requirements (watts or amps) and the extension cord’s rating.
Q4: What does it mean to “polarize” a plug?
A4: A polarized plug has one blade that is wider than the other. This ensures the plug can only be inserted into the outlet in one orientation, connecting the neutral wire to the wider slot and the hot wire to the narrower slot in the outlet, which enhances safety. When wiring a male plug, ensure you connect the white wire to the wider blade’s terminal and the black wire to the narrower blade’s terminal.
Q5: Is it safe to repair a frayed extension cord by just taping it?
A5: No, simply taping a frayed or damaged extension cord is not safe. Exposed wires are a serious shock and fire hazard. You must either replace the damaged section of cord or, more practically, install a new cord end or replace appliance plug components to properly insulate and protect the wires.
By following these steps and safety guidelines, you can effectively perform electrical cord repair by wiring a male plug and giving new life to your extension cords, ensuring both functionality and safety. Remember, when in doubt, always prioritize safety and consult a professional.