
Can I wire up a circuit breaker box myself? While some homeowners may attempt this, it’s highly recommended to hire a qualified, licensed electrician for circuit breaker box wiring. This is a complex and potentially dangerous task that involves working with high voltage electricity. Mistakes can lead to serious injury, fire, or damage to your home’s electrical system.
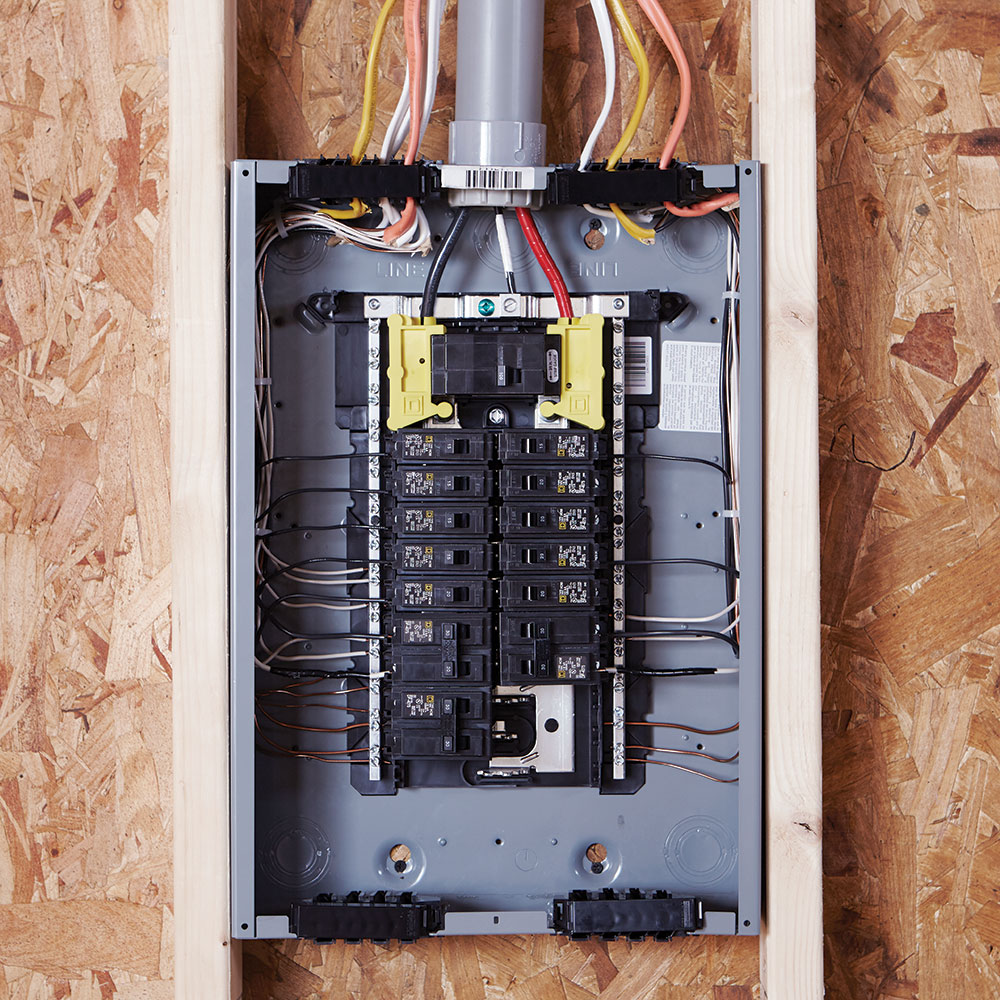
Image Source: contentgrid.homedepot-static.com
Introducing the Electrical Panel: Your Home’s Power Hub
The electrical panel, often called a breaker box or fuse box, is the heart of your home’s electrical system. It’s where the electricity from the utility company enters your house and is distributed to various circuits. Each circuit is protected by a circuit breaker, a safety device that automatically shuts off power if it detects an overload or a fault. If you’re looking to replace an old fuse box replacement or upgrade your home’s power capacity, you’ll be dealing with the load center or service panel. This guide will walk you through the general process, but always remember that safety and professional expertise are paramount.
Why an Electrical Panel is Crucial
Think of your electrical panel as a sophisticated traffic controller for electricity.
- Distribution: It takes the single, high-voltage feed from the power company and splits it into multiple, lower-voltage circuits.
- Protection: Each circuit breaker acts like a tiny guardian, monitoring the flow of electricity. If too much current flows (like when you plug in too many appliances), the breaker trips, stopping the flow to prevent overheating wires and potential fires.
- Control: It allows you to easily turn power on or off to specific parts of your home for maintenance or in emergencies.
Old vs. New: The Evolution from Fuse Boxes to Breaker Panels
For decades, homes relied on fuse boxes. These used screw-in fuses with metal filaments that would melt and break the circuit when overloaded. While functional, they were less convenient and often led to people using higher-rated fuses than recommended, creating fire hazards.
The transition to a circuit breaker installation and breaker boxes was a significant safety improvement. Breakers can be reset easily, and they are generally more reliable in detecting and responding to electrical faults. If your home still has a fuse box, an electrical panel upgrade is a wise investment for safety and modern convenience.
Preparing for the Project: Safety First, Always
Before we even think about wiring a breaker, we must emphasize safety. Electricity is unforgiving. If you are not a qualified electrician, do not attempt this work yourself. This guide is for informational purposes only to help you understand the process, not to encourage DIY electrical work.
Essential Safety Precautions
- De-energize Everything: The absolute first step before any work on the electrical panel is to shut off the main breaker that controls power to the entire panel. This should be done at the meter base or the main disconnect if accessible and permitted by your utility company. If you are unsure, leave it to the professionals.
- Wear Protective Gear: Always wear insulated rubber gloves, safety glasses, and non-conductive footwear.
- Use Insulated Tools: Ensure all your tools are properly insulated.
- Never Work Alone: Always have someone with you who knows what you are doing and can assist in an emergency.
- Test for Voltage: After shutting off the main power, always use a non-contact voltage tester to confirm that the power is indeed off at all the terminals you will be working with. Test the tester on a known live source before and after to ensure it’s functioning correctly.
- Understand Local Codes: Electrical work must comply with local building codes and the National Electrical Code (NEC). These codes are in place to ensure safety.
Gathering Your Tools and Materials
For a professional electrician, the following are typically required for installing breakers and wiring a new panel:
- New Electrical Panel (Load Center): Chosen based on the number of circuits needed and amperage rating required.
- Circuit Breakers: Appropriate types and amperages for each circuit.
- Wire Strippers and Cutters: For preparing electrical wires.
- Screwdrivers (Insulated): Various sizes, including Phillips and flathead.
- Pliers: Various types, including needle-nose and lineman’s pliers.
- Non-Contact Voltage Tester: Crucial for safety checks.
- Multimeter: For verifying voltage and continuity.
- Wire Nuts and Connectors: For making secure wire connections.
- Electrical Tape: For insulating connections.
- Wire Strippers: To remove insulation from wires.
- Fish Tape: For pulling wires through conduits if necessary.
- Drill and Bits: For mounting the panel and potentially drilling new openings.
- Stud Finder: To locate wall studs for secure mounting.
- Utility Knife: For various cutting tasks.
- Safety Glasses and Insulated Gloves: Non-negotiable safety gear.
- Properly Rated Extension Cords: For temporary power if needed during a phased upgrade.
- Main Breaker: The primary safety device for the entire panel.
- Grounding Bar and Bonding Screw: Essential for grounding a breaker box.
- Neutral Bar: To connect the neutral wires from circuits.
The Step-by-Step Process of Wiring an Electrical Panel
This section outlines the general steps involved in wiring a new electrical panel or performing an electrical panel upgrade. Again, this is a complex job.
Step 1: Shutting Off Power and Removing the Old Panel (if applicable)
- Locate the Main Disconnect: The first and most critical step is to de-energize the entire system. This is typically done by shutting off the main breaker at the panel itself. If you are replacing an entire panel, you may need to shut off power at the meter.
- Verify Power is Off: Use your non-contact voltage tester to confirm that all power is off at the existing panel’s bus bars and breaker terminals.
- Remove Old Breakers and Wires: Carefully remove each existing circuit breaker by pulling it away from the bus bar. Then, disconnect the wires from the breaker terminals. Label each wire with its corresponding circuit (e.g., “Kitchen Lights,” “Bedroom Outlets”).
- Disconnect Main Feeder Wires: After confirming power is off, disconnect the large wires (usually black, red, and white) that bring power from the utility meter to the main lugs of the old panel. These are the service entrance conductors.
- Remove the Old Panel: Carefully unscrew and remove the old panel from the wall.
Step 2: Mounting the New Electrical Panel (Load Center)
- Choose the Location: The new load center should be installed in a dry, accessible location, typically near where the service entrance wires enter the building. Ensure it meets local code requirements regarding clearance and placement.
- Secure Mounting: Use screws and the mounting holes on the back of the panel to securely attach it to wall studs. A level installation is important for ease of wiring and future access.
Step 3: Installing the Main Breaker and Bus Bars
- Install the Main Breaker: The main breaker is usually the largest breaker and is installed at the top of the panel. It connects directly to the service entrance conductors. Ensure it’s rated correctly for the panel’s capacity.
- Connect Bus Bars: The bus bars are the metal strips where the circuit breakers connect. They are typically pre-installed in modern panels.
Step 4: Connecting the Service Entrance Conductors
- Identify Conductors: The service entrance conductors are the thickest wires bringing power from the utility. There will typically be two hot wires (usually black and red) and one neutral wire (usually white).
- Connect Hot Wires: Connect the two hot service entrance conductors to the line terminals of the main breaker. These are the terminals that receive power. Use properly sized lugs.
- Connect Neutral Wire: Connect the neutral service entrance conductor to the main neutral bus bar.
Step 5: Grounding a Breaker Box: The Crucial Safety Step
Grounding a breaker box is vital for safety. It provides a path for electricity to flow to the ground in case of a fault, preventing shocks.
- Grounding Bus Bar: Most panels have a separate grounding bus bar.
- Connect Grounding Electrode Conductor: Connect the grounding electrode conductor (often a bare copper wire or a green insulated wire) from your home’s grounding system (e.g., ground rods driven into the earth) to the grounding bus bar.
- Bonding: In the main panel, a bonding screw is often used to connect the neutral bus bar to the grounding bus bar. This is critical for proper grounding a breaker box. Check local codes for specific bonding requirements.
- Grounding Circuit Wires: Connect the ground wires (usually bare copper or green insulated) from each individual circuit to the grounding bus bar.
Step 6: Wiring Individual Circuits
This is where wiring a breaker comes into play for each individual circuit.
- Connect Neutral Wires: Connect the white neutral wires from each circuit to the neutral bus bar. Keep them organized.
- Connect Ground Wires: Connect the ground wires (bare copper or green) from each circuit to the grounding bus bar.
- Install Circuit Breakers: Slide the terminal of each circuit breaker onto the corresponding slot on the panel’s bus bar until it clicks securely into place.
- Connect Hot Wires to Breakers: Connect the black (or other colored) hot wires from each circuit to the terminal screw on its respective circuit breaker. Ensure the breaker is rated correctly for the wire gauge and the circuit’s load. For example, a 15-amp breaker for 14-gauge wire, and a 20-amp breaker for 12-gauge wire.
Table: Wire Gauge and Corresponding Breaker Amperage
| Wire Gauge (AWG) | Maximum Amperage Rating | Common Uses |
|---|---|---|
| 14 | 15 Amps | Lighting, general outlets |
| 12 | 20 Amps | Kitchen, bathroom outlets, heavy-duty appliances |
| 10 | 30 Amps | Water heaters, electric dryers, air conditioners |
| 8 | 40 Amps | Electric ranges, large AC units |
| 6 | 50 Amps | Electric ovens, sub-panels |
Note: Always consult the NEC and local codes for specific requirements.
Step 7: Organizing and Securing Wires
- Neat Wiring: Use zip ties or cable management clips to neatly organize the wires within the panel. This improves airflow and makes future troubleshooting easier.
- Secure Connections: Double-check that all wire connections are tight and secure. Loose connections are a common cause of electrical problems and fire hazards.
Step 8: Installing the Panel Cover and Testing
- Install Cover: Once all wiring is complete and checked, carefully install the panel’s cover. Ensure no wires are pinched.
- Turn On Power: Go back to the main disconnect and turn the main breaker back on.
- Test Circuits: One by one, turn on each individual circuit breaker. Test the outlets and lights on each circuit to ensure they are working correctly. Use a multimeter to check voltages if necessary.
Special Considerations for Electrical Panel Upgrades
An electrical panel upgrade often involves more than just replacing the box.
Increasing Amperage Capacity
Many older homes were built with 60-amp service. Modern homes often require 100-amp, 150-amp, or even 200-amp service to handle the increased demand from appliances, electronics, and electric vehicles.
- Service Drop: This may involve upgrading the wires from the utility pole to your home (the service drop).
- Meter Base: The meter base may also need to be upgraded to handle the higher amperage.
- Main Panel Capacity: The new load center must have a higher amperage rating and the correct type of main breaker.
- Utility Coordination: You will need to coordinate with your local utility company for any work on their side of the service entrance.
Adding More Circuits
As electrical needs grow, you might need to add more circuits than your current panel can accommodate. This is a common reason for an electrical panel upgrade.
- Panel Size: Choose a new panel with enough physical slots for future circuit breakers.
- Amperage: Ensure the new panel’s overall amperage rating can support the total load of all the new circuits.
- Dedicated Circuits: Modern electrical codes often require dedicated circuits for specific appliances and outlets (e.g., kitchens, bathrooms, garages, HVAC systems).
Sub-Panels
In larger homes or for specific areas like garages or additions, a sub-panel might be installed. This panel is fed from the main service panel and distributes power to a local set of circuits.
- Feeder Breaker: A double-pole breaker in the main panel powers the sub-panel.
- Separate Grounding: Sub-panels typically have separate neutral and ground bars, and the neutral and ground systems are kept separate.
Troubleshooting Common Issues
Even with careful installation, minor issues can arise.
Breakers Tripping Immediately
- Short Circuit: A hot wire is touching a neutral wire or a ground wire.
- Overload: Too many appliances are drawing power from the circuit.
- Faulty Breaker: The breaker itself might be defective.
Lights Flickering or Dimming
- Loose Connection: A connection in the panel or at an outlet/switch is loose.
- Undersized Wiring: The wiring for the circuit is too small for the load.
- Utility Issue: A problem with the power coming from the utility company.
No Power to a Circuit
- Breaker Tripped: The most common reason.
- Loose Wire: A wire has come loose from a breaker terminal or connection point.
- Open Circuit: A break in the wiring somewhere along the circuit.
Frequently Asked Questions (FAQ)
Q1: Can I replace a fuse box with a breaker box myself?
A1: While technically possible, it is strongly advised against for individuals without extensive electrical experience. It involves working with live high-voltage wires and requires a deep knowledge of electrical codes and safety practices. Hiring a licensed electrician is the safest and most reliable option.
Q2: How do I know if I need an electrical panel upgrade?
A2: Signs you might need an electrical panel upgrade include frequently tripping breakers, dimming lights when appliances turn on, outlets that feel warm to the touch, a panel that is full, or if your home has an old fuse box. Also, if you are adding major new appliances or electric vehicle charging, you’ll likely need a service upgrade.
Q3: What is the main breaker in an electrical panel?
A3: The main breaker is the largest switch in your electrical panel. It controls the flow of electricity to all the other circuits in your home. When flipped off, it de-energizes the entire panel.
Q4: Is grounding a breaker box important?
A4: Yes, grounding a breaker box is critically important for safety. It provides a safe path for electricity to flow to the ground in the event of a fault, significantly reducing the risk of electric shock and fire.
Q5: What is the difference between a load center and an electrical panel?
A5: The terms load center and electrical panel are often used interchangeably. A load center is essentially a type of service panel designed to house circuit breakers for distributing electricity to various circuits within a building.
Q6: How much does it cost to wire up a circuit breaker box?
A6: The cost can vary significantly depending on your location, the complexity of the job, whether it’s a new installation or a fuse box replacement, and the need for an electrical panel upgrade to a higher amperage. Expect costs to range from several hundred to a few thousand dollars for professional installation.
Q7: What is the process of wiring a breaker?
A7: Wiring a breaker involves connecting the hot wire from a circuit to the terminal on the breaker, and then connecting the breaker to the bus bar in the electrical panel. The neutral wire connects to the neutral bar, and the ground wire connects to the ground bar.
Remember, electrical work is inherently dangerous. This guide is for educational purposes. Always prioritize safety and consult with a qualified, licensed electrician for any work involving your home’s electrical panel.