
Can you adjust a miter saw to a 45-degree angle? Yes, absolutely! This is one of the most common and essential adjustments you’ll make with a miter saw, crucial for tasks like framing, trim work, and creating precise joints. This guide will walk you through the process of achieving that perfect 45-degree cut with your miter saw, ensuring accuracy and great results for your projects.
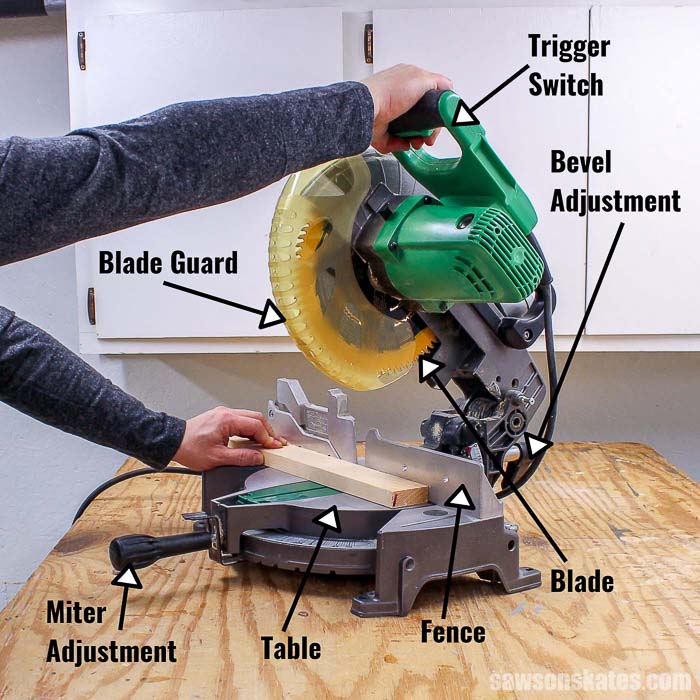
Image Source: sawsonskates.com
The Importance of Miter Saw Alignment and Calibration
Getting your miter saw set correctly isn’t just about making a pretty cut. Proper miter saw alignment and regular calibrating miter saw angle are fundamental to the success of any woodworking or construction project. A misaligned saw can lead to pieces that don’t fit, weak joints, and wasted materials. When you need to make a clean, crisp 45-degree cut, whether it’s for a picture frame, crown molding, or a simple shelf, precision is key. This often involves adjusting the saw’s bevel and miter settings.
Setting Up Your Miter Saw for 45 Degrees
The process of setting miter saw for 45 degrees involves a few key steps. Most miter saws have two main adjustment mechanisms: the miter angle and the bevel angle. For a standard 45-degree crosscut or miter cut, you’ll primarily be focusing on the miter angle. However, if your project requires a 45-degree bevel cut, you’ll need to adjust the tilt of the blade.
Locating the Miter Angle Adjustment
Every miter saw is designed slightly differently, but the miter angle adjustment is almost always a prominent feature. Look for a large knob or lever, typically located near the base of the saw or around the turntable. This mechanism controls the horizontal rotation of the saw’s arm, allowing you to swing the blade left or right from the 0-degree (90-degree crosscut) position.
Finding the 45-Degree Mark
On the base of the saw, where the turntable pivots, you’ll find a degree scale. This scale is marked with common angles, including 0, 15, 22.5, 31.6, and 45 degrees. These marks are your guides.
Engaging the Miter Lock
Once you’ve identified the adjustment knob or lever, you’ll need to unlock the saw’s turntable. This is usually done by lifting or turning the knob. With the turntable unlocked, you can swing the saw arm. Gently move the arm until the indicator on the turntable lines up precisely with the 45-degree mark on the scale.
Securing the Miter Lock
After positioning the saw arm at 45 degrees, it’s crucial to lock it firmly in place. This is often done by tightening the same knob or lever you used to unlock it. Ensure the lock is snug to prevent any movement during the cut. A secure miter saw angle stop is vital for miter saw cutting 45 degrees accurately.
Adjusting the Bevel Angle (When Needed)
Sometimes, a 45-degree cut isn’t just a horizontal miter. You might need to cut a piece of wood at a 45-degree angle to its thickness – this is a bevel cut. This involves tilting miter saw blade to the side.
Identifying the Bevel Adjustment
The bevel adjustment is usually found on the side of the saw’s motor housing or arm. It typically involves a knob, lever, or even a pin system that allows the entire saw head to tilt.
Setting the Bevel to 45 Degrees
Similar to the miter adjustment, the bevel mechanism will have a scale indicating the tilt angle. You’ll need to unlock the bevel mechanism, tilt the saw head to the 45-degree mark on the bevel scale, and then lock it securely. This is where the miter saw bevel setting becomes critical. A proper miter saw bevel lock ensures the blade stays at the desired angle.
Fine-Tuning for Maximum Miter Saw Angle Accuracy
Even with the markings on the saw, achieving perfect miter saw angle accuracy often requires a bit of fine-tuning. Here’s how to ensure your saw is cutting precisely at 45 degrees.
Using a Reliable Measuring Tool
While the saw’s markings are helpful, they aren’t always perfectly calibrated. The best way to confirm your 45-degree angle is to use a reliable measuring tool.
Protractor or Combination Square
A high-quality protractor or a combination square with a clearly marked angle gauge is an excellent tool for this. Place the base of your measuring tool against the saw’s fence (when the blade is at 0 degrees) and then swing the blade to the desired angle. The edge of your saw blade should line up perfectly with the 45-degree mark on your tool.
Digital Angle Finder
For ultimate precision, a digital angle finder can be used. These devices offer highly accurate readings and can be placed directly on the saw blade or the turntable to measure the exact angle.
Making a Test Cut
The most practical way to check your miter saw alignment is to make a test cut on a scrap piece of wood.
Preparing the Test Cut
Take a piece of scrap wood and mark a line at 45 degrees on it using your measuring tool. Then, align the saw blade with this marked line.
Executing the Test Cut
Make the cut. After the cut, use your measuring tool to check the angle of the cut surface. If it’s not exactly 45 degrees, you’ll need to make small adjustments to the saw’s angle setting and repeat the test cut until it’s perfect.
Common Issues and Troubleshooting
Sometimes, even after following the steps, you might encounter issues with miter saw angle adjustment. Here are some common problems and how to fix them.
Worn or Loose Pivot Points
Over time, the pivot points on your miter saw can become worn or loose. This can lead to play in the turntable, affecting miter saw angle accuracy.
Tightening Adjustments
Check for any visible screws or bolts around the turntable and bevel mechanisms. Gently tighten them if they feel loose. Be careful not to overtighten, as this can make adjustments difficult.
Lubrication
Sometimes, stiff or sticky adjustment mechanisms can prevent accurate miter saw bevel setting. A light application of lubricant to the pivot points can help.
Blade Drift
Blade drift can occur if the blade isn’t properly seated on the arbor or if the arbor itself is damaged. This can cause the cut to be slightly off, even if the angle setting is correct.
Checking Blade Mounting
Ensure the blade is securely fastened to the arbor. Remove the blade guard and blade, check for any debris on the arbor, and re-mount the blade, ensuring it’s flush and the locking nut is tight.
Blade Quality
A dull or damaged blade can also contribute to drift. Ensure you are using a sharp, high-quality blade appropriate for the material you are cutting.
Fence Alignment
The fence of your miter saw is crucial for guiding the workpiece. If the fence is not perfectly square to the blade at the 0-degree setting, it will affect all your angle adjustments.
Squaring the Fence
When the saw is at its 0-degree position (blade perpendicular to the turntable), use a combination square to check if the blade is perfectly at 90 degrees to the fence. If it’s not, there’s usually an adjustment screw or mechanism on the fence assembly to square it up.
Table: Common Miter Saw Angle Settings and Their Uses
| Angle | Primary Use | Notes |
|---|---|---|
| 0 Degrees | Straight Crosscuts | Blade is perpendicular to the turntable. |
| 15 Degrees | Decorative Trim, Simple Angles | Often used for decorative moldings or when a slight angle is desired. |
| 22.5 Degrees | Octagon Frames, Common Bevels | Frequently used for creating octagonal shapes or specific joinery. |
| 30 Degrees | Hexagon Frames, Various Joinery | Useful for creating hexagonal shapes or specific angled joints. |
| 31.6 Degrees | Joining 12-sided shapes (dodecagons) | Less common, but used for specific geometric constructions. |
| 45 Degrees | Square Frames, Corner Joinery, Box Construction | Essential for creating 90-degree corners (two 45-degree cuts) and various boxes. |
Advanced Tips for Precise Miter Saw Cutting
Achieving consistently accurate cuts, especially at 45 degrees, involves more than just adjusting the saw.
Workpiece Support
Ensure your workpiece is stable and supported. Use outfeed supports or roller stands, especially for longer pieces, to prevent the offcut from dropping and potentially causing a jagged cut or kicking back.
Material Handling
Always keep your workpiece firmly pressed against the saw’s fence and the turntable. Your non-cutting hand should be a safe distance from the blade.
Blade Choice
The type of blade you use significantly impacts cut quality. For fine trim work, a higher tooth count blade (e.g., 60-80 teeth) will provide a smoother finish. For rougher lumber, a lower tooth count blade might be more efficient.
Dust Collection
Good dust collection not only keeps your workspace clean but can also prevent dust buildup from interfering with the saw’s mechanisms or the workpiece’s position.
Frequently Asked Questions (FAQ)
Q1: How often should I calibrate my miter saw angle?
It’s a good practice to check your miter saw alignment and calibrating miter saw angle before starting any significant project, or at least every few months if you use your saw regularly. Rough handling or transport can knock the saw out of calibration.
Q2: Can I use my miter saw for compound angles?
Yes, most modern miter saws are designed for compound cuts, which involve both a miter and a bevel adjustment. This is essential for cutting things like crown molding or angled rafters.
Q3: What is the most common angle for miter saw cuts?
The most common angles are 0 degrees (for straight cuts) and 45 degrees. The 45-degree angle is crucial for creating 90-degree corners in frames and boxes.
Q4: My miter saw has a lot of play when I move it. What should I do?
This usually indicates worn pivot points. Check for loose adjustment screws or bolts. If tightening doesn’t resolve it, you might need to consult your saw’s manual for parts replacement or professional servicing, especially if it’s a newer saw that shouldn’t have worn parts.
Q5: How do I ensure my miter saw is safe to use at 45 degrees?
Always ensure the miter saw bevel lock and miter saw angle stop are securely engaged. Keep your hands away from the blade path and use the blade guard. Make sure the workpiece is stable and not binding the blade.
By following these detailed steps and tips, you can confidently adjust your miter saw to achieve accurate 45-degree cuts every time, enhancing the quality and professionalism of your woodworking projects. Remember that consistent practice and attention to detail are your best tools for mastering any woodworking machinery.