
Can you hang a power strip on the wall? Absolutely! Hanging a power strip on the wall is a smart way to tidy up your space, keep cords organized, and improve safety. This guide will walk you through how to mount power strip units securely and neatly, making your home or office much more organized.
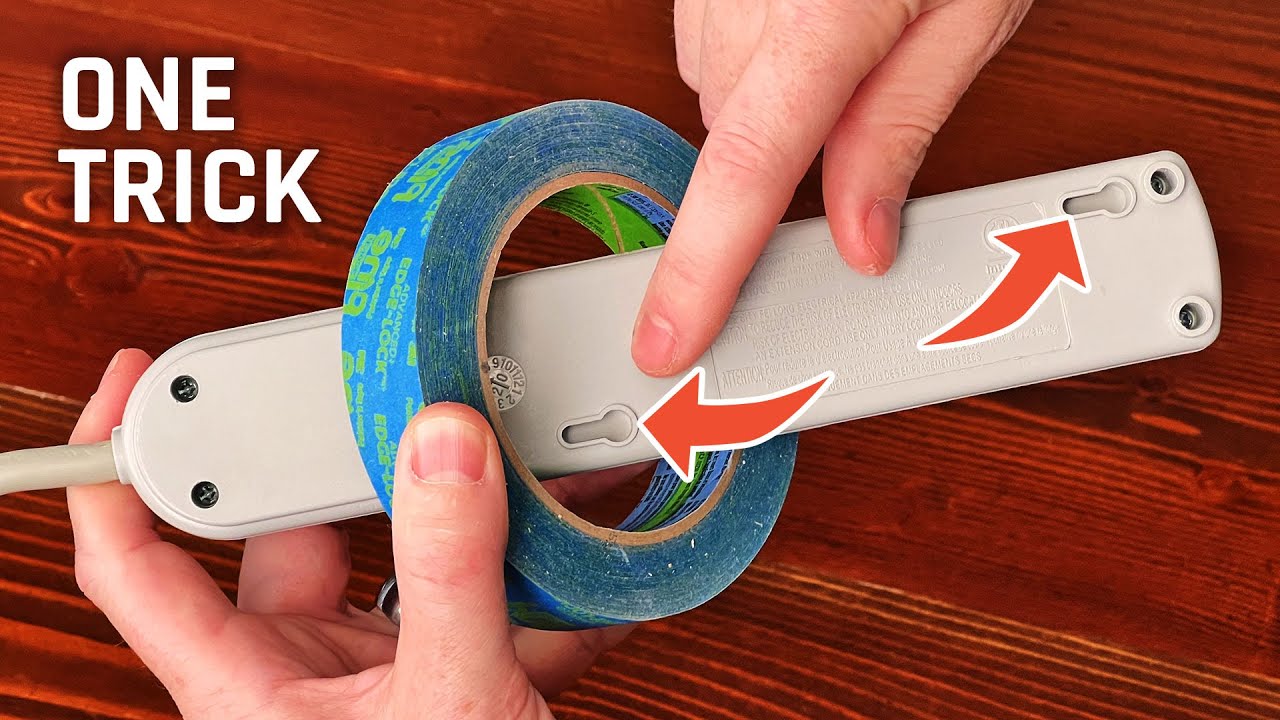
Image Source: i.ytimg.com
Why Mount Your Power Strip?
Many people wonder why they should bother hanging a power strip. The reasons are many and impactful:
- Decluttering: Loose power strips can be eyesores. Mounting them hides them away, making your room look cleaner.
- Safety: Trailing cords are tripping hazards. Securing them to the wall reduces this risk, especially in busy areas.
- Accessibility: Placing a power strip at a convenient height means you don’t have to reach under desks or behind furniture to plug things in.
- Organization: It’s a core part of good cable management. Keeping cords in one place makes it easier to identify and manage your electronics.
- Aesthetics: A well-placed and secured power strip contributes to a neat entertainment center setup or a tidy workspace.
Choosing Your Mounting Method
There are two main ways to attach power strip devices to your wall: adhesive mounting and screw mounting. Each has its pros and cons.
Adhesive Mounting: The Quick Fix
Adhesive mounting is popular because it’s fast and doesn’t require tools or drilling.
How it Works:
Power strips designed for adhesive mounting often come with strong, pre-applied adhesive strips or a separate adhesive pad. You simply peel off the backing and press the power strip firmly onto the desired location.
Pros:
- No Tools Needed: Great for renters or situations where drilling isn’t allowed.
- Fast and Easy: Can be done in minutes.
- No Wall Damage (usually): Avoids holes in your wall.
Cons:
- Weight Limits: Not suitable for heavy power strips with many large adapters. Always check the adhesive’s weight rating.
- Surface Dependent: Works best on smooth, clean, and dry surfaces. It may not stick well to textured walls or wallpaper.
- Potential Residue: Some strong adhesives can leave residue when removed, which might require a bit of cleaning.
- Durability: May not last as long as screw mounting, especially in high-traffic areas.
Best For:
Lightweight power strips, temporary setups, smooth wall surfaces.
Screw Mounting: The Sturdy Solution
Screw mounting offers the most secure and durable way to secure power strip units.
How it Works:
Many power strips come with built-in mounting slots or holes. You’ll use screws and anchors (if needed) to fasten the power strip directly to the wall.
Pros:
- Maximum Security: Holds the power strip firmly in place, even with heavy loads.
- Long-Lasting: Screws provide a permanent and robust attachment.
- Versatile Surfaces: Can be used on drywall, plaster, wood, or even studs for extra strength.
Cons:
- Requires Tools: You’ll need a drill, screwdriver, and potentially a level.
- Wall Damage: Creates holes that may need patching if you move the power strip.
- Takes More Time: Requires more effort and precision.
Best For:
Heavier power strips, permanent installations, any wall surface, situations where maximum security is needed.
Step-by-Step Guide: Adhesive Mounting
If you’ve decided adhesive mounting is right for you, follow these steps for a neat and secure power strip installation.
What You’ll Need:
- Power strip with adhesive mounting capability
- Rubbing alcohol or a mild cleaning solution
- Clean cloths or paper towels
- (Optional) Additional strong double-sided adhesive tape if the power strip doesn’t come with it
The Process:
-
Choose the Location:
- Decide where you want your power strip. Consider outlet access. Do you need it near your desk, TV, or a charging station?
- Ensure the location is clean and dry.
- Think about how the cords will run. Try to plan for a neat cable management system from the start.
-
Prepare the Wall Surface:
- This is the most crucial step for adhesive success. Clean the wall thoroughly with rubbing alcohol or a mild cleaner.
- Use a clean cloth to wipe away any dust, grease, or moisture.
- Let the area dry completely.
-
Prepare the Power Strip:
- If your power strip has pre-applied adhesive, ensure the protective film is ready to be peeled.
- If it comes with separate adhesive pads, carefully align them with the back of the power strip and press firmly.
-
Attach the Power Strip:
- Carefully peel the protective backing from the adhesive.
- Align the power strip with your chosen spot on the wall.
- Press the power strip firmly against the wall. Hold it in place for at least 30 seconds to ensure good adhesion.
-
Wait (Important!):
- Many adhesives require a “curing” time. This means they get stronger over the next 24-48 hours.
- Avoid plugging in heavy electronics or tugging on the power strip for at least this period. This will help you mount power strip units reliably.
-
Manage Your Cables:
- Once the adhesive has cured, plug in your devices.
- Use cable ties, clips, or raceways to bundle and hide the cords. This turns your mounted power strip into a wall organizer solution.
Step-by-Step Guide: Screw Mounting
For a long-lasting and robust installation, screw mounting is the way to go.
What You’ll Need:
- Power strip with mounting holes or slots
- Screwdriver (manual or electric drill with screwdriver bits)
- Drill bits (if pre-drilling holes)
- Screws (often included with the power strip, or choose appropriate ones for your wall type)
- Wall anchors (if not screwing into a stud)
- Pencil
- Level
The Process:
-
Choose the Location:
- Similar to adhesive mounting, select a practical spot for outlet access and cord routing.
- Consider the wall material. If possible, aim to screw into wall studs for maximum strength. Use a stud finder if necessary.
-
Mark the Mounting Points:
- Hold the power strip against the wall where you want to attach power strip it.
- Use a pencil to lightly mark the locations of the mounting holes or slots.
- Use a level to ensure the power strip will be straight.
-
Pre-Drill Holes (Optional but Recommended):
- If screwing into drywall without studs, or if your screws are thick, it’s best to pre-drill pilot holes.
- Select a drill bit that is slightly smaller than the diameter of your screws.
- Drill holes at your marked points.
- If screwing into drywall without a stud, insert wall anchors into the drilled holes. Gently tap them in with a hammer until they are flush with the wall.
-
Attach the Power Strip:
- Align the mounting holes of the power strip with the pre-drilled holes (or anchors).
- Insert the screws through the power strip and into the wall.
- Use a screwdriver or drill to tighten the screws. Don’t overtighten, as this can strip the holes or damage the power strip.
- Ensure the power strip is snug and firmly attached. This is how you secure power strip units effectively.
-
Manage Your Cables:
- Plug in your devices.
- Use cable ties, sleeves, or raceways to bundle and hide the cords. This transforms your mounted power strip into a functional wall organizer and helps with overall cable management.
Using a Power Strip Holder or Mount
For even more flexibility and a cleaner look, consider dedicated power strip holders or mounts. These accessories are specifically designed to help you mount power strip devices neatly.
Types of Power Strip Holders:
- Adhesive Backed Holders: These are like special brackets with adhesive. You stick the holder to the wall, then slide or clip your power strip into it.
- Screw-In Holders: Similar to adhesive holders, but they attach with screws for a more permanent hold.
- Adjustable Straps/Clips: Some holders use Velcro straps or adjustable clips to secure the power strip, offering flexibility for different sizes.
- Under-Desk Mounts: Designed to keep power strips out of sight but easily accessible under a desk, perfect for an entertainment center setup or workstation.
Benefits of Using a Holder:
- Easier Installation: Often simpler than direct mounting, especially if the holder has a good design.
- Versatile: Can accommodate various power strip sizes and shapes.
- Improved Aesthetics: Can create a very clean, integrated look.
- Protection: Keeps the power strip from direct contact with the wall, potentially aiding ventilation.
Creative Placement Ideas for Your Mounted Power Strip
Where you put your power strip can make a big difference in convenience and neatness.
Behind Furniture:
- TV or Entertainment Center: Mount a power strip behind your TV cabinet or media console. This hides the strip and all connected power bricks and cords, creating a clean look for your entertainment center setup. You’ll have discreet outlet access behind the unit.
- Bedside Table: Mount a power strip on the wall next to your bed, but slightly behind the nightstand. This keeps your phone chargers and lamps within reach without cluttering the surface.
Under Desks and Workstations:
- This is a prime location for cable management. Mount the power strip under your desk to keep all your computer, monitor, and peripheral power cords off the floor. This dramatically improves the look and safety of your workspace.
Kitchen and Utility Areas:
- Mount a power strip under kitchen cabinets to power small appliances like mixers or toasters, keeping your countertops clear.
- In a laundry room, mount one near the washer and dryer for easy access to ironing boards or lint vacuums.
Entryways or Hallways:
- A discreetly mounted power strip near the door can power charging stations for phones, tablets, or even e-bike batteries.
Frequently Asked Questions (FAQ)
Q1: Can I mount a power strip on a textured wall?
A1: It depends on the mounting method. Adhesive mounting is unlikely to work well on heavily textured walls. Screw mounting is generally a better option for textured surfaces, as the screws can bite into the wall material more effectively.
Q2: What is the best way to secure power strip in a rental property?
A2: For rental properties, adhesive mounting is usually the preferred method to avoid making holes. Use high-quality, double-sided adhesive tape designed for heavy loads. Alternatively, look for power strip holders that use strong adhesives and are known to remove cleanly.
Q3: How much weight can an adhesive power strip mount hold?
A3: This varies greatly by product. Always check the manufacturer’s specifications for the adhesive’s weight rating. For heavier power strips with many bulky adapters, screw mounting is a safer bet.
Q4: What if my power strip doesn’t have mounting holes?
A4: You can often still attach power strip devices using a power strip holder or by using strong, reliable double-sided mounting tape directly on the back of the power strip, provided the surface is suitable and the weight is not excessive.
Q5: Is it safe to mount a power strip near a heat source?
A5: It’s generally not recommended to mount a power strip directly next to a heat source (like a radiator or heater) or in an area that gets very hot. The heat can degrade the adhesive over time and may also be a fire hazard if it causes the power strip or its components to overheat.
Q6: How do I ensure good outlet access when mounting a power strip?
A6: Plan your location carefully. Think about what devices will be plugged in and how frequently you’ll need to access the outlets. Mounting it at a convenient height, rather than low on the floor or too high up, will ensure easy outlet access.
Q7: What are some good cable management techniques to use with a mounted power strip?
A7: Once your power strip is mounted, use cable ties, Velcro straps, cable sleeves, or cord raceways to bundle and hide excess cable length. This will make your wall organizer setup look professional and tidy.
Q8: Can I mount a power strip horizontally or vertically?
A8: Most power strips are designed to be mounted horizontally, as this is how their internal components are best positioned for heat dissipation and safety. Always check the manufacturer’s instructions for recommended orientation.
By following these guidelines, you can successfully mount power strip units on your wall, creating a cleaner, safer, and more organized living or working space. Whether you choose the quick convenience of adhesive mounting or the robust security of screw mounting, the result is a neater environment and improved cable management.